快捷图标有两部分组成,一部分是应用的图标,另一部分就是应用的名称。其实Launcher中的快捷图标只是继承了TextView控件,重绘了一下,将背景弄成浅灰色(具体是什么颜色我也不知道)的椭圆背景,显示的文字颜色则是白色。TextView有android:drawableTop;drawableBottom(上下左右我这里就不全写出来了)属性,用来显示应用的图标。
废话不多说了,直接上例子,大家一步一步来,多敲敲代码,成长快一点。
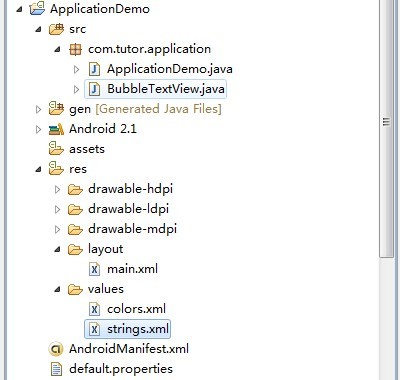
第一步:新建一个Android工程,命名为ApplicationDemo.如下图:
第二步:在values目录下新建colors.xml文件,定义一些要用的颜色,代码如下:
- <?xml version="1.0" encoding="utf-8"?>
- <resources>
- <color name="white">#FFFFFF</color>
- <color name="black">#000000</color>
- <color name="bubble_dark_background">#B2191919</color>
- </resources>
第三步:也就是重点了,新建一个BubbleTextView类,继承TextView,代码如下:
- package com.tutor.application;
- import android.content.Context;
- import android.graphics.Canvas;
- import android.graphics.Paint;
- import android.graphics.RectF;
- import android.text.Layout;
- import android.util.AttributeSet;
- import android.widget.TextView;
- public class BubbleTextView extends TextView {
- private static final int CORNER_RADIUS = 8;
- private static final int PADDING_H = 5;
- private static final int PADDING_V = 1;
- private final RectF mRect = new RectF();
- private Paint mPaint;
- public BubbleTextView(Context context) {
- super(context);
- init();
- }
- public BubbleTextView(Context context, AttributeSet attrs) {
- super(context, attrs);
- init();
- }
- public BubbleTextView(Context context, AttributeSet attrs, int defStyle) {
- super(context, attrs, defStyle);
- init();
- }
- private void init() {
- setFocusable(true);
- // We need extra padding below to prevent the bubble being cut.
- setPadding(PADDING_H, 0, PADDING_H, PADDING_V);
- mPaint = new Paint(Paint.ANTI_ALIAS_FLAG);
- mPaint.setColor(getContext().getResources()
- .getColor(R.color.bubble_dark_background));
- }
- @Override
- protected void drawableStateChanged() {
- invalidate();
- super.drawableStateChanged();
- }
- @Override
- public void draw(Canvas canvas) {
- final Layout layout = getLayout();
- final RectF rect = mRect;
- final int left = getCompoundPaddingLeft();
- final int top = getExtendedPaddingTop();
- rect.set(left + layout.getLineLeft(0) - PADDING_H,
- top + layout.getLineTop(0) - PADDING_V,
- Math.min(left + layout.getLineRight(0) + PADDING_H,
- getScrollX() + getRight() - getLeft()),
- top + layout.getLineBottom(0) + PADDING_V);
- canvas.drawRoundRect(rect, CORNER_RADIUS, CORNER_RADIUS, mPaint);
- super.draw(canvas);
- }
- }
第四步:修改main.xml布局文件,代码如下:
- <?xml version="1.0" encoding="utf-8"?>
- <LinearLayout xmlns:android="http://schemas.android.com/apk/res/android"
- android:orientation="vertical"
- android:layout_width="fill_parent"
- android:layout_height="fill_parent"
- >
- <TextView
- android:layout_width="wrap_content"
- android:layout_height="wrap_content"
- android:drawableTop="@drawable/icon"
- android:text="ApplicationDemo"
- android:textColor="@color/black"
- />
- <com.tutor.application.BubbleTextView
- android:layout_width="wrap_content"
- android:layout_height="wrap_content"
- android:drawableTop="@drawable/icon"
- android:textColor="@color/white"
- android:text="ApplicationDemo"
- />
- </LinearLayout>
第五步:修改AndroidManifest.xml文件,注意这里我们在Activity里增加了一个透明的样式,Launcher其实就是透明的Activity。
代码如下(第8行代码):
- <?xml version="1.0" encoding="utf-8"?>
- <manifest xmlns:android="http://schemas.android.com/apk/res/android"
- package="com.tutor.application"
- android:versionCode="1"
- android:versionName="1.0">
- <application android:icon="@drawable/icon" android:label="@string/app_name">
- <activity android:name=".ApplicationDemo"
- android:theme="@android:style/Theme.Wallpaper.NoTitleBar"
- android:label="@string/app_name">
- <intent-filter>
- <action android:name="android.intent.action.MAIN" />
- <category android:name="android.intent.category.LAUNCHER" />
- </intent-filter>
- </activity>
- </application>
- <uses-sdk android:minSdkVersion="7" />
- </manifest>
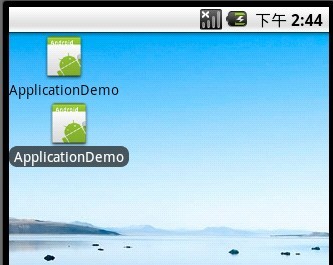
第六步:运行上述工程,查看效果如下:
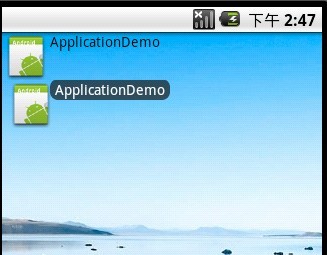
将android:drawableLeft修改为android:drawableTop,效果如下:
搞定!大功告成!