写在前面的话
相关背景及资源:
曹工说Spring Boot源码(1)-- Bean Definition到底是什么,附spring思维导图分享
曹工说Spring Boot源码(2)-- Bean Definition到底是什么,咱们对着接口,逐个方法讲解
曹工说Spring Boot源码(3)-- 手动注册Bean Definition不比游戏好玩吗,我们来试一下
曹工说Spring Boot源码(4)-- 我是怎么自定义ApplicationContext,从json文件读取bean definition的?
曹工说Spring Boot源码(5)-- 怎么从properties文件读取bean
曹工说Spring Boot源码(6)-- Spring怎么从xml文件里解析bean的
曹工说Spring Boot源码(7)-- Spring解析xml文件,到底从中得到了什么(上)
曹工说Spring Boot源码(8)-- Spring解析xml文件,到底从中得到了什么(util命名空间)
曹工说Spring Boot源码(9)-- Spring解析xml文件,到底从中得到了什么(context命名空间上)
曹工说Spring Boot源码(10)-- Spring解析xml文件,到底从中得到了什么(context:annotation-config 解析)
曹工说Spring Boot源码(11)-- context:component-scan,你真的会用吗(这次来说说它的奇技淫巧)
曹工说Spring Boot源码(12)-- Spring解析xml文件,到底从中得到了什么(context:component-scan完整解析)
工程结构图:

概要
本篇已经是spring源码第13篇,前一篇讲了context:component-scan的完整解析,本篇,继续解析context命名空间里的另一个重量级元素:load-time-weaver。它可以解决你用aop搞不定的事情。
大家如果熟悉aop,会知道aop的原理是基于beanPostProcessor的。比如平时,我们会在service类的部分方法上加@transactional,对吧,transactional是基于aop实现的。最终的效果就是,注入到controller层的service,并不是原始的service bean,而是一个动态代理对象,这个动态代理对象,会去执行你的真正的service方法前后,去执行事务的打开和关闭等操作。
aop的限制就在于:被aop的类,需要被spring管理,管理的意思是,需要通过@component等,弄成一个bean。
那,假设我们想要在一个第三方的,没被spring管理的类的一个方法前后,做些aop的事情,该怎么办呢?
一般来说,目前的方法主要是通过修改class文件。
class文件在什么时候才真正生效?答案是:在下面这个方法执行完成后:
public Class<?> loadClass(String name) throws ClassNotFoundException {
    return loadClass(name, false);
}
一旦通过上述方法,获取到返回的Class对象后,基本就不可修改了。
那根据这个原理,大致有3个时间节点(第二种包含了2个时间点),对class进行修改:
-
编译器织入,比如aspectJ的ajc编译器,假如你自己负责实现这个ajc编译器,你当然可以自己夹带私货,悄悄地往要编译的class文件里,加点料,对不?这样的话,编译出来的class,和java源文件里的,其实是不一致的;
-
自己实现classloader,在调用上述的loadClass(String name)时,自己加点料;通俗地说,这就是本课要讲的
load-time-weaving,即,加载时织入;其中,又分为两种,因为我们知道,classloader去loadClass的时候,其实是分两步的,一个是java代码层面,一个是JVM层面。
java代码层面:你自定义的classloader,想怎么玩就怎么玩,比如针对传进来的class,获取到其inputStream后,对其进行修改(增强或进行解密等)后,再丢给JVM去加载为一个Class;
JVM层面:Instrumentation机制,具体理论的东西我也说不清,简单来说,就是java命令启动时,指定agent参数,agent jar里,有一个premain方法,该方法可以注册一个字节码转换器。
字节码转换器接口大致如下:
public interface ClassFileTransformer {
    // 这个方法可以对参数中指定的那个class进行转换,转换后的class的字节码,通过本方法的返回参数返回
    // 即,本方法的返回值,就是最终的class的字节码
    byte[]
    transform(  ClassLoader         loader,
                String              className,
                Class<?>            classBeingRedefined,
                ProtectionDomain    protectionDomain,
                byte[]              classfileBuffer)
        throws IllegalClassFormatException;
}
大家参考下面两篇文章。
Java Instrumentation,这一篇原文没代码,我自己整理了下,附上了具体的步骤,放在码云

第一种,需要使用aspectj的编译器来进行编译,还是略显麻烦;这里我们主讲第二种,LTW。
LTW其实,包含了两部分,一部分是切面的问题(切点定义切哪儿,通知定义在切点处要嵌进去的逻辑),一部分是切面怎么生效的问题。
我们下面分别来讲。
Aspectj的LTW怎么玩
我们可以参考aspectj的官网说明:
https://www.eclipse.org/aspectj/doc/released/devguide/ltw-configuration.html
这里面提到了实现ltw的三种方式,其中第一种,就是我们前面说的java instrumentation的方式,只是这里的agent是使用aspectjweaver.jar;第二种,使用了专有命令来执行,这种方式比较奇葩,直接跳过不理;第三种,和我们前面说的类似,就是自定义classloader的方式:
Enabling Load-time Weaving
AspectJ 5 supports several ways of enabling load-time weaving for an application: agents, a command-line launch script, and a set of interfaces for integration of AspectJ load-time weaving in custom environments.
Agents
AspectJ 5 ships with a number of load-time weaving agents that enable load-time weaving. These agents and their configuration are execution environment dependent. Configuration for the supported environments is discussed later in this chapter.Using Java 5 JVMTI you can specify the
-javaagent:pathto/aspectjweaver.jaroption to the JVM.Using BEA JRockit and Java 1.3/1.4, the very same behavior can be obtained using BEA JRockit JMAPI features with the-Xmanagement:class=org.aspectj.weaver.loadtime.JRockitAgentCommand-line wrapper scripts
ajThe aj command runs Java programs in Java 1.4 or later by setting up
WeavingURLClassLoaderas the system class loader. For more information, see aj.The aj5 command runs Java programs in Java 5 by using the-javaagent:pathto/aspectjweaver.jaroption described above. For more information, see aj.Custom class loader
A public interface is provided to allow a user written class loader to instantiate a weaver and weave classes after loading and before defining them in the JVM. This enables load-time weaving to be supported in environments where no weaving agent is available. It also allows the user to explicitly restrict by class loader which classes can be woven. For more information, see aj and the API documentation and source for
WeavingURLClassLoaderandWeavingAdapter.
第一种方式呢,我这里弄了个例子,代码放在:
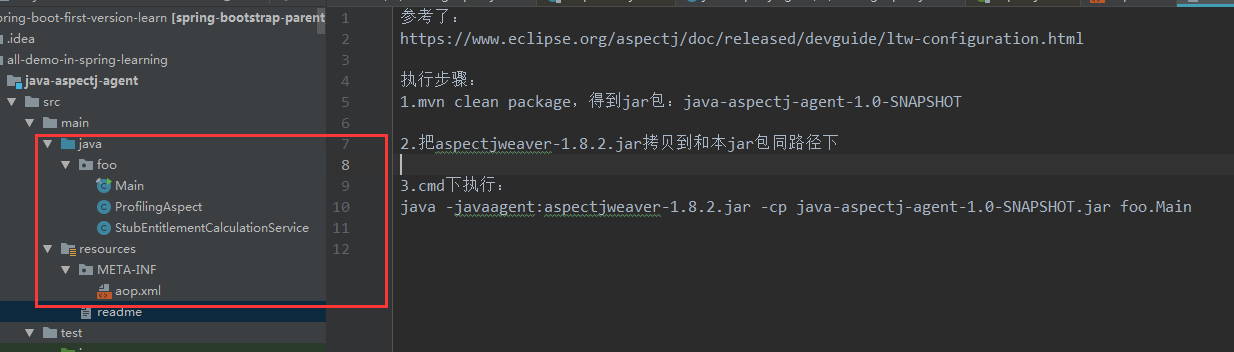
整个demo的代码结构如下图:
-
目标类,是要被增强的对象
package foo; public class StubEntitlementCalculationService { public void calculateEntitlement() { System.out.println("calculateEntitlement"); } } -
切面类
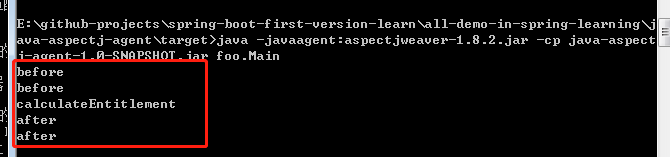
package foo; import org.aspectj.lang.ProceedingJoinPoint; import org.aspectj.lang.annotation.Around; import org.aspectj.lang.annotation.Aspect; import org.aspectj.lang.annotation.Pointcut; @Aspect public class ProfilingAspect { @Around("methodsToBeProfiled()") public Object profile(ProceedingJoinPoint pjp) throws Throwable { System.out.println("before"); try { return pjp.proceed(); } finally { System.out.println("after"); } } // 这里定义了切点 @Pointcut("execution(public * foo..*.*(..))") public void methodsToBeProfiled(){} } -
aop配置,指定要使用的切面,和要扫描的范围
<!DOCTYPE aspectj PUBLIC "-//AspectJ//DTD//EN" "https://www.eclipse.org/aspectj/dtd/aspectj.dtd"> <aspectj> <weaver> <!-- only weave classes in our application-specific packages --> <include within="foo.*"/> </weaver> <aspects> <!-- weave in just this aspect --> <aspect name="foo.ProfilingAspect"/> </aspects> </aspectj> -
测试类
package foo; public final class Main { public static void main(String[] args) { StubEntitlementCalculationService entitlementCalculationService = new StubEntitlementCalculationService(); // 如果进展顺利,这处调用会被增强 entitlementCalculationService.calculateEntitlement(); } } -
启动测试
执行步骤:
1.mvn clean package,得到jar包:java-aspectj-agent-1.0-SNAPSHOT

2.把aspectjweaver-1.8.2.jar拷贝到和本jar包同路径下

3.cmd下执行:
java -javaagent:aspectjweaver-1.8.2.jar -cp java-aspectj-agent-1.0-SNAPSHOT.jar foo.Main
执行的效果如下:
Aspectj的LTW的原理剖析
我们这一小节,简单说说其原理。我们前面提到,aspectj的ltw共三种方式,我们上面用了第一种,这种呢,其实就是基于instrumentation机制来的。
只是呢,这里我们指定的agent是aspectj提供的aspectjweaver.jar。我这里把这个jar包(我这里版本是1.8.2)解压缩了一下,我们来看看。
解压缩后,在其META-INF/MANIFEST.MF中,我们看到了如下内容:
Manifest-Version: 1.0
Name: org/aspectj/weaver/
Specification-Title: AspectJ Weaver Classes
Specification-Version: 1.8.2
Specification-Vendor: aspectj.org
Implementation-Title: org.aspectj.weaver
Implementation-Version: 1.8.2
Implementation-Vendor: aspectj.org
Premain-Class: org.aspectj.weaver.loadtime.Agent   这个地方重点关注,这个是指定main执行前要执行的类
Can-Redefine-Classes: true
上面我们看到,其指定了:
Premain-Class: org.aspectj.weaver.loadtime.Agent
那么我们看看这个类:
/**
 * Java 1.5 preMain agent to hook in the class pre processor
 * Can be used with -javaagent:aspectjweaver.jar
 * */
public class Agent {

    /**
     * The instrumentation instance
     */
    private static Instrumentation s_instrumentation;

    /**
     * The ClassFileTransformer wrapping the weaver
     */
    private static ClassFileTransformer s_transformer = new ClassPreProcessorAgentAdapter();

    /**
     * JSR-163 preMain Agent entry method
     * 敲黑板,这个premain的方法签名是定死了的,和我们main方法类似。其中,参数instrumentation是由JVM传进来的
     * @param options
     * @param instrumentation
     */
    public static void premain(String options, Instrumentation instrumentation) {
    	/* Handle duplicate agents */
    	if (s_instrumentation != null) {
    		return;
    	}
        s_instrumentation = instrumentation;
        // 这里,加了一个字节码转换器
        s_instrumentation.addTransformer(s_transformer);
    }

    /**
     * Returns the Instrumentation system level instance
     */
    public static Instrumentation getInstrumentation() {
        if (s_instrumentation == null) {
            throw new UnsupportedOperationException("Java 5 was not started with preMain -javaagent for AspectJ");
        }
        return s_instrumentation;
    }

}
别的我也不多说,多的我也不懂,只要大家明白,这里premain会在main方法执行前执行,且这里的instrumentation由JVM传入,且这里通过执行:
s_instrumentation.addTransformer(s_transformer);
给JVM注入了一个字节码转换器。
这个字节码转换器的类型是,ClassPreProcessorAgentAdapter。
这个类里面呢,翻来覆去,代码很复杂,但是大家想也知道,无非是去aop.xml文件里,找到要使用的Aspect切面。切面里面定义了切点和切面逻辑。拿到这些后,就可以对目标class进行转换了。
我大概翻了代码,解析aop.xml的代码在:org.aspectj.weaver.loadtime.ClassLoaderWeavingAdaptor类中。
	// aop文件的名称
	private final static String AOP_XML = "META-INF/aop.xml";

	/**
	 * 加载aop.xml
	 * Load and cache the aop.xml/properties according to the classloader visibility rules
	 *
	 * @param loader
	 */
	List<Definition> parseDefinitions(final ClassLoader loader) {

		List<Definition> definitions = new ArrayList<Definition>();
		try {
			String resourcePath = System.getProperty("org.aspectj.weaver.loadtime.configuration", AOP_XML);


			StringTokenizer st = new StringTokenizer(resourcePath, ";");

			while (st.hasMoreTokens()) {
				String nextDefinition = st.nextToken();
				... 这里面是具体的解析
			}
		}
         ...
		return definitions;
	}
AspectJ的LTW的劣势
优势我就不多说了,大家可以自由发挥,比如大家熟知的性能监控啥的,基本都是基于这个来做的。
劣势是啥?大家发现了吗,我们总是需要在启动时,指定-javaagent参数,就像下面这样:
java -javaagent:aspectjweaver-1.8.2.jar -cp java-aspectj-agent-1.0-SNAPSHOT.jar foo.Main
大概有以下问题:
- 很多时候,部署是由运维去做的,开发不能做到只给一个jar包,还得让运维去加参数,要是运维忘了呢?风险很大;
- 假设我们要进行ltw的是一个tomcat的webapp应用,但这个tomcat同时部署了好几个webapp,但是另外几个webapp其实是不需要被ltw的,但是么办法啊,粒度就是这么粗。
基于以上问题,出现了spring的基于aspectJ进行了优化的,粒度更细的LTW。
具体我下节再讲。
总结
本来是打算讲清楚spring的context:load-time-weaver,无奈内容太多了,只能下节继续。今天内容到这,谢谢大家。源码我是和spring这个系列放一块的,其实今天的代码比较独立,大家可以加我,我单独发给大家也可以。