先来看看官网的介绍:

主要有八个生命周期,分别是:
beforeCreate、created、beforeMount、mounted、beforeupdate、updated 、beforeDestroy和destroyed,分别对应八个不同的时期,另外还有两个activated和deactivated生命周期是对应Keep-Alive组件的
关于这八个生命周期的具体用法官网介绍的很详细了,飞机入口:点我点我 ,另外还有一张比较直观图形介绍,飞机入口:点我点我
例如:
<!DOCTYPE html>
<html lang="en">
<head>
    <meta charset="UTF-8">
    <script src="https://cdn.jsdelivr.net/npm/vue@2.6.10/dist/vue.js"></script>
    <title>Document</title>
</head>
<body>
    <div id="app">
        <p>{{message}}</p>
        <button @click="test1()">测试(更新操作)</button>
        <button @click="test2()">测试(销毁操作)</button>
    </div>
    <script>
        Vue.config.productionTip=false;
        Vue.config.devtools=false;
        new Vue({
            el:'#app',
            data:{message:"Hello World!"},
            beforeCreate:function(){    console.log('beforeCreate');    },
            created:function(){         console.log('created');         },
            beforeMount:function(){     console.log('beforeMount');     },
            mounted:function(){         console.log('mounted');         },
            beforeUpdate:function(){    console.log('beforeUpdate');    },
            updated:function(){         console.log('updated');         },
            beforeDestroy:function(){   console.log('beforeDestroy');   },
            destroyed:function(){       console.log('destroyed');       },
            methods:{
                test1:function(){this.message="Hello Vue!";},
                test2:function(){this.$destroy();},
            }
        })
    </script>
</body>
</html>
页面渲染如下:

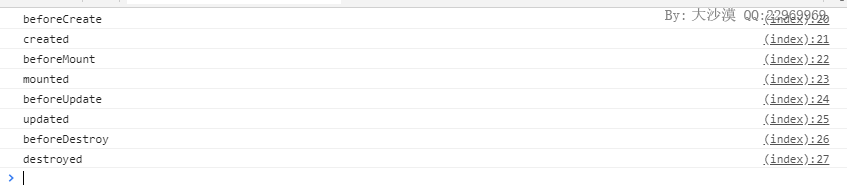
渲染完成后控制台输出:

当点击了测试(更新操作)这个按钮后,修改了Vue实例的message值做了更新操作,此时控制台输出如下:

当我们点击测试(销毁操作)按钮时,Vue实例做了销毁操作,控制台输出如下:
对于Vue的插件(包括官方的生态)来说,绝大多数都用到了beforeCreate()这个生命周期函数,可以在实例化前混入一些属性,以vuex为例,如下:
  function applyMixin (Vue) {
    var version = Number(Vue.version.split('.')[0]);

    if (version >= 2) {
      Vue.mixin({ beforeCreate: vuexInit });              //如果Vue的版本大于2,则将vuexInit混入到beforeCreate生命周期函数,这样vuex就会进行初始化
    } else {
      // override init and inject vuex init procedure
      // for 1.x backwards compatibility.
      var _init = Vue.prototype._init;
      Vue.prototype._init = function (options) {
        if ( options === void 0 ) options = {};

        options.init = options.init
          ? [vuexInit].concat(options.init)
          : vuexInit;
        _init.call(this, options);
      };
    }
vue-router也是的,如下:
  Vue.mixin({                                     //混入了两个生命周期,分别是beforeCreate和destroyed
    beforeCreate: function beforeCreate () {
      if (isDef(this.$options.router)) {
        this._routerRoot = this;
        this._router = this.$options.router;
        this._router.init(this);
        Vue.util.defineReactive(this, '_route', this._router.history.current);
      } else {
        this._routerRoot = (this.$parent && this.$parent._routerRoot) || this;
      }
      registerInstance(this, this);
    },
    destroyed: function destroyed () {
      registerInstance(this);
    }
  });
源码分析
生命周期的源码实现比较简单,都是通过Vue内部的一个叫callHook()的全局函数执行的,如下:
function callHook (vm, hook) {    //第2914行 vm:vue实例 hook:对应的操作名(例如:beforeCreate、created等)
  // #7573 disable dep collection when invoking lifecycle hooks
  pushTarget();
  var handlers = vm.$options[hook];           //获取生命周期函数
  if (handlers) {
    for (var i = 0, j = handlers.length; i < j; i++) {    //遍历生命周期函数
      try {
        handlers[i].call(vm);                               //执行该函数,以vm作为上下文
      } catch (e) {
        handleError(e, vm, (hook + " hook"));
      }
    }
  }
  if (vm._hasHookEvent) {
    vm.$emit('hook:' + hook);
  }
  popTarget();
}
beforeCreate和created是在init()的时候执行的,如下:
Vue.prototype._init = function (options) {  //第4576行
    /*略*/
    vm._self = vm;
    initLifecycle(vm);
    initEvents(vm);
    initRender(vm);
    callHook(vm, 'beforeCreate');             //执行beforeCreate生命周期函数
    initInjections(vm); // resolve injections before data/props
    initState(vm);
    initProvide(vm); // resolve provide after data/props
    callHook(vm, 'created');                  //执行created生命周期函数

    /*略*/
  };
beforeMount和mounted是在挂载的时候在mountComponent()里执行的,如下:
function mountComponent(vm, el, hydrating) {    //第2739行 挂载组件 vm:Vue实例  el:真实的DOM节点对象
    /*略*/
    callHook(vm, 'beforeMount');                    //挂载前 执行生命周期里的beforeMount事件
    var updateComponent;
    if ("development" !== 'production' && config.performance && mark) {         //开启了性能追踪时的分支
        /*略*/
    } else {
        updateComponent = function () {vm._update(vm._render(), hydrating);};
    }

    new Watcher(vm, updateComponent, noop, null, true);
    hydrating = false;

    if (vm.$vnode == null) {
        vm._isMounted = true;                       //设置vm._isMounted为true,表示已挂载
        callHook(vm, 'mounted');                    //执行生命周期里的Mount事件
    }
    return vm
}
beforeUpdate是在Vue原型上的_update更新时触发的,如下:
Vue.prototype._update = function (vnode, hydrating) { //第2646行
    var vm = this;
    if (vm._isMounted) {                        //如果已经挂载了,则表示已经挂载了
        callHook(vm, 'beforeUpdate');               //则触发beforeUpdate
    }
    /*略*/
}
updated是在nextTick()执行时当watcher执行完了之后触发的,如下:
function callUpdatedHooks (queue) { //第3016行
  var i = queue.length;
  while (i--) {
    var watcher = queue[i];
    var vm = watcher.vm;
    if (vm._watcher === watcher && vm._isMounted) { //如果当前是渲染watcher,且已经挂载了
      callHook(vm, 'updated');                        //则触发update生命周期函数
    }
  }
}
beforeDestroy和destroyed是在Vue原型的$destroy()方法里触发的,如下:
 Vue.prototype.$destroy = function () { //第2695行
    var vm = this;
    if (vm._isBeingDestroyed) {
      return
    }
    callHook(vm, 'beforeDestroy');        //触发beforeDestroy生命周期函数
    /*这里进行销毁过程*/
    callHook(vm, 'destroyed');            //触发destroyed生命周期函数
    /*略*/
  };
}