一般情况下都会自带安装了python2,所以不要删除。继续安装你的python3就好,因为某些程序需要依赖目前python2环境。
一.安装依赖环境
# yum -y install zlib-devel bzip2-devel openssl-devel ncurses-devel sqlite-devel readline-devel tk-devel gdbm-devel db4-devel libpcap-devel xz-devel
二.下载Python3
从[官网下载](https://www.python.org/downloads/)相应的Python版本,目前最新版本为Python3.6.7,[点击下载](https://www.python.org/ftp/python/3.6.3/Python-3.6.3.tgz)。
也可以通过如下命令下载:
wget https://www.python.org/ftp/python/3.6.7/Python-3.6.7.tgz
三.安装
在Python下载目录依次运行如下命令
[root@cdh1 opt]# tar zxvf Python-3.6.7.tgz
[root@cdh1 opt]# cd Python-3.6.7
创建安装目录
[root@cdh1 Python-3.6.7]# mkdir -p /usr/local/python3
[root@cdh1 Python-3.6.7]# ./configure --prefix=/usr/local/python3
[root@cdh1 Python-3.6.7]# make
[root@cdh1 Python-3.6.7]# make install
make是一个编译命令,如果make的时候出现以下情况
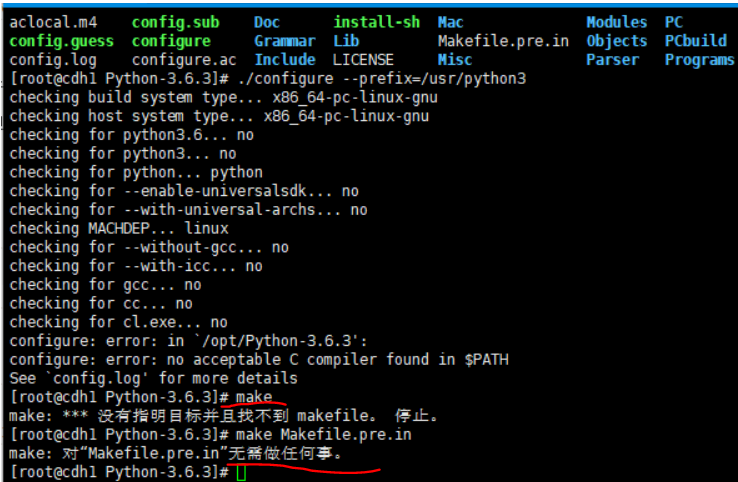
那就是没有找到makefile,可以看下configure的时候有没有报错呀?是不是提示有什么依赖的包没有装,先把依赖的包装了。再configure试试,看有没有makefile。
四.安装依赖包(若不报错,则此步骤不用安装)
安装python的时候出现如下的错误:
Python3.6安装报错 configure: error: no acceptable C compiler found in $PATH**
[root@master ~]#./configure --prefix=/usr/local/python3.6
checking build system type... i686-pc-linux-gnu
checking host system type... i686-pc-linux-gnu
checking for --enable-universalsdk... no
checking for --with-universal-archs... 32-bit
checking MACHDEP... linux
checking for --without-gcc... no
checking for gcc... no
checking for cc... no
checking for cl.exe... no
configure: error: in `/usr/local/src/pythonSoft/Python-3.3.4':
configure: error: no acceptable C compiler found in $PATH
See `config.log' for more details
由于本机缺少gcc编译环境
1.通过yum安装gcc编译环境:yum install -y gcc
2.本机没有安装yum功能,可下载gcc安装包:https://gcc.gnu.org/
[root@cdh1 Python-3.6.7]# yum install -y gcc
然后再make
[root@cdh1 Python-3.6.7]# make
[root@cdh1 Python-3.6.7]# make install
五.建立python3的软链
一般情况下使用第一种方法
第一种方法:直接创建
[root@cdh1 Python-3.6.7]# ln -s /usr/local/python3/bin/python3 /usr/bin/python3
第二种方法:创建新版本的软连接
###修改旧版本
mv /usr/bin/python /usr/bin/python_bak
###创建新的软连接
ln -s /usr/local/python3/bin/python3 /usr/bin/python
六.将(/usr/local/python3/bin)加入PATH 路径
[root@cdh1 Python-3.6.7]# vim ~/.bash_profile
将原:PATH=$PATH:$HOME/bin:
改成:PATH=$PATH:$HOME/bin:/usr/local/python3/bin
# .bash_profile

# Get the aliases and functions

if [ -f ~/.bashrc ]; then

. ~/.bashrc

fi

# User specific environment and startup programs

PATH=$PATH:$HOME/bin:/usr/local/python3/bin

export PATH
按ESC,输入:wq回车退出
七.修改完PATH路径记得执行行下面的命令,让上一步修改生效
[root@cdh1 Python-3.6.7]# source ~/.bash_profile
八.最后检查Python3及pip3是否安装成功
[root@cdh1 Python-3.6.7]# python3 -V
Python 3.6.7
[root@cdh1 Python-3.6.7]# pip3 -V
pip 10.0.1 from /usr/local/python3/lib/python3.6/site-packages/pip (python 3.6)

[root@cdh1 Python-3.6.7]#python3
Python 3.6.7 (default, Mar 23 2020, 17:02:26)
[GCC 4.8.5 20150623 (Red Hat 4.8.5-11)] on linux
Type "help", "copyright", "credits" or "license" for more information.
>>>
出现以上情况说明安装成功,否则继续以下安装
如果有问题再创建一下pip3的软链接,重新生成
[root@cdh1 Python-3.6.7]# ln -s /usr/local/python3/bin/pip3 /usr/bin/pip3
安装pip以及setuptools
为了方便的安装第三方库,使用pip3命令,需要进行相应的安装。 最新版本  setuptools (39.0.1)
[root@cdh1 Python-3.6.7]#wget --no-check-certificate  https://pypi.python.org/packages/source/s/setuptools/setuptools-19.6.tar.gz#md5=c607dd118eae682c44ed146367a17e26
[root@cdh1 Python-3.6.7]# tar -zxvf setuptools-19.6.tar.gz
[root@cdh1 Python-3.6.7]# cd setuptools-19.6
[root@cdh1 setuptools-19.6]# python3 setup.py build
[root@cdh1 setuptools-19.6]#python3 setup.py install
如果前面没布置好环境的话继续操作如下方法
报错: RuntimeError: Compression requires the (missing) zlib module
我们需要在linux中安装zlib-devel包,进行支持。
[root@cdh1 Python-3.6.7]# yum install zlib-devel
需要对python3.6进行重新编译安装。
[root@cdh1 Python-3.6.7]# cd python3.6.7
[root@cdh1 Python-3.6.7]# make
[root@cdh1 Python-3.6.7]# make install

又是漫长的编译安装过程。
重新安装setuptools
[root@cdh1 Python-3.6.7]# python3 setup.py build
[root@cdh1 Python-3.6.7]# python3 setup.py install

安装pip命令如下:
[root@cdh1 Python-3.6.7]# wget --no-check-certificate  https://pypi.python.org/packages/source/p/pip/pip-8.0.2.tar.gz#md5=3a73c4188f8dbad6a1e6f6d44d117eeb
[root@cdh1 Python-3.6.7]# tar -zxvf pip-8.0.2.tar.gz
[root@cdh1 Python-3.6.7]# cd pip-8.0.2
[root@cdh1 Python-3.6.7]# python3 setup.py build
[root@cdh1 Python-3.6.7]# python3 setup.py install
如果没有意外的话,pip安装完成


如果没有搞好环境的话,会碰见亲切的报错:
[root@cdh1 Python-3.6.7]#  pip3 install paramiko

报这个错:pip is configured with locations that require TLS/SSL, however the ssl module in Python is not available.

然后开始进行如下操作
[root@cdh1 Python-3.6.7]# yum install openssl
[root@cdh1 Python-3.6.7]# yum install openssl-devel
[root@cdh1 Python-3.6.7]# cd python3.6.7
[root@cdh1 Python-3.6.7]# make
[root@cdh1 Python-3.6.7]# make install

还可以参考下面同学的链接
https://www.cnblogs.com/kimyeee/p/7250560.html
根据自己需求安装相应模块
[root@cdh1 Python-3.6.7]# pip3 install requests
[root@cdh1 Python-3.6.7]# pip3 install flask
[root@cdh1 Python-3.6.7]# pip3 install gevent
[root@cdh1 Python-3.6.7]# pip3 install redis
[root@cdh1 Python-3.6.7]# pip3 install redis-py-cluster
[root@cdh1 Python-3.6.7]# pip3 install pymongo
[root@cdh1 Python-3.6.7]# pip3 install pillow
[root@cdh1 Python-3.6.7]# pip3 install numpy
[root@cdh1 Python-3.6.7]# pip3 install tensorflow
用命令将Python安装包导出导入
导出
pip3 freeze > requirements.txt
导入
pip3 install -r requirements.txt
aliyun-python-sdk-core==2.13.15
aliyun-python-sdk-core-v3==2.13.11
aliyun-python-sdk-kms==2.10.1
beautifulsoup4==4.7.1
boto==2.49.0
boto3==1.10.32
botocore==1.13.32
bs4==0.0.1
certifi==2019.11.28
cffi==1.12.2
chardet==3.0.4
crcmod==1.7
demjson==2.2.4
docutils==0.15.2
gensim==3.8.1
gevent==1.4.0
greenlet==0.4.15
idna==2.8
jmespath==0.9.4
kafka==1.3.5
kafka-python==1.4.7
lxml==4.5.0
numpy==1.15.4
oss2==2.9.1
Pillow==7.0.0
pycparser==2.19
pycryptodome==3.9.7
pymongo==3.10.0
python-dateutil==2.8.0
redis==2.10.6
redis-py-cluster==1.3.6
requests==2.22.0
s3transfer==0.2.1
scipy==1.2.1
selenium==3.141.0
six==1.13.0
smart-open==1.9.0
soupsieve==1.8
threadpool==1.3.2
tornado==6.0.3
urllib3==1.25.7
wincertstore==0.2
在Linux系统下常用命令
Linux远程拷贝scp命令
[root@iZbp17myadp30d5qukpv2wZ opt]# scp Python-3.6.7.tgz root@47.97.37.7:/opt/
The authenticity of host '47.97.37.7 (47.97.37.7)' can't be established.
ECDSA key fingerprint is e7:ac:cd:3b:3c:3e:b2:e1:0f:a1:4e:2d:81:25:1c:9b.
Are you sure you want to continue connecting (yes/no)? y
Please type 'yes' or 'no': y
Please type 'yes' or 'no': yes
Warning: Permanently added '47.97.37.7' (ECDSA) to the list of known hosts.
root@47.97.37.7's password:
Python-3.6.7.tgz
从本机拷贝到目标远程主机
scp 拷贝目标文件 远程用户@远程主机地址:远程目录
scp php-7.2.4.tar.gz root@192.168.9.142:/usr/local/src/   //这里是从当前主机拷贝到IP位142的局域网主机目录/usr/local/src下
The authenticity of host '192.168.9.142 (192.168.9.142)' can't be established.
RSA key fingerprint is 11:b6:be:81:a0:be:b7:14:b4:2d:d6:99:de:8d:7c:f1.
Are you sure you want to continue connecting (yes/no)? yes     //输入回车会弹出提示,然后输入yes回车
root@192.168.9.142's password:    //输入密码即可执行完成之后,去目标远程主机对应目录查看,文件在,说明成功
从远程主机拷贝到本机
scp root@192.168.9.142:/usr/local/src/redis.tar.gz /usr/local/src/  //这里是从目标主机142拷贝文件到本机/usr/local/src下
root@192.168.9.142's password:   //输入远程主机密码回车即可
redis.tar.gz                                            100% 1696KB   1.7MB/s   00:00 补充、一次拷贝多个文件或者目录

scp root@192.168.9.142:/usr/local/src/cp_dir/*.php /usr/local/src/  //拷贝多个文件
scp -r root@192.168.9.142:/usr/local/src/cp_dir/ /usr/local/src/   //拷贝目录
压缩包解压方式
1.unzip Python-3.6.7.zip
2.tar -zxvf java.tar.gz
3.tar zxvf Python-3.6.7.tgz
解压到指定的文件夹
# tar -zxvf java.tar.gz -C /usr/java
安装上传下载文件命令
# yum -y install lrzsz
unzip命令解压缩的时候,出现错误
# unzip: command not found
其原因是找不到zip压缩软件,用yum解决问题
# yum install -y unzip zip
脚本执行权限
# chmod +x  curl_ip.sh (filename)

#./ filename
定时crontab执行py脚本
每1小时零5分执行py脚本
5 */1 * * * python3 /root/auto_test_jinRong.py >/dev/null 2>&1
每4小时零5分执行py脚本:
5 */4 * * * python3 /root/auto_test_jinRong.py >/dev/null 2>&1
每隔5分钟执行py脚本:
*/5 * * * * python3 /root/auto_test_jinRong.py >/dev/null 2>&1