一、需求分析
在同一个系统中,我们可能只允许一个用户在一个终端上登录,一般来说这可能是出于安全方面的考虑,但是也有一些情况是出于业务上的考虑。要实现一个用户不可以同时在两台设备上登录,我们有两种思路:
- 后来的登录自动踢掉前面的登录,就像大家在扣扣中看到的效果。
- 如果用户已经登录,则不允许后来者登录。
这种思路都能实现这个功能,具体使用哪一个,还要看我们具体的需求。
在 Spring Security 中,这两种都很好实现,一个配置就可以搞定。
二、具体实现 - 踢掉已经登录用户
想要用新的登录踢掉旧的登录,我们只需要将最大会话数设置为 1 即可,配置如下:
@Override
protected void configure(HttpSecurity http) throws Exception {
    http.authorizeRequests()
            .anyRequest().authenticated()
            .and()
            .formLogin()
            .loginPage("/login.html")
            .permitAll()
            .and()
            .csrf().disable()
            .sessionManagement()
            .maximumSessions(1);
}
maximumSessions 表示配置最大会话数为 1,这样后面的登录就会自动踢掉前面的登录。配置完成后,分别用 Chrome 和 Firefox 两个浏览器进行测试(或者使用 Chrome 中的多用户功能)。
- Chrome 上登录成功后,访问 /hello 接口。
- Firefox 上登录成功后,访问 /hello 接口。
- 在 Chrome 上再次访问 /hello 接口,此时会看到如下提示:This session has been expired (possibly due to multiple concurrent logins being attempted as the same user).
可以看到,这里说这个 session 已经过期,原因则是由于使用同一个用户进行并发登录。
三、具体实现 - 禁止新的登录
如果相同的用户已经登录了,你不想踢掉他,而是想禁止新的登录操作,那也好办,配置方式如下:
@Override
protected void configure(HttpSecurity http) throws Exception {
    http.authorizeRequests()
            .anyRequest().authenticated()
            .and()
            .formLogin()
            .loginPage("/login.html")
            .permitAll()
            .and()
            .csrf().disable()
            .sessionManagement()
            .maximumSessions(1)
            .maxSessionsPreventsLogin(true);
}
添加 maxSessionsPreventsLogin 配置即可。此时一个浏览器登录成功后,另外一个浏览器就登录不了了。
是不是很简单?不过还没完,我们还需要再提供一个 Bean:
@Bean
HttpSessionEventPublisher httpSessionEventPublisher() {
    return new HttpSessionEventPublisher();
}
为什么要加这个 Bean 呢?因为在 Spring Security 中,它是通过监听 session 的销毁事件,来及时的清理 session 的记录。用户从不同的浏览器登录后,都会有对应的 session,当用户注销登录之后,session 就会失效,但是默认的失效是通过调用 StandardSession#invalidate 方法来实现的,这一个失效事件无法被 Spring 容器感知到,进而导致当用户注销登录之后,Spring Security 没有及时清理会话信息表,以为用户还在线,进而导致用户无法重新登录进来(小伙伴们可以自行尝试不添加上面的 Bean,然后让用户注销登录之后再重新登录)。
为了解决这一问题,我们提供一个 HttpSessionEventPublisher ,这个类实现了 HttpSessionListener 接口,在该 Bean 中,可以将 session 创建以及销毁的事件及时感知到,并且调用 Spring 中的事件机制将相关的创建和销毁事件发布出去,进而被 Spring Security 感知到,该类部分源码如下:
public void sessionCreated(HttpSessionEvent event) {
  HttpSessionCreatedEvent e = new HttpSessionCreatedEvent(event.getSession());
  getContext(event.getSession().getServletContext()).publishEvent(e);
}
public void sessionDestroyed(HttpSessionEvent event) {
  HttpSessionDestroyedEvent e = new HttpSessionDestroyedEvent(event.getSession());
  getContext(event.getSession().getServletContext()).publishEvent(e);
}
OK,虽然多了一个配置,但是依然很简单!
四、实现原理
上面这个功能,在 Spring Security 中是怎么实现的呢?我们来稍微分析一下源码。
首先我们知道,在用户登录的过程中,会经过 UsernamePasswordAuthenticationFilter,而 UsernamePasswordAuthenticationFilter 中过滤方法的调用是在 AbstractAuthenticationProcessingFilter 中触发的,我们来看下 AbstractAuthenticationProcessingFilter#doFilter 方法的调用:
public void doFilter(ServletRequest req, ServletResponse res, FilterChain chain)
  throws IOException, ServletException {
 HttpServletRequest request = (HttpServletRequest) req;
 HttpServletResponse response = (HttpServletResponse) res;
 if (!requiresAuthentication(request, response)) {
  chain.doFilter(request, response);
  return;
 }
 Authentication authResult;
 try {
  authResult = attemptAuthentication(request, response);
  if (authResult == null) {
   return;
  }
  sessionStrategy.onAuthentication(authResult, request, response);
 }
 catch (InternalAuthenticationServiceException failed) {
  unsuccessfulAuthentication(request, response, failed);
  return;
 }
 catch (AuthenticationException failed) {
  unsuccessfulAuthentication(request, response, failed);
  return;
 }
 // Authentication success
 if (continueChainBeforeSuccessfulAuthentication) {
  chain.doFilter(request, response);
 }
 successfulAuthentication(request, response, chain, authResult);
在这段代码中,我们可以看到,调用 attemptAuthentication 方法走完认证流程之后,回来之后,接下来就是调用 sessionStrategy.onAuthentication 方法,这个方法就是用来处理 session 的并发问题的。具体在:
public class ConcurrentSessionControlAuthenticationStrategy implements
  MessageSourceAware, SessionAuthenticationStrategy {
 public void onAuthentication(Authentication authentication,
   HttpServletRequest request, HttpServletResponse response) {

  final List<SessionInformation> sessions = sessionRegistry.getAllSessions(
    authentication.getPrincipal(), false);

  int sessionCount = sessions.size();
  int allowedSessions = getMaximumSessionsForThisUser(authentication);

  if (sessionCount < allowedSessions) {
   // They haven't got too many login sessions running at present
   return;
  }

  if (allowedSessions == -1) {
   // We permit unlimited logins
   return;
  }

  if (sessionCount == allowedSessions) {
   HttpSession session = request.getSession(false);

   if (session != null) {
    // Only permit it though if this request is associated with one of the
    // already registered sessions
    for (SessionInformation si : sessions) {
     if (si.getSessionId().equals(session.getId())) {
      return;
     }
    }
   }
   // If the session is null, a new one will be created by the parent class,
   // exceeding the allowed number
  }

  allowableSessionsExceeded(sessions, allowedSessions, sessionRegistry);
 }
 protected void allowableSessionsExceeded(List<SessionInformation> sessions,
   int allowableSessions, SessionRegistry registry)
   throws SessionAuthenticationException {
  if (exceptionIfMaximumExceeded || (sessions == null)) {
   throw new SessionAuthenticationException(messages.getMessage(
     "ConcurrentSessionControlAuthenticationStrategy.exceededAllowed",
     new Object[] {allowableSessions},
     "Maximum sessions of {0} for this principal exceeded"));
  }

  // Determine least recently used sessions, and mark them for invalidation
  sessions.sort(Comparator.comparing(SessionInformation::getLastRequest));
  int maximumSessionsExceededBy = sessions.size() - allowableSessions + 1;
  List<SessionInformation> sessionsToBeExpired = sessions.subList(0, maximumSessionsExceededBy);
  for (SessionInformation session: sessionsToBeExpired) {
   session.expireNow();
  }
 }
}
这段核心代码我来给大家稍微解释下:
1、首先调用 sessionRegistry.getAllSessions 方法获取当前用户的所有 session,该方法在调用时,传递两个参数,一个是当前用户的 authentication,另一个参数 false 表示不包含已经过期的 session(在用户登录成功后,会将用户的 sessionid 存起来,其中 key 是用户的主体(principal),value 则是该主题对应的 sessionid 组成的一个集合)。
2、接下来计算出当前用户已经有几个有效 session 了,同时获取允许的 session 并发数。
3、如果当前 session 数(sessionCount)小于 session 并发数(allowedSessions),则不做任何处理;如果 allowedSessions 的值为 -1,表示对 session 数量不做任何限制。
4、如果当前 session 数(sessionCount)等于 session 并发数(allowedSessions),那就先看看当前 session 是否不为 null,并且已经存在于 sessions 中了,如果已经存在了,那都是自家人,不做任何处理;如果当前 session 为 null,那么意味着将有一个新的 session 被创建出来,届时当前 session 数(sessionCount)就会超过 session 并发数(allowedSessions)。
5、如果前面的代码中都没能 return 掉,那么将进入策略判断方法 allowableSessionsExceeded 中。
6、allowableSessionsExceeded 方法中,首先会有 exceptionIfMaximumExceeded 属性,这就是我们在 SecurityConfig 中配置的 maxSessionsPreventsLogin 的值,默认为 false,如果为 true,就直接抛出异常,那么这次登录就失败了,如果为 false,则对 sessions 按照请求时间进行排序,然后再使多余的 session 过期即可。
以上来源于:王松的《深入浅出Spring Security》一书,已由清华大学出版社正式出版发行。
五、项目实现
我们项目中使用 token 认证,并且设置了 不保存 session 状态,所以需要新加一个 configure 配置,如下:
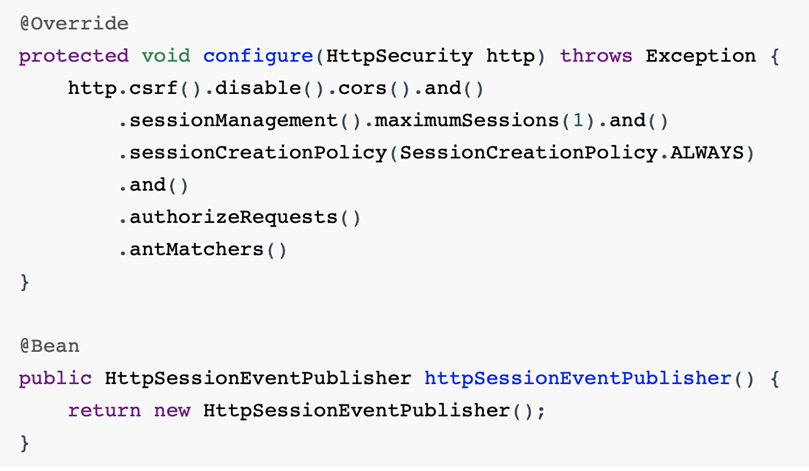
但是设置security.sessions策略为 always:保存session状态(每次会话都保存,可能会导致内存溢出)
1、security.sessions策略如下:
always:保存session状态(每次会话都保存,可能会导致内存溢出)
never:不会创建HttpSession,但是会使用已经存在的HttpSession
if_required:仅在需要HttpSession创建
stateless:不会保存session状态
注意:stateless策略推荐使用,也是默认配置
Session状态策略:org.springframework.security.config.http.SessionCreationPolicy
public enum SessionCreationPolicy {
    /** Always create an {@link HttpSession} */
    ALWAYS,
    /**
     * Spring Security will never create an {@link HttpSession}, but will use the
     * {@link HttpSession} if it already exists
     */
    NEVER,
    /** Spring Security will only create an {@link HttpSession} if required */
    IF_REQUIRED,
    /**
     * Spring Security will never create an {@link HttpSession} and it will never use it
     * to obtain the {@link SecurityContext}
     */
    STATELESS
}
2、需求
rest客户端访问rest服务端默认状态的配置策略是:无状态的;
假如默认配置策略不是无状态配置,则需要配置为无状态;若不配置无状态,则rest服务端会爆掉,堆积海量的sessionId;