最近入手做Java项目,使用SpringBoot和安全框架SpringSecurity,之前也总结了很多问题解决的博客,可以查看之前博客,这篇是决定把整个流程及大致代码记录一下,当然我只贴关键代码流程哦。
一、流程和代码详解
1、首先需要导入核心依赖
<!-- spring security-->
<dependency>
  <groupId>org.springframework.boot</groupId>
  <artifactId>spring-boot-starter-security</artifactId>
</dependency>
2、然后看一下代码结构
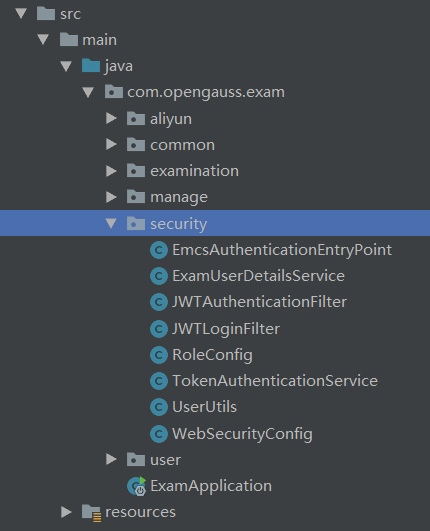
最主要的就是 security 包下的内容咯。
3、WebSecurityConfig类
最重要的就是 WebSecurityConfig 类咯,这个类得继承至 WebSecurityConfigurerAdapter 类,并且得加上 @EnableWebSecurity 注解,即启用web安全。
WebSecurityConfig类使用了@EnableWebSecurity注解 ,以启用SpringSecurity的Web安全支持,并提供Spring MVC集成。它还扩展了WebSecurityConfigurerAdapter,并覆盖了一些方法来设置Web安全配置的一些细节。
比如可以覆写configure(HttpSecurity)方法定义了哪些URL路径应该被保护,哪些不应该。
项目实例代码:
@Configuration
@EnableWebSecurity   // 开启web安全支持
public class WebSecurityConfig  extends WebSecurityConfigurerAdapter {
    ......
    @Override
    protected void configure(HttpSecurity http) throws Exception {
        http.csrf().disable().cors().and()
            .sessionManagement()
            .sessionCreationPolicy(SessionCreationPolicy.STATELESS)
            .and()
            // user
            .authorizeRequests().antMatchers(HttpMethod.GET,"/user/code").permitAll()
            .antMatchers(HttpMethod.POST, "/user/resetPassword", "/user/alipayNotify").permitAll()
            .anyRequest().authenticated()  // 以上配置的路径不需要认证,anyRequest其他任何都需要认证
            .and().exceptionHandling().authenticationEntryPoint(authenticationEntryPoint()) // 异常时走这个自定义的提示
            .and()
            .addFilterBefore(  // 添加自定义登录拦截过滤器
                new JWTLoginFilter(
                    new AntPathRequestMatcher("/login", HttpMethod.POST.name()),
                    authenticationManager()
                ),
                UsernamePasswordAuthenticationFilter.class
            )
            .addFilterBefore(new JWTAuthenticationFilter(),
                UsernamePasswordAuthenticationFilter.class);
       // 添加JWT权限认证拦截器,用于将每个接口拦截进行token验证,将token里的信息拿取用户并放入安全上下文
    }
  ......
}
4、JWTLoginFilter 自定义登录过滤器
JWTLoginFilter主要是用来处理自定义登录的业务逻辑处理。我们的登录是第一次验证码登录,之后用户也可以设置密码用密码登录。
// 需要继承AbstractAuthenticationProcessingFilter类,然后覆写下面这3个方法,IDE会自动给提示
public class JWTLoginFilter extends AbstractAuthenticationProcessingFilter {
    public JWTLoginFilter(RequestMatcher requestMatcher, AuthenticationManager authManager) {
        super(requestMatcher);
        setAuthenticationManager(authManager);
    }
    @Override
    public Authentication attemptAuthentication(HttpServletRequest req,
                                                HttpServletResponse res) throws AuthenticationException, IOException {
        ......// 登录是否含手机号,从请求流转换为User实例
        User voUser = new ObjectMapper().readValue(req.getInputStream(), User.class);
        if (voUser == null || voUser.getPhoneNum() == null) {
            throw new AuthenticationServiceException("请输入手机号");
        }
     // 通过 反射 获取到UserService,然后从数据库里取到当前请求用户数据
        UserService userService = SpringUtil.getBean(UserService.class);
        User dbUser = userService.getUserByPhoneNum(voUser.getPhoneNum());
        // 如果是密码登录,需要校验密码
        if (StringUtils.isBlank(voUser.getCode())) {
            if (dbUser == null) {
                throw new AuthenticationServiceException("用户不存在,请使用验证码注册");
            }
            ......
            voUser.setUserId(dbUser.getUserId());
            //添加用户id,登录方式到session,方便后续验证
            req.setAttribute("userId", dbUser.getUserId());
            return getAuthenticationManager().authenticate(
                new UsernamePasswordAuthenticationToken(
                    voUser.getUserId(),
                    voUser.getPassword()
                )
            );
        } else { // 验证码登录:需要校验验证码
            ......if (!userService.verifySmsCode(voUser.getPhoneNum(), voUser.getCode())) {
                throw new AuthenticationServiceException("短信验证码错误");
            }
            if(dbUser == null) {
                userService.saveUserPhone(voUser);
                dbUser = userService.getUserByPhoneNum(voUser.getPhoneNum());
            }
            req.setAttribute("loginType", 1);
            req.setAttribute("userId", dbUser.getUserId());
       // 由于可以验证码登录,用户在库里也可能没有密码,所以无法用上面 security 自带校验方式
       // 自定义校验方式,只要验证码校验成功,那么就通过用户Id,去TokenAuthenticationService里生成 token
            TokenAuthenticationService.addAuthentication(res, String.valueOf(dbUser.getUserId()));
            OperationInfo info = OperationInfo.success("登录成功");
            HttpResponseUtil.setResponseMessage(res, info);
            return null;
        }
    }
   // 这个是需要覆写 security 自带的校验成功方法,也就是登录校验成功之后,去TokenAuthenticationService里生成 token
    @Override
    protected void successfulAuthentication(HttpServletRequest req,
                                            HttpServletResponse res,
                                            FilterChain chain,
                                            Authentication auth) throws IOException {
        TokenAuthenticationService.addAuthentication(res, auth.getName());
        OperationInfo info = OperationInfo.success("登录成功");
        HttpResponseUtil.setResponseMessage(res, info);
    }
   // 这个是需要覆写 security 自带的校验失败方法,也就是登录失败之后,给出提示,这个OperationInfo也就是我们项目定义的返回操作类
    @Override
    protected void unsuccessfulAuthentication(HttpServletRequest req,
                                              HttpServletResponse res,
                                              AuthenticationException failed) throws IOException {
        OperationInfo info;
        if (failed instanceof BadCredentialsException) {
            info = OperationInfo.failure("用户密码错误");
        } else {
            info = OperationInfo.failure(failed.getMessage());
        }
        HttpResponseUtil.setResponseMessage(res, info);
    }

}
5、TokenAuthenticationService 生成及解析token
接上面我们都用到了 TokenAuthenticationService 去生成 token,那么我们看一下这个Service的主要作用,其实就是生成 JWT token,和解析JWT token。
@Slf4j
@Component
public class TokenAuthenticationService {
    private static final long EXPIRATIONTIME = 604_800_000; // 7 days
    private static String SECRET;  // 签名
    private static final String TOKEN_PREFIX = "Bearer";
    private static final String HEADER_STRING = "Authorization";

    @Resource
    private EnvService envService;  // 自定义工具类,用于判断环境从而生成不同的 secret

    @PostConstruct  // 这个注解可以了解下,加载servlet的时候运行
    public void setSecret() {
        if (envService.isProd()) {
            SECRET = "TokenSecret";
        } else {
            SECRET = "TestTokenSecret";
        }
    }

    public static Authentication getAuthentication(HttpServletRequest req, HttpServletResponse res) {
        //如果header没有auth头,从cookie获取token
        String token = req.getHeader(HEADER_STRING);
        Cookie[] cookies = req.getCookies();
        if (cookies != null && cookies.length > 0) {
            for (Cookie cookie : cookies) {
                if (Objects.equals(cookie.getName(), "token")) {
                    try {
                        token = URLDecoder.decode(cookie.getValue(), StandardCharsets.UTF_8.name());
                    } catch (UnsupportedEncodingException e) {
                        log.error(LogUtil.getStack(e));
                    }
                }
            }
        }
        if (StringUtils.isNotBlank(token) && token.length() != 32) {
            // parse the token.
            Claims body = Jwts.parser()
                    .setSigningKey(SECRET)
                    .parseClaimsJws(token.replace(TOKEN_PREFIX, ""))
                    .getBody();
            String username = body.getSubject();
            String role = (String) body.get("roleName");
            long exp = body.getExpiration().getTime();
            long now = System.currentTimeMillis();
            if (username != null) {
                if (exp - 864_00_000 < now) { //1 day left refresh 如果过期时间只在1天内,那么就重新生成一个新token给用户端,避免过期
                    addAuthentication(res, username, role);
                }
                return new UsernamePasswordAuthenticationToken(username, null, RoleConfig.getAuthoritiesWithoutPrefix(role));
            }
        }
        return null;
    }

    public static void addAuthentication(HttpServletResponse res, String username, String role) {
        String JWT = Jwts.builder()
                .setSubject(username)
                .setExpiration(new Date(System.currentTimeMillis() + EXPIRATIONTIME))
                .claim("roleName", role)
                .signWith(SignatureAlgorithm.HS512, SECRET)
                .compact();
        res.addHeader(HEADER_STRING, TOKEN_PREFIX + " " + JWT);
    }

    public static void addAuthentication(HttpServletResponse res, String username) {
        Integer userId = Integer.valueOf(username);
        UserService userService = SpringUtil.getBean(UserService.class);
        User user = userService.getUserById(userId);
        String role = RoleConfig.ROLE_PREFIX + user.getRoleName();
        addAuthentication(res, username, role);
    }

}
然后看一下 EnvService ,这个就是用来判断环境的
@AllArgsConstructor
@Service
public class EnvService {
    private Environment environment;

    public boolean isProd() {
        for (String activeProfile : environment.getActiveProfiles()) {
          return StringUtils.contains(activeProfile, "prod");
        }
        return false;
    }
}
然后再看下 RoleConfig,这个就是将从 token 中拿到的角色、权限等放到列表中,分别是带前缀和不带前缀。因为 security 里默认得带前缀 "Role_",而返回给用户端的就不需要这个前缀了。
并且我们在这个类上开启了 security 的方法级管控。
@Configuration
@EnableGlobalMethodSecurity( // 开启了Security的方法级管控
    prePostEnabled = true,
    securedEnabled = true,
    jsr250Enabled = true
)
public class RoleConfig extends GlobalMethodSecurityConfiguration {
    public static final String ROLE_PREFIX = "ROLE_";

    public static Collection<GrantedAuthority> getAuthorities(String roleName, List<String> permissions) {
        List<GrantedAuthority> authList = new ArrayList<>();
        authList.add(new SimpleGrantedAuthority(ROLE_PREFIX + roleName));
        if (permissions != null) {
            authList.addAll(
                permissions.stream()
                    .map(SimpleGrantedAuthority::new)
                    .collect(Collectors.toList())
            );
        }
        return authList;
    }

    public static Collection<GrantedAuthority> getAuthoritiesWithoutPrefix(String roleName, List<String> permissions) {
        List<GrantedAuthority> authList = new ArrayList<>();
        authList.add(new SimpleGrantedAuthority(roleName));
        if (permissions != null) {
            authList.addAll(
                permissions.stream()
                    .map(SimpleGrantedAuthority::new)
                    .collect(Collectors.toList())
            );
        }
        return authList;
    }
}
6、自定义UserDetailsService
关于自定义登录拦截还有一个最重要的就是:自定义UserDetailsService
@Configuration
@EnableWebSecurity
public class WebSecurityConfig  extends WebSecurityConfigurerAdapter {
    @Autowired
    private ExamUserDetailsService examUserDetailsService;

    @Bean
    public AuthenticationEntryPoint authenticationEntryPoint() {
        return new EmcsAuthenticationEntryPoint();
    }

    @Override
    protected void configure(HttpSecurity http) throws Exception {
       ......
    }

    @Override  // 这个configure就是用来定义密码校验的,可以使用security自带的BCryptPasswordEncoder,也可以使用自定义的
    protected void configure(AuthenticationManagerBuilder auth) throws Exception {
        auth.userDetailsService(examUserDetailsService).passwordEncoder(new BCryptPasswordEncoder());
    }
}
这个自定义的UserService里最重要的就是要覆写 loadUserByUsername 方法,这个是源码里面看来的
@Service
public class ExamUserDetailsService implements UserDetailsService {
    @Autowired
    private UserService userService;
   // 覆写 loadUserByUsername 方法,从数据库里取出用户数据,这个参数username,其实就是userId
   // 下面这个是 security 的 User,他的角色默认是带 Role_ 前缀的,所以 RoleConfig.getAuthorities 的角色就是需要带 Role_ 前缀
    @Override
    public UserDetails loadUserByUsername(String username) throws UsernameNotFoundException {
        Integer userId = Integer.valueOf(username);
        User user = userService.getUserById(userId);
        if (user == null) {
            throw new UsernameNotFoundException("用户不存在");
        }
        return new org.springframework.security.core.userdetails.User(
                username,
                user.getPassword(),
                true,
                true,
                true,
                true,
                RoleConfig.getAuthorities(user.getRoleName())
        );
    }
}
这样自定义登录拦截的业务就差不多了。
7、JWTAuthenticationFilter 拦截器
这个拦截器是请求过滤,所有的请求都会走这个拦截。这个拦截器的主要作用是:进行token验证,并把解析的用户信息放入安全上下文。
public class JWTAuthenticationFilter extends GenericFilterBean {
    @Override  // 覆写 doFilter 方法,走我们的自定义业务逻辑
    public void doFilter(ServletRequest request, ServletResponse response, FilterChain filterChain) throws IOException, ServletException {
        // 可以取到用户信息的(有正确token)将用户信息放入上下文
        try {
            Authentication auth = TokenAuthenticationService.getAuthentication((HttpServletRequest) request, (HttpServletResponse) response);
            SecurityContextHolder.getContext().setAuthentication(auth);
        } catch (MalformedJwtException | SignatureException | ExpiredJwtException | UnsupportedJwtException e) {
       // 需要捕获一下上面4个异常,如果异常就将上下文设为null,类似于游客访问
            SecurityContextHolder.getContext().setAuthentication(null);
        } finally{
            filterChain.doFilter(request, response);
        }
    }
}
8、UserUtils 安全上下文信息工具类
......  // 主要是这三个重要的类
import org.springframework.security.core.Authentication;
import org.springframework.security.core.GrantedAuthority;
import org.springframework.security.core.context.SecurityContextHolder;

public class UserUtils {public static User getCurrentUser() {
        Integer userId = getCurrentUserId();
        if (userId == null) {
            return null;
        }
        UserService userService = SpringUtil.getBean(UserService.class);
        return userService.getUserById(userId);
    }
   public static Integer getCurrentUserId() {
        Authentication auth = getAuth(); // 从安全上下文拿到凭证,取到 userId
        if (auth == null) {
            return null;
        }
        String userId = (String) auth.getPrincipal();
        if (userId == null || StringUtils.equalsIgnoreCase("anonymousUser", userId)) {
            return null;
        }
        return Integer.valueOf(userId);
    }
   // 从安全上下文拿到角色public static String getRole() {
        GrantedAuthority[] authorities = getAuth().getAuthorities().toArray(new GrantedAuthority[1]);
        if (authorities.length > 0) {
            for (GrantedAuthority authority : authorities) {
                String authorityName = authority.getAuthority();
                if (authorityName.startsWith(RoleConfig.ROLE_PREFIX)) {
                    return authorityName.substring(5);
                }
            }
        }
        return null;
    }
   // 从 安全上下文获取到 凭证
    private static Authentication getAuth() {
        return SecurityContextHolder.getContext().getAuthentication();
    }

}
主要是从安全上下文拿到 凭证、拿到userId之类的信息,然后通过这个信息,就可以查数据库拿到很多数据。
9、AuthenticationEntryPoint:自定义未登录的返回状态
还有一个需要注意的是 security 登录不成功默认返回的是它自带的 403 之类的信息,我们如果需要自定义成我们想要的结构的话,就需要实现AuthenticationEntryPoint,然后覆写 commence 方法。
@Configuration
@EnableWebSecurity
public class WebSecurityConfig  extends WebSecurityConfigurerAdapter {

    @Bean
    public AuthenticationEntryPoint authenticationEntryPoint() {
        return new EmcsAuthenticationEntryPoint();
    }
   ......
}
先在 WebSecurityConfig 里注册AuthenticationEntryPoint,然后使用我们自定义的EmcsAuthenticationEntryPoint
public class EmcsAuthenticationEntryPoint implements AuthenticationEntryPoint {
    @Override
    public void commence(HttpServletRequest request, HttpServletResponse response, AuthenticationException e) throws IOException {
        response.setStatus(HttpStatus.UNAUTHORIZED.value());
        OperationInfo info = OperationInfo.failure("请登录后操作");
        HttpResponseUtil.setResponseMessage(response, info);
    }
}
二、导图流程解析

这个导图就是上面这个流程介绍,其中单点登录,是我们有2个平台,一个墨天轮平台,一个内部知识库平台,登录放在墨天轮平台,所以内部知识库平台只需要一个过滤器 JWTAuthenticationFilter 即可。