Authority 权限
Credential 证书
Grant 授予
Authentication 身份验证
以下,我们将通过四步,逐步实现spring-security的username+password身份验证的登录功能。
一、添加spring-boot-start-security依赖即可实现默认的username+password登录。(默认用户认证)
二、实现自定义的固定用户和密码(内存用户认证)
三、实现自定义用户及密码登录的系统(UserDetailsService认证)
四、配置自定义页面,可配置的相关页面包括:登录表单页,登录错误页,登录成功页等。
请注意,我们是以一个spring-boot-starter-web项目为起点。
一、添加spring-boot-start-security依赖即可实现默认的username+password登录。(默认用户认证)
        <!-- 依赖:spring-security -->
        <dependency>
            <groupId>org.springframework.boot</groupId>
            <artifactId>spring-boot-starter-security</artifactId>
        </dependency>
启动web应用,访问站点资源时,会出现spring-security提供的默认登录页面
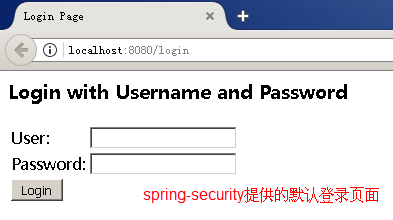
其默认用户名为:user
登录密码在启动信息中可以找到:

填写正确即可登录成功。
这个最简单的配置适用于只有一个用户且每次系统启动后查阅更新密码的系统。当然,这种系统不常见。
二、实现自定义的固定用户和密码(内存用户认证)
需添加自定义配置,我们以java配置方式实现。
1. 创建一个继承自org.springframework.security.config.annotation.web.configuration.WebSecurityConfigurerAdapter的类;
2. 类上以@Configuration和@EnableWebSecurity注解,表明这是一个java配置类,并启用spring-security身份认证;
3. 覆写configure(AuthenticationManagerBuilder auth)方法;
4. 调用auth对象的.inMemoryAuthentication().withUser("xxx").password("xxx").roles("USER")等方法,指定用户、密码及角色,多个用户可以调用.and()方法来连接.withUser方法。
@Configuration
@EnableWebSecurity
public class SecurityConfig extends WebSecurityConfigurerAdapter{

    @Override
    protected void configure(AuthenticationManagerBuilder auth) throws Exception {
        auth
        .inMemoryAuthentication()    // 内存用户认证
          .withUser("xxx").password("xxx").roles("USER")    // 配置用户xxx密码xxx及角色USER
          .and()
       .withUser("yyy").password("yyy").roles("USER")    // 配置用户yyy密码yyy及角色USER
; } }
重启web应用后,默认的user用户登录方式已失效,
现在可以用户xxx或yyy登录(针对spring4版本)
使用spring5版本的话,在此,会报错:java.lang.IllegalArgumentException: There is no PasswordEncoder mapped for the id "null",登录页面无法跳转

spring5要求必须指定密码编译码器,我们可以用BCryptPasswordEncoder。
修改一下configure(AuthenticationManagerBuilder auth)方法,填加一行代码:.passwordEncoder(new BCryptPasswordEncoder()) // 指定加密方式
    @Override
    protected void configure(AuthenticationManagerBuilder auth) throws Exception {
        auth
        .inMemoryAuthentication()    // 内存用户认证
        .passwordEncoder(new BCryptPasswordEncoder())    // 指定加密方式
        .withUser("xxx").password("xxx").roles("USER")    // 配置用户xxx密码xxx及角色USER
     .and()
     .withUser("yyy").password("yyy").roles("USER") // 配置用户yyy密码yyy及角色USER
    ;
  }
重新登录,还出错:
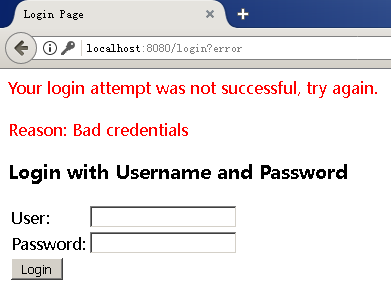
控制台有提示:Encoded password does not look like BCrypt(看上去不像BCrypt编码的密码)

我们的密码"xxx"是以明文方式传递的,用new BCryptPasswordEncoder().encode("xxx")改为密文即可。
@Configuration
@EnableWebSecurity
public class SecurityConfig extends WebSecurityConfigurerAdapter{

    @Override
    protected void configure(AuthenticationManagerBuilder auth) throws Exception {
        auth
        .inMemoryAuthentication()    // 内存用户认证
        .passwordEncoder(new BCryptPasswordEncoder())    // 指定加密方式
        .withUser("xxx").password(new BCryptPasswordEncoder().encode("xxx")).roles("USER")    // 配置用户xxx密码xxx及角色USER
        .and()
        .withUser("yyy").password(new BCryptPasswordEncoder().encode("yyy")).roles("USER")    // 配置用户yyy密码yyy及角色USER
        ;
    }

}
以上是修改后的配置类,再次重启登录就正常了。
这个简单的配置适用于拥有少数明确固定用户且密码不得改变的系统。当然,这种系统不够灵活。
三、实现自定义用户及密码登录的系统(UserDetailsService认证)
1. 依然使用上面的配置类;
2. 只是调用auth的.userDetailsService方法,该方法需要一个UserDetailsService接口作为参数;
3. 需要实现UserDetailsService接口的loadUserByUsername(String username):UserDetails方法来完成用户身份认证;
loadUserByUsername(String username)返回一个UserDetails接口;
UserDetails接口要求提供用户名、密码、角色等属性信息;
4. 注意指定密码编译器,可参考前例。
我们用一个私有方法来提供UserDetails接口作为示例,实际运用时推荐调用一个实体服务方法(例如:UserService.findBy(String username):User)来提供UserDetails接口。示例代码如下:
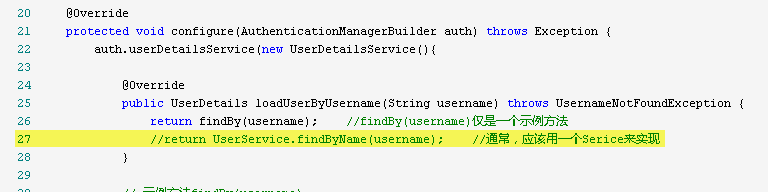
@Configuration
@EnableWebSecurity
public class SecurityConfig extends WebSecurityConfigurerAdapter{

    @Override
    protected void configure(AuthenticationManagerBuilder auth) throws Exception {
        auth.userDetailsService(new UserDetailsService(){

            @Override
            public UserDetails loadUserByUsername(String username) throws UsernameNotFoundException {
                return findBy(username);    //findBy(username)仅是一个示例方法
                //return UserService.findByName(username);    //通常,应该用一个Serice来实现
            }

            // 示例方法findBy(username)
            private UserDetails findBy(String username) {
                return new UserDetails(){

                    private String username = "aaa";    //假定用户名为aaa
                    private String password = "aaa";    //假定用户密码为aaa

                    @Override
                    public String getUsername() {
                        return username;
                    }

                    @Override
                    public String getPassword() {
                        // 注意在此返回指定密码编译器编译的密文密码
                        return new BCryptPasswordEncoder().encode(password);
                    }

                    //以上属性通常是自定义实体类User定义的
                    //以下属性是User实现UserDetails接口必须的

                    @Override
                    public Collection<? extends GrantedAuthority> getAuthorities() {
                        return java.util.Arrays.asList(new SimpleGrantedAuthority("USER"));//默认为USER角色
                    }

                    @Override
                    public boolean isAccountNonExpired() {
                        return true;    //默认账户未过期
                    }

                    @Override
                    public boolean isAccountNonLocked() {
                        return true;    //默认用户未被锁定
                    }

                    @Override
                    public boolean isCredentialsNonExpired() {
                        return true;    //默认证书未过期
                    }

                    @Override
                    public boolean isEnabled() {
                        return true;    //默认有效,即用户未被停用
                    }};
            }})
        .passwordEncoder(new BCryptPasswordEncoder())        // 指定密码编译器
        ;
    }

}
配置类经过以上修改,再次重启,以用户aaa密码aaa就正常登录了。
需注意事项:
1. Arrays来自java.util.Arrays;
2. spring5中必须指定密码编译器,.passwordEncoder(new BCryptPasswordEncoder())
3. new SimpleGrantedAuthority("USER")只是示例性的简单授权,实际应用中应以数据源来提供用户角色。
4. 如果我们另以MyUserDetailsService实现UserDetailsService接口的话,代码更清晰,实际上主体代码是:
@Configuration
@EnableWebSecurity
public class SecurityConfig extends WebSecurityConfigurerAdapter{

    @Override
    protected void configure(AuthenticationManagerBuilder auth) throws Exception {
        auth
      .userDetailsService(new MyUserDetailsService())
      .passwordEncoder(new BCryptPasswordEncoder())        // 指定密码编译器
        ;
    }
}
以上为UserDetailsService认证的java配置类主体代码。
这种通过实现UserDetailsService接口来完成用户身份认证的方式基本可以满足绝大部分系统需求,即username+password认证方式。
至此,功能倒是实现了,但spring-security提供的默认登录页面,未免过于简陋,这些界面是可以定制的。
四、配置自定义页面,可配置的相关页面包括:登录表单页,登录错误页,登录成功页等。
依然使用上面的配置类,重写configure(HttpSecurity http)方法来配置自定义页面。
以登录页为例,我们以spring-boot-starter-web和Thymeleaf来做示例。
前例中使用spring-security默认的登录页url为:http://localhost:8080/login,登录错误页url为:http://localhost:8080/login?error=true。
1. 对应的,我们设计自定义的url:登录http://localhost:8080/uia/login,登录错误http://localhost:8080/uia/login?error=true来取代。
2. 定义一个控制器来响应上面的登录请求
3. 编写登录页面,默认的输入参数name分别为username和password,自定义的话可以用类似.usernameParameter("usr").passwordParameter("pwd")方法来指定;
4. 修改配置类,重写configure(HttpSecurity http)方法,若啥也不写的话,默认配置为匿名访问所有资源。
5. 配置开放静态资源(/res/**)及及登录等(/uia/**),而其他请求都得认证;
6. 配置登录表单等请求;
7. 为简化复杂性,忽略csft防范!!! 切记,生产环境中不可忽略。spring4+默认启用csft,会拦截所有的POST请求,表现为提交登录表单无效。
    @Override
    protected void configure(HttpSecurity http) throws Exception {
        http
        .authorizeRequests()
            .antMatchers("/css/**", "/uia/**").permitAll()    //开放静态资源和登录等页面
            .anyRequest().authenticated()    //其他所有资源均需认证
            .and()
        .formLogin()    // 启用登录表单
            .loginPage("/uia/login")    //指定登录请求
            .failureUrl("/uia/login?error=true")    //指定登录失败请求
            //.usernameParameter("usr").passwordParameter("pwd")    //指定form中输入域input的name属性
        .and().csrf().disable()    //示例中为简化复杂性,忽略csft防范!!!切记,此项不可用于生产环境。
        ;
    }
Controller简单示例,其他如注册,找回密码等代码已移除。
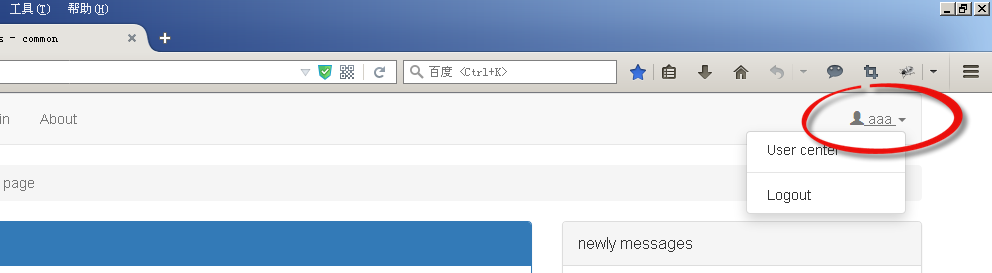
@RestController
@RequestMapping("/uia")
public class UiaController {

    @RequestMapping(value="/login")
    public ModelAndView login(){
        //TODO 处理些页面后台数据,例如:登录提示、错误原因等
        return new ModelAndView("loginView");
    }

    @RequestMapping("/logout")
    public ModelAndView logout(HttpServletRequest request, HttpServletResponse response){
        Authentication auth = SecurityContextHolder.getContext().getAuthentication();
        if (auth != null){
            new SecurityContextLogoutHandler().logout(request, response, auth);
        }
        return new ModelAndView("loginView");
    }
}
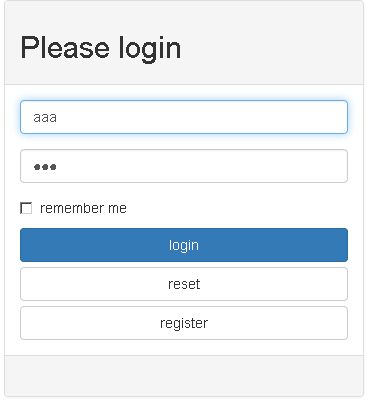
登录页loginView.html简单示例,在此使用了Thymeleaf模板,多余的如bootstrap代码均已移除。
!DOCTYPE html>
<html xmlns:th="http://www.thymeleaf.org">
<head>
<meta charset="utf-8">
<title>Login</title>
</head>
<body>
                <h2>Please login</h2>
                <form name="f" method="post" th:action="@{/uia/login}" >
                        <input type="text" name="username" placeholder="user name" />
                        <input type="password" name="password" placeholder="password" />
                    <input type="submit" value="login" />
                </form>
                <p><span th:if="${param.error}">登录失败</span></p>
</body>
</html>
注意:
form的action属性被th:action="@{/uia/login}所替代,这样,在post提交时,会自动补上sessionId。
最后,贴上完成的SecurityConfig.java代码
 1 @Configuration
 2 @EnableWebSecurity
 3 public class SecurityConfigB extends WebSecurityConfigurerAdapter{
 4
 5     @Override
 6     protected void configure(HttpSecurity http) throws Exception {
 7         http
 8         .authorizeRequests()
 9             .antMatchers("/css/**", "/uia/**").permitAll()    //开放静态资源和登录等页面
10             .anyRequest().authenticated()    //其他所有资源均需认证
11             .and()
12         .formLogin()    // 启用登录表单
13             .loginPage("/uia/login")    //指定登录请求
14             .failureUrl("/uia/login?error=true")    //指定登录失败请求
15             //.usernameParameter("usr").passwordParameter("pwd")    //指定form中输入域input的name属性
16         .and().csrf().disable()    //示例中为简化复杂性,忽略csft防范!!!切记,此项不可用于生产环境。
17         ;
18     }
19
20     @Override
21     protected void configure(AuthenticationManagerBuilder auth) throws Exception {
22         auth.userDetailsService(new UserDetailsService(){
23
24             @Override
25             public UserDetails loadUserByUsername(String username) throws UsernameNotFoundException {
26                 return findBy(username);    //findBy(username)仅是一个示例方法
27                 //return UserService.findByName(username);    //通常,应该用一个Serice来实现
28             }
29
30             // 示例方法findBy(username)
31             private UserDetails findBy(String username) {
32                 return new UserDetails(){
33
34                     private String username = "aaa";    //假定用户名为aaa
35                     private String password = "aaa";    //假定用户密码为aaa
36
37                     @Override
38                     public String getUsername() {
39                         return username;
40                     }
41
42                     @Override
43                     public String getPassword() {
44                         // 注意在此返回指定密码编译器编译的密文密码
45                         return new BCryptPasswordEncoder().encode(password);
46                     }
47
48                     //以上属性通常是自定义实体类User定义的
49                     //以下属性是User实现UserDetails接口必须的
50
51                     @Override
52                     public Collection<? extends GrantedAuthority> getAuthorities() {
53                         return java.util.Arrays.asList(new SimpleGrantedAuthority("USER"));
54                     }
55
56                     @Override
57                     public boolean isAccountNonExpired() {
58                         return true;    //默认账户未过期
59                     }
60
61                     @Override
62                     public boolean isAccountNonLocked() {
63                         return true;    //默认用户未被锁定
64                     }
65
66                     @Override
67                     public boolean isCredentialsNonExpired() {
68                         return true;    //默认证书未过期
69                     }
70
71                     @Override
72                     public boolean isEnabled() {
73                         return true;    //默认有效,即用户未被停用
74                     }};
75             }})
76         .passwordEncoder(new BCryptPasswordEncoder())        // 指定密码编译器
77         ;
78     }
79 }
请自行实现UserService服务,启用下面第27行代码:
把配置文件变成这样
@Configuration
@EnableWebSecurity
public class SecurityConfigC extends WebSecurityConfigurerAdapter{

    @Autowired
    UserService userService;

    @Override
    protected void configure(HttpSecurity http) throws Exception {
        http
        .authorizeRequests()
            .antMatchers("/res/**", "/uia/**").permitAll()    //开放静态资源和登录等页面
            .anyRequest().authenticated()    //其他所有资源均需认证
            .and()
        .formLogin()    // 启用登录表单
            .loginPage("/uia/login")    //指定登录请求
            .failureUrl("/uia/login?error=true")    //指定登录失败请求
            //.usernameParameter("usr").passwordParameter("pwd")    //指定form中输入域input的name属性
        //.and().csrf().disable()    //示例中为简化复杂性,忽略csft防范!!!切记,此项不可用于生产环境。
        ;
    }


    @Override
    protected void configure(AuthenticationManagerBuilder auth) throws Exception {
        auth.userDetailsService(new UserDetailsService(){

            @Override
            public UserDetails loadUserByUsername(String username) throws UsernameNotFoundException {
                return userService.findByName(username);    //通常,应该用一个Service来实现
            }

        })
        .passwordEncoder(new BCryptPasswordEncoder())        // 指定密码编译器
        ;
    }
}
至此,spring-security也算可以用起来了。