spring boot遵循“约定优于配置”的原则,使用annotation对一些常规的配置项做默认配置,减少或不使用xml配置,让你的项目快速运行起来。spring boot的神奇不是借助代码的生成来实现的,而是通过条件注解来实现的。
自动配置AutoConfiguration是实现spring boot的重要原理,理解AutoConfiguration的运行原理特别重要,自己写一个AutoConfiguration可以加深我们对spring boot的理解。
1、定义Type-safe Configuration Properties
@ConfigurationProperties("author")//1
public class AuthorPropertis {
    private static final String NAME = "pyj";

    private static final String PWD = "12324";

    private String name = NAME;//2

    private String pwd = PWD;

    private String[] arrayProps;//3

    private Properties properties = new Properties();//4

    private List<Map<String, Object>> listProp1 = new ArrayList();//5

    private List<String> listProp2 = new ArrayList();//6

    private Map<String, Object> mapProps = new HashMap();//7

    getter and setter...
}
1、@ConfigurationProperties映射application.yml以author为前缀的配置
2、author.name的默认值是pyj
3-7:对于容器对象的属性注入
2、定义一个简单的bean
public class HelloService {

    private String msg;
getter and setter...
}
注意:不用纠结HelloService的内容,它就是一个简单的bean。
3、定义AutoConfiguration
@Configuration//1
@ConditionalOnClass(HelloService.class)//2
@EnableConfigurationProperties(AuthorPropertis.class)//3
@ConditionalOnProperty(prefix = "author",value = "enabled",matchIfMissing = true)//4
public class AuthorAutoConfiguration {

    private final AuthorPropertis authorPropertis;

    public AuthorAutoConfiguration(AuthorPropertis authorPropertis) {//5
        this.authorPropertis = authorPropertis;
    }

    @Bean//6
    @ConditionalOnMissingBean(HelloService.class)//7
    public HelloService helloService() throws JsonProcessingException {
        HelloService helloService = new HelloService();
        helloService.setMsg(authorPropertis.getName() +" :" + authorPropertis.getPwd());

        ObjectMapper objectMapper = new ObjectMapper();
        System.out.println("arrayProps: " + objectMapper.writeValueAsString(authorPropertis.getArrayProps()));
        System.out.println("listProp1: " + objectMapper.writeValueAsString(authorPropertis.getListProp1()));
        System.out.println("listProp2: " + objectMapper.writeValueAsString(authorPropertis.getListProp2()));
        System.out.println("mapProps: " + objectMapper.writeValueAsString(authorPropertis.getMapProps()));
        System.out.println("Props: " + objectMapper.writeValueAsString(authorPropertis.getProperties()));
        return helloService;
    }
}
1、@Configuration声明为一个配置类
2、@ConditionalOnClass表示HelloService在类路径下的时候调用
3、@EnableConfigurationProperties使用AuthorPropertis的配置
4、@ConditionalOnProperty指定的author是否有默认值
5、注入AuthorPropertis
6-7、当不存在HelloService的bean时候,新建一个HelloService的bean
4、在spring.factories注册
org.springframework.boot.autoconfigure.EnableAutoConfiguration=
  com.github.gin.springboot.config.AuthorAutoConfiguration
在resources新建META-INF目录,再新建spring.factories,注册上AuthorAutoConfiguration,让spring boot知道为你自动配置。
如果不明白这个的原理,可以看看@EnableAutoConfiguration通过@Import({EnableAutoConfigurationImportSelector.class})来读取spring.factories
5、配置文件application.yml
debug: true

author:
  name: pyj
  pwd: 1234
  properties:
    reasonable: 'true'
    returnPageInfo: 'true'
  listProp1:
    - name: abc
      value: sgaw
    - name: efg
      value: sagsag
  listProp2:
    - config2Value1
    - config2Vavlue2
  mapProps:
    reasonable: true
    returnPageInfo: true
  arrayProps: 1,2,3,4,5
6、测试
@RestController
public class TestController {

    @Autowired
    HelloService helloService;

    @RequestMapping("/")
    public String index(){
        return "hello world!";
    }

    @RequestMapping("/hello")
    public String hello(){
        return helloService.getMsg();
    }
}
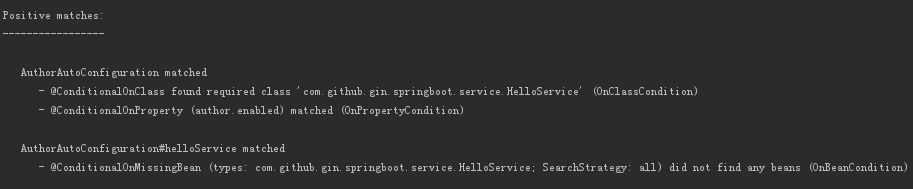
运行mvn spring-boot:run,如果看到结果,那么证明是没问题的

上面的AuthorPropertis 、HelloService 、AuthorAutoConfiguration 可以作为一个独立的starter pom为其他项目提供一个通用的服务。虽然spring boot覆盖了大部分的使用场景,但也不是全部都有,但我们也可以利用AutoConfiguration起到同样的效果。
实例代码地址:有爱自取