写在前面
因为找到了指导老师,现在准备开始学习目标检测的相关内容,目标检测有一个感性的认识还是比较简单的,但是每个目标检测更新换代的过程要自己实现和弄懂细节的话还是有点难度的。
这是一篇目标检测的入门摘要博客,写得非常不错,有一个感性的认识完全是够了。
通过基本的了解,我发现目标检测的基本过程过主要是候选区域的选择,然后图像的识别和边界框回归,不同的技术主要体现在避免使每个区域都训练(预测)一次的大量时间浪费,更加先进的是不在原图上进行候选区域的选择。所以说候选区域(Region Proposal)的选择就是基础,而selective search方法就是目标检测的的入门垫脚石。
Selective Search
算法步骤
- 算法输入:(彩色)图片
- 算法输出:不同大小的候选区域
- step1:使用2004年Felzenszwalb提出的基于图的图像分割算法生成基础的候选区域。具体论文解析博客,我的理解是将每个图片看作离散数学中的图,每个像素点相当于顶点,两两像素点之间的不相似性就是边,然后设定一个阈值(或者像论文中提出的自适应阈值)判断顶点是否相连,最后采用最小生成树算法,求出该图的多个连通分量,不同连通分量就可以表示图像的分割,同时是我们的需要的基本候选区域集合R,注意这里的R包含的是像素区域的最小矩形区域。
- step2:计算相邻区域之间的相似度,放入集合S中。这里相似度的计算稍后进行解释。
- step3:选择S中相似度最大的两个区域,ri、rj
- step4:合并两个区域,rt = ri U rj
- step5:移除S中和Si和Sj有关的相似度
- step6:计算rt与相邻区域的相似度并放入S中
- step7:R = R U rt (这里可以看出之前的区域ri、rj并没有删除,在算法结果中也可以明显得看到候选框是存在包含的,至于不删除的原因?)
- step8:若S不为空,返回step2,否则,返回R
贴出一张论文中的算法步骤:

相似度的计算
相似度分为四种,分别是颜色相似度、纹理相似度、尺寸相似度和交叠相似度,最终的相似度是四种的加权和。
颜色相似度
首先必须将RGB色彩空间转为HSV空间,然后对每个通道下的矩阵以bins = 25计算直方图,一共75个区间。接着进行归一化(除以区域尺寸),进行下面的计算:
| 式子 | 含义 |
|---|---|
| (r_i) | 第i个区域 |
| (c_i^k) | 第i个区域第k个区间的值 |
| (S_{colour}(r_i,r_j) = sum_{k=1}^nmin(c_i^k,c_j^k)) | 计算两个区域的相似度 |
如果两个区域的颜色相似,直方图的波峰和波谷的位置应该相同则S大,相似度高,否则如果波峰波谷错开并且每次都去最小值,那么S小,相似度低。同时这里可以发现,这里计算相似度的方法可以计算不同大小候选区域的相似度,我认为这是直方图的计算的优势同时也是为什么要做归一化的原因。
纹理相似度
- 论文采用方差为1的高斯分布在8个方向做梯度统计,然后将统计结果(尺寸与区域大小一致)以bins=10计算直方图。直方图区间数为8310=240(使用RGB色彩空间)。
(S_{texture} = sum^n_{k=1}min(t^k_i,t^k_j))
其中(t^k_i)表示第i个区域第k个bins的值。 - 在我看的代码中,使用的LBP(Local Binary Pattern)方法计算纹理相似度,具体博客地址,我的理解是其实和颜色相似度的计算方式类似,只是每个通道上每个像素点的值不是HSV空间的对应的值了,而是通过确定半径R和邻域像素点个数P来确定(具体见上述博客),这里就可以体现出"纹理"两字,然后接下来的方法是相同的,只是Bins可能不同。
尺寸相似度
贴出公式:(S_{size} = 1-frac{{size}_{ri}-{size}_{rj}}{{size_{im}}})
这是为了保证不会让大区域吃掉小区域,相近大小的区域优先合并,保证合并操作尺度均匀。
尺寸相似度(操作优先级)高 -> 低:两个区域尺寸较小且接近 -> 两个区域尺寸接近 -> 两个区域尺寸较小 -> 两个区域尺寸不接近
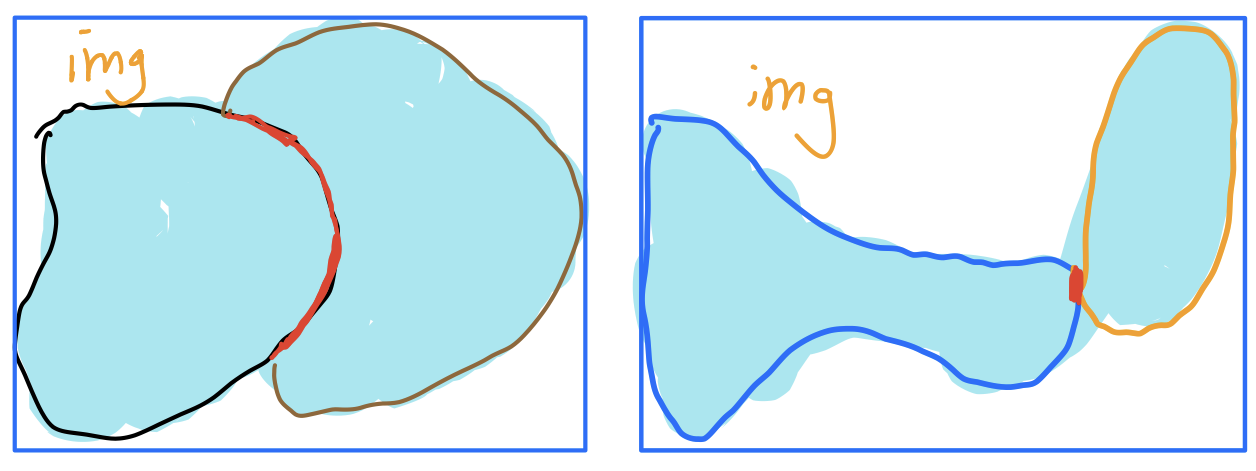
交叠相似度
(脑洞:这里我一看到这个,首先想到的是IOU,交并比,所以一开始理解错了,但是基础的候选框是不会重合的,只会交叠,下面举一个例子来说明)
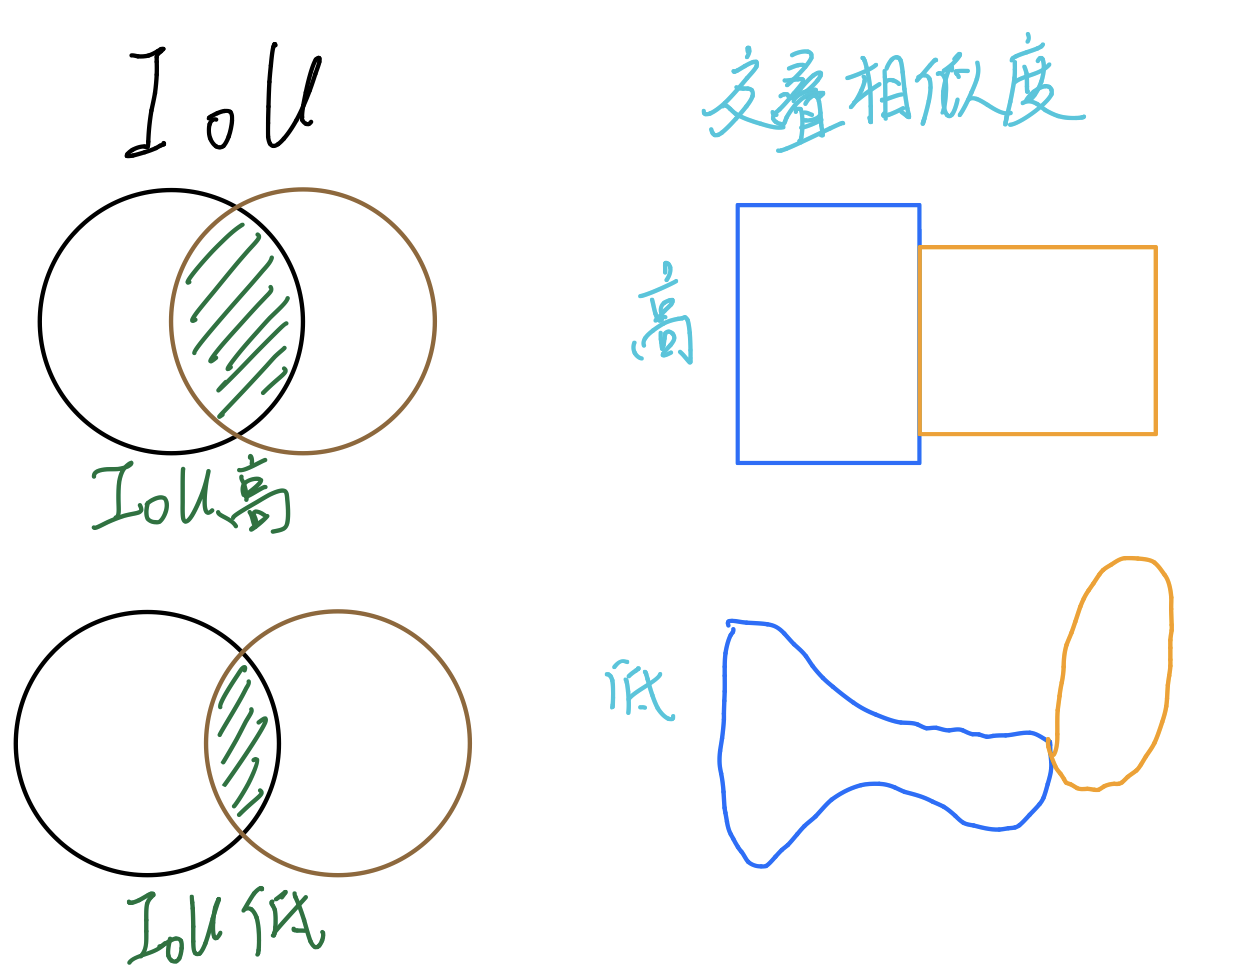
公式:(S_{fill}(r_i,r_j) = 1 - frac{size(BB_{ij})-size(r_i)-size(r_j)}{size(im)})
其中:(size(BB_{ij}))表示区域i、j最小外接矩阵面积,(size(r_i))表示第i个区域的像素面积
如果两个区域交叠程度高的话,交叠相似度高,分子部分就会很小,S大。下图可以说明:
算法运行结果展示
我就没好看的小姐姐图片了(doge
原始图片

使用Felzenszwalb图像分割后的掩码灰度图片

使用算法后的图像
- 产生较多候选框
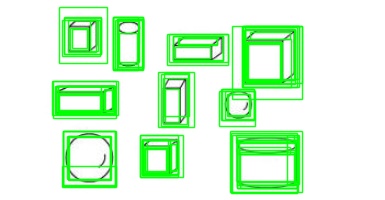
- 产生较少候选框

CODE
使用opencv的Python代码(观察结果)
'''
Usage:
    ./ssearch.py input_image (f|q)
    f=fast, q=quality
Use "l" to display less rects, 'm' to display more rects, "q" to quit.
'''

import sys
import cv2
import ipdb
if __name__ == '__main__':
    # If image path and f/q is not passed as command
    # line arguments, quit and display help message
    if len(sys.argv) < 3:
        print(__doc__)
        sys.exit(1)

    # speed-up using multithreads
    cv2.setUseOptimized(True)  # 使用优化
    cv2.setNumThreads(4)  # 开启多线程计算

    # ipdb.set_trace()
    # read image
    im = cv2.imread(sys.argv[1])  # 这张图片,默认是RGB格式
    # resize image
    newHeight = 200
    newWidth = int(im.shape[1]*200/im.shape[0])
    im = cv2.resize(im, (newWidth, newHeight))  # 裁剪图片

    # create Selective Search Segmentation Object using default parameters
    ss = cv2.ximgproc.segmentation.createSelectiveSearchSegmentation()

    # set input image on which we will run segmentation
    ss.setBaseImage(im)

    # Switch to fast but low recall Selective Search method
    if (sys.argv[2] == 'f'):
        ss.switchToSelectiveSearchFast()

    # Switch to high recall but slow Selective Search method
    elif (sys.argv[2] == 'q'):
        ss.switchToSelectiveSearchQuality()
    # if argument is neither f nor q print help message
    else:
        print(__doc__)
        sys.exit(1)

    # run selective search segmentation on input image
    rects = ss.process()
    print('Total Number of Region Proposals: {}'.format(len(rects)))

    # number of region proposals to show
    numShowRects = 100
    # increment to increase/decrease total number
    # of reason proposals to be shown
    increment = 50
    count = 1
    while True:
        # create a copy of original image
        imOut = im.copy()

        # itereate over all the region proposals
        for i, rect in enumerate(rects):
            # draw rectangle for region proposal till numShowRects
            if (i < numShowRects):
                x, y, w, h = rect
                cv2.rectangle(imOut, (x, y), (x+w, y+h), (0, 255, 0), 1, cv2.LINE_AA)
            else:
                break

        # show output
        cv2.imshow("Output", imOut)
        cv2.imwrite('{}.jpg'.format(count),imOut)
        count += 1
        # record key press
        k = cv2.waitKey(0) & 0xFF # 不允许超过256

        # m is pressed
        if k == 109:
            # increase total number of rectangles to show by increment
            numShowRects += increment
        # l is pressed
        elif k == 108 and numShowRects > increment:
            # decrease total number of rectangles to show by increment
            numShowRects -= increment
        # q is pressed
        elif k == 113:
            break

    # close image show window
    cv2.destroyAllWindows()
使用skimage的Python(利于理解)
# -*- coding: utf-8 -*-
from __future__ import division

import skimage.io
import skimage.feature
import skimage.color
import skimage.transform
import skimage.util
import skimage.segmentation
import numpy
import ipdb
import sys
import pandas as pd

# "Selective Search for Object Recognition" by J.R.R. Uijlings et al.
#
#  - Modified version with LBP extractor for texture vectorization


def _generate_segments(im_orig, scale, sigma, min_size):
    """
        segment smallest regions by the algorithm of Felzenswalb and
        Huttenlocher
    """

    # 打开图片,生成图片掩码指示端标签,表示该部分图片属于那一部分候选框
    im_mask = skimage.segmentation.felzenszwalb(
        skimage.util.img_as_float(im_orig), scale=scale, sigma=sigma,
        min_size=min_size)
    # pd.DataFrame(im_mask).to_excel('./mask.xlsx')
    # 让生成的初始候选框成为图片的第四通道
    im_orig = numpy.append(
        im_orig, numpy.zeros(im_orig.shape[:2])[:, :, numpy.newaxis], axis=2)
    im_orig[:, :, 3] = im_mask

    return im_orig


def _sim_colour(r1, r2):  # 颜色相似性
    """
        calculate the sum of histogram intersection of colour
    """
    return sum([min(a, b) for a, b in zip(r1["hist_c"], r2["hist_c"])])


def _sim_texture(r1, r2):  # 纹理相似性
    """
        calculate the sum of histogram intersection of texture
    """
    return sum([min(a, b) for a, b in zip(r1["hist_t"], r2["hist_t"])])


def _sim_size(r1, r2, imsize):  # 尺寸相似性
    """
        calculate the size similarity over the image
    """
    return 1.0 - (r1["size"] + r2["size"]) / imsize

'''
imsize:是整个图片大小
r1['size']:是候选区域大小
'''
def _sim_fill(r1, r2, imsize):  # 空间交叠相似性
    """
        calculate the fill similarity over the image
    """
    bbsize = (
        (max(r1["max_x"], r2["max_x"]) - min(r1["min_x"], r2["min_x"]))
        * (max(r1["max_y"], r2["max_y"]) - min(r1["min_y"], r2["min_y"]))
    )
    return 1.0 - (bbsize - r1["size"] - r2["size"]) / imsize
    # 两个区域交叠越大那么空间交叠相似性越高,那为什么要1减去?


def _calc_sim(r1, r2, imsize):  # 总相似性
    return (_sim_colour(r1, r2) + _sim_texture(r1, r2)
            + _sim_size(r1, r2, imsize) + _sim_fill(r1, r2, imsize))


def _calc_colour_hist(img):
    """
        calculate colour histogram for each region
        the size of output histogram will be BINS * COLOUR_CHANNELS(3)
        number of bins is 25 as same as [uijlings_ijcv2013_draft.pdf]
        extract HSV
    """

    BINS = 25
    hist = numpy.array([])

    for colour_channel in (0, 1, 2):

        # extracting one colour channel
        c = img[:, colour_channel]

        # calculate histogram for each colour and join to the result
        hist = numpy.concatenate(
            [hist] + [numpy.histogram(c, BINS, (0.0, 255.0))[0]])

    # L1 normalize
    hist = hist / len(img)

    return hist


def _calc_texture_gradient(img):
    """
        calculate texture gradient for entire image
        The original SelectiveSearch algorithm proposed Gaussian derivative
        for 8 orientations, but we use LBP instead.
        output will be [height(*)][width(*)]
    """
    ret = numpy.zeros((img.shape[0], img.shape[1], img.shape[2]))

    for colour_channel in (0, 1, 2):
        ret[:, :, colour_channel] = skimage.feature.local_binary_pattern(
            img[:, :, colour_channel], 8, 1.0)
    # 第一个参数是灰度矩阵,第二个是代表每个像素点选取周围的8的像素点编码,第三个参数是半径
    return ret


def _calc_texture_hist(img):
    """
        calculate texture histogram for each region
        calculate the histogram of gradient for each colours
        the size of output histogram will be
            BINS * ORIENTATIONS * COLOUR_CHANNELS(3)
    """
    BINS = 10

    hist = numpy.array([])

    for colour_channel in (0, 1, 2):

        # mask by the colour channel
        fd = img[:, colour_channel]

        # calculate histogram for each orientation and concatenate them all
        # and join to the result
        hist = numpy.concatenate(
            [hist] + [numpy.histogram(fd, BINS, (0.0, 1.0))[0]])

    # L1 Normalize
    hist = hist / len(img)

    return hist


def _extract_regions(img):

    R = {}

    # get hsv image转换成HSV颜色空间
    hsv = skimage.color.rgb2hsv(img[:, :, :3])

    # pass 1: count pixel positions
    # 通过遍历每个单元格,找出每个候选框的范围
    for y, i in enumerate(img):

        for x, (r, g, b, l) in enumerate(i):  # 表示一个单元格,四个通道

            # initialize a new region
            if l not in R:
                R[l] = {
                    "min_x": 0xffff, "min_y": 0xffff,
                    "max_x": 0, "max_y": 0, "labels": [l]}
            # 修改这个候选框的范围
            # bounding box
            if R[l]["min_x"] > x:
                R[l]["min_x"] = x
            if R[l]["min_y"] > y:
                R[l]["min_y"] = y
            if R[l]["max_x"] < x:
                R[l]["max_x"] = x
            if R[l]["max_y"] < y:
                R[l]["max_y"] = y

    # pass 2: calculate texture gradient 计算纹理梯度
    tex_grad = _calc_texture_gradient(img)

    # pass 3: calculate colour histogram of each region
    for k, v in list(R.items()):

        # colour histogram
        masked_pixels = hsv[:, :, :][img[:, :, 3] == k]  # 候选框为K的
        R[k]["size"] = len(masked_pixels / 4)
        R[k]["hist_c"] = _calc_colour_hist(masked_pixels)  # 每个候选框的颜色直方图向量

        # texture histogram
        R[k]["hist_t"] = _calc_texture_hist(tex_grad[:, :][img[:, :, 3] == k])  # 每个候选框的纹理直方图向量

    return R  # R中的每个元素包含了区域信息(min_x,min_y,max_x,max_y),size?,颜色和纹理直方图


def _extract_neighbours(regions):
    # 抽取相邻矩阵
    def intersect(a, b):  # 相交
        if (a["min_x"] < b["min_x"] < a["max_x"]
                and a["min_y"] < b["min_y"] < a["max_y"]) or (
            a["min_x"] < b["max_x"] < a["max_x"]
                and a["min_y"] < b["max_y"] < a["max_y"]) or (
            a["min_x"] < b["min_x"] < a["max_x"]
                and a["min_y"] < b["max_y"] < a["max_y"]) or (
            a["min_x"] < b["max_x"] < a["max_x"]
                and a["min_y"] < b["min_y"] < a["max_y"]):
            return True
        return False

    R = list(regions.items())
    neighbours = []
    for cur, a in enumerate(R[:-1]):
        for b in R[cur + 1:]:
            if intersect(a[1], b[1]):
                neighbours.append((a, b))

    return neighbours


def _merge_regions(r1, r2):
    new_size = r1["size"] + r2["size"]
    rt = {
        "min_x": min(r1["min_x"], r2["min_x"]),
        "min_y": min(r1["min_y"], r2["min_y"]),
        "max_x": max(r1["max_x"], r2["max_x"]),
        "max_y": max(r1["max_y"], r2["max_y"]),
        "size": new_size,
        "hist_c": (
            r1["hist_c"] * r1["size"] + r2["hist_c"] * r2["size"]) / new_size,
        "hist_t": (
            r1["hist_t"] * r1["size"] + r2["hist_t"] * r2["size"]) / new_size,
        "labels": r1["labels"] + r2["labels"]
    }
    return rt


def selective_search(
        im_orig, scale=1.0, sigma=0.8, min_size=50):
    '''Selective Search
    Parameters
    ----------
        im_orig : ndarray
            Input image
        scale : int
            Free parameter. Higher means larger clusters in felzenszwalb segmentation.
        sigma : float
            Width of Gaussian kernel for felzenszwalb segmentation.
        min_size : int
            Minimum component size for felzenszwalb segmentation.
    Returns
    -------
        img : ndarray
            image with region label
            region label is stored in the 4th value of each pixel [r,g,b,(region)]
        regions : array of dict
            [
                {
                    'rect': (left, top, width, height),
                    'labels': [...],
                    'size': component_size
                },
                ...
            ]
    '''
    assert im_orig.shape[2] == 3, "3ch image is expected"

    # load image and get smallest regions
    # region label is stored in the 4th value of each pixel [r,g,b,(region)]
    img = _generate_segments(im_orig, scale, sigma, min_size)

    if img is None:
        return None, {}

    imsize = img.shape[0] * img.shape[1]
    R = _extract_regions(img)  # R 是指候选区域

    # extract neighbouring information
    neighbours = _extract_neighbours(R)

    # calculate initial similarities
    S = {}
    for (ai, ar), (bi, br) in neighbours:
        S[(ai, bi)] = _calc_sim(ar, br, imsize)

    # hierarchal search
    while S != {}:

        # get highest similarity
        i, j = sorted(S.items(), key=lambda i: i[1])[-1][0]

        # merge corresponding regions
        t = max(R.keys()) + 1.0
        R[t] = _merge_regions(R[i], R[j])

        # mark similarities for regions to be removed
        key_to_delete = []
        for k, v in list(S.items()):
            if (i in k) or (j in k):
                key_to_delete.append(k)

        # remove old similarities of related regions
        for k in key_to_delete:
            del S[k]

        # calculate similarity set with the new region
        for k in [a for a in key_to_delete if a != (i, j)]:  # 新区域相邻的就是删除的那些相似度的区域
            n = k[1] if k[0] in (i, j) else k[0]
            S[(t, n)] = _calc_sim(R[t], R[n], imsize)

    regions = []
    for k, r in list(R.items()):
        regions.append({
            'rect': (
                r['min_x'], r['min_y'],
                r['max_x'] - r['min_x'], r['max_y'] - r['min_y']),
            'size': r['size'],
            'labels': r['labels']
        })
    # 生成的size和rect是不能完全对应的,size是由掩码求出来的,是一个完整的形状
    # rect只是粗略的矩形框,这一点可以从生成的mask.xlsx文件看出来
    return img, regions

if __name__ == '__main__':
    ipdb.set_trace()
    img = skimage.io.imread(sys.argv[1])
    img_lbl,regions = selective_search(img)
    skimage.io.imshow(img_lbl)