这里那些概念不说,主要是记录下spring cloud config配置中心的服务端和客户端的一个demo。
服务端即提供统一配置文件
客户端即从服务端读取配置
1.新建一个spring boot项目config-server(config服务端)
主要依赖:
<dependency>
    <groupId>org.springframework.cloud</groupId>
    <artifactId>spring-cloud-config-server</artifactId>
</dependency>
pom.xml文件如下:


<?xml version="1.0" encoding="UTF-8"?>
<project xmlns="http://maven.apache.org/POM/4.0.0" xmlns:xsi="http://www.w3.org/2001/XMLSchema-instance"
         xsi:schemaLocation="http://maven.apache.org/POM/4.0.0 http://maven.apache.org/xsd/maven-4.0.0.xsd">
    <modelVersion>4.0.0</modelVersion>
    <parent>
        <groupId>org.springframework.boot</groupId>
        <artifactId>spring-boot-starter-parent</artifactId>
        <version>2.1.1.RELEASE</version>
        <relativePath/> <!-- lookup parent from repository -->
    </parent>
    <groupId>com.example</groupId>
    <artifactId>config-server</artifactId>
    <version>0.0.1-SNAPSHOT</version>
    <name>config-server</name>
    <description>Demo project for Spring Boot</description>

    <properties>
        <java.version>1.8</java.version>
        <spring-cloud.version>Greenwich.RC1</spring-cloud.version>
    </properties>

    <dependencies>
        <dependency>
            <groupId>org.springframework.cloud</groupId>
            <artifactId>spring-cloud-config-server</artifactId>
        </dependency>

        <dependency>
            <groupId>org.springframework.boot</groupId>
            <artifactId>spring-boot-starter-test</artifactId>
            <scope>test</scope>
        </dependency>

        <dependency>
            <groupId>org.springframework.boot</groupId>
            <artifactId>spring-boot-starter-security</artifactId>
        </dependency>
    </dependencies>

    <dependencyManagement>
        <dependencies>
            <dependency>
                <groupId>org.springframework.cloud</groupId>
                <artifactId>spring-cloud-dependencies</artifactId>
                <version>${spring-cloud.version}</version>
                <type>pom</type>
                <scope>import</scope>
            </dependency>
        </dependencies>
    </dependencyManagement>

    <build>
        <plugins>
            <plugin>
                <groupId>org.springframework.boot</groupId>
                <artifactId>spring-boot-maven-plugin</artifactId>
            </plugin>
        </plugins>
    </build>

    <repositories>
        <repository>
            <id>spring-milestones</id>
            <name>Spring Milestones</name>
            <url>https://repo.spring.io/milestone</url>
        </repository>
    </repositories>

</project>
通过注解启用配置中心: @EnableConfigServer
package com.example.configserver;

import org.springframework.boot.SpringApplication;
import org.springframework.boot.autoconfigure.SpringBootApplication;
import org.springframework.cloud.config.server.EnableConfigServer;

@EnableConfigServer
@SpringBootApplication
public class ConfigServerApplication {

    public static void main(String[] args) {
        SpringApplication.run(ConfigServerApplication.class, args);
    }

}
修改配置文件: application.yml
server:
  port: 1201

spring:
  application:
    name: config-server
  cloud:
    config:
      server:
        git:
          # Git 仓库位置
          uri: https://github.com/gexiaoshan518/spring-cloud.git
          # 访问 Git 仓库的用户名
          username:
          # 访问 Git 仓库的密码
          password:
#          default-label: ${spring.profiles.active}
          # 仓库路径下相对搜索位置,可配置多个
          search-paths: 'config-server/src/main/resources/{application}'
          #force-pull: true
  #加密,配置用户名密码
  security:
    user:
      name: admin
      password: 123456
配置文件存放在gitHub上
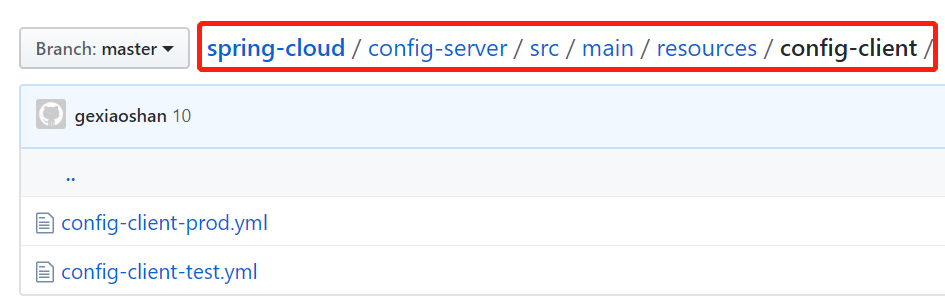
上面配的git地址(https://github.com/gexiaoshan518/spring-cloud.git),界面如下:

文件具体位置,在search-paths: 'config-server/src/main/resources/{application}' 路径下:
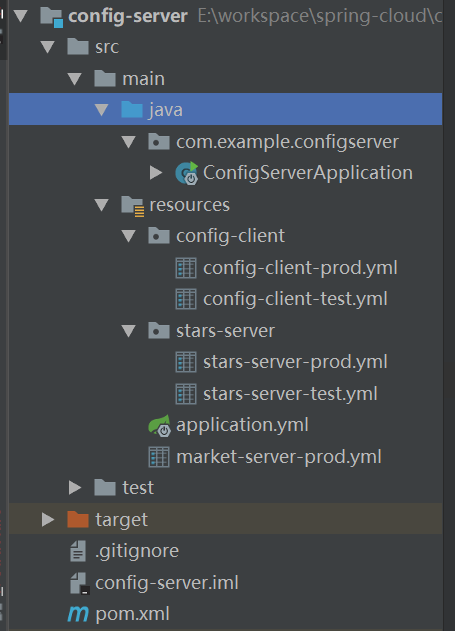
config-server结构如下:
项目推送到gitHub,启动
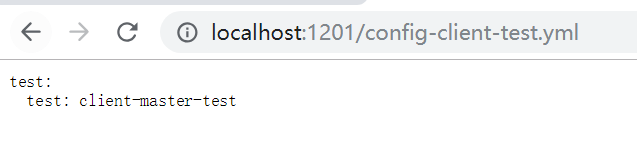
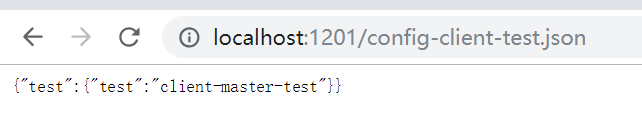
可按照以下规则访问配置信息:
/{application}/{profile}[/{label}]
/{application}-{profile}.yml
/{label}/{application}-{profile}.yml
/{application}-{profile}.properties
/{label}/{application}-{profile}.properties
各个占位符所代表的含义
- application: 表示微服务名称,即配置的spring.application.name
- profile: 表示当前的环境,local、feature、dev、test、prod
- label: 表示git仓库分支,feature、develop、test、master,当然默认的话是master
启动后,访问效果如下:


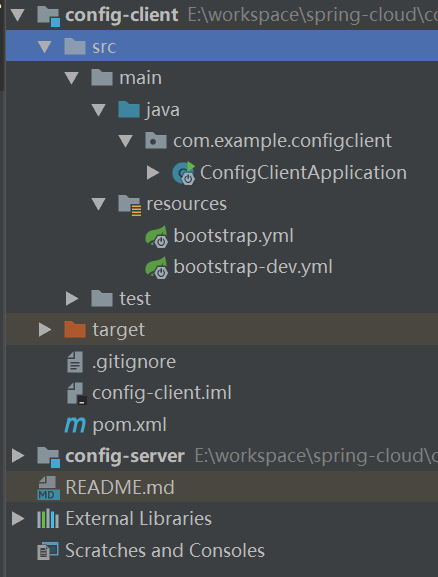
2.新建一个spring boot项目config-client(config客户端)
结构如下:
pom.xml配置如下:
<?xml version="1.0" encoding="UTF-8"?>
<project xmlns="http://maven.apache.org/POM/4.0.0" xmlns:xsi="http://www.w3.org/2001/XMLSchema-instance"
         xsi:schemaLocation="http://maven.apache.org/POM/4.0.0 http://maven.apache.org/xsd/maven-4.0.0.xsd">
    <modelVersion>4.0.0</modelVersion>
    <parent>
        <groupId>org.springframework.boot</groupId>
        <artifactId>spring-boot-starter-parent</artifactId>
        <version>2.1.1.RELEASE</version>
        <relativePath/> <!-- lookup parent from repository -->
    </parent>
    <groupId>com.example</groupId>
    <artifactId>config-client</artifactId>
    <version>0.0.1-SNAPSHOT</version>
    <name>config-client</name>
    <description>Demo project for Spring Boot</description>

    <properties>
        <java.version>1.8</java.version>
        <spring-cloud.version>Greenwich.RC1</spring-cloud.version>
    </properties>

    <dependencies>
        <dependency>
            <groupId>org.springframework.cloud</groupId>
            <artifactId>spring-cloud-starter-config</artifactId>
        </dependency>

        <dependency>
            <groupId>org.springframework.boot</groupId>
            <artifactId>spring-boot-starter-web</artifactId>
        </dependency>

        <dependency>
            <groupId>org.springframework.boot</groupId>
            <artifactId>spring-boot-starter-actuator</artifactId>
        </dependency>

        <dependency>
            <groupId>org.springframework.boot</groupId>
            <artifactId>spring-boot-starter-test</artifactId>
            <scope>test</scope>
        </dependency>
    </dependencies>

    <dependencyManagement>
        <dependencies>
            <dependency>
                <groupId>org.springframework.cloud</groupId>
                <artifactId>spring-cloud-dependencies</artifactId>
                <version>${spring-cloud.version}</version>
                <type>pom</type>
                <scope>import</scope>
            </dependency>
        </dependencies>
    </dependencyManagement>

    <build>
        <plugins>
            <plugin>
                <groupId>org.springframework.boot</groupId>
                <artifactId>spring-boot-maven-plugin</artifactId>
            </plugin>
        </plugins>
    </build>

    <repositories>
        <repository>
            <id>spring-milestones</id>
            <name>Spring Milestones</name>
            <url>https://repo.spring.io/milestone</url>
        </repository>
    </repositories>

</project>
配置bootstrap.yml 如下:
server:
  port: 8088

spring:
  application:
    name: config-client
  profiles:
    active: prod
  cloud:
    config:
      profile: ${spring.profiles.active}
      label: master
      uri: http://localhost:1201
      username: admin
      password: 123456
ConfigClientApplication代码如下:
package com.example.configclient;

import org.springframework.beans.factory.annotation.Value;
import org.springframework.boot.SpringApplication;
import org.springframework.boot.autoconfigure.SpringBootApplication;
import org.springframework.web.bind.annotation.RequestMapping;
import org.springframework.web.bind.annotation.RestController;

@SpringBootApplication
@RestController
public class ConfigClientApplication {


    public static void main(String[] args) {
        SpringApplication.run(ConfigClientApplication.class, args);
    }

    @Value("${test.test}")
    private String test;

    @RequestMapping("/test")
    public String getTest(){
        return test;
    }
}
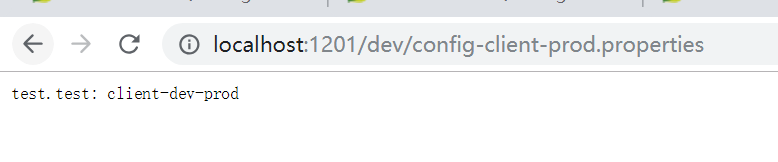
启动,访问http://localhost:8088/test,如下:

因配置中心中只配置了config-client的test和prod环境的配置文件,若客户端配置spring.profiles.active:dev
则会读取本项目下的bootstrap-dev.yml 配置文件中的配置
当仓库中的配置修改后,如何在不启动客户端服务的情况下,更新配置,下面介绍下refresh 手动刷新的方法。
在客户端添加依赖:
<dependency>
            <groupId>org.springframework.boot</groupId>
            <artifactId>spring-boot-starter-actuator</artifactId>
</dependency>
在需要加载变量的类上面加载@RefreshScope,在客户端执行/actuator/refresh的时候就会更新此类下面的变量值。
@RestController
@RefreshScope
public class TestController {

    @Value("${test.test}")
    private String test;

    @RequestMapping("/test")
    public String getTest(){
        return test;
    }
}
修改配置bootstrap.yml,添加如下配置:
management:
  endpoints:
    web:
      exposure:
        include: refresh
说明下我这里使用的springboot2.1
测试:
调用
curl -X POST http://localhost:8088/actuator/refresh
后,在调用接口,配置更新demo代码gitHub地址:https://github.com/gexiaoshan518/spring-cloud
欢迎扫码交流: