 Bump mapping is very much like Texture Mapping. However, where Texture Mapping added colour to a polygon, Bump Mapping adds, what appears to be surface roughness. This can have a dramatic effect on the look of a polygonal object. Bump Mapping can add minute detail to an object which would otherwise require a large number of polygons. Note that the polygon is still physically flat, but appears to a be bumpy.
Take a look at the cube on the left. If you look closely, you can see lots of detail on it. It looks as if it must have been made from millions of tiny polygons, but is made from just 6. You might ask how this differs from Texture Mapping. The difference is that a Bump Map is a Texture Map that responds to the direction of the light.
The theory behind Bump Mapping
ake a close look at a rough surface. From a distance, the only way you know it is rough is by the fact that it's brightness changes up and down across it's surface. Your brain can pick out these bright and dark patterns and interpret them as bumps on the surface.
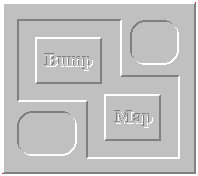
The little picture on the left illustrates this. You see what looks like an embossed surface. Some rectangles and letters have been pressed into it, but if you touch it, it just feels like the glass of your monitor.Nothing more has been done than change the brightness if the image in just the right places, your brain does the rest. This technique can be used to add real feeling to a polygon.
So how did I know which bits to make bright, and which to make dark? It's easy. Most people spend their lives in an environment where the main light source is above them (except us spods of course, whose main light source comes from the monitor). So surfaces angled upwards tend to be brightly lit, and downward inclined surfaces tend to be darker. Therefore it follows that if your eyes see light and dark areas on an object, they will interpret them as bumps; lighter bits it takes as up-facing, and darker bits it takes as down-facing. So, I just coloured the lines on the image accordingly.
As if you needed any more evidence, here is exactly the same image, but rotated 180 degrees. It appears to be the inverse of the previous one. Those areas that appeared to be pushed in, now seem to have popped out, and vice-versa.
Now, your brain is not entirely stupid. If you had visual evidence that the inverted image was lit from underneath, your brain would again interpret it as the first image. Infact, if you stare, and think hard enough about a light source comming from the bottom right, you can make that happen.
What is a Bump Map
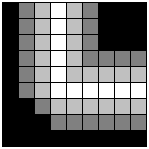
A bump map is very much like a texture map. However, rather than containing colours, it contains bumps. The most common way to represent bumps is by the height field method. A greyscaled texture map is used, where the brightness of each pixel represents how much it sticks out from the surface (see image on right). This is a very convenient way to store a bump map, and it's simple to make. How this information is used by the renderer will become apparent later.Of course, you needn't limit yourself to such simple patterns. You can have wood, stone, peeling paint, anything you want.

So how's it done
Bump mapping is an extension of the Phong Shading technique. In Phong Shading, the surface normal was interpolated over the polygon, and that vector was used to calculate the brightness of that pixel. When you add bump mapping, you are altering the normal vector slightly, based on information in the bump map. Adjusting the normal vector causes changes in the brightness of the pixels in the polygon. Simple.
Now, there are several ways of acheving this. I have never actually programmed real phong shading or bump mapping, only the fast versions (which work very nicely thankyou), so I am kind of making this next bit up as I go along. Bare with me.
OK, so we need a method for converting the height information on the bump map into vector adjustment information for the phong shader. This is not so hard to do, but it might be tricky to explain.
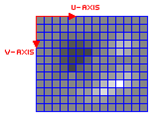
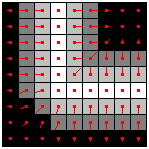
OK, so first you'll need a way to convert the bumps on the bumpmap into little vectors, one vector for each pixel. Take a look at the zoomed-in view of a bumpmap on the left. The lighter pixels stick out more than the darker ones. Get the picture? Now, for each pixel, a vector must be computed. These vectors represent the incline of the surface at that pixel. The picture on the right represents this. The little red vectors point in the 'downhill' direction.
There are many ways to calculate these vectors. Some are more accurate than others, but it depends exactly what you mean by accurate. One of the most common methods is to calculate the X and Y gradient at that pixel:
x_gradient = pixel(x-1, y) - pixel(x+1, y)
y_gradient = pixel(x, y-1) - pixel(x, y+1)
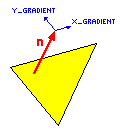
 With these two gradients, you will now need to adjust the normal vector of the polygon at that point.Here is the polygon, with it's origional normal vector, n. Also shown are the two vectors which are going to be used to adjust the normal vector for this pixel. The two vectors must be aligned with the bumpmap for the polygon to be rendered correctly. I.E. the vectors are parallel to the axes of the bumpmap.
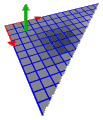
On the right are the bump map, and the polygon. Both pictures show the U and V vectors.
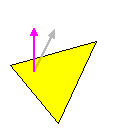
Now you can see the new Normal vector after adjustment. The adjustment is simply:
New_Normal = Normal + (U * x_gradient) + (V * y_gradient)
With this New_Normal vector, you can procede to calculate the brightness of the polygon at that point, using the usual phong shading technique.