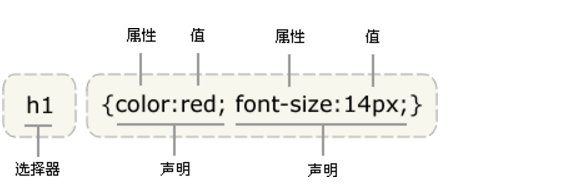
1 css 基础语法:
2 派生选择器
li strong {
    font-style: italic;
    font-weight: normal;
  }
<p><strong>我是粗体字,不是斜体字,因为我不在列表当中,所以这个规则对我不起作用</strong></p>

<ol>
<li><strong>我是斜体字。这是因为 strong 元素位于 li 元素内。</strong></li>
<li>我是正常的字体。</li>
</ol>
3 css id 选择器
3.1选择器用#来定义
#red {color:red;}
#green {color:green;}
<p id="red">这个段落是红色。</p>
<p id="green">这个段落是绿色。</p>
3.2 id派生选择器
#sidebar p {
    font-style: italic;
    text-align: right;
    margin-top: 0.5em;
    }
html中虽然有id=sidebar的选项,但只有其中为<p>标签被样式了
3.3 基于类的单独选择器
div#sidebar {
    border: 1px dotted #000;
    padding: 10px;
    }
4 css类选择器
4.1用一个. 来表示, 想当于*(通配符).
.center {text-align: center}
<h1 class="center">
This heading will be center-aligned
</h1>
<p class="center">
This paragraph will also be center-aligned.
</p>
4.2 也可以用作派生
.fancy td {
    color: #f60;
    background: #666;
    }
4.3 还可以用作基于类的选择
td.fancy {
    color: #f60;
    background: #666;
    }
5 css属性选择器
5.1属性选择器
[title]
{
color:red;
}
5.2 属性和值的选择器
[title=W3School]
{
border:5px solid blue;
}
5.3 属性和多值的选择器
[title~=hello] { color:red; }
包含hello字符串的所有title标签都会被样式
6 css的创建
6.1外部样式表
<head>
<link rel="stylesheet" type="text/css" href="mystyle.css" />
</head>
用到<link>标签
然后在mystyle.css中定义样式
hr {color: sienna;}
p {margin-left: 20px;}
body {background-image: url("images/back40.gif");}
6.2 内部样式表
<head>
<style type="text/css">
  hr {color: sienna;}
  p {margin-left: 20px;}
  body {background-image: url("images/back40.gif");}
</style>
</head>
使用到<style>标签
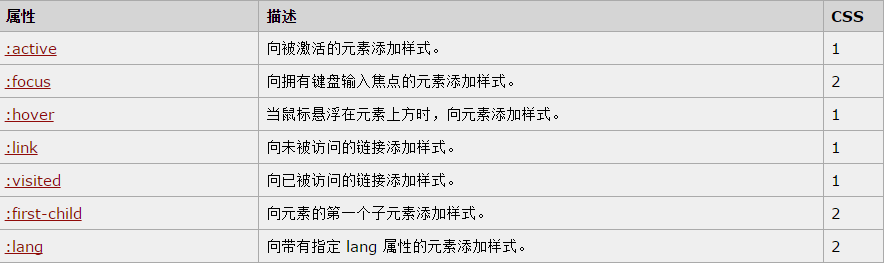
7 伪类与伪元素
7.1 伪类,下面实例:
<html>
<head>
<style type="text/css">
p:first-child i {
  color:blue;
  }
</style>
</head>

<body>
<p>some <i>text</i>. some <i>text</i>.</p>
<p>some <i>text</i>. some <i>text</i>.</p>
</body>
</html>
对这个css进行解释:<p>的伪类first-child下的<i>标签会有样式,而这个first-child表示第一次出现的标签。总之就是省去了class属性
7.2 伪元素 下面实例:
p.article:first-letter
  {
  color: #FF0000;
  }

<p class="article">This is a paragraph in an article。</p>
这个html的表示在<p>标签下class='article'会有first-letter特点
