一,shopList组件,从store获取数据,填充模板
 mounted() {
    this.$store.dispatch('getShops')
  },

  computed: {
    ...mapState(['shops'])
  }
二,使用svg显示加载中提示页面,如果数据还没回来,可用svg图片过渡下,需要用v-if判断

在msite中的轮播图使用
   <!--首页导航-->
    <nav class="msite_nav">
      <div class="swiper-container" v-if="categorys.length">
        <div class="swiper-wrapper">
          <div
            class="swiper-slide"
            v-for="(c1, index) in categorysArr"
            :key="index"
          >
            <a
              href="javascript:"
              class="link_to_food"
              v-for="(c2, index) in c1"
              :key="c2.id"
            >
              <div class="food_container">
                <img :src="baseImageUrl + c2.image_url" />
              </div>
              <span>{{ c2.title }}</span>
            </a>
          </div>
        </div>
        <!-- Add Pagination -->
        <div class="swiper-pagination"></div>
      </div>

      <div v-else>
        <img src="./images/msite_back.svg" alt="">
      </div>
    </nav>
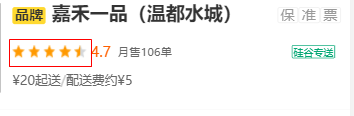
在shopLIst中使用

三,从shopList组件中拆分Start子组件
需要传递size和评分score
  <section class="shop_rating_order">
              <section class="shop_rating_order_left">
                <!-- 星星组件 -->
                <Start :size="4" :score="shop.rating"></Start>
                <div class="rating_section">
                  {{shop.rating}}
                </div>
子组件利用props接收,通过score来判断on,half,off类名的个数,组成一个数组,然后去模板遍历
<template>
  <div class="star " :class="`start-${size}`">
    <span
      class="star-item "
      v-for="(startClass, index) in startClasss"
      :key="index"
      :class="startClass"
    ></span>
    <!-- <span class="star-item on"></span>
    <span class="star-item on"></span>
    <span class="star-item half"></span>
    <span class="star-item off"></span> -->
  </div>
</template>

<script>
// 星星的类名思路, on类需要判断分数的整数部分, half需要判断分数的小数部分,并且小数大于0.5,只有一个,
// off需要分数的小数部分,个数是on+half<5,循环下  span是需要遍历的,定义一个类的数组(长度是5),符合条件的push一下,根据score计算属性
const classOn = 'on'
const classHalf = 'half'
const classOff = 'off'
export default {
  name: 'Start',
  data() {
    return {}
  },
  props: ['size', 'score'],

  computed: {
    startClasss() {
      const { score } = this
      // 定义一个空数组,符合条件的需要push
      const arr = []
      // 添加on类
      const scoreZS = Math.floor(score)
      for (let i = 0; i < scoreZS; i++) {
        arr.push(classOn)
      }
      // 添加half类
      if (score * 10 - scoreZS * 10 > 5) {
        arr.push(classHalf)
      }
      // 添加off类
      while (arr.length < 5) {
        arr.push(classOff)
      }

      return arr
    }
  }
}
</script>
四,登录login组件,关于登录方式切换功能
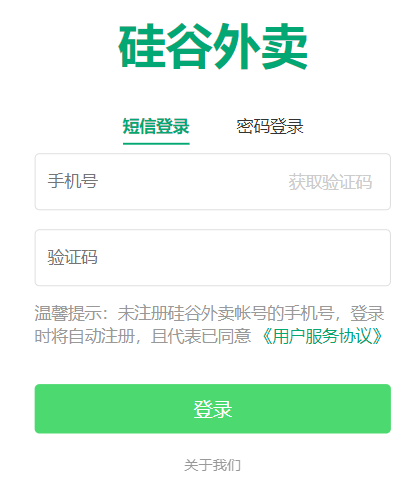
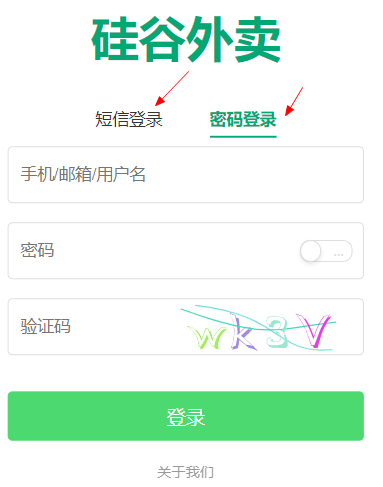
4.1,点击短信登录标题,出现下划线,并且切换到短信登录栏,密码登录也是如此
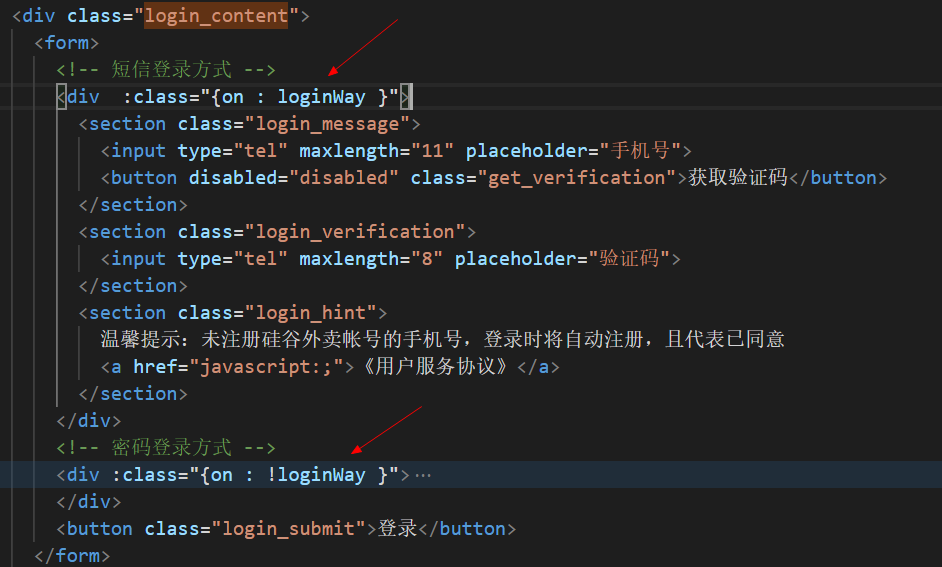
登录标题的下划线通过on类名来控制的, 短信登录form组件和密码登录fom组件也是根据onl类名来控制的,此时我们需要定义一个标识变量
 .login_header_title
            padding-top 40px
            text-align center
            >a
              color #333
              font-size 14px
              padding-bottom 4px
              &:first-child
                margin-right 40px
              &.on
                color #02a774
                font-weight 700
                border-bottom 2px solid #02a774
 .login_content
          >form
            >div
              display none
              &.on
                display block
              input
                width 100%
                height 100%
 data() {
        return {
          // 定义一个变量标识
          loginWay: true
        };
    },
 <div class="login_header_title">
            <a href="javascript:;" :class="{on : loginWay }"  @click="loginWay = true">短信登录</a>
            <a href="javascript:;" :class="{on : !loginWay }"  @click="loginWay = false">密码登录</a>
          </div>
4.2,输入格式正确的手机号,获取验证码自动高亮(需要用到正则)

根据登录接口请求收集参数,并且根据输入的手机号利用正则进行匹配,是否正确,然后通过自定义类名right_phone,来改变颜色
  data() {
        return {
          // 定义一个变量标识
          loginWay: true,
          phone:'',
        };
    },
// 计算手机号是否正确
    computed:{
      rightPhone(){
        // 布尔值
         return /^1d{10}$/.test(this.phone)
      }
    }
类名配置
  .get_verification
                  position absolute
                  top 50%
                  right 10px
                  transform translateY(-50%)
                  border 0
                  color #ccc
                  font-size 14px
                  background transparent
                  &.right_phone
                    color black
disable属性也要根据rightPhone动态绑定
<form>
            <!-- 短信登录方式 -->
            <div  :class="{on : loginWay }">
              <section class="login_message">
                <input type="tel" maxlength="11" placeholder="手机号" v-model="phone">
                <button :disabled="!rightPhone" class="get_verification" :class="{right_phone : rightPhone}"
                >{{ 获取验证码}}</button>
              </section>
4.3,点击验证码按钮,实现30秒倒计时功能
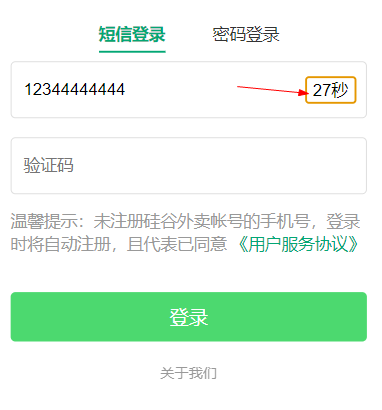
// 点击验证码,开始30秒倒计时
// 1.先定义一个倒计时变量computeTime,模板用三元表达式判断是倒计时还是请输入验证码
// 2.点击验证码,写一个循环倒计时逻辑,另外必须要是没有在倒计时的时候写循环倒计时逻辑
  data() {
        return {
          // 定义一个变量标识
          loginWay: true,
          computeTime:0,  //倒计时标识时间
          phone:'',
        };
点击form表单的任何一个按钮,都会提交表单,刷新页面,需要禁止默认行为
 <form>
            <!-- 短信登录方式 -->
            <div  :class="{on : loginWay }">
              <section class="login_message">
                <input type="tel" maxlength="11" placeholder="手机号" v-model="phone">
                <button :disabled="!rightPhone" class="get_verification" :class="{right_phone : rightPhone}"
                @click.prevent="getCode">{{computeTime>0 ? `${computeTime}秒` : '获取验证码'}}</button>
              </section>
 // 点击验证码,倒计时
      getCode(){
        // alert('---')
        // 需要在没倒计时的时候才可以启动倒计时
        if(this.computeTime ===0){
           this.computeTime = 30
            const timer =   setInterval(()=>{
              this.computeTime--
              if(this.computeTime ===0){
                clearInterval(timer)
              }
            },1000)
        }

      }
4.4,在 密码登录栏,密码框点击切换按钮,密码明文暗文切换
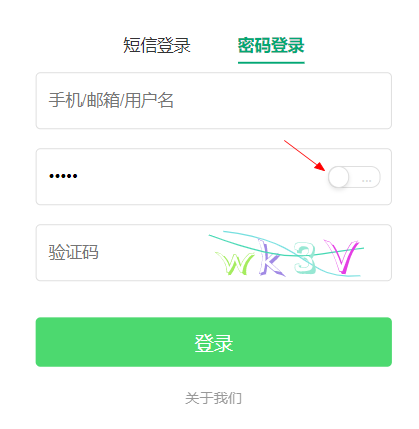
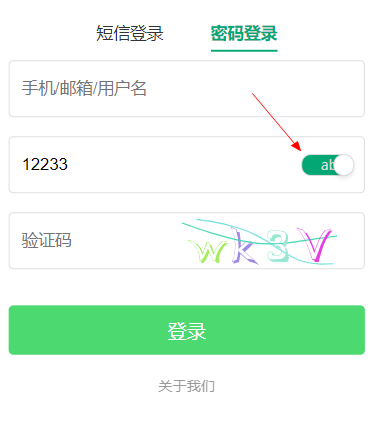
定义一个变量标识,判断是明文还是暗文框
    data() {
        return {
          // 定义一个变量标识
          loginWay: false,
          computeTime:0,  //倒计时标识
          showPwd:false, //暗文和明文标识
          phone:'',
          pwd: ''
        };
    },
下面的类名动态切换也需要根据showPwd来判断
 </div>
            <!-- 密码登录方式 -->
            <div :class="{on : !loginWay }">
              <section>
                <section class="login_message">
                  <input type="tel" maxlength="11" placeholder="手机/邮箱/用户名">
                </section>
                <section class="login_verification">
                  <input type="text" maxlength="8" placeholder="密码" v-if="showPwd" v-model="pwd">
                  <input type="password" maxlength="8" placeholder="密码" v-else v-model="pwd">
                  <div class="switch_button " :class="showPwd ? 'on' : 'off'" @click="showPwd = !showPwd">
                    <div class="switch_circle" :class="{right : showPwd}"></div>
                    <span class="switch_text">{{showPwd ? 'abc': '...' }} </span>
                  </div>
                </section>
 >.switch_circle
                    //transform translateX(27px)
                    position absolute
                    top -1px
                    left -1px
                    width 16px
                    height 16px
                    border 1px solid #ddd
                    border-radius 50%
                    background #fff
                    box-shadow 0 2px 4px 0 rgba(0,0,0,.1)
                    transition transform .3s
                    &.right
                      transform translateX(27px)
 .switch_button
                  font-size 12px
                  border 1px solid #ddd
                  border-radius 8px
                  transition background-color .3s,border-color .3s
                  padding 0 6px
                  width 30px
                  height 16px
                  line-height 16px
                  color #fff
                  position absolute
                  top 50%
                  right 10px
                  transform translateY(-50%)
                  &.off
                    background #fff
                    .switch_text
                      float right
                      color #ddd
                  &.on
                    background #02a774
4.5,对表单中短信登录栏或者密码登录栏进行表单验证
判断是否是短信登录还是密码登录,然后判断各个输入框的值
警告提示框组件(alertTip)已经写好,在login组件中引入即可
<template>
  <div class="alert_container">
    <section class="tip_text_container">
      <div class="tip_icon">
        <span></span>
        <span></span>
      </div>
      <p class="tip_text">{{alertText}}</p>
      <div class="confrim" @click="closeTip">确认</div>
    </section>
  </div>
</template>

<script>
  export default {
    props: {
      alertText: String
    },

    methods: {
      closeTip() {
        // 分发自定义事件(事件名: closeTip)
        this.$emit('closeTip')
      }
    }
  }
</script>
 <!-- 警告框 -->
      <AlertTip :alertText="alertText" v-show="alertShow" @closeTip="closeTip"></AlertTip>
定义属性
 <div class="login_content">
          <form @submit.prevent="login">
            <!-- 短信登录方式 -->
  data() {
        return {

          loginWay: true, // 定义一个变量标识,是否是短信或者用户名登录
          computeTime:0,  //倒计时标识
          showPwd:false, //暗文和明文标识
          phone:'', //手机号
          pwd: '', //短信验证码
          code:'', //手机验证码
          name:'', //用户名
          captcha:'', //图形验证码
          alertText:'',  //警告框文本
          alertShow : false  //警告框是否显示
        };
    },
   // 警告框提示
      showAlert(text){
        this.alertText = text
        this.alertShow = true
      },

      // 异步登录功能
      login(){
        const {phone, pwd, rightPhone,code,name,captcha} =this
        if(this.loginWay){
          // 短信验证栏
          if(!rightPhone){
            // 手机号错误,提示
            this.showAlert('手机号错误')

          }else if(!/^d{6}$/.test(code)){
            // 验证码有误,提示
            this.showAlert('验证码有误')
          }
        }else{
          // 用户名登录栏
          if(!name){
            // 指定用户名,提示
            this.showAlert('需指定用户名')
          }else if(!pwd){
            // 指定密码,提示
            this.showAlert('需指定密码')

          }else if(!captcha){
            // 指定图片验证码,提示
            this.showAlert('需指定图片验证码')

          }

        }
      },

      // 监听到子组件alerttip
      closeTip(){
        this.alertShow = false
     this.alertText  = ''

      }
4.6, 密码登录栏,点击图片验证码,跟换图形验证码
获取到的src属性,路径需要及时跟新(query参数),用时间来控制就可以,不然每次点击都是同一个路径,不会跟换图形验证码
 <section class="login_message">
                  <input type="text" maxlength="11" placeholder="验证码" v-model="captcha">
                  <img class="get_verification" ref="captcha" src="http://localhost:4000/captcha" alt="captcha" @click="getCaptcha">
                </section>
// 获取一个新的图片验证码
      getCaptcha () {
        // 每次指定的src要不一样,没有发ajax请求,不存在跨域
        this.$refs.captcha.src = 'http://localhost:4000/captcha?time='+Date.now()
      }
4.7,在短信登录栏,点击短信验证码,发送获取收集验证码的请求
在容联,云通讯注册个账号,提供测试短信服务,后台去配置account_sid, auth_token, appId三个值
在main.js,引入api接口函数文档,将他挂载到Vue的原型上,以便组件内部可以直接获取接口函数
import * as API from '@/api'

new Vue({
  beforeCreate() {
    Vue.prototype.$API = API
  },
  router,
  render: h => h(App),
  store
}).$mount('#app')
将倒计时挂载在this上,以便不在作用域内也可操作
 // 点击验证码,倒计时
      async  getCode(){
        // alert('---')
        // 需要在没倒计时的时候才可以启动倒计时
        if(this.computeTime ===0){
           this.computeTime = 30
            this.timer =   setInterval(()=>{
              this.computeTime--
              if(this.computeTime ===0){
                clearInterval(timer)
              }
            },1000)
        }

        // 发送请求获取验证码
        const result = await  this.$API.reqSendCode(this.phone)
        // 发送失败,结束倒计时
        if(result.code ===1){
          alert(result.msg)
          // 发送成功,终止计时器
        this.computeTime = 0
        clearInterval(this.timer)
        this.timer = null
        }
      },
4.8,短信登录和用户密码登录发送请求,获取数据
注:
1,对于短信验证登录,我们发送请求后,需要对短信验证码的倒计时清除
2.对于用户密码登录,发送请求后,如果请求失败,我们需要重新调用图形验证码函数,获取新的图形验证码,并且弹出警告框
  // 异步登录功能
    async login() {
      const { phone, pwd, rightPhone, code, name, captcha } = this
      let result
      if (this.loginWay) {
        // 短信验证栏
        if (!rightPhone) {
          // 手机号错误,提示
          this.showAlert('手机号错误')
          return
        } else if (!/^d{6}$/.test(code)) {
          // 验证码有误,提示
          this.showAlert('验证码有误')
          return
        }

        // 发送登录请求
        result = await this.$API.reqSmsLogin(phone, code)
      } else {
        // 用户名登录栏
        if (!name) {
          // 指定用户名,提示
          this.showAlert('需指定用户名')
          return
        } else if (!pwd) {
          // 指定密码,提示
          this.showAlert('需指定密码')
          return
        } else if (!captcha) {
          // 指定图片验证码,提示
          this.showAlert('需指定图片验证码')

          return
        }

        // 发送密码登录请求
        result = await this.$API.reqPwdLogin({ name, pwd, captcha })
      }

      // 发送请求不论成功还是失败,都需要清空计时器
      if (this.computeTime) {
        this.computeTime = 0
        clearInterval(this.timer)
        this.timer = null
      }

      // 获取数据
      if (result.code === 0) {
        // console.log(result.data)
        this.user = result.data
      } else {
        //调用警告框
        this.showAlert(result.msg)
        //  验证码错误,发送请求失败,重新获取图形验证码
        this.getCaptcha()
      }
    },
 // 获取一个新的图片验证码
    getCaptcha() {
      // 每次指定的src要不一样,没有发ajax请求,不存在跨域
      this.$refs.captcha.src =
        'http://localhost:4000/captcha?time=' + Date.now()
    }
4.8, 登录成功后,需要将用户信息保存在vuex中,并且跳转到profile我的组件中

在vuex中接收数据
actions
 // 保存登录用户信息
  recordUser({ commit }, user) {
    commit('RECEIVE_USER_INFO', user)
  }
mutions
 RECEIVE_USER_INFO(state, user) {
    state.userInfo = user
  }
states
const state = {
  latitude: 40.10038, // 纬度
  longitude: 116.36867, // 经度
  address: {}, //地址相关信息对象
  categorys: [], // 食品分类数组
  shops: [], // 商家数组
  userInfo: {}, // 用户信息
在profile我的组件中,填充数据
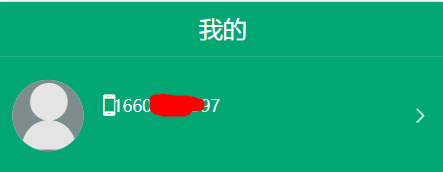
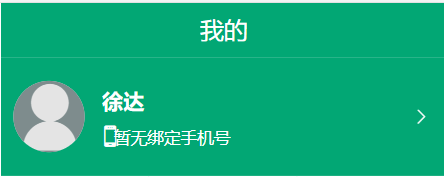
1.短信登录,用户信息有手机号
2.用户密码登录,用户信息有用户名,需要去判断
<div class="user-info">
            <p class="user-info-top" v-if="!userInfo.phone">{{userInfo.name || '登录/注册' }}</p>
            <p >
              <span class="user-icon">
                <i class="iconfont icon-shouji icon-mobile"></i>
              </span>
              <span class="icon-mobile-number">{{userInfo.phone || '暂无绑定手机号'}}</span>
            </p>
          </div>
4.9, 登录成功后,在首页组件msite中涉及到用户信息,也要改造下页面
1.没有登录成功,跳转到登录页面,登录成功,跳转到userinfo页面
2.登录成功,显示头像图标,没登录成功,显示登录|注册
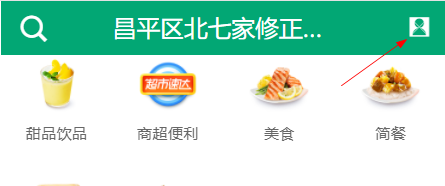

  <template>
        <router-link class="header_search" slot="left" to="/search">
          <i class="iconfont icon-sousuo"></i>
        </router-link>

        <router-link class="header_login" slot="right" :to="userInfo._id ? '/userinfo' : '/login'">
          <span class="header_login_text" v-if="!userInfo._id">登录|注册</span>
          <span class="header_login_text" v-else>
            <i class="iconfont icon-person"></i>
            </span>
        </router-link>
4.10, 实现自动登录功能,用户登录成功后,但是刷新浏览器,登录信息都会失去
方法一:
将登录信息保存在sessionStorage中,然后在store的state中读取

  // 用户信息
  userInfo: JSON.parse(window.sessionStorage.getItem('USER')) || {},
actons中
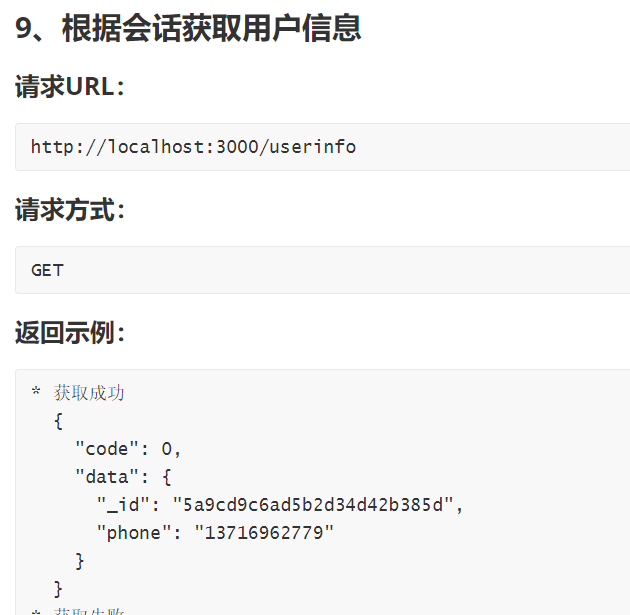
 // 保存登录用户信息
  recordUser({ commit }, user) {
    commit('RECEIVE_USER_INFO', user)
  },

  // 异步获取用户信息
  async getUserInfo({ commit }) {
    const result = await reqUserInfo()
    if (result.code === 0) {
      const user = result.data
      commit('RECEIVE_USER_INFO', user)
    }
  }
states
userInfo: {},
然后在app的mouted中diapatch下
mounted(){
    this.$store.dispatch('getAddress')

    this.$store.dispatch('getUserInfo')
  },
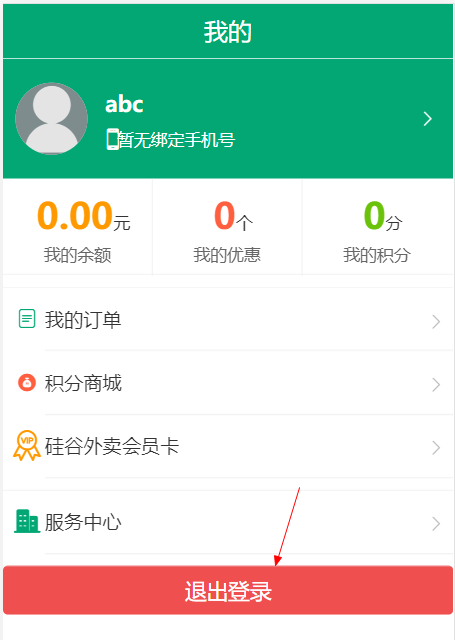
4.11, 在profile我的组件中,有一个退出登录按钮(已经登录才有),需要用到mint-ui插件,
点击退出登录按钮,清空用户信息
安装mint-ui, npm i mint-ui -S
实现按需打包,在babel.config.js配置
module.exports = {
  presets: ['@vue/cli-plugin-babel/preset'],

  plugins: [
    '@babel/plugin-transform-runtime',
    '@babel/plugin-proposal-class-properties',
    [
      'component',
      {
        libraryName: 'mint-ui',
        style: true
      }
    ]
  ]
}
新建plugin文件夹,新建index.js,
import Vue from 'vue'
import { Button,MessageBox,Toast } from 'mint-ui'

// Vue.use(Button)
Vue.component(Button.name, Button)
Vue.prototype.$MessageBox = MessageBox
Vue.prototype.$Toast = Toast
然后在main.js中引入
// 引入mint
import './plugin/mint.js'
在profile组件中
<!-- 退出登录按钮 -->
      <section class="profile_my_order border-1px">
        <mt-button
          type="danger"
          style=" 100%"
          v-if="userInfo._id"
          @click="logout"
          >退出登录</mt-button
        >
      </section>
退出逻辑,dispatch到vuex中actions
  // 点击退出登录,cancel(取消按钮),confirm(确定按钮)
    async logout() {
      // catch捕捉取消按钮时的报错
      let r = await this.$MessageBox.confirm('确定退出?').catch(error => error)
      // console.log(r)
      if (r === 'confirm') {
        this.$store.dispatch('logout')
        this.$Toast('登出完成')
      } else if (r === 'cancel') {
        this.$Toast('已取消登录')
      }
    }
 // 退出登录
  async logout({ commit }) {
    // 退出登录请求
    const result = await reqLogout()
    if (result.code === 0) {
      commit('RESET_USER_INFO')
    }
  }
RESET_USER_INFO(state) {
    state.userInfo = {}
  }