一,home组件,侧边栏静态页面搭建,
1.1。去element-ui找组件
按需引入element组件
import Vue from 'vue'
import {
  Button,
  Form,
  FormItem,
  Input,
  Message,
  Container,
  Header,
  Aside,
  Main,
  Menu,
  Submenu,
  MenuItemGroup,
  MenuItem
} from 'element-ui'

Vue.prototype.$message = Message
Vue.use(Button)
Vue.use(Form)
<template>
  <el-container>
    <!-- 头部 -->
    <el-header>
      <div>
        <img src="../assets/heima.png" alt="" />
        <span>电商管理后台</span>
      </div>
      <el-button type="primary" size="default" @click="logout">退出</el-button>
    </el-header>
    <!-- 页面主体区域 -->
    <el-container>
      <!-- 侧边栏 -->
      <el-aside width="200px">
        <!-- 侧边栏菜单区域 -->
        <el-menu
          background-color="#545c64"
          text-color="#fff"
          active-text-color="#ffd04b"
        >
          <!-- 一级菜单 -->
          <el-submenu index="1">
            <!-- 一级菜单模板 -->
            <template slot="title">
              <i class="el-icon-location"></i>
              <span>导航一</span>
            </template>

            <!-- 二级菜单 -->
            <el-menu-item index="1-4-1">
              <!-- 二级菜单模板 -->
              <template slot="title">
                <i class="el-icon-location"></i>
                <span>导航二</span>
              </template>
            </el-menu-item>
          </el-submenu>
        </el-menu>
      </el-aside>
      <!-- 右侧主体区域 -->
      <el-main>Main</el-main>
    </el-container>
  </el-container>
</template>
样式
在element-ui中,组件名称就是类名,比如 .el-button
<style lang="less" scoped>
.el-container {
  height: 100%;
}

.el-header {
  background-color: #373d41;
  // 开始弹性盒子
  display: flex;
  // 主轴对齐
  justify-content: space-between;
  // 副轴对齐方式
  align-items: center;
  color: #fff;
  font-size: 20px;
  // 左边padding为0
  padding-left: 0;
  & div {
    display: flex;
    align-items: center;
    span {
      margin-left: 20px;
    }
  }
}

.el-aside {
  background-color: #333744;
}

.el-main {
  background-color: #eaedf1;
}
</style>
二,配置请求拦截器,添加token
在main.js中配置
import axios from 'axios'
// 配置请求的跟路径
axios.defaults.baseURL = 'http://127.0.0.1:8888/api/private/v1/'
Vue.prototype.$http = axios
// 配置请求拦截器,添加token
axios.interceptors.request.use(config => {
  // console.log(config)
  config.headers.Authorization = window.sessionStorage.getItem('token')
  return config
})
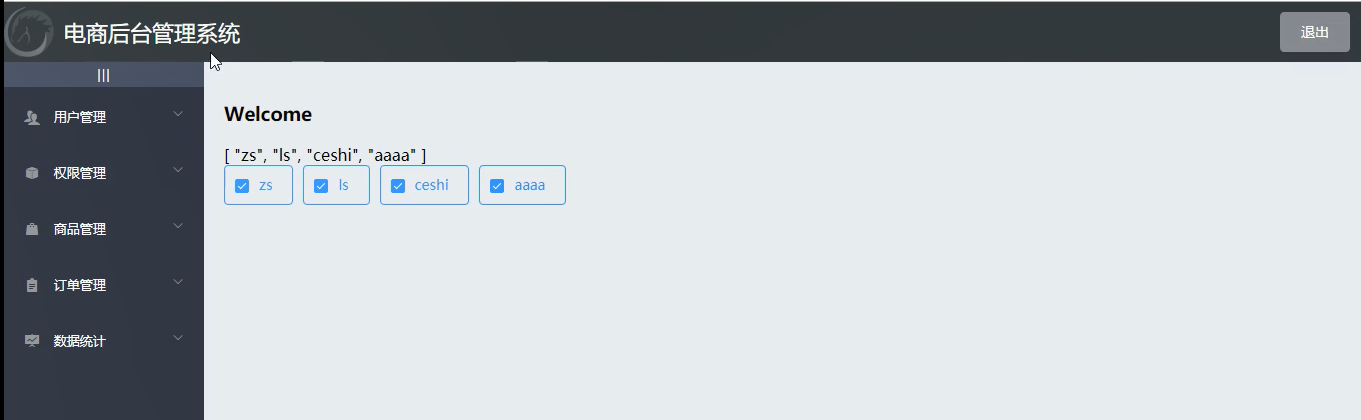
三,发送请求,获取左菜单栏的数据
 // 获取侧边栏菜单的数据
    async getMenuList() {
      const { data: res } = await this.$http.get('menus')
      console.log(res)
      if (res.meta.status === 200) {
        this.$message.success(res.meta.msg)
        this.menuList = res.data
      } else {
        this.$message.error('获取数据失败')
      }
    }


   <!-- 侧边栏菜单区域 -->
        <el-menu
          background-color="#545c64"
          text-color="#fff"
          active-text-color="#ffd04b"
        >
          <!-- 一级菜单 -->
          <el-submenu :index="item.id+''"  v-for="(item, index) in menuList" :key="item.id">
            <!-- 一级菜单模板 -->
            <template slot="title">
              <!-- 图标 -->
              <i class="el-icon-location"></i>
              <!-- 文本 -->
              <span>{{item.authName}}</span>
            </template>

            <!-- 二级菜单 -->
            <el-menu-item :index="`${subitem.id}`" v-for="(subitem, index) in item.children" :key="subitem.id">
              <!-- 二级菜单模板 -->
              <template slot="title">
                <!-- 图标 -->
                <i class="el-icon-location"></i>
                <!-- 文本 -->
                <span>{{subitem.authName}}</span>
              </template>
            </el-menu-item>
          </el-submenu>
        </el-menu>
五,菜单栏的图标设置,以及颜色设置
5.1,点击菜单栏时,颜色变化
 <!-- 侧边栏菜单区域 -->
        <el-menu
          background-color="#545c64"
          text-color="#fff"
          active-text-color="#409EFF"
        >
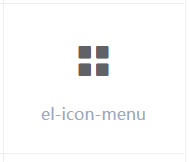
5.2,二级菜单栏的图标设置,用element-ui的图标组件
<!-- 二级菜单 -->
            <el-menu-item :index="`${subitem.id}`" v-for="(subitem, index) in item.children" :key="subitem.id">
              <!-- 二级菜单模板 -->
              <template slot="title">
                <!-- 图标 -->
                <i class="el-icon-menu"></i>
5.3,一级菜单图标设置,需要设置成不同的图标,一级菜单的类名是写死了,如何变活呢
方法;一级菜单已经v-for循环了,但是他们有唯一的id值,我们可以利用id和图标类名组成键值对,组成一个对象,就可动态显示图标类名了。用阿里巴巴图标
 data() {
    return {
      menuList: [],
      iconsObj: {
        '125': 'iconfont icon-user',
        '103': 'iconfont icon-tijikongjian',
        '101': 'iconfont icon-shangpin',
        '102': 'iconfont icon-danju',
        '145': 'iconfont icon-baobiao'
      }
  <!-- 一级菜单 -->
          <el-submenu
            :index="item.id + ''"
            v-for="(item, index) in menuList"
            :key="item.id"
          >
            <!-- 一级菜单模板 -->
            <template slot="title">
              <!-- 图标 -->
              <i :class="iconsObj[item.id]"></i>
图标设置padding距离
.iconfont{
  padding-right: 10px;
}

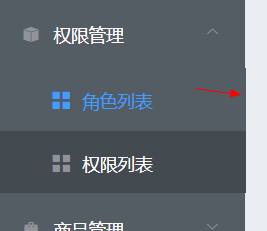
六,点击一个一级菜单,上一个展开的一级菜单自动关闭
在el-menu添加一个属性,只写属性,默认是true

  <!-- 侧边栏菜单区域 -->
        <el-menu
          background-color="#545c64"
          text-color="#fff"
          active-text-color="#409EFF"
          unique-opened
        >
6.1,点击二级菜单,右边有一些边框突出,需要在el-menu设置边框为0

.el-aside {
  background-color: #333744;
  .el-menu{
    border-right: 0;
  }
}
七,左侧菜单的折叠与展开功能
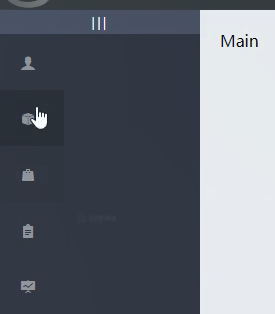

7.1,我们先在el-menu添加一个div结构,用于点击时,左侧菜单栏的折叠与展开,el-menu组件中有两个属性,我们默认设置不折叠,点击新增的div结构时,collapse取反,取消动画,
而且el-aside的宽度也要动态设置


 <el-aside :width="isCollapse ? '64px': '200px'">
        <div class="toggle-button" @click="toggleCollapse">|||</div>
        <!-- 侧边栏菜单区域 -->
        <el-menu
          background-color="#545c64"
          text-color="#fff"
          active-text-color="#409EFF"
          unique-opened
          :collapse="isCollapse"
          :collapse-transition="false"
        >
data() {
    return {
      isCollapse: false,
.el-aside {
  background-color: #333744;
  .toggle-button {
    background-color: #4a5064;
    font-size: 10px;
    height: 24px;
    line-height: 24px;
    color: #fff;
    // 文本水平居中
    text-align: center;
    // 字间距
    letter-spacing: 0.2em;
    // 小手状态
    cursor: pointer;
  }
// 点击左侧菜单栏的折叠与展开
    toggleCollapse() {
      this.isCollapse = !this.isCollapse
    }
八,实现home组件路由重定向
8.1,在view中新增welcome子路由组件,在路由文件中配置
 {
    path: '/home',
    component: Home,
    // 重定向
    redirect: '/welcome',
    children: [{ path: '/welcome', component: Welcome }]
  }
  <!-- 右侧主体区域 -->
      <el-main>
        <!-- 路由占位符 -->
        <router-view></router-view>
        </el-main>
九,左侧二级菜单改成路由连接,el-menu开启路由模式,点击后会跳转

请求回来的菜单栏数据中,有个path属性,我们将二级菜单的index的属性值设置为它,前边加个‘/’,此时就是路由的路径
c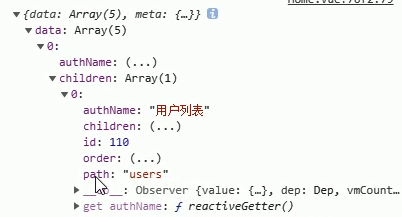
  <!-- 侧边栏菜单区域 -->
        <el-menu
          background-color="#545c64"
          text-color="#fff"
          active-text-color="#409EFF"
          unique-opened
          :collapse="isCollapse"
          :collapse-transition="false"
          router
        >
 <!-- 二级菜单 -->
            <el-menu-item
              :index="'/' + subitem.path"
              v-for="(subitem, index) in item.children"
              :key="subitem.id"
            >
十,用户列表开发
10.1,点击二级菜单的用户列表,跳转到user组件,在views新增user组件,是home的子路由,在路由文件中配置路由对象
{
    path: '/home',
    component: Home,
    // 重定向
    redirect: '/welcome',
    children: [
      { path: '/welcome', component: Welcome },
      { path: '/users', component: User }
    ]
  }
此时有个小bug,点击二级菜单,文本没有高亮

我们需要激活它,每次点击二级菜单的路由连接时,我们需要将他的路劲赋值给这个属性。
home组件创建时,需要激活,点击二级菜单也要激活
   <!-- 二级菜单 -->
            <el-menu-item
              :index="'/' + subitem.path"
              v-for="(subitem, index) in item.children"
              :key="subitem.id"
              @click="saveNavState('/' + subitem.path)"
            >
 saveNavState(activePath) {
      window.sessionStorage.setItem('activePath', activePath)
      this.activePath = activePath
    }
 mounted() {
    this.getMenuList()
    this.activePath = window.sessionStorage.getItem('activePath')
  },
data() {
    return {
      isCollapse: false,
      menuList: [],
      // 被激活的链接地址
      activePath: '',
    <!-- 侧边栏菜单区域 -->
        <el-menu
          background-color="#545c64"
          text-color="#fff"
          active-text-color="#409EFF"
          unique-opened
          :collapse="isCollapse"
          :collapse-transition="false"
          router
          :default-active="activePath"
        >
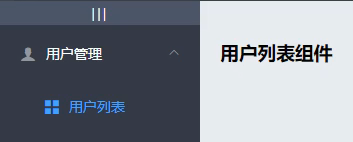
10.2,user路由组件,面包屑搭建
 <!-- 面包屑导航区域 -->
    <el-breadcrumb separator-class="el-icon-arrow-right">
      <el-breadcrumb-item to="/home">首页</el-breadcrumb-item>
      <el-breadcrumb-item>用户管理</el-breadcrumb-item>
      <el-breadcrumb-item>用户列表</el-breadcrumb-item>
    </el-breadcrumb>
样式
.el-breadcrumb {
  margin-bottom: 20px;
  margin-bottom: 15px;
  font-size: 12px;
}

.el-card {
  box-shadow: 0 1px 1px rgba(0, 0, 0, 0.15) !important;
}
10.3,卡片视图搭建
input框和button按钮的宽度比例,使用栅格layout,:span为每列的宽度, :gutter为列与列的距离
   <!-- 卡片视图 -->
    <el-card>
      <!-- 栅格 -->
      <el-row :gutter="20">
        <el-col :span="8">
          <el-input placeholder="请输入内容">
            <el-button slot="append" icon="el-icon-search"></el-button>
          </el-input>
        </el-col>

        <el-col :span="4">
          <el-button type="primary" size="default">添加</el-button>
        </el-col>
      </el-row>
    </el-card>
10.4,发送请求,获取用户数据
data() {
    return {
      // 获取用户列表的参数对象
      queryInfo: {
        query: '',
        // 当前的页数
        pagenum: 1,
        // 当前每页显示多少条数据
        pagesize: 2
      },
      userlist: [],
      total: 0
    }
get请求,
axios.get(url, {配置}) // {params: {id: 1}}, 是问号的参数,相当于query参数
axios({
      url: '路径', // 这个路径中可以包含params或query参数
      method: 'get/post/put/delete',
      params: {}, // 包含query参数的对象,问号后面的参数
      data: {}, // 包含请求体参数的对象
    })
 mounted() {
    this.getUserList()
  },

  methods: {
    // 发送请求,获取用户列表数据
    async getUserList() {
      const { data: res } = await this.$http.get('users', {
        params: this.queryInfo
      })
      console.log(res)
      if (res.meta.status === 200) {
        this.userlist = res.data.users
        this.total = res.data.total
      } else {
        this.$message.error('获取用户数据失败')
      }
    }
  }
返回的数据

10.5,用户列表静态页面搭建

el-switch选择开关组件v-modle收集的是布尔值,决定开或者闭合
<!-- 用户列表区域 -->
      <el-table :data="userlist" border stripe style="margin:20px 0">
        <el-table-column type="index"></el-table-column>
        <el-table-column label="姓名" prop="username"></el-table-column>
        <el-table-column label="邮箱" prop="email"></el-table-column>
        <el-table-column label="电话" prop="mobile"></el-table-column>
        <el-table-column label="角色" prop="role_name"></el-table-column>
        <el-table-column label="状态">
          <template slot-scope="{ row, $index }">
            <el-switch
              v-model="row.mg_state"
              active-color="#13ce66"
              inactive-color="#ff4949"
            >
            </el-switch>
          </template>
        </el-table-column>
        <el-table-column label="操作" width="180px"> </el-table-column>
      </el-table>
10.6,操作栏静态页面搭建
注;tooltip文字提示组件,

  <el-table-column label="操作" width="180px">
          <template slot-scope="{row , $index}">
            <!-- 修改按钮 -->
            <el-button type="primary" icon="el-icon-edit" size="mini" title="编辑"></el-button>
            <!-- 删除按钮 -->
            <el-button type="danger" icon="el-icon-delete" size="mini" title="删除"></el-button>
            <!-- 分配角色按钮 -->
            <el-tooltip effect="dark" content="分配角色" placement="top" :enterable="false">
              <el-button type="warning" icon="el-icon-setting" size="mini"></el-button>
            </el-tooltip>
          </template>
        </el-table-column>
10.7,分页组件搭建
   <!-- 分页区域 -->
      <el-pagination @size-change="handleSizeChange" @current-change="getUserList"
        :current-page="queryInfo.pagenum" :page-sizes="[1, 2, 5, 10]"
        :page-size="queryInfo.pagesize" layout=" prev, pager, next, jumper,->,->, sizes,total" :total="total">
      </el-pagination>
 // 每页多少条数据
    handleSizeChange(size) {
      this.queryInfo.pagesize = size
      // 重新发送请求,获取最新数据
      this.getUserList()
    }
// 发送请求,获取用户列表数据
    async getUserList(page = 1) {
      this.queryInfo.pagenum = page
      const { data: res } = await this.$http.get('users', {
        params: this.queryInfo
      })
      console.log(res)
      if (res.meta.status === 200) {
        this.userlist = res.data.users
        this.total = res.data.total
      } else {
        this.$message.error('获取用户数据失败')
      }
    },
10.8,实现用户状态修改功能

更改的状态,需要重新发送请求,同步到数据库中
  <el-table-column label="状态">
          <template slot-scope="{ row, $index }">
            <el-switch
              v-model="row.mg_state"
              active-color="#13ce66"
              inactive-color="#ff4949"
              @change="userStateChanged(row)"
            >
            </el-switch>
          </template>
        </el-table-column>
   // 监听 switch 开关状态的改变
    async userStateChanged(userinfo) {
      //点击状态开关, 此时mg_state属性已经修改了,需要发送请求,同步更改到数据库
      console.log(userinfo)
      const { data: res } = await this.$http.put(
        `users/${userinfo.id}/state/${userinfo.mg_state}`
      )
      if (res.meta.status !== 200) {
        userinfo.mg_state = !userinfo.mg_state
        return this.$message.error('更新用户状态失败!')
      }
      this.$message.success('更新用户状态成功!')
    }