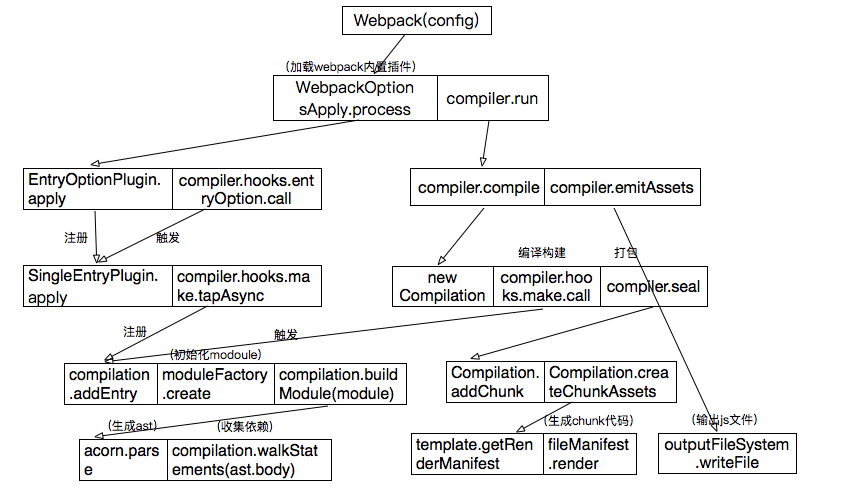
先上一张流程图
一般webpack打包文件是通过cli调用
webpack.js --config=webpack.build.js这实际上等同于通过node调用
const Webpack = require('./node_modules/webpack');
const config = require('./config1.js');
const compiler = Webpack(config);
compiler.run();
Webpack(config)源码如下:
const webpack = (options, callback) => {
    //将用户本地的配置文件拼接上webpack内置的参数
    options = new WebpackOptionsDefaulter().process(options);
    //初始化compiler对象(webpack编辑器对象,包含所有webpack主环境相关内容)
    compiler = new Compiler(options.context);
    compiler.options = options;
    //注册NodeEnvironmentPlugin插件和用户配置的插件
    new NodeEnvironmentPlugin().apply(compiler);
    if (options.plugins && Array.isArray(options.plugins)) {
        for (const plugin of options.plugins) {
            plugin.apply(compiler);
        }
    }
    //触发environment和afterEnvironment上注册的事件
    compiler.hooks.environment.call();
    compiler.hooks.afterEnvironment.call();
    //注册webpack内置插件,源码如下
    compiler.options = new WebpackOptionsApply().process(options, compiler);
    return compiler;
})

class WebpackOptionsApply extends OptionsApply {
    process(options, compiler) {
        //注册EntryOptionPlugin
        new EntryOptionPlugin().apply(compiler);
        //触发entryOption钩子
        var a = compiler.hooks.entryOption.call(options.context, options.entry);
        //触发afterPlugins钩子
        compiler.hooks.afterPlugins.call(compiler);
        //触发afterResolvers钩子
        compiler.hooks.afterResolvers.call(compiler);
    }
}
主要是初始化compiler对象和注册插件,下面介绍下EntryOptionPlugin插件
EntryOptionPlugin.apply方法
apply(compiler) {
    //将回调函数注册到hooks.entryOption上
    //上文调用compiler.hooks.entryOption.call(options.context, options.entry)时触发
    compiler.hooks.entryOption.tap("EntryOptionPlugin", (context, entry) => {
        //取出entry文件入口配置,判断是否数组,调用对应的插件
        for (const name of Object.keys(entry)) {
            itemToPlugin(context, entry[name], name).apply(compiler);
        }
    }
}
const itemToPlugin = (context, item, name) => {
    if (Array.isArray(item)) {
        return new MultiEntryPlugin(context, item, name);
    }
    return new SingleEntryPlugin(context, item, name);
}
//本文介绍entry[name]为字符串的情况,调用new SingleEntryPlugin().apply方法,源码如下
apply(compiler) {
    //在compilation钩子上注册回调,compilation.call时触发
    compiler.hooks.compilation.tap(
        "SingleEntryPlugin",
        (compilation, { normalModuleFactory }) => {
            //设置SingleEntryDependency使用normalModuleFactory创建Module
            compilation.dependencyFactories.set(
                SingleEntryDependency,
                normalModuleFactory
            );
        }
    );
    compiler.hooks.make.tapAsync(
        "SingleEntryPlugin",
        (compilation, callback) => {
            const { entry, name, context } = this;

            const dep = SingleEntryPlugin.createDependency(entry, name);
            compilation.addEntry(context, dep, name, callback);
        }
    );
}
经过上一步的分析可以对webpack的插件机制有一定的了解,插件主要是挂载一些回调函数在compiler的生命周期上,当执行到该阶段时触发(事件的发布订阅,继承自tapable)。
compiler的生命周期可参考:webpack hooks,下面再看下compiler.run()方法
run(callback) {
    this.compile(onCompiled);
}

compile(callback) {
    //初始化compilation,compilation对象代表了一次单一的版本构建和生成资源过程
    const compilation = this.newCompilation(params);
    // 触发注册在make上的事件函数,
    this.hooks.make.callAsync(compilation, err => {
        //make上注册的事件执行完毕后触发回调,源码后面给出
    }
}
//触发上文提到的SingleEntryPlugin注册事件
compiler.hooks.make.tapAsync(
    "SingleEntryPlugin",
    (compilation, callback) => {
        const { entry, name, context } = this;
        // 入口文件的依赖对象,
        const dep = SingleEntryPlugin.createDependency(entry, name);
        compilation.addEntry(context, dep, name, callback);
    }
);

addEntry(context, entry, name, callback) {
        this._addModuleChain(context, dep, ...)
}

_addModuleChain(context, dependency, onModule, callback) {
    //获取dependency
    const Dep = /** @type {DepConstructor} */ (dependency.constructor);
    //获取moduleFactory,根据上文的介绍此处是normalModuleFactory
    const moduleFactory = this.dependencyFactories.get(Dep);
    //获取module
    moduleFactory.create((err, module) => {
        dependency.module = module;
        this.buildModule(module, false, null, null, err => {
            //初始化moudle后生成ast对象,计算依赖,后面介绍
        })
    )
}
//获取module的实现
//normalModuleFactory.create
create(data, callback) {
    // 获取在constructor中注册的factory方法
    const factory = this.hooks.factory.call(null);
    factory(result, (err, module) => {})
}

class NormalModuleFactory extends Tapable {
    constructor(context, resolverFactory, options) {
        this.hooks.factory.tap("NormalModuleFactory", () => (result, callback) => {
            //返回初始的module对象
            callback(null, {
                context: context,
                request: loaders
                    .map(loaderToIdent)
                    .concat([resource])
                    .join("!"),
                dependencies: data.dependencies,
                ...
            });
        }
    }
}
buildModule回调
this.buildModule(module, false, null, null, err => {
    // 根据js代码获取ast语法树对象
    ast = acorn.parse(code, parserOptions);
    // 根据ast加载模块的依赖
    this.prewalkStatements(ast.body);
    this.walkStatements(ast.body);
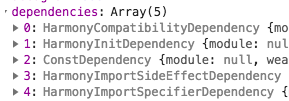
make主要是以entry为入口,生成一个modoule对象,其中的关键是根据js代码生成ast语法树对象,同时分析语法树加载需要使用到的依赖(dependency),如果存在import依赖,就会生成新的modoule,知道所有依赖加在完毕,下图是部分dependency示例
make阶段完成之后会进入seal阶段
this.hooks.make.callAsync(compilation, err => {
    compilation.seal(err => {})
})
seal() {
    for (const preparedEntrypoint of this._preparedEntrypoints) {
        const module = preparedEntrypoint.module;
        const name = preparedEntrypoint.name;
        const chunk = this.addChunk(name);
        chunk.entryModule = module;
    }
    this.createChunkAssets();
}
createChunkAssets(){
   const manifest = template.getRenderManifest({
        chunk,
        hash: this.hash,
        fullHash: this.fullHash,
        outputOptions,
        moduleTemplates: this.moduleTemplates,
        dependencyTemplates: this.dependencyTemplates
    }); // [{ render(), filenameTemplate, pathOptions, identifier, hash }]
    for (const fileManifest of manifest) {
        source = fileManifest.render();
    }
}
compile结束后调用compiler.emitAssets
emitAssets() {
    const targetPath = this.outputFileSystem.join(
        outputPath,
        targetFile
    );
    let content = source.source();
    //this.writeFile = fs.writeFile.bind(fs);
    this.outputFileSystem.writeFile(targetPath, content, callback);
}

