1、搭建springboot项目,整合shiro,完成基本配置。
2、下载layui mini前端框架,并将java部分的代码整合到springboot工程中。
下载:http://layuimini.99php.cn/docs/index.html,我下载的是onepage单页版-V2版本。
参考:http://layuimini.99php.cn/docs/init/java.html,Java部分的代码,整合到springboot中。
application.yml:
#本地开发环境配置中心

spring:
  application:
    name: springboot-webAdmin
  jpa:
    show-sql: true
    database: mysql
    #generate-ddl: true
    database-platform: org.hibernate.dialect.MySQL5Dialect
    hibernate:
      naming:
        #解决使用其他库的表时候,把小数点变成下划线,导致sql无法成功执行。
        #这是由于物理命名策略引起的,大写字母变小写,加_下划线(hibernate5以上高版本)
        physical-strategy: org.hibernate.boot.model.naming.PhysicalNamingStrategyStandardImpl
      #ddl-auto: update
    #ddl-auto: update
  datasource:
    url: jdbc:mysql://localhost:3306/kudao_db?characterEncoding=utf-8&serverTimezone=GMT%2B8
    username: root
    password: 123456
    driver-class-name: com.mysql.jdbc.Driver
    type: com.zaxxer.hikari.HikariDataSource
    hikari:
      auto-commit: true
      minimum-idle: 2
      idle-timeout: 60000
      connection-timeout: 30000
      max-lifetime: 1800000
      pool-name: DatebookHikariCP
  #thymeleaf模板配置
  thymeleaf:
    cache: false
    enabled: true
    prefix: classpath:/templates/
    suffix: .html
    #严格执行H5标准
    mode: LEGACYHTML5
    encoding: UTF-8
    servlet:
      content-type: text/html
  #content-type: text/html
  resources:
    chain:
      strategy:
        content:
          enabled: true
          paths: /**

  #静态资源路径
  mvc:
    static-path-pattern: /static/**
    #关掉原生icon图标
    favicon:
      enabled: false
mybatis:
  type-aliases-package: com.kudao.shiro.domain
  mapper-locations: classpath:mapper/*.xml

#项目端口
server:
  port: 8080
  #连接超时,单位为毫秒,-1永不超时
  connection-timeout: 60000
  #设置tomcat参数
  tomcat:
    uri-encoding: utf-8
    max-connections: 10000
    min-spare-threads: 10
    #最大220个并发,可以达到不丢包(可以自己实测),默认为200。
    max-threads: 220
    #配置访问路径,默认为/
    #servlet:
    #context-path: /index/main
#这两行代码是layui示例中没有启用的,该配置是启用工程访问路径
  servlet:
    context-path: /api


#配置日志文件参数
logging:
  file:
    path: F:/myLog/adminLog.log
  level:
    org:
      springframework: debug
    hibernate: debug
3、最终要的一步:安装nginx,并进行相应的配置
首先下载安装Nginx,百度搜索下载并安装

安装完成,启动前需要进行Nginx配置,否则无法启动Nginx的。
打开conf文件夹,找到nginx.conf文件,打开进行编辑
nginx.conf文件:
#user  nobody;
worker_processes  1;

#error_log  logs/error.log;
#error_log  logs/error.log  notice;
#error_log  logs/error.log  info;

#pid        logs/nginx.pid;


events {
    worker_connections  1024;
}


http {
    include       mime.types;
    default_type  application/octet-stream;

    #log_format  main  '$remote_addr - $remote_user [$time_local] "$request" '
    #                  '$status $body_bytes_sent "$http_referer" '
    #                  '"$http_user_agent" "$http_x_forwarded_for"';

    #access_log  logs/access.log  main;

    sendfile        on;
    #tcp_nopush     on;

    #keepalive_timeout  0;
    keepalive_timeout  65;

    #gzip  on;

    server {
        listen       8888;
        server_name  localhost;

        #charset koi8-r;

        #access_log  logs/host.access.log  main;

      #自定义配置1:将root由html改为vscode开发的项目工程真实路径,并将路径中的“/”改为“”
        location / {
            root   E:workjavalayuimini-2-onepage;
            index  index.html index.htm;
        }
      #自定义配置2:设置要监听的路径/api,以及代理的idea搭建的springboot访问地址http://localhost:8080/api,其中“/api”对应的是application.yml中servlet:context-path:/api,在这里可以全局配置,就不需要在每个Controller中设置“/api”映射了;
      location /api {
          proxy_pass  http://localhost:8080/api;
      }

      #自定义配置3:解决乱码
      default_type 'text/html';
      charset utf-8;

        #error_page  404              /404.html;

        # redirect server error pages to the static page /50x.html
        #
        error_page   500 502 503 504  /50x.html;
        location = /50x.html {
            root   html;
        }

        # proxy the PHP scripts to Apache listening on 127.0.0.1:80
        #
        #location ~ .php$ {
        #    proxy_pass   http://127.0.0.1;
        #}

        # pass the PHP scripts to FastCGI server listening on 127.0.0.1:9000
        #
        #location ~ .php$ {
        #    root           html;
        #    fastcgi_pass   127.0.0.1:9000;
        #    fastcgi_index  index.php;
        #    fastcgi_param  SCRIPT_FILENAME  /scripts$fastcgi_script_name;
        #    include        fastcgi_params;
        #}

        # deny access to .htaccess files, if Apache's document root
        # concurs with nginx's one
        #
        #location ~ /.ht {
        #    deny  all;
        #}
    }


    # another virtual host using mix of IP-, name-, and port-based configuration
    #
    #server {
    #    listen       8000;
    #    listen       somename:8080;
    #    server_name  somename  alias  another.alias;

    #    location / {
    #        root   html;
    #        index  index.html index.htm;
    #    }
    #}


    # HTTPS server
    #
    #server {
    #    listen       443 ssl;
    #    server_name  localhost;

    #    ssl_certificate      cert.pem;
    #    ssl_certificate_key  cert.key;

    #    ssl_session_cache    shared:SSL:1m;
    #    ssl_session_timeout  5m;

    #    ssl_ciphers  HIGH:!aNULL:!MD5;
    #    ssl_prefer_server_ciphers  on;

    #    location / {
    #        root   html;
    #        index  index.html index.htm;
    #    }
    #}
    #include ../vhost/test.conf;
}
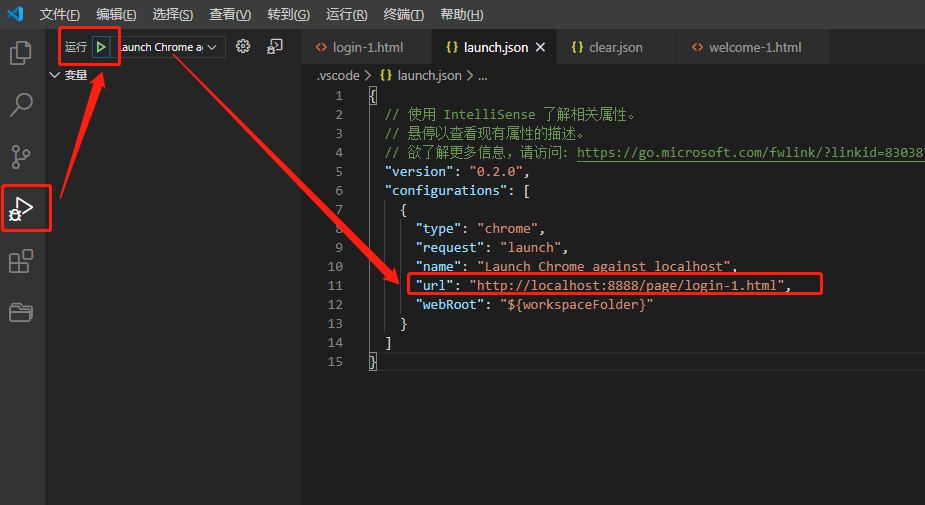
4、使用vscode工具开发、测试前端
第一步:将第2步下载的layui mini框架,用vscode打开
第二步:Ctrl+Shift+x搜索:Debugger for Chrome,安装,并配置launch.json文件
{
  // 使用 IntelliSense 了解相关属性。
  // 悬停以查看现有属性的描述。
  // 欲了解更多信息,请访问: https://go.microsoft.com/fwlink/?linkid=830387
  "version": "0.2.0",
  "configurations": [
    {
      "type": "chrome",
      "request": "launch",
      "name": "Launch Chrome against localhost",
      "url": "http://localhost:8888/page/login-1.html",//只需要配置这行即可,其中8888端口是nginx反向代理监听的端口
      "webRoot": "${workspaceFolder}"
    }
  ]
}
配置完成后,按下图方式运行前端程序进行开发测试,会自动打开chrome浏览器,并打开launch.json中配置的url:
5、开发时ajax请求url地址写法,/api关联映射的是nginx.conf内:location /api,后面的/pub/login才是Controller的路径
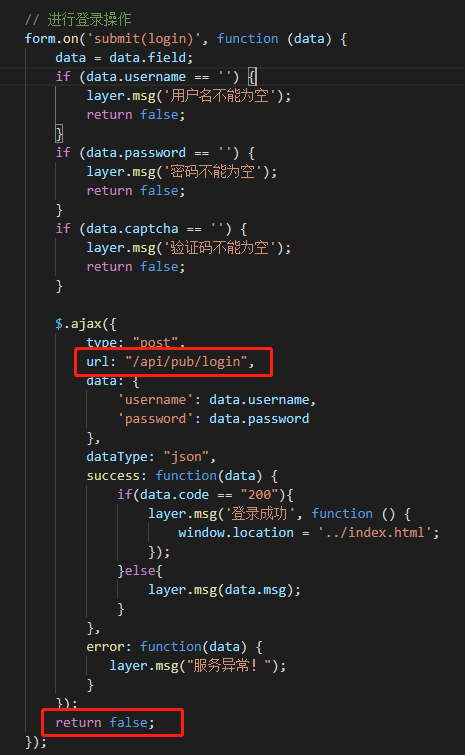
需要注意的是:ajax请求的最后一定要有:return false,否则不会发送ajax请求,这是layui的要求。