本文转自:https://dzone.com/articles/what-are-nopcommerce-widgets-and-how-to-create-one
A widget is a stand-alone application that can be embedded into third party sites by any user on a page. It's a small application that can be installed and executed within a web page by an end user. (Wikipedia).
What Are Widgets in Nopcommerce?
A widget is an element of a graphical user interface (GUI) that displays information which can be changed by the user or store admin. nopCommerce has several built-in widget plugins such as Google Analytics and Nivo Slider etc. When adding a widget to the public store, the site administrator needs to define (or select) a widget zone. Now, you must be wondering, what is a widget zone? A widget zone is part of the UI (user-interface) in the public store where the widget can be displayed or rendered. For example, you can place a Live Person chat widget on the left column or on the right column widget zone. Widget zones are basically the pre-defined locations in a nopCommerce public site that make it easier for the store admin to display any information.
How Widgets Are Different From Plugins in Nopcommerce?
In nopCommerce, a widget is used to add some kind of functionality or feature (or even display information) that can be rendered on some parts of the public site (also known as widget zones). Whereas, plugins in nopCommerce are used to extend the functionality of nopCommerce. nopCommerce has several types of plugins. Some examples are payment methods (such as PayPal), tax providers, shipping method computation methods (such as UPS, USP, FedEx), widgets (such as 'live chat' block), and many others.
Here you can find third-party plugins/extensions and themes which are developed by the nopCommerce community and partners: http://www.nopcommerce.com/extensions-and-themes.aspx
The Widget Structure, Required Files, and Locations
The first thing you need to do is to create a new "Class Library" project in the solution. It's a good practice to place all widgets (or plugins) into Plugins directory in the root of your solution (do not mix up with Plugins subdirectory located in Nop.Web directory which is used for already deployed widgets and plugins). You can find more information about solution folders here.
Steps to Create a Custom Nopcommerce Widget
Step 1) Open the nopCommerce solution in Visual Studio (remember you need full source code)
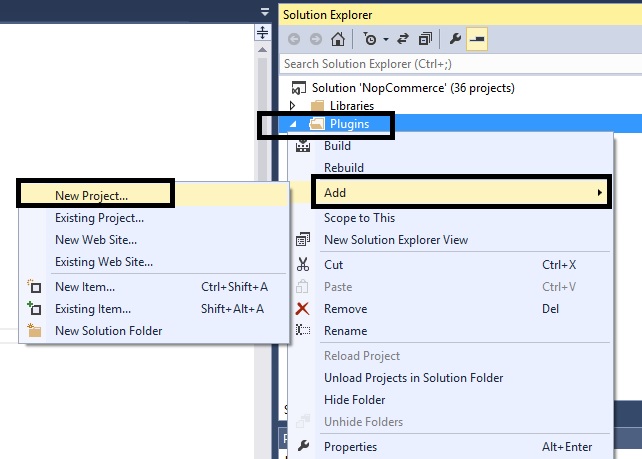
Step 2) Right click on the plugin folder: Add > New Project
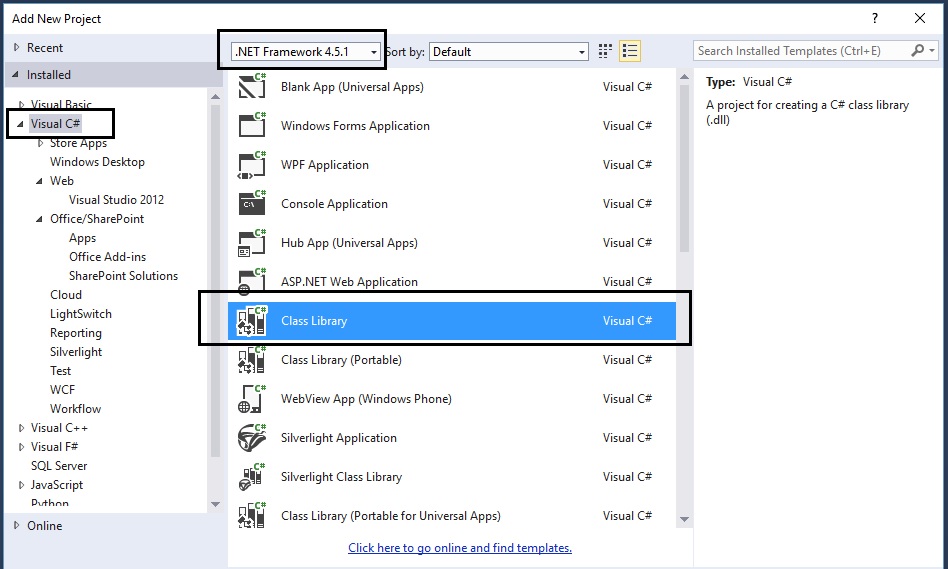
Step 3) On the add new project window:
-
select.NET Framework 4.5.1
-
select Visual C#
-
select Class Library
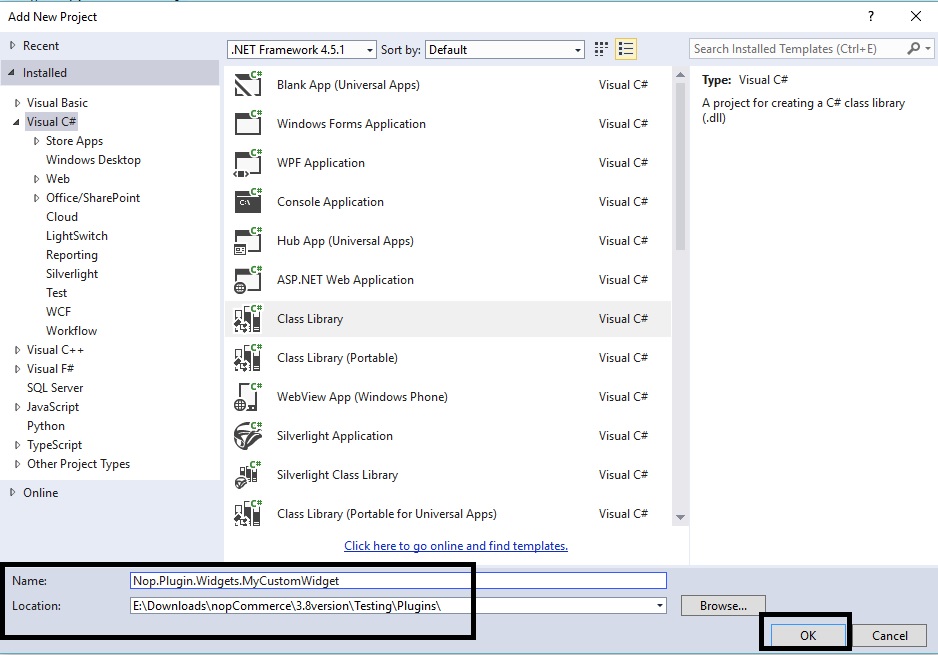
Step 4) Now, name the widget and set the location as follows:
In this case, we are naming the plugin: Nop.Plugin.Widgets.MyCustomWidget
Location: You will need to click on the "Browse" button and select the plugin folder that contains the source code of all the plugins / widgets (not the folder inside Nop.Web that only contains the compiled dlls)
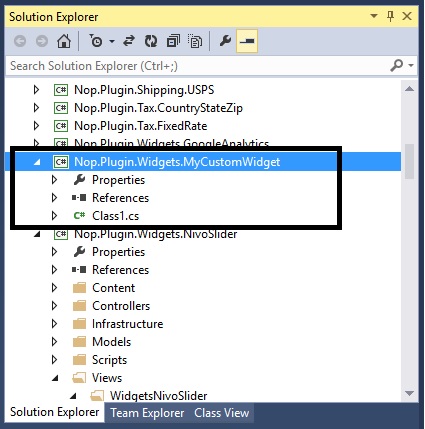
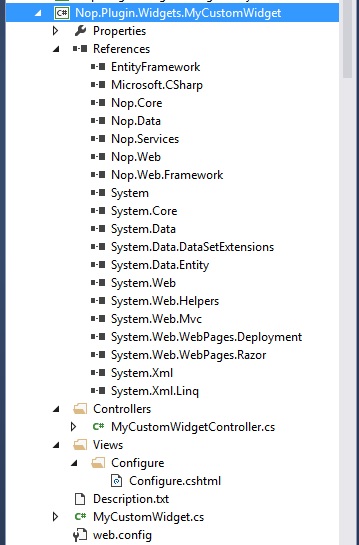
Step 5) Now, you should be able to see your custom widget project in the solution explorer like this:
Step 6) Now is the time to add all the correct references. Go to: References > Add Reference…
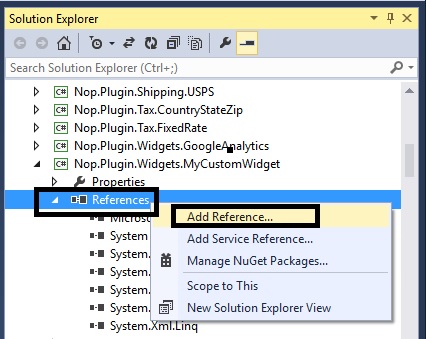
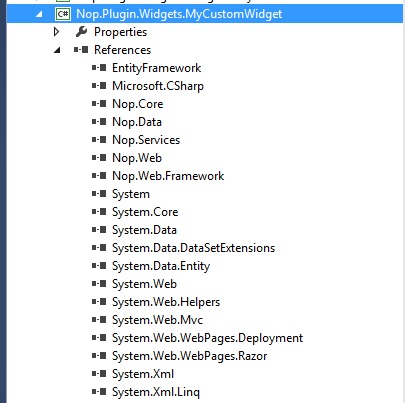
You will need to add all the references (see pic below). In case you are not able to find the right reference, simple go to any other plugin that has it and get the reference from there.
Step 7) You need to configure your custom widget in a proper structure.
Description.txt: The next step is creating a Description.txt file required for each widget. This file contains meta information describing your widget. Just copy this file from any other existing widget and modify it for your needs.
Group: Widgets
FriendlyName: MyCustomWidget
SystemName: Nop.Plugin.Widgets.MyCustomWidget
Version: 1.00
SupportedVersions: 3.80
Author: Lavish Kumar
DisplayOrder: 1
FileName: Nop.Plugin.Widgets.MyCustomWidget.dll
Web.config: You should also create a web.config file and ensure that it's copied to output. Just copy it from any existing widget.

Step 8) Add a class MyCustomWidget.cs and use the following code:

using System;
using System.Collections.Generic;
using System.Linq;
using System.Text;
using System.Threading.Tasks;
using System.IO;
using System.Web.Routing;
using Nop.Core;
using Nop.Core.Plugins;
using Nop.Services.Cms;
using Nop.Services.Configuration;
using Nop.Services.Localization;
using Nop.Services.Media;
using Nop.Services.Common;
namespace Nop.Plugin.Widgets.MyCustomWidget
{
/// <summary>
/// PLugin
/// </summary>
public class MyCustomWidget : BasePlugin, IWidgetPlugin
{
/// <summary>
/// Gets widget zones where this widget should be rendered
/// </summary>
/// <returns>Widget zones</returns>
public IList<string> GetWidgetZones()
{
return new List<string> { "home_page_before_categories" };
}
/// <summary>
/// Gets a route for provider configuration
/// </summary>
/// <param name="actionName">Action name</param>
/// <param name="controllerName">Controller name</param>
/// <param name="routeValues">Route values</param>
public void GetConfigurationRoute(out string actionName, out string controllerName, out RouteValueDictionary routeValues)
{
actionName = "Configure";
controllerName = "MyCustomWidget";
routeValues = new RouteValueDictionary { { "Namespaces", "Nop.Plugin.Widgets.MyCustomWidget.Controllers" }, { "area", null } };
}
/// <summary>
/// Gets a route for displaying widget
/// </summary>
/// <param name="widgetZone">Widget zone where it's displayed</param>
/// <param name="actionName">Action name</param>
/// <param name="controllerName">Controller name</param>
/// <param name="routeValues">Route values</param>
public void GetDisplayWidgetRoute(string widgetZone, out string actionName, out string controllerName, out RouteValueDictionary routeValues)
{
actionName = "PublicInfo";
controllerName = "MyCustomWidget";
routeValues = new RouteValueDictionary
{
{"Namespaces", "Nop.Plugin.Widgets.MyCustomWidget.Controllers"},
{"area", null},
{"widgetZone", widgetZone}
};
}
/// <summary>
/// Install plugin
/// </summary>
public override void Install()
{
PluginManager.MarkPluginAsInstalled(this.PluginDescriptor.SystemName);
}
/// <summary>
/// Uninstall plugin
/// </summary>
public override void Uninstall()
{
PluginManager.MarkPluginAsUninstalled(this.PluginDescriptor.SystemName);
}
}
}
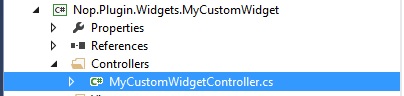
Step 9) Add a class MyCustomWidgetController.cs (in folder “Controllers” within your widget) and use the following code:
using System;
using System.Collections.Generic;
using System.Data.Entity.Migrations;
using System.Linq;
using System.Text.RegularExpressions;
using System.Web.Mvc;
using Nop.Services;
using Nop.Web.Framework.Controllers;
using Nop.Web.Framework.Kendoui;
using Nop.Services.Localization;
using Nop.Services.Security;
using Nop.Core.Domain.Localization;
using Nop.Core.Data;
using Nop.Core;
using Nop.Web.Models.Common;
using Nop.Core.Caching;
using Nop.Web.Infrastructure.Cache;
using Nop.Core.Infrastructure;
namespace Nop.Plugin.Widgets.MyCustomWidget.Controllers
{
public class MyCustomWidgetController : BasePluginController
{
[AdminAuthorize]
public ActionResult Configure()
{
return View("/Plugins/Widgets.MyCustomWidget/Views/Configure/Configure.cshtml");
}
public ActionResult PublicInfo(string widgetZone, object additionalData = null)
{
return View("/Plugins/Widgets.MyCustomWidget/Views/Configure/PublicInfo.cshtml");
}
}
}
Step 10) Add a Configure.cshtml (View) inside “Views” folder – In this case we are creating a blank view
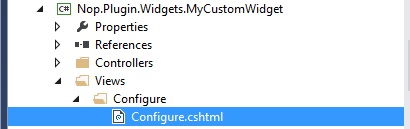
Note: Make sure the output directory (in properties) for your view (Configure.cshtml) is defined as “Copy if newer”
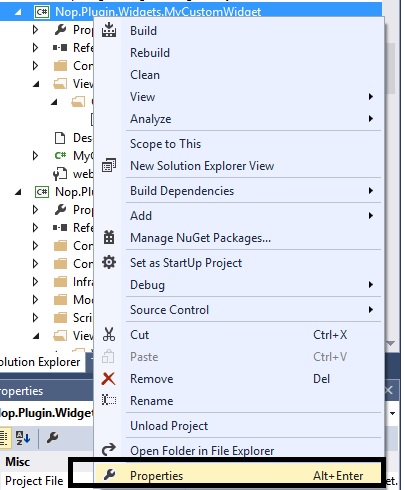
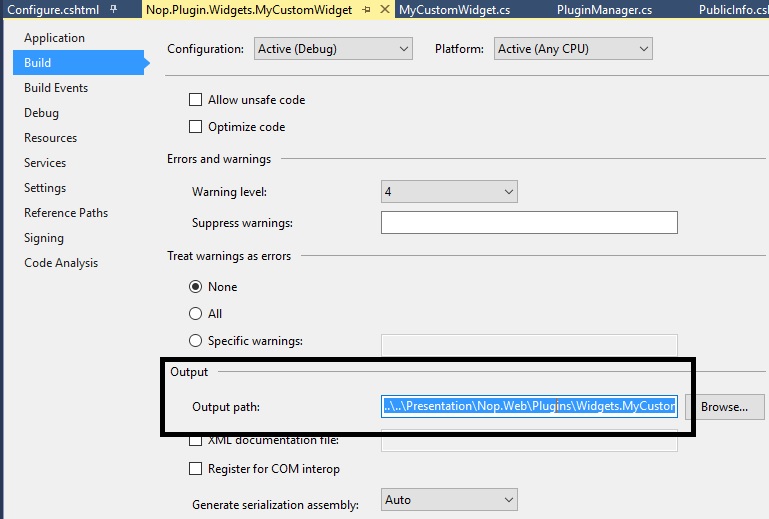
Step 11) Right click on the “Nop.Plugin.Widgets.MyCustomWidget” project and click “Properties”
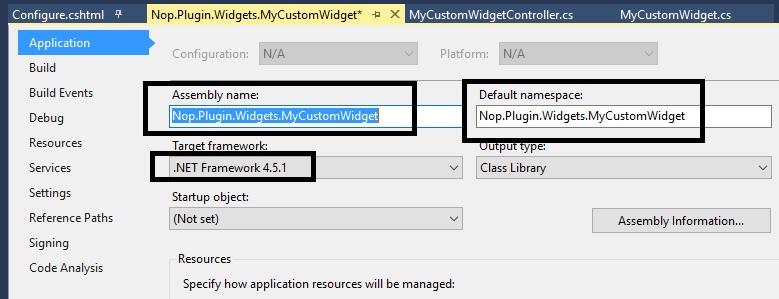
Make sure the assemble name and default namespaces are as follows (along with the.NET Framework):
Go to the left tab “Build” in the properties window:
Scroll down to “Output” and make sure the path is same as:
....PresentationNop.WebPluginsWidgets.MyCustomWidget
Step 12) Make sure everything is saved and look like this (and follows this structure):
Step 13) Right click on your custom widget project and click “Build”
Step 14) After re-building your project, run the whole solution and go to the Administration section and “Clear cache”
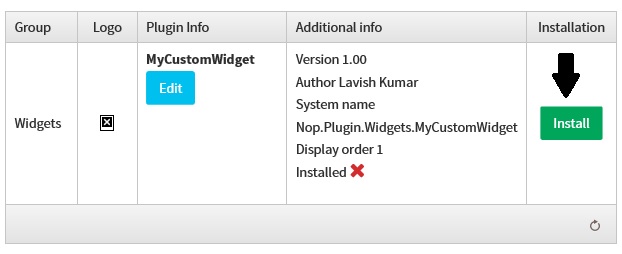
Step 15) Go to the plugin directory and click on the button “Reload list of plugins”


Step 16) Now, if you scroll down, you should be able to see your new custom widget in the list of plugins - Click on the “Install” button for your custom widget.
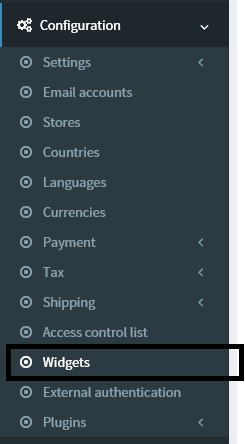
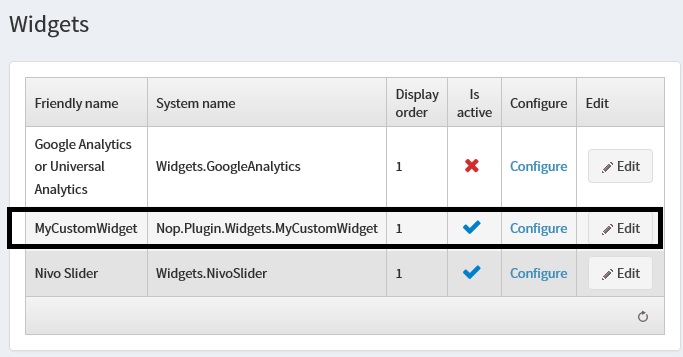
Step 17) Go to: Administration > Configuration > Widgets
Now, you should be able to see your widget in the list.
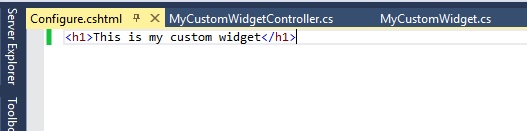
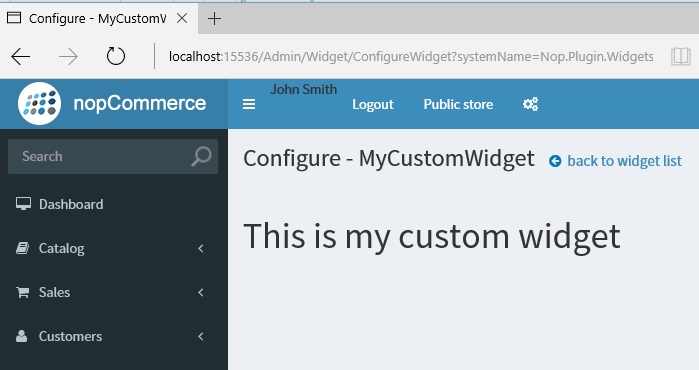
Step 18) Click on the CONFIGURE link and you should be able to see your view like this:
We have successfully created a nopCommerce widget. If you have any questions, please feel free to ask.
-
nopCommerce can be download here: http://www.nopcommerce.com/downloads.aspx
-
nopCommerce Version (used in this article): Version 3.80
-
nopCommerce Support: http://www.nopcommerce.com/boards/