一、概念
1、Spring是一个IOC(DI)和AOP容器框架
二、idea搭建Spring运行时环境并演示IOC容器管理对象
1) 加入JAR包
① Spring自身JAR包:spring-framework-4.0.0.RELEASElibs目录下
spring-beans-4.0.0.RELEASE.jar
spring-context-4.0.0.RELEASE.jar
spring-core-4.0.0.RELEASE.jar
spring-expression-4.0.0.RELEASE.jar
② commons-logging-1.1.1.jar
2)build path 包
file-->Project Structure-->Modules-->点击项目选择Dependencies-->点击+选择上面的jar包,Apply/ok
3)新建Spring的配置文件
① File->New->XML Configuration File-->Spring Config
② 为文件取名字 例如:applicationContext.xml
4)使用Spring创建对象,为属性赋值
Spring就是一个工厂,一个容器,帮组我们管理对象,创建对象。这时候我们自己写一个类Students,交给Spring去管理
示例
步骤1:创建一个Students类,包含studentId属性,sayHello的成员方法
package com.wufq.spring;

public class Students {
    private int studentId;
    private String stuName;

    public int getStudentId() {
        return studentId;
    }

    public void setStudentId(int studentId) {
        this.studentId = studentId;
    }

    public String getStuName() {
        return stuName;
    }

    public void setStuName(String stuName) {
        this.stuName = stuName;
    }

    public void sayHello(){
        System.out.println("Hello World");
    }
}
步骤2:applicationContext.xml文件中使用bean元素定义一个由IOC容器来创建Students类的对象
<?xml version="1.0" encoding="UTF-8"?>
<beans xmlns="http://www.springframework.org/schema/beans"
       xmlns:xsi="http://www.w3.org/2001/XMLSchema-instance"
       xsi:schemaLocation="http://www.springframework.org/schema/beans http://www.springframework.org/schema/beans/spring-beans.xsd">

    <!--使用bean元素定义一个由IOC容器创建的对象 -->

    <!--id属性指定引用bean实例的标识 -->
    <!--class属性指定创建bean类的全类名 -->
    <bean id="stu" class="com.wufq.spring.Students">

        <!--使用property子元素为bean属性赋值  -->
        <property name="studentId" value="1"></property>

        <property name="stuName" value="jack"></property>


    </bean>

</beans>
步骤3:通过Spring的IOC容器创建Students类实例,调用sayHello方法
package com.wufq.spring;

import org.springframework.context.ApplicationContext;
import org.springframework.context.support.ClassPathXmlApplicationContext;

public class Main {
    public static void main(String[] args){

//        1、创建Spring的IOC容器对象
        ApplicationContext context = new ClassPathXmlApplicationContext("applicationContext.xml");
//        2、获取Students对象
        Students stu = (Students) context.getBean("stu"); //stu指的就是applicationContext.xml配置文件内bean标签内的id名称
                            //为什么用getBean方法,原因在于applicationContext.xml用的bean标签来控制的
//        3、调用方法
        stu.sayHello();
    }
}
三、IOC容器和Bean的配置
IOC:反转控制。反转了资源的获取方向--改由容器主动的将资源推送给需要的组件,开发人员不需要知道容器是如何创建资源对象的,值需要提供接受资源的方式即可
DI:依赖注入。是IOC具体的实现方式。
IOC描述的是一种思想,而DI是对IOC思想的具体实现。
1、bean配置解释
配置bean
      配置方式:基于xml的方式,使用全类名的方式
      <bean>:受Spring管理的一个javaBean对象。(javabean简单理解就是一个普通的类)
      id:<bean>的唯一标识。在整个IOC容器中唯一不重复
      class:指定javaBean的全类名。目的是通过反射创建对象。(也就是给一个全类名,然后创建对象)
            Class cls = Class.forName(com.wufq.spring.Students);
            Object obj=cls.newInstance();  必须提供缺省构造器

            注意:这时候需要注意一个问题,那就是newInstance会默认调用缺省构造器,也就是说如果Students类内只有有参的构造方法,而
            没有缺省构造器的时候会报错。
            如果如果想调用有参数的构造方法时,必须先通过getConstructor方法获取指定对象的构造方法,然后在调用newInstance方法来设置有参构造方法内的参数
            Class classs = Class.forName(Naame);
            Constructor con =classs.getConstructor(String.class,int.class);//获取到了指定对象的构造方法
            Object obj = con.newInstance("小强",22); //真实产生对象

        <property> :给对象的属性赋值
                name:指定属性名,指定set风格的属性名
                value:指定属性值
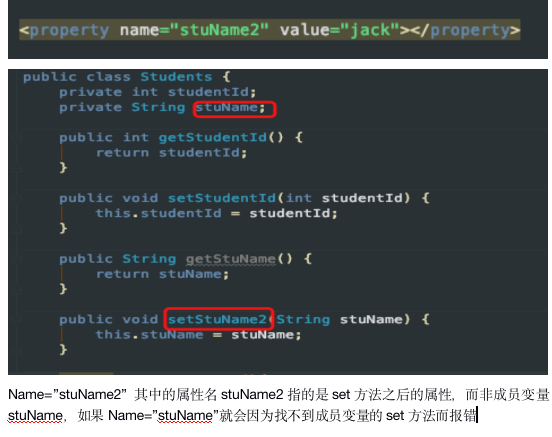
注意点:<property>标签中的name找的是set方法,而不是成员变量,所以要保证成员变量要有set方法。从下图可以看出为什么找的是set方法对应的属性而不是成员变量
2、获取bean的三种方式
Students stu1 = (Students) context.getBean("id");
Students stu2 = context.getBean(Students.class); //这种方式如果有多个bean标签,会抛出异常
Students stu3 = context.getBean("id",Students.class);//Students.class其实找的是全类名
3、给bean的属性赋值
3.1、依赖注入的方式
1)通过bean的setXxx()方法赋值
<!--DI依赖注入的方式:Set方法注入-->
<bean id="car" class="com.wufq.spring.Car">
        <property name="brand" value="奔驰"></property>
        <property name="crop" value="一汽"></property>
        <property name="price" value="400000"></property>

</bean>

//property标签中name就是通过setXxx()方法赋值
2)通过bean的构造器赋值+通过索引指定参数位置+类型区分重载的构造器
<!--DI依赖注入的方式:通过bean构造器赋值+通过类型区分-->
    <bean id="car2" class="com.wufq.spring.Car">
        <constructor-arg value="宝马" index="0" type="java.lang.String"></constructor-arg>
        <constructor-arg value="华晨" index="1" type="java.lang.String"></constructor-arg>
        <constructor-arg value="200" index="2" type="java.lang.Integer"></constructor-arg>
    </bean>
调用
 @Test
    public void testConstructor(){
        ApplicationContext context = new ClassPathXmlApplicationContext("spring-di.xml");
        Car car1 = context.getBean("car1", Car.class);
        System.out.println(car1);
    }

=====执行结果=====
setBrand=奔驰
setCrop=一汽
setPrice=400000
Car{brand='奥迪', crop='一汽', price='450000'}
注意:在调用构造器赋值时,仍然会把set赋值的内容打印出来,这说明在创建IOC容器时,就把所有的bean标签都加载了
3.2、bean标签内可以使用的值
1、字面量
|-- 可以使用字符串表示的值,可以通过value属性(value="")或value子节点(<value></value>)的方式指定
|-- 基本数据类型及其封装类,String等类型都可以采用字面值注入的方式
|-- 若字面值中包含特殊字符,可以使用<![CDATA[]]>把字面值包裹起来
#案例:
1)创建一个Book类,包含私有属性bookId,bookName
2)创建springXml文件
<!--字面量 遇到特殊字符处理方式: 1、使用实体:空格:  >:< <:> 2、通用写法:<![CDATA[任意字符]]> 注意:这种写法一般都是放到<value></value>,任意字符都可以被打出来 --> <bean id="book" class="com.wufq.spring.Book"> <property name="bookId"> <value>10010</value> <!--可以使用value标签的方式来给name赋值,一般情况下还是习惯直接在name后面写value=""--> </property> <property name="bookName"> <value><![CDATA[@#$%^&*()]]]></value> </property> </bean>
3)测试类测试
 @Test
    public void testBook(){
        ApplicationContext context = new ClassPathXmlApplicationContext("spring-di.xml");
        Book book = context.getBean("book", Book.class);
        System.out.println(book);

    }
=====执行结果=====
Book{bookId=10010, bookName='@#$%^&*()]'}
2、除了字面值,如何给对象类型的值赋值(用关键字ref引用其他的bean)-->(引用范围只能是IOC容器内的bean)
    <!--给对象类型赋值,用ref关键字引用同IOC容器内的其他bean-->
    <bean id="person" class="com.wufq.spring.Person">
        <property name="id" value="10010"></property>
        <property name="name" value="苍老师"></property>
        <property name="car" ref="car"></property>

    </bean>
3、内部bean:声明在bean里面的一个bean
<!--内部bean-->
    <bean id="person1" class="com.wufq.spring.Person">
        <property name="id" value="10010"></property>
        <property name="name" value="张无忌"></property>
        <property name="car">
            <bean class="com.wufq.spring.Car">
                <property name="brand" value="法拉利"></property>
                <property name="crop" value="法拉利"></property>
                <property name="price" value="500000"></property>
                <property name="speed" value="350"></property>
            </bean>
        </property>
注意:内部bean只能使用在内部。并且不需要id了。应用于:比如没办法去创建car对象的bean,而又不得不去给car属性赋值,这时候就只能用内部bean的方式赋值
4、给bean的级联方式赋值
<bean id="person" class="com.wufq.spring.Person">
        <property name="id" value="10010"></property>
        <property name="name" value="苍老师"></property>
        <property name="car" ref="car"></property>

        <!--级联方式赋值-->
        <property name="Car.speed" value="500"></property>

    </bean>
注意:name="Car.speed" 意思是类调用属性,然后给属性赋值