一. Phoenix的简介
1. 什么是phoenix
现有hbase的查询工具有很多如:Hive,Tez,Impala,Shark/Spark,Phoenix等。今天主要说Phoenix。phoenix是一个在hbase上面实现的基于hadoop的OLTP技术,具有低延迟、事务性、可使用sql、提供jdbc接口的特点。 而且phoenix还提供了hbase二级索引的解决方案,丰富了hbase查询的多样性,继承了hbase海量数据快速随机查询的特点。但是在生产环境中,不可以用在OLTP中。在线事务处理的环境中,需要低延迟,而Phoenix在查询HBase时,虽然做了一些优化,但延迟还是不小。所以依然是用在OLAT中,再将结果返回存储下来。
Phoenix完全使用Java编写,作为HBase内嵌的JDBC驱动。Phoenix查询引擎会将SQL查询转换为一个或多个HBase扫描,并编排执行以生成标准的JDBC结果集。直接使用HBase API、协同处理器与自定义过滤器,对于简单查询来说,其性能量级是毫秒,对于百万级别的行数来说,其性能量级是秒。
2. phoenix的架构

3. phoenix的下载
选择对应的hbase版本进行下载,我这里使用的是hbase-1.2.6版本,下载地址:http://mirror.bit.edu.cn/apache/phoenix/


[admin@node21 ~]$ cd /opt/software/
[admin@node21 software]$ wget http://mirror.bit.edu.cn/apache/phoenix/apache-phoenix-4.14.0-HBase-1.2/bin/apache-phoenix-4.14.0-HBase-1.2-bin.tar.gz
[admin@node21 software]$ ll
-rw-rw-r-- 1 admin admin 346171547 Jun  5 06:16 apache-phoenix-4.14.0-HBase-1.2-bin.tar.gz
4. 集群部署
| 节点IP | 节点名称 | HBase | Phoniex | Zookeeper | Hadoop |
| 192.168.100.21 | node21 | √ | √ | √ | √ |
| 192.168.100.22 | node22 | √ | √ | √ | |
| 192.168.100.23 | node23 | √ | √ | √ |
Hadoop集群搭建参考: CentOS7.5搭建Hadoop2.7.6完全分布式集群
zookeeper集群搭建参考:CentOS7.5搭建Zookeeper3.4.12集群
HBase集群搭建参考: CentOS7.5搭建HBase1.2.6HA集群
二. Phoenix服务端安装
官网安装文档参考:http://phoenix.apache.org/installation.html
1. 解压缩安装包
[admin@node21 software]$ tar zxvf apache-phoenix-4.14.0-HBase-1.2-bin.tar.gz -C /opt/module/
[admin@node21 software]$ cd /opt/module/
[admin@node21 module]$ mv apache-phoenix-4.14.0-HBase-1.2-bin phoenix-4.14.0-HBase-1.2
[admin@node21 module]$ ll
drwxr-xr-x  5 admin admin   4096 Jun  5 05:41 phoenix-4.14.0-HBase-1.2
2. 拷贝jar包到hbase/lib包
进入到phoenix的安装目录把phoenix-4.12.0-HBase-1.2-server.jar 拷贝到集群中每个节点( 主节点也要拷贝 )的 hbase 的 lib 目录下
[admin@node21 module]$ cd phoenix-4.14.0-HBase-1.2/
[admin@node21 phoenix-4.14.0-HBase-1.2]$ cp phoenix-4.14.0-HBase-1.2-server.jar /opt/module/hbase-1.2.6/lib/
[admin@node21 phoenix-4.14.0-HBase-1.2]$ scp phoenix-4.14.0-HBase-1.2-server.jar admin@node22:/opt/module/hbase-1.2.6/lib/
[admin@node21 phoenix-4.14.0-HBase-1.2]$ scp phoenix-4.14.0-HBase-1.2-server.jar admin@node23:/opt/module/hbase-1.2.6/lib/
3. 配置phoenix环境变量
[admin@node21 phoenix-4.14.0-HBase-1.2]$ sudo vi /etc/profile
export PHOENIX_HOME=/opt/module/phoenix-4.14.0-HBase-1.2
export PATH=$PATH:$PHOENIX_HOME/bin
[admin@node21 phoenix-4.14.0-HBase-1.2]$ source /etc/profile
4. 重启Hbase
                $ zkServer.sh start
[admin@node21 ~]$ start-dfs.sh
[admin@node22 ~]$ start-yarn.sh
[admin@node21 ~]$ start-hbase.sh
5. 启动phoenix
启动命令:phoenix-4.14.0-HBase-1.2/bin/sqlline.py zookeeper
[admin@node21 phoenix-4.14.0-HBase-1.2]$ ./bin/sqlline.py 192.168.100.21,192.168.100.22,192.168.100.23:2181
Setting property: [incremental, false]
Setting property: [isolation, TRANSACTION_READ_COMMITTED]
issuing: !connect jdbc:phoenix:192.168.100.21,192.168.100.22,192.168.100.23:2181 none none org.apache.phoenix.jdbc.PhoenixDriver
Connecting to jdbc:phoenix:192.168.100.21,192.168.100.22,192.168.100.23:2181
SLF4J: Class path contains multiple SLF4J bindings.
SLF4J: Found binding in [jar:file:/opt/module/phoenix-4.14.0-HBase-1.2/phoenix-4.14.0-HBase-1.2-client.jar!/org/slf4j/impl/StaticLoggerBinder.class]
SLF4J: Found binding in [jar:file:/opt/module/hadoop-2.7.6/share/hadoop/common/lib/slf4j-log4j12-1.7.10.jar!/org/slf4j/impl/StaticLoggerBinder.class]
SLF4J: See http://www.slf4j.org/codes.html#multiple_bindings for an explanation.
18/08/21 02:28:30 WARN util.NativeCodeLoader: Unable to load native-hadoop library for your platform... using builtin-java classes where applicable
Connected to: Phoenix (version 4.14)
Driver: PhoenixEmbeddedDriver (version 4.14)
Autocommit status: true
Transaction isolation: TRANSACTION_READ_COMMITTED
Building list of tables and columns for tab-completion (set fastconnect to true to skip)...
133/133 (100%) Done
Done
sqlline version 1.2.0
0: jdbc:phoenix:192.168.100.21,192.168.100.22>
6. 验证phoenix
1)查看所有表
输入 !tables ,查看都有哪些表。以下显示均为Phoenix系统表,系统表中维护了用户表的元数据信息。

2)退出Phoenix
输入 !exit 命令(PS:Phoenix早期版本如(2.11版本)需输入!quilt才可退出,目前高版本已改为!exit命令)

三. Phoenix基本shell命令
提示:以下,可能有部分命令在Phoenix更高版本中已失效,改为其他命令代替,请注意。
0: jdbc:phoenix:192.168.100.21,192.168.100.22> help
!all                Execute the specified SQL against all the current
                    connections
!autocommit         Set autocommit mode on or off
!batch              Start or execute a batch of statements
!brief              Set verbose mode off
!call               Execute a callable statement
!close              Close the current connection to the database
!closeall           Close all current open connections
!columns            List all the columns for the specified table
!commit             Commit the current transaction (if autocommit is off)
!connect            Open a new connection to the database.
!dbinfo             Give metadata information about the database
!describe           Describe a table
!dropall            Drop all tables in the current database
!exportedkeys       List all the exported keys for the specified table
!go                 Select the current connection
!help               Print a summary of command usage
!history            Display the command history
!importedkeys       List all the imported keys for the specified table
!indexes            List all the indexes for the specified table
!isolation          Set the transaction isolation for this connection
!list               List the current connections
!manual             Display the SQLLine manual
!metadata           Obtain metadata information
!nativesql          Show the native SQL for the specified statement
!outputformat       Set the output format for displaying results
                    (table,vertical,csv,tsv,xmlattrs,xmlelements)
!primarykeys        List all the primary keys for the specified table
!procedures         List all the procedures
!properties         Connect to the database specified in the properties file(s)
!quit               Exits the program
!reconnect          Reconnect to the database
!record             Record all output to the specified file
!rehash             Fetch table and column names for command completion
!rollback           Roll back the current transaction (if autocommit is off)
!run                Run a script from the specified file
!save               Save the current variabes and aliases
!scan               Scan for installed JDBC drivers
!script             Start saving a script to a file
!set                Set a sqlline variable

Variable        Value      Description
=============== ========== ================================
autoCommit      true/false Enable/disable automatic
                           transaction commit
autoSave        true/false Automatically save preferences
color           true/false Control whether color is used
                           for display
fastConnect     true/false Skip building table/column list
                           for tab-completion
force           true/false Continue running script even
                           after errors
headerInterval  integer    The interval between which
                           headers are displayed
historyFile     path       File in which to save command
                           history. Default is
                           $HOME/.sqlline/history (UNIX,
                           Linux, Mac OS),
                           $HOME/sqlline/history (Windows)
incremental     true/false Do not receive all rows from
                           server before printing the first
                           row. Uses fewer resources,
                           especially for long-running
                           queries, but column widths may
                           be incorrect.
isolation       LEVEL      Set transaction isolation level
maxColumnWidth  integer    The maximum width to use when
                           displaying columns
maxHeight       integer    The maximum height of the
                           terminal
maxWidth        integer    The maximum width of the
                           terminal
numberFormat    pattern    Format numbers using
                           DecimalFormat pattern
outputFormat    table/vertical/csv/tsv Format mode for
                           result display
propertiesFile  path       File from which SqlLine reads
                           properties on startup; default is
                           $HOME/.sqlline/sqlline.properties
                           (UNIX, Linux, Mac OS),
                           $HOME/sqlline/sqlline.properties
                           (Windows)
rowLimit        integer    Maximum number of rows returned
                           from a query; zero means no
                           limit
showElapsedTime true/false Display execution time when
                           verbose
showHeader      true/false Show column names in query
                           results
showNestedErrs  true/false Display nested errors
showWarnings    true/false Display connection warnings
silent          true/false Be more silent
timeout         integer    Query timeout in seconds; less
                           than zero means no timeout
trimScripts     true/false Remove trailing spaces from
                           lines read from script files
verbose         true/false Show verbose error messages and
                           debug info
!sql                Execute a SQL command
!tables             List all the tables in the database
!typeinfo           Display the type map for the current connection
!verbose            Set verbose mode on

Comments, bug reports, and patches go to ???
四. SQuirrel客户端安装
如果您更愿意使用客户端GUI与Phoenix进行交互,请下载并安装SQuirrel。由于Phoenix是一个JDBC驱动程序,因此与此类工具的集成是无缝的。通过SQuirrel,您可以在SQL选项卡中发出SQL语句(创建表,插入数据,运行查询),并在“对象”选项卡中检查表元数据(即列表,列,主键和类型)。
1. 下载SQuirrel
官网下载地址:http://squirrel-sql.sourceforge.net/

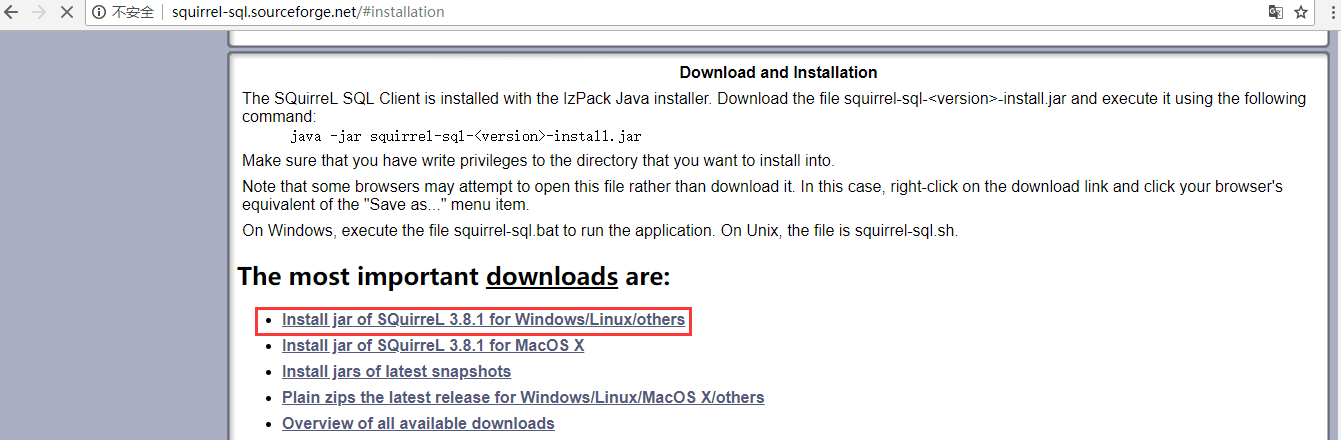
下载完成:
2. 安装Squirrel
进入到squirrel-sql-3.8.1-standard.jar所在目录,cmd,执行如下命令:
java -jar squirrel-sql-3.8.1-standard.jar
然后,除了选择安装路径,其它的可按需选择,否则一路“next”即可。
3. 配置Squirrel客户端
(1)将服务器上Phoenix安装目录下的phoenix-4.14.0-HBase-1.2-client.jar文件,下载到Windows下squirrel-sql安装目录的lib文件夹下,并点击squirrel-sql.bat启动。
(2)添加新的驱动(Drivers -> New Driver),如下图所示:

(3)在弹出的“Add Driver”窗口中,设置Driver的“Name”为:Phoenix,“Phoenix”为:jdbc:phoenix:192.168.100.21,其中,192.168.100.21为你Phoenix服务器的地址;“ClassName”为:org.apache.phoenix.jdbc.PhoenixDriver,最终结果如下图:

参数说明:
Name:phoenix(可以填写其他名称)
ExampleURL:填写HBase集群的zookeeper集群的连接信息,这里是jdbc:phoenix:192.168.100.21:2181
Website URL:这里不填写
Java Class Path:选择phoenix-4.2.2-client.jar(是否选中无所谓,只要在Java Class Path里面就行)
Class Name:org.apache.phoenix.jdbc.PhoenixDriver
设置完成后,点击OK关闭。
(4)点击“Drivers”边上的“Alias”选项卡,和第(2)步的新建驱动一样新建Alias (Aliases -> New Aliases),在弹出的窗口中,填写Name,UserName,Password,这三项可任意填写,在Driver选项的下拉列表中查找我们刚添加的Phoenix驱动,然后点击“Test”按钮测试连接,然后点击“Connect”按钮,弹出“Connection successful”表示配置成功。结果如下图:
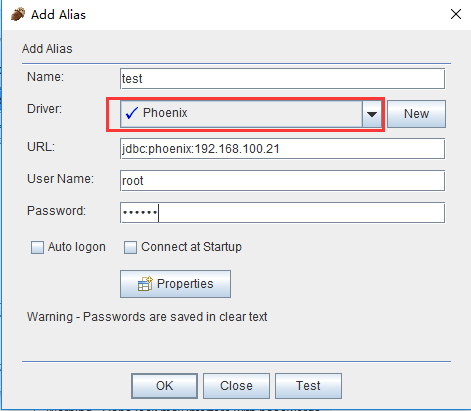
参数说明:
Name:phoenix(可以填写其他名称)
Driver:选择phoenix,即上一步创建的Driver
URL:这里就是HBase集群的zookeeper的连接ip和port
User Name:随便填写
Password:随便填写
点击OK按钮,关闭弹出窗口。
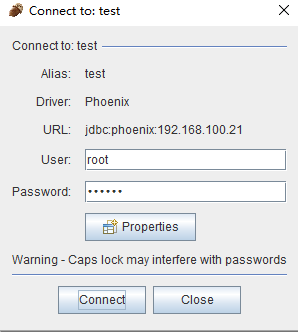
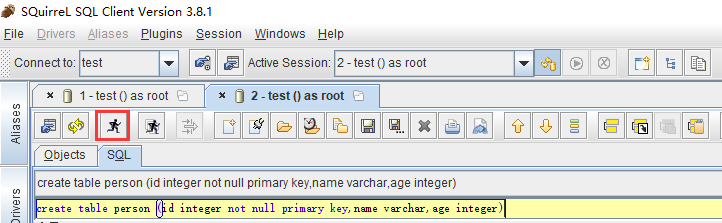
(5)双击新建的test Alias ,然后点击“Connect”按钮,打开SQL命令行,在“SQL”选项卡下,即可编写sql命令,新建一张person表进行测试
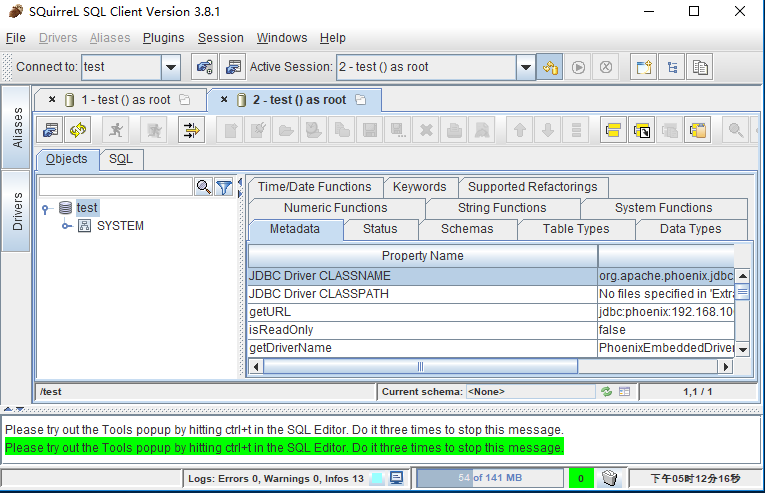
create table person (id integer not null primary key,name varchar,age integer)
插入一条数据:
upsert into person values (1,'zhangsan' ,18)
查询数据:
select * from person
查询结果如下图所示:

(6)到Hbase Shell下去查看我们刚刚添加的数据
可以看到我们新建的person表已经添加进去了,至此squirrel也安装并配置成功了!!
注意:通过squirrel添加的表,会自动转换为大写,由于Phoenix是区分大小写的,所以在Hbase Shell下,表名都要用大写,如:desc 'PERSON',如果用desc 'person'是会报错的。
4.关联hbase已创建的视图表
创建视图表关联hbase;
create view "person" (
pk varchar primary key,
"info"."name" varchar,
"info"."age" varchar,
"info"."birthday" varchar,
"info"."company" varchar,
"address"."contry" varchar,
"address"."province" varchar,
"address"."city" varchar
) as select * from "person";
查询表
select * from "person";
删除视图表
drop view "person";
五. Phoenix的使用
1. 命令行方式
从命令行执行SQL的终端接口现在与Phoenix捆绑在一起。要启动它,请从bin目录执行以下命令:
[admin@node21 phoenix-4.14.0-HBase-1.2]$ ./bin/sqlline.py 192.168.100.21,192.168.100.22,192.168.100.23:2181
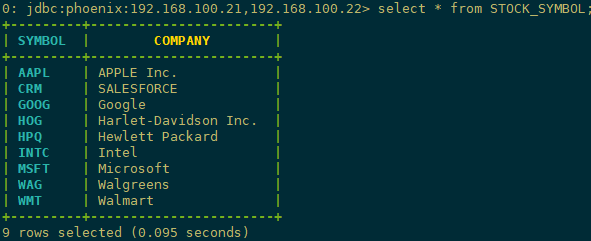
1)建表插入数据:这里演示官方案例,安装包目录下examples包下STOCK_SYMBOL.sql 内容如下:
CREATE TABLE IF NOT EXISTS STOCK_SYMBOL (SYMBOL VARCHAR NOT NULL PRIMARY KEY, COMPANY VARCHAR);
UPSERT INTO STOCK_SYMBOL VALUES ('CRM','SalesForce.com');
SELECT * FROM STOCK_SYMBOL;
要从命令行执行SQL脚本,可以包含如下所示的SQL文件参数:
[admin@node21 phoenix-4.14.0-HBase-1.2]$ sqlline.py 192.168.100.21,192.168.100.22,192.168.100.23:2181 ./examples/STOCK_SYMBOL.sql
Setting property: [incremental, false]
Setting property: [isolation, TRANSACTION_READ_COMMITTED]
Setting property: [run, ./examples/STOCK_SYMBOL.sql]
issuing: !connect jdbc:phoenix:192.168.100.21,192.168.100.22,192.168.100.23:2181 none none org.apache.phoenix.jdbc.PhoenixDriver
Connecting to jdbc:phoenix:192.168.100.21,192.168.100.22,192.168.100.23:2181
SLF4J: Class path contains multiple SLF4J bindings.
SLF4J: Found binding in [jar:file:/opt/module/phoenix-4.14.0-HBase-1.2/phoenix-4.14.0-HBase-1.2-client.jar!/org/slf4j/impl/StaticLoggerBinder.class]
SLF4J: Found binding in [jar:file:/opt/module/hadoop-2.7.6/share/hadoop/common/lib/slf4j-log4j12-1.7.10.jar!/org/slf4j/impl/StaticLoggerBinder.class]
SLF4J: See http://www.slf4j.org/codes.html#multiple_bindings for an explanation.
18/08/21 07:53:36 WARN util.NativeCodeLoader: Unable to load native-hadoop library for your platform... using builtin-java classes where applicable
Connected to: Phoenix (version 4.14)
Driver: PhoenixEmbeddedDriver (version 4.14)
Autocommit status: true
Transaction isolation: TRANSACTION_READ_COMMITTED
Building list of tables and columns for tab-completion (set fastconnect to true to skip)...
136/136 (100%) Done
Done
1/4          CREATE TABLE IF NOT EXISTS STOCK_SYMBOL (SYMBOL VARCHAR NOT NULL PRIMARY KEY, COMPANY VARCHAR);
No rows affected (3.818 seconds)
2/4          UPSERT INTO STOCK_SYMBOL VALUES ('CRM','SalesForce.com');
1 row affected (0.166 seconds)
3/4          SELECT * FROM STOCK_SYMBOL;
+---------+-----------------+
| SYMBOL  |     COMPANY     |
+---------+-----------------+
| CRM     | SalesForce.com  |
+---------+-----------------+
1 row selected (0.184 seconds)
4/4
Closing: org.apache.phoenix.jdbc.PhoenixConnection
sqlline version 1.2.0
examples/STOCK_SYMBOL.csv
AAPL,APPLE Inc.
CRM,SALESFORCE
GOOG,Google
HOG,Harlet-Davidson Inc.
HPQ,Hewlett Packard
INTC,Intel
MSFT,Microsoft
WAG,Walgreens
WMT,Walmart
2)导入数据:此外,您可以使用bin / psql.py加载CSV数据或执行SQL脚本。例如:
[admin@node21 phoenix-4.14.0-HBase-1.2]$ ./bin/psql.py -t STOCK_SYMBOL 192.168.100.21,192.168.100.22,192.168.100.23:2181 ./examples/STOCK_SYMBOL.csv
PS:其中 -t 后面是表名, ../examples/STOCK_SYMBOL.csv是csv数据(注意数据的分隔符需要是逗号)。

3)查询数据
[admin@node21 phoenix-4.14.0-HBase-1.2]$ ./bin/sqlline.py 192.168.100.21,192.168.100.22,192.168.100.23:2181
0: jdbc:phoenix:192.168.100.21,192.168.100.22> select * from STOCK_SYMBOL;
查询总条数

2. 客户端方式
SQuirrel是用来连接Phoenix的客户端,前面已做介绍。
六. Phoenix的api操作HBase
1. 参考资料链接
常见问题参考:http://phoenix.apache.org/faq.html#What_is_the_Phoenix_JDBC_URL_syntax
帮助文档参考:https://help.aliyun.com/document_detail/69105.html?spm=a2c4g.11186623.6.591.420a48cbSK2wy8
参考文档: http://phoenix.apache.org/phoenix_spark.html
2. 开发环境准备
IDEA、jdk1.8、window10、hadoop2.7.6、hbase1.2.6、phoenix4.14.0
1、从集群拷贝以下文件:core-site.xml、hbase-site.xml、hdfs-site.xml文件放到工程src下
2、把phoenix的phoenix-4.14.0-client.jar和phoenix-core-4.14.0.jar添加到工程classpath
3、配置集群中各节点的hosts文件,把客户端的hostname:IP添加进去
4、在客户端host文件中加入集群的hostname和IP
3. 例一
package com.xyg.phoenix;

import java.sql.Connection;
import java.sql.DriverManager;
import java.sql.ResultSet;
import java.sql.SQLException;
import java.sql.Statement;

/**
 * Author: Mr.Deng
 * Date: 2018/8/25
 * Desc: create table, create index, insert data, select table.
 */
public class TestPhoenixJDBC {

    private static String driver = "org.apache.phoenix.jdbc.PhoenixDriver";

    public static void main(String[] args) throws SQLException {

        Connection conn = null;
        Statement stmt = null;
        ResultSet rs = null;
        try {
              Class.forName(driver);
            } catch (ClassNotFoundException e) {
                e.printStackTrace();
            }
        conn = DriverManager.getConnection("jdbc:phoenix:node21,node22,node23:2181");
        stmt = conn.createStatement();
        stmt.execute("drop table if exists test");
        stmt.execute("create table test (mykey integer not null primary key, mycolumn varchar)");
        stmt.execute("create index test_idx on test(mycolumn)");
        stmt.executeUpdate("upsert into test values (1,'World!')");
        stmt.executeUpdate("upsert into test values (2,'Hello')");
        stmt.executeUpdate("upsert into test values (3,'World!')");
        conn.commit();
        rs = stmt.executeQuery("select mykey from test where mycolumn='Hello'");
        while (rs.next()) {
            System.out.println(rs.getInt(1));
        }
        stmt.close();
        rs.close();
        conn.close();

    }

}