一 Redis单机安装
1 Redis下载安装
1.1 检查依赖环境(Redis是C语言开发,编译依赖gcc环境)
[root@node21 redis-4.0.10]$ gcc -v
-bash: gcc: command not found
[root@node21 redis-4.0.10]$ yum install -y gcc
1.2 解压文件到指定目录
[root@node21 software]$ wget http://download.redis.io/releases/redis-4.0.10.tar.gz
[root@node21 software]$ ll
-rw-rw-r-- 1 root root   1738465 June 14 00:51 redis-4.0.10.tar.gz
[root@node21 software]$ tar xzf redis-4.0.10.tar.gz -C /opt/module/
1.3 编译文件
[root@node21 software]$ cd /opt/module/redis-4.0.10/
[root@node21 redis-4.0.10]$ make
1)如果没有安装gcc,编译会出现如下错误提示。(如果编译失败,必须删除文件夹,重新解压)
/bin/sh: cc: command not found
make[1]: *** [adlist.o] Error 127
make[1]: Leaving directory `/opt/module/redis-4.0.10/src'
make: *** [all] Error 2
2)安装成功

1.4 安装
[root@node21 redis-4.0.10]$ make PREFIX=/opt/module/redis-4.0.10 install
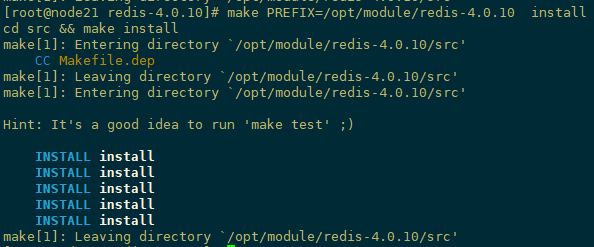
安装完成后,在redis安装目录下会出现一个bin目录,bin目录下有几个可执行文件
redis-benchmark         ---性能测试工具
redis-check-aof         ---AOF文件修复工具
redis-check-rdb         ---RDB文件检测工具(快照持久化文件)
redis-cli               ---命令行客户端
redis-sentinel -> redis-server   ---redis哨兵
redis-server            ---redis服务器启动命令
1.5 配置环境变量
[root@node21 redis-4.0.10]$  vi /etc/profile
末未追加如下
export  REDIS_HOME=/opt/module/redis-4.0.10
export  PATH=$REDIS_HOME/bin:$PATH
[root@node21 redis-4.0.10]# source /etc/profile
2 Redis服务启动
2.1 前台模式启动(默认)
[root@node21 redis-4.0.10]$ bin/redis-server
前台服务端启动成功后,不能进行其他操作,使用Ctrl+c结束或者服务器关闭redis服务自动结束,此种方式不推荐,成功启动信息如下


[root@node21 redis-4.0.10]$ bin/redis-server
5356:C 19 June 22:47:00.955 # oO0OoO0OoO0Oo Redis is starting oO0OoO0OoO0Oo
5356:C 19 June 22:47:00.956 # Redis version=4.0.10, bits=64, commit=00000000, modified=0, pid=5356, just started
5356:C 19 June 22:47:00.956 # Warning: no config file specified, using the default config. In order to specify a config file use bin/redis-server /path/to/redis.conf
                _._
           _.-``__ ''-._
      _.-``    `.  `_.  ''-._           Redis 4.0.10 (00000000/0) 64 bit
  .-`` .-```.  ```/    _.,_ ''-._
 (    '      ,       .-`  | `,    )     Running in standalone mode
 |`-._`-...-` __...-.``-._|'` _.-'|     Port: 6379
 |    `-._   `._    /     _.-'    |     PID: 5356
  `-._    `-._  `-./  _.-'    _.-'
 |`-._`-._    `-.__.-'    _.-'_.-'|
 |    `-._`-._        _.-'_.-'    |           http://redis.io
  `-._    `-._`-.__.-'_.-'    _.-'
 |`-._`-._    `-.__.-'    _.-'_.-'|
 |    `-._`-._        _.-'_.-'    |
  `-._    `-._`-.__.-'_.-'    _.-'
      `-._    `-.__.-'    _.-'
          `-._        _.-'
              `-.__.-'

5356:M 19 June 22:47:00.960 # WARNING: The TCP backlog setting of 511 cannot be enforced because /proc/sys/net/core/somaxconn is set to the lower value of 128.
5356:M 19 June 22:47:00.960 # Server initialized
5356:M 19 June 22:47:00.960 # WARNING overcommit_memory is set to 0! Background save may fail under low memory condition. To fix this issue add 'vm.overcommit_memory =
1' to /etc/sysctl.conf and then reboot or run the command 'sysctl vm.overcommit_memory=1' for this to take effect.5356:M 19 June 22:47:00.960 # WARNING you have Transparent Huge Pages (THP) support enabled in your kernel. This will create latency and memory usage issues with Redis.
 To fix this issue run the command 'echo never > /sys/kernel/mm/transparent_hugepage/enabled' as root, and add it to your /etc/rc.local in order to retain the setting after a reboot. Redis must be restarted after THP is disabled.5356:M 19 June 22:47:00.960 * Ready to accept connections
2.2 后台模式启动
修改redis.conf 将daemonize no 改为 daemonize yes,说明:将Redis设置为后台进程;绑定ip由本地ip换成真机ip,方便对外访问
[root@node21 redis-4.0.10]# vi redis.conf


修改完之后指定配置文件为后台启动
[root@node21 redis-4.0.10]# ./bin/redis-server ./redis.conf
5388:C 19 June 23:09:44.115 # oO0OoO0OoO0Oo Redis is starting oO0OoO0OoO0Oo
5388:C 19 June 23:09:44.115 # Redis version=4.0.10, bits=64, commit=00000000, modified=0, pid=5388, just started
5388:C 19 June 23:09:44.115 # Configuration loaded
Redis默认端口6379,通过当前服务进行查看
[root@node21 redis-4.0.10]# ps -ef |grep redis
root 5356 1    0 22:47 ?     00:00:02 bin/redis-server *:6379
root 5391 5364 0 23:12 pts/1 00:00:00 grep --color=auto -i redis
3 Redis客户端连接
连接客户端 :redis-cli -h ip地址 -p 端口
[root@node21 redis-4.0.10]# ./bin/redis-cli -h 192.168.100.21 -p 6379
192.168.100.21:6379>
redis-cli连上redis服务后,可以在命令行发送命令 ping,测试客户端和Redis的连接是否正常,如果连接正常会收到回复pong。
192.168.100.21:6379> ping
PONG
4 Redis停止
强制终止Redis进程可能会导致redis持久化数据丢失
[root@node21 redis-4.0.10]# kill -9 5336 #pid需要通过‘ps -aux |grep redis’ 进行查询
正确停止Redis连接方式应向redis发送shutdown指令(关闭默认端口)
[root@node21 redis-4.0.10]# redis-cli -h 192.168.100.21 -p 6379 shutdown
quit 退出客户端连接
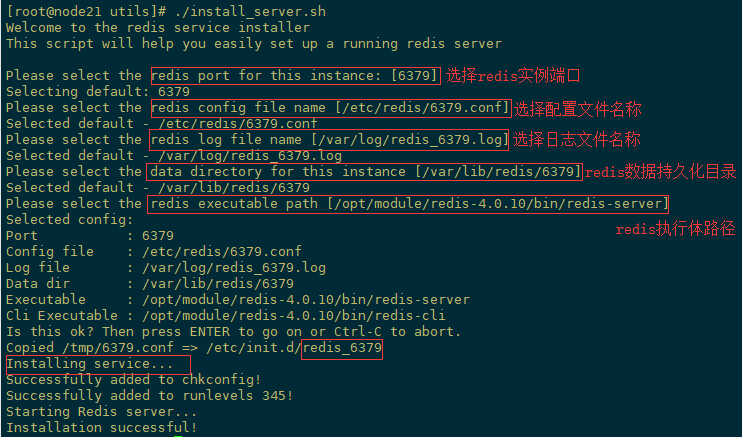
5 安装服务脚本
[root@node21 redis-4.0.10]# cd utils/
[root@node21 utils]# ./install_server.sh
查看服务运行状态
[root@node21 utils]# service redis_6379 status

停止Redis服务
[root@node21 admin]# service redis_6379 stop
二 Redis集群安装
右侧是官网文档(Redis集群规范) http://redis.io/topics/cluster-spec
右侧是上文链接的翻译文档 http://redisdoc.com/topic/cluster-spec.html#cluster-spec
1 原理简述
此处的集群指的是Cluster, 通过分区/分片来实现一定程度的分布式与高可用部署。

2 集群配置
Redis 最小集群规划,需要包含至少三个主节点,此处测试部署具有三个主服务器和三个从服务器的六节点群集。计划是在一台机器上模拟一个集群,主节点端口7000,7001,7002, 从节点7003,7004,7005,这和生产环境的集群搭建没本质区别。
2.1 创建节点目录
创建一个新目录以及redis实例已端口号命名的以下目录
[root@node21 module]# mkdir redis-Cluster
[root@node21 module]# cd redis-Cluster
[root@node21 redis-Cluster]# mkdir 7000 7001 7002 7003 7004 7005
2.2 创建配置文件
在每个节点目录中创建一个文件redis.conf,从7000到7005.作为配置文件的模板,以下是最小的Redis群集配置文件,每个节点实例配置稍作修改
[root@node21 redis-Cluster]# cd 7000
[root@node21 7000]# vi redis.conf
port 7000                       #端口7000,7001,7002,7003,7004,7005
cluster-enabled yes             #开启集群
cluster-config-file nodes.conf  #集群配置信息,开启集群后自动生成
cluster-node-timeout 5000       #请求超时时长
appendonly yes                  #开启aof日志,它会每次写操作都记录一条日志
daemonize yes                   #redis后台运行
bind 192.168.100.21             #默认ip为127.0.0.1 需要改为其他节点机器可访问的ip 否则创建集群时无法访问对应的端口,无法创建集群
pidfile  /opt/module/redis-Cluster/7000/redis_7000.pid     #pidfile文件对应7000,7001,7002,7003,7004,7005
dir  /opt/module/redis-Cluster/7000/    #数据文件存放位置对应7000,7001,7002,7003,7004,7005
2.3 启动节点服务
分别启动6个实例,可执行文件redis-server用之前单机版的,已配过环境变量
[root@node21 redis-Cluster]# redis-server 7000/redis.conf
[root@node21 redis-Cluster]# redis-server 7001/redis.conf
[root@node21 redis-Cluster]# redis-server 7002/redis.conf
[root@node21 redis-Cluster]# redis-server 7003/redis.conf
[root@node21 redis-Cluster]# redis-server 7004/redis.conf
[root@node21 redis-Cluster]# redis-server 7005/redis.conf
6台实例运行起来后,查看进程,下一步创建集群
[root@node21 redis-Cluster]# ps -ef |grep redis
root       9240      1  0 18:11 ?        00:00:00 redis-server 192.168.100.21:7000 [cluster]
root       9245      1  0 18:11 ?        00:00:01 redis-server 192.168.100.21:7001 [cluster]
root       9265      1  0 18:14 ?        00:00:00 redis-server 192.168.100.21:7002 [cluster]
root       9270      1  0 18:14 ?        00:00:00 redis-server 192.168.100.21:7003 [cluster]
root       9275      1  0 18:14 ?        00:00:00 redis-server 192.168.100.21:7004 [cluster]
root       9280      1  0 18:14 ?        00:00:00 redis-server 192.168.100.21:7005 [cluster]
2.4 创建集群
redis安装目录src中redis-trib.rb完成集群创建,redis-trib.rb命令需要安装gem redis模块才能运行,gem redis需要Ruby环境
[root@node21 redis-Cluster]# yum install ruby rubygems -y
[root@node21 redis-Cluster]# gem install redis
创建新集群命令:命令create,选项--replicas 1意味着我们希望每个创建的主服务器都有一个从服 其他参数是我要用于创建新集群的实例的地址列表。
[root@node21 src]# pwd
/opt/module/redis-4.0.10/src
[root@node21 src]# ./redis-trib.rb create --replicas 1 192.168.100.21:7000 192.168.100.21:7001 192.168.100.21:7002 192.168.100.21:7003 192.168.100.21:7004 192.168.100.21:7005
创建命令运行界面如下,主要是分配主从和槽位数
>>> Creating cluster
>>> Performing hash slots allocation on 6 nodes...
Using 3 masters:
192.168.100.21:7000
192.168.100.21:7001
192.168.100.21:7002
Adding replica 192.168.100.21:7004 to 192.168.100.21:7000
Adding replica 192.168.100.21:7005 to 192.168.100.21:7001
Adding replica 192.168.100.21:7003 to 192.168.100.21:7002
>>> Trying to optimize slaves allocation for anti-affinity
[WARNING] Some slaves are in the same host as their master
M: 2b2a9cab4591508e44290a1fd16781e5c9099010 192.168.100.21:7000
   slots:0-5460 (5461 slots) master
M: 69d97b0c7c3c1587f0e4ed0abb82c01fa66a5478 192.168.100.21:7001
   slots:5461-10922 (5462 slots) master
M: 4728f1d7da089b6ec9c20f8c9907652536ee5804 192.168.100.21:7002
   slots:10923-16383 (5461 slots) master
S: 73f894c5ddca484f5b72fd7f1f08612e50681133 192.168.100.21:7003
   replicates 4728f1d7da089b6ec9c20f8c9907652536ee5804
S: 7f09c99b30f16ed583f9e144c75e2bb065c0528d 192.168.100.21:7004
   replicates 2b2a9cab4591508e44290a1fd16781e5c9099010
S: 23d31961a1ad249b4af1d9f7be6cf3abc1b82f0a 192.168.100.21:7005
   replicates 69d97b0c7c3c1587f0e4ed0abb82c01fa66a5478
Can I set the above configuration? (type 'yes' to accept): yes
>>> Nodes configuration updated
>>> Assign a different config epoch to each node
>>> Sending CLUSTER MEET messages to join the cluster
Waiting for the cluster to join..
>>> Performing Cluster Check (using node 192.168.100.21:7000)
M: 2b2a9cab4591508e44290a1fd16781e5c9099010 192.168.100.21:7000
   slots:0-5460 (5461 slots) master
   1 additional replica(s)
S: 73f894c5ddca484f5b72fd7f1f08612e50681133 192.168.100.21:7003
   slots: (0 slots) slave
   replicates 4728f1d7da089b6ec9c20f8c9907652536ee5804
S: 7f09c99b30f16ed583f9e144c75e2bb065c0528d 192.168.100.21:7004
   slots: (0 slots) slave
   replicates 2b2a9cab4591508e44290a1fd16781e5c9099010
S: 23d31961a1ad249b4af1d9f7be6cf3abc1b82f0a 192.168.100.21:7005
   slots: (0 slots) slave
   replicates 69d97b0c7c3c1587f0e4ed0abb82c01fa66a5478
M: 69d97b0c7c3c1587f0e4ed0abb82c01fa66a5478 192.168.100.21:7001
   slots:5461-10922 (5462 slots) master
   1 additional replica(s)
M: 4728f1d7da089b6ec9c20f8c9907652536ee5804 192.168.100.21:7002
   slots:10923-16383 (5461 slots) master
   1 additional replica(s)
[OK] All nodes agree about slots configuration.
>>> Check for open slots...
>>> Check slots coverage...
[OK] All 16384 slots covered.
3 集群测试
集群客户端连接方式 redis-cli -c
[root@node21 redis-Cluster]# redis-cli -c -h 192.168.100.21 -p 7000
192.168.100.21:7000> set foo bar
-> Redirected to slot [12182] located at 192.168.100.21:7002
OK
192.168.100.21:7002> get foo
"bar"
192.168.100.21:7002> keys *
1) "foo"
192.168.100.21:7002> exit
[root@node21 redis-Cluster]# redis-cli -c -h 192.168.100.21 -p 7000
192.168.100.21:7000> keys *
(empty list or set)
192.168.100.21:7000> get foo
-> Redirected to slot [12182] located at 192.168.100.21:7002
"bar"
192.168.100.21:7002>
不加-c会报错如下
[root@node21 redis-Cluster]# redis-cli -p 7000
192.168.100.21:7000> set foo bar
(error) MOVED 12182 192.168.100.21:7002
4验证故障转移
我们可以使用以下命令识别集群并使其崩溃:
[root@node21 redis-Cluster]# redis-cli -h 192.168.100.21 -p 7000 cluster nodes | grep master
2b2a9cab4591508e44290a1fd16781e5c9099010 192.168.100.21:7000@17000 myself,master - 0 1532157916000 1 connected 0-5460
69d97b0c7c3c1587f0e4ed0abb82c01fa66a5478 192.168.100.21:7001@17001 master - 0 1532157917389 2 connected 5461-10922
4728f1d7da089b6ec9c20f8c9907652536ee5804 192.168.100.21:7002@17002 master - 0 1532157917000 3 connected 10923-16383
如上,7000,7001和7002都是主服。让我们使用DEBUG SEGFAULT命令崩溃节点7002 :
[root@node21 redis-Cluster]# redis-cli -h 192.168.100.21 -p 7002 debug segfault
Error: Server closed the connection
7002的从服7003节点部分日志信息如下
8417:S 21 Jul 13:51:43.245 * Background AOF rewrite finished successfully
8417:S 21 Jul 15:27:45.370 # Connection with master lost.
8417:S 21 Jul 15:27:45.371 * Caching the disconnected master state.
8417:S 21 Jul 15:27:45.595 * Connecting to MASTER 192.168.100.21:7002
8417:S 21 Jul 15:27:45.595 * MASTER <-> SLAVE sync started
8417:S 21 Jul 15:27:45.595 # Error condition on socket for SYNC: Connection refused
8417:S 21 Jul 15:27:46.604 * Connecting to MASTER 192.168.100.21:7002
8417:S 21 Jul 15:27:46.605 * MASTER <-> SLAVE sync started
8417:S 21 Jul 15:27:46.605 # Error condition on socket for SYNC: Connection refused
8417:S 21 Jul 15:27:47.999 * Connecting to MASTER 192.168.100.21:7002
8417:S 21 Jul 15:27:47.999 * MASTER <-> SLAVE sync started
8417:S 21 Jul 15:27:47.999 # Error condition on socket for SYNC: Connection refused
8417:S 21 Jul 15:27:49.008 * Connecting to MASTER 192.168.100.21:7002
8417:S 21 Jul 15:27:49.008 * MASTER <-> SLAVE sync started
8417:S 21 Jul 15:27:49.008 # Error condition on socket for SYNC: Connection refused
8417:S 21 Jul 15:27:50.023 * Connecting to MASTER 192.168.100.21:7002
8417:S 21 Jul 15:27:50.023 * MASTER <-> SLAVE sync started
8417:S 21 Jul 15:27:50.024 # Error condition on socket for SYNC: Connection refused
8417:S 21 Jul 15:27:51.032 * FAIL message received from 69d97b0c7c3c1587f0e4ed0abb82c01fa66a5478 about 4728f1d7da089b6ec9c20f8c9907652536ee5804
8417:S 21 Jul 15:27:51.032 * Connecting to MASTER 192.168.100.21:7002
8417:S 21 Jul 15:27:51.032 * MASTER <-> SLAVE sync started
8417:S 21 Jul 15:27:51.032 # Start of election delayed for 699 milliseconds (rank #0, offset 7992).
8417:S 21 Jul 15:27:51.032 # Cluster state changed: fail
8417:S 21 Jul 15:27:51.033 # Error condition on socket for SYNC: Connection refused
8417:S 21 Jul 15:27:51.738 # Starting a failover election for epoch 7.
8417:S 21 Jul 15:27:51.749 # Failover election won: I'm the new master.
8417:S 21 Jul 15:27:51.750 # configEpoch set to 7 after successful failover
8417:M 21 Jul 15:27:51.750 # Setting secondary replication ID to 8ef669a5f5a6e6efafed75005ca9426d539c4c47, valid up to offset: 7993. New replication ID is bec5f6f31031
1deaa4aff371b7244cd131f594fe8417:M 21 Jul 15:27:51.750 * Discarding previously cached master state.
8417:M 21 Jul 15:27:51.750 # Cluster state changed: ok
客户端测试:7002的数据自动跳转到7003上
[root@node21 redis-Cluster]# redis-cli -c -h 192.168.100.21 -p 7000
192.168.100.21:7000> get foo
-> Redirected to slot [12182] located at 192.168.100.21:7003
"bar"
192.168.100.21:7003>
查看集群节点状态
[root@node21 redis-Cluster]# redis-cli -h 192.168.100.21 -p 7000 cluster nodes
2b2a9cab4591508e44290a1fd16781e5c9099010 192.168.100.21:7000@17000 myself,master - 0 1532158988000 1 connected 0-5460
73f894c5ddca484f5b72fd7f1f08612e50681133 192.168.100.21:7003@17003 master - 0 1532158987255 7 connected 10923-16383
7f09c99b30f16ed583f9e144c75e2bb065c0528d 192.168.100.21:7004@17004 slave 2b2a9cab4591508e44290a1fd16781e5c9099010 0 1532158987558 5 connected
23d31961a1ad249b4af1d9f7be6cf3abc1b82f0a 192.168.100.21:7005@17005 slave 69d97b0c7c3c1587f0e4ed0abb82c01fa66a5478 0 1532158988769 6 connected
69d97b0c7c3c1587f0e4ed0abb82c01fa66a5478 192.168.100.21:7001@17001 master - 0 1532158987558 2 connected 5461-10922
4728f1d7da089b6ec9c20f8c9907652536ee5804 192.168.100.21:7002@17002 master,fail - 1532158065392 1532158064562 3 disconnected
7002再启动,又成为集群中的从服。
5 其他说明
5.1 添加新节点为主服
使用add-node命令将新节点的地址指定为第一个参数,并将集群中随机存在节点的地址指定为第二个参数,redis-trib在运行之前也会检查集群的状态。
# ./redis-trib.rb add-node 192.168.100.21:7006 192.168.100.21:7000
当添加新节点为主节点时,
- 它没有数据,因为它没有分配的哈希槽。
- 因为它是没有分配插槽的主设备,所以当从设备想要成为主设备时,它不参与选举过程。
现在可以使用resharding功能为此节点分配哈希槽redis-trib,重新分区,具体参考官方文档,这里不详述了。
5.2 添加新节点为副本
添加新副本分配给指定的主副本
./redis-trib.rb add-node --slave --master-id 3c3a0c74aae0b56170ccb03a76b60cfe7dc1912e 192.168.100.21:7006 192.168.100.21:7000
三 安装报错解决
1 gem安装超时
解决gem install redis 因为网络问题造成连接超时的问题,把gem镜像换成国内淘宝的
[root@node21 redis-Cluster]# gem sources -l
*** CURRENT SOURCES ***

https://rubygems.org/
[root@node21 redis-Cluster]# gem sources --remove https://rubygems.org/
https://rubygems.org/ removed from sources
[root@node21 redis-Cluster]# gem sources -a https://ruby.taobao.org/
https://ruby.taobao.org/ added to sources
[root@node21 redis-Cluster]# gem sources -l
*** CURRENT SOURCES ***

https://ruby.taobao.org/
2Ruby版本过低
[root@node21 redis-Cluster]# gem install redis
Fetching: redis-4.0.1.gem (100%)
ERROR:  Error installing redis:
    redis requires Ruby version >= 2.2.2.
我这里CentOS7.5默认安装的Ruby版本为2.0,需升级为2.2.2以上(ruby -v),先安装RVM,用RVM升级Ruby
1、sudo yum install curl  安装curl
2、http://www.rvm.io/ 官网首页就可以看到 $ gpg --keyserver hkp://keys.gnupg.net --recv-keys 409B6B1796C275462A1703113804BB82D39DC0E3 7D2BAF1CF37B13E2069D6956105BD0E739499BDB
3、下载rvm  $ curl -sSL https://get.rvm.io | bash -s stable
4、查找配置文件 find / -name rvm.sh
5、配置文件生效 source /etc/profile.d/rvm.sh
6、下载rvm依赖 rvm requirements
7、查看rvm库ruby版本 rvm list known
8、安装ruby指定版本 rvm install ruby-2.5.1
9、使用ruby版本默认 rvm use 2.5.1 default
10.gem install redis
3创建集群报错
集群数据不为空,Node 192.168.100.21:7001 is not empty
[root@node21 src]# ./redis-trib.rb create --replicas 1 192.168.100.21:7000 192.168.100.21:7001 192.168.100.21:7002 192.168.100.21:7003 192.168.100.21:7004 192.168.100.
21:7005>>> Creating cluster
[ERR] Node 192.168.100.21:7001 is not empty. Either the node already knows other nodes (check with CLUSTER NODES) or contains some key in database 0.
清空数据,在将每个节点下aof、rdb、nodes.conf本地备份文件删除 ,重新创建即可成功
[root@node21 src]# redis-cli -h 192.168.100.21 -p 7001
192.168.100.21:7001> flushdb
OK
四Redis配置说明
Redis 的配置文件位于 Redis 安装目录下,文件名为 redis.conf,配置项说明如下:
1. Redis默认不是以守护进程的方式运行,可以通过该配置项修改,使用yes启用守护进程
daemonize no
2. 当Redis以守护进程方式运行时,Redis默认会把pid写入/var/run/redis.pid文件,可以通过pidfile指定
pidfile /var/run/redis.pid
3. 指定Redis监听端口,默认端口为6379,
port 6379
4. 绑定的主机地址
bind 127.0.0.1
5.当 客户端闲置多长时间后关闭连接,如果指定为0,表示关闭该功能
timeout 300
6. 指定日志记录级别,Redis总共支持四个级别:debug、verbose、notice、warning,默认为verbose
loglevel verbose
7. 日志记录方式,默认为标准输出,如果配置Redis为守护进程方式运行,而这里又配置为日志记录方式为标准输出,则日志将会发送给/dev/null
logfile stdout
8. 设置数据库的数量,默认数据库为0,可以使用SELECT <dbid>命令在连接上指定数据库id
databases 16
9. 指定在多长时间内,有多少次更新操作,就将数据同步到数据文件,可以多个条件配合
save <seconds> <changes>
Redis默认配置文件中提供了三个条件:
save 900 1
save 300 10
save 60 10000
分别表示900秒(15分钟)内有1个更改,300秒(5分钟)内有10个更改以及60秒内有10000个更改。
10. 指定存储至本地数据库时是否压缩数据,默认为yes,Redis采用LZF压缩,如果为了节省CPU时间,可以关闭该选项,但会导致数据库文件变的巨大
rdbcompression yes
11. 指定本地数据库文件名,默认值为dump.rdb
dbfilename dump.rdb
12. 指定本地数据库存放目录
dir ./
13. 设置当本机为slav服务时,设置master服务的IP地址及端口,在Redis启动时,它会自动从master进行数据同步
slaveof <masterip> <masterport>
14. 当master服务设置了密码保护时,slav服务连接master的密码
masterauth <master-password>
15. 设置Redis连接密码,如果配置了连接密码,客户端在连接Redis时需要通过AUTH <password>命令提供密码,默认关闭
requirepass foobared
16. 设置同一时间最大客户端连接数,默认无限制,Redis可以同时打开的客户端连接数为Redis进程可以打开的最大文件描述符数,如果设置 maxclients 0,表示不作限制。当客户端连接数到达限制时,Redis会关闭新的连接并向客户端返回max number of clients reached错误信息
maxclients 128
17. 指定Redis最大内存限制,Redis在启动时会把数据加载到内存中,达到最大内存后,Redis会先尝试清除已到期或即将到期的Key,当此方法处理 后,仍然到达最大内存设置,将无法再进行写入操作,但仍然可以进行读取操作。Redis新的vm机制,会把Key存放内存,Value会存放在swap区
maxmemory <bytes>
18. 指定是否在每次更新操作后进行日志记录,Redis在默认情况下是异步的把数据写入磁盘,如果不开启,可能会在断电时导致一段时间内的数据丢失。因为 redis本身同步数据文件是按上面save条件来同步的,所以有的数据会在一段时间内只存在于内存中。默认为no
appendonly no
19. 指定更新日志文件名,默认为appendonly.aof
appendfilename appendonly.aof
20. 指定更新日志条件,共有3个可选值:
no:表示等操作系统进行数据缓存同步到磁盘(快)
always:表示每次更新操作后手动调用fsync()将数据写到磁盘(慢,安全)
everysec:表示每秒同步一次(折衷,默认值)
appendfsync everysec
21. 指定是否启用虚拟内存机制,默认值为no,简单的介绍一下,VM机制将数据分页存放,由Redis将访问量较少的页即冷数据swap到磁盘上,访问多的页面由磁盘自动换出到内存中(在后面的文章我会仔细分析Redis的VM机制)
vm-enabled no
22. 虚拟内存文件路径,默认值为/tmp/redis.swap,不可多个Redis实例共享
vm-swap-file /tmp/redis.swap
23. 将所有大于vm-max-memory的数据存入虚拟内存,无论vm-max-memory设置多小,所有索引数据都是内存存储的(Redis的索引数据 就是keys),也就是说,当vm-max-memory设置为0的时候,其实是所有value都存在于磁盘。默认值为0
vm-max-memory 0
24. Redis swap文件分成了很多的page,一个对象可以保存在多个page上面,但一个page上不能被多个对象共享,vm-page-size是要根据存储的 数据大小来设定的,作者建议如果存储很多小对象,page大小最好设置为32或者64bytes;如果存储很大大对象,则可以使用更大的page,如果不 确定,就使用默认值
vm-page-size 32
25. 设置swap文件中的page数量,由于页表(一种表示页面空闲或使用的bitmap)是在放在内存中的,,在磁盘上每8个pages将消耗1byte的内存。
vm-pages 134217728
26. 设置访问swap文件的线程数,最好不要超过机器的核数,如果设置为0,那么所有对swap文件的操作都是串行的,可能会造成比较长时间的延迟。默认值为4
vm-max-threads 4
27. 设置在向客户端应答时,是否把较小的包合并为一个包发送,默认为开启
glueoutputbuf yes
28. 指定在超过一定的数量或者最大的元素超过某一临界值时,采用一种特殊的哈希算法
hash-max-zipmap-entries 64
hash-max-zipmap-value 512
29. 指定是否激活重置哈希,默认为开启(后面在介绍Redis的哈希算法时具体介绍)
activerehashing yes
30. 指定包含其它的配置文件,可以在同一主机上多个Redis实例之间使用同一份配置文件,而同时各个实例又拥有自己的特定配置文件
include /path/to/local.conf