下面代码由搭档注释,保存下来用作参考。
github项目地址:https://github.com/shekkizh/FCN.tensorflow
from __future__ import print_function
import tensorflow as tf
import numpy as np

import TensorflowUtils as utils
import read_MITSceneParsingData as scene_parsing
import datetime
import BatchDatsetReader as dataset
#six.moves 是用来处理那些在2 和 3里面函数的位置有变化的,直接用six.moves就可以屏蔽掉这些变化
#xrange 用来处理数据类型切换
from six.moves import xrange
#执行main函数之前首先进行flags的解析,也就是说TensorFlow通过设置flags来传递tf.app.run()所需要的参数,
#我们可以直接在程序运行前初始化flags,也可以在运行程序的时候设置命令行参数来达到传参的目的。
##调用flags内部的DEFINE_string函数来制定解析规则
FLAGS = tf.flags.FLAGS
tf.flags.DEFINE_integer("batch_size", "2", "batch size for training")
tf.flags.DEFINE_string("logs_dir", "logs/", "path to logs directory")
tf.flags.DEFINE_string("data_dir", "Data_zoo/MIT_SceneParsing/", "path to dataset")
tf.flags.DEFINE_float("learning_rate", "1e-4", "Learning rate for Adam Optimizer")
tf.flags.DEFINE_string("model_dir", "Model_zoo/", "Path to vgg model mat")
tf.flags.DEFINE_bool('debug', "False", "Debug mode: True/ False")
tf.flags.DEFINE_string('mode', "train", "Mode train/ test/ visualize")

MODEL_URL = 'http://www.vlfeat.org/matconvnet/models/beta16/imagenet-vgg-verydeep-19.mat'#如果没有找到Vgg-19的模型,将会从这个网址进行下载

MAX_ITERATION = int(2)
#类别数
NUM_OF_CLASSESS = 151
#图片尺寸
IMAGE_SIZE = 224
##定义vgg网络层结构## vgg 网络部分, weights 是vgg网络各层的权重集合, image是被预测的图像的向量
def vgg_net(weights, image):
     ## fcn的前五层网络就是vgg网络
    layers = (
        'conv1_1', 'relu1_1', 'conv1_2', 'relu1_2', 'pool1',

        'conv2_1', 'relu2_1', 'conv2_2', 'relu2_2', 'pool2',

        'conv3_1', 'relu3_1', 'conv3_2', 'relu3_2', 'conv3_3',
        'relu3_3', 'conv3_4', 'relu3_4', 'pool3',

        'conv4_1', 'relu4_1', 'conv4_2', 'relu4_2', 'conv4_3',
        'relu4_3', 'conv4_4', 'relu4_4', 'pool4',

        'conv5_1', 'relu5_1', 'conv5_2', 'relu5_2', 'conv5_3',
        'relu5_3', 'conv5_4', 'relu5_4'
    )

    net = {}
    current = image#输入图片
    for i, name in enumerate(layers):
        kind = name[:4]

        if kind == 'conv':
            kernels, bias = weights[i][0][0][0][0]
            print('1111:',weights[i][0][0][0][0])
            # matconvnet: weights are [width, height, in_channels, out_channels]
            # tensorflow: weights are [height, width, in_channels, out_channels]
            # 由于 imagenet-vgg-verydeep-19.mat 中的参数矩阵和我们定义的长宽位置颠倒了
            #原来索引号(reshape(2,2,3))是012,现在是102
            kernels = utils.get_variable(np.transpose(kernels, (1, 0, 2, 3)), name=name + "_w")#(1, 0, 2, 3)是索引号
            print('kernels:',kernels)
            bias = utils.get_variable(bias.reshape(-1), name=name + "_b")#reshape(-1)把bias参数数组合并成一行
            print('bias:',bias)
            current = utils.conv2d_basic(current, kernels, bias)
            print('current:',current)
        elif kind == 'relu':
            current = tf.nn.relu(current, name=name)
            print('current1:',current)
            if FLAGS.debug:
                utils.add_activation_summary(current)
        elif kind == 'pool':
            ## vgg 的前5层的stride都是2,也就是前5层的size依次减小1倍
            ## 这里处理了前4层的stride,用的是平均池化
            ## 第5层的pool在下文的外部处理了,用的是最大池化
            ## pool1 size缩小2倍
            ## pool2 size缩小4倍
            ## pool3 size缩小8倍
            ## pool4 size缩小16倍
            current = utils.avg_pool_2x2(current)#平均池化
        net[name] = current
            print('current2:',current)
    return net ## vgg每层的结果都保存再net中了

## 预测流程,image是输入图像的向量,keep_prob是dropout rate
def inference(image, keep_prob):#语义分割网络定义
    """
    Semantic segmentation network definition
    :param image: input image. Should have values in range 0-255
    :param keep_prob:#keep_prob: 名字代表的意思, keep_prob 参数可以为 tensor,意味着,训练时候 feed 为0.5,
    :return:
    """
## 获取训练好的vgg部分的model
    print("setting up vgg initialized conv layers ...")#设置vgg初始化的conv层
    model_data = utils.get_model_data(FLAGS.model_dir, MODEL_URL)

    mean = model_data['normalization'][0][0][0]#这里个人认为上述加载后的模型保存在一个类似于字典的结构里。
    print('mean:',mean)
    #获取图片像素的均值
    mean_pixel = np.mean(mean, axis=(0, 1))
    print('mean_pixel:',mean_pixel)
    weights = np.squeeze(model_data['layers'])
 ## 将图像的向量值都减去平均像素值,进行 normalization
    processed_image = utils.process_image(image, mean_pixel)

    with tf.variable_scope("inference"):
        ## 计算前5层vgg网络的输出结果
        image_net = vgg_net(weights, processed_image)
        conv_final_layer = image_net["conv5_3"]
        ## pool1 size缩小2倍
        ## pool2 size缩小4倍
        ## pool3 size缩小8倍
        ## pool4 size缩小16倍
        ## pool5 size缩小32倍
        pool5 = utils.max_pool_2x2(conv_final_layer)

        ## 初始化第6层的w、b
        ## 7*7 卷积核的视野很大
        W6 = utils.weight_variable([7, 7, 512, 4096], name="W6")
        b6 = utils.bias_variable([4096], name="b6")
        conv6 = utils.conv2d_basic(pool5, W6, b6)
        relu6 = tf.nn.relu(conv6, name="relu6")
        if FLAGS.debug:
            utils.add_activation_summary(relu6)
        relu_dropout6 = tf.nn.dropout(relu6, keep_prob=keep_prob)
 ## 在第6层没有进行池化,所以经过第6层后 size缩小仍为32倍

 ## 初始化第7层的w、b
        W7 = utils.weight_variable([1, 1, 4096, 4096], name="W7")
        b7 = utils.bias_variable([4096], name="b7")
        conv7 = utils.conv2d_basic(relu_dropout6, W7, b7)
        relu7 = tf.nn.relu(conv7, name="relu7")
        if FLAGS.debug:
            utils.add_activation_summary(relu7)
        relu_dropout7 = tf.nn.dropout(relu7, keep_prob=keep_prob)
## 初始化第8层的w、b
## 输出维度为NUM_OF_CLASSESS
        W8 = utils.weight_variable([1, 1, 4096, NUM_OF_CLASSESS], name="W8")
        b8 = utils.bias_variable([NUM_OF_CLASSESS], name="b8")
        conv8 = utils.conv2d_basic(relu_dropout7, W8, b8)
        # annotation_pred1 = tf.argmax(conv8, dimension=3, name="prediction1")

        # now to upscale to actual image size
        ## 开始将size提升为图像原始尺寸(反卷积)
        deconv_shape1 = image_net["pool4"].get_shape()
        W_t1 = utils.weight_variable([4, 4, deconv_shape1[3].value, NUM_OF_CLASSESS], name="W_t1")
        b_t1 = utils.bias_variable([deconv_shape1[3].value], name="b_t1")
## 对第8层的结果进行反卷积(上采样),通道数也由NUM_OF_CLASSESS变为第4层的通道数
        conv_t1 = utils.conv2d_transpose_strided(conv8, W_t1, b_t1, output_shape=tf.shape(image_net["pool4"]))
        fuse_1 = tf.add(conv_t1, image_net["pool4"], name="fuse_1")
 ## 对上一层上采样的结果进行反卷积(上采样),通道数也由上一层的通道数变为第3层的通道数
        deconv_shape2 = image_net["pool3"].get_shape()
        W_t2 = utils.weight_variable([4, 4, deconv_shape2[3].value, deconv_shape1[3].value], name="W_t2")
        b_t2 = utils.bias_variable([deconv_shape2[3].value], name="b_t2")
        conv_t2 = utils.conv2d_transpose_strided(fuse_1, W_t2, b_t2, output_shape=tf.shape(image_net["pool3"]))
        ## 对应论文原文中的"2× upsampled prediction + pool3 prediction"
        fuse_2 = tf.add(conv_t2, image_net["pool3"], name="fuse_2")
 ## 原始图像的height、width和通道数
        shape = tf.shape(image)
        deconv_shape3 = tf.stack([shape[0], shape[1], shape[2], NUM_OF_CLASSESS])
        W_t3 = utils.weight_variable([16, 16, NUM_OF_CLASSESS, deconv_shape2[3].value], name="W_t3")
        b_t3 = utils.bias_variable([NUM_OF_CLASSESS], name="b_t3")
         ## 再进行一次反卷积,将上一层的结果转化为和原始图像相同size、通道数为分类数的形式数据
        conv_t3 = utils.conv2d_transpose_strided(fuse_2, W_t3, b_t3, output_shape=deconv_shape3, stride=8)
        ## 目前conv_t3的形式为size为和原始图像相同的size,通道数与分类数相同
        ## 这句我的理解是对于每个像素位置,根据3个维度(通道数即RGB的值)通过argmax能计算出这个像素点属于哪个分类
        ## 也就是对于每个像素而言,NUM_OF_CLASSESS个通道中哪个数值最大,这个像素就属于哪个分类
        annotation_pred = tf.argmax(conv_t3, dimension=3, name="prediction")

    return tf.expand_dims(annotation_pred, dim=3), conv_t3

##训练:定义训练损失优化器及训练的梯度下降方法以更新参数
def train(loss_val, var_list):#测试损失
    optimizer = tf.train.AdamOptimizer(FLAGS.learning_rate)
    grads = optimizer.compute_gradients(loss_val, var_list=var_list)
    if FLAGS.debug:
        # print(len(var_list))
        for grad, var in grads:
            utils.add_gradient_summary(grad, var)
    return optimizer.apply_gradients(grads)

#主函数
def main(argv=None):
    keep_probability = tf.placeholder(tf.float32, name="keep_probabilty")#定义dropout的占位符
    #定义原图和标签的占位符用来动态存储传入的图片
    image = tf.placeholder(tf.float32, shape=[None, IMAGE_SIZE, IMAGE_SIZE, 3], name="input_image")#原始图像的形式,None为自动查看相应的样本数
    annotation = tf.placeholder(tf.int32, shape=[None, IMAGE_SIZE, IMAGE_SIZE, 1], name="annotation")#原始图片对应的标签形式
 ## 输入原始图像向量、保留率,得到预测的标签图像和随后一层的网络logits输出
    pred_annotation, logits = inference(image, keep_probability)
    correct_prediction = tf.equal(tf.argmax(annotation,1),pred_annotation)
    acc = tf.reduce_mean(tf.cast(correct_prediction,tf.float32))
     ## 为了方便查看图像预处理的效果,可以利用 TensorFlow 提供的 tensorboard 工具进行可视化,直接用 tf.summary.image 将图像写入 summary
     #可视化原图、标签和预测标签
    tf.summary.image("input_image", image, max_outputs=2)
    tf.summary.image("ground_truth", tf.cast(annotation, tf.uint8), max_outputs=2)
    tf.summary.image("pred_annotation", tf.cast(pred_annotation, tf.uint8), max_outputs=2)
    ## 计算预测标注图像和真实标注图像的交叉熵用来确定损失函数和以产生训练过程中的损失
    loss = tf.reduce_mean((tf.nn.sparse_softmax_cross_entropy_with_logits(logits=logits,
                                                                          labels=tf.squeeze(annotation, squeeze_dims=[3]),
                                                                          name="entropy")))
    #可视化模型训练过程中的损失
    tf.summary.scalar("entropy", loss)
## 返回需要训练的变量列表并进行规范化
    trainable_var = tf.trainable_variables()
    if FLAGS.debug:
        for var in trainable_var:
            utils.add_to_regularization_and_summary(var)#规范化
#调用之前定义的优化器函数然后可视化
    train_op = train(loss, trainable_var)
    print("Setting up summary op...")
     ## 定义合并变量操作,一次性生成所有摘要数据
    summary_op = tf.summary.merge_all()

    print("Setting up image reader...")
     ## 读取训练数据集、验证数据集
     #注意读取的时候是调用scene_parsing.read_dataset函数,这个函数可以吧数据转为列表形式的pickle文件
    train_records,valid_records = scene_parsing.read_dataset(FLAGS.data_dir)
    print(len(train_records))
    print(len(valid_records))

    print("Setting up dataset reader")
## 将训练数据集、验证数据集的格式转换为网络需要的格式
    image_options = {'resize': True, 'resize_size': IMAGE_SIZE}
    #从文件夹images 和annotations获取数据
    if FLAGS.mode == 'train':
       #注意train和test分开执行train指令时顺便也把测试的给执行了后面还有个预测可视化。
        train_dataset_reader = dataset.BatchDatset(train_records, image_options)
    validation_dataset_reader = dataset.BatchDatset(valid_records, image_options)

    sess = tf.Session()

    print("Setting up Saver...")
    saver = tf.train.Saver()
    #写入logs为将来可视化做准备
    summary_writer = tf.summary.FileWriter(FLAGS.logs_dir, sess.graph)

    sess.run(tf.global_variables_initializer())
## 加载之前的checkpoint(检查点日志)检查点保存在logs文件里。
    ckpt = tf.train.get_checkpoint_state(FLAGS.logs_dir)
   # sess:表示当前会话,之前保存的结果将被加载入这个会话
   #.model_checkpoint_path:表示模型存储的位置,不需要提供模型的名字,它会去查看checkpoint文件,看看最新的是谁,叫做什么。
    if ckpt and ckpt.model_checkpoint_path:
        saver.restore(sess, ckpt.model_checkpoint_path)
        print("Model restored...")
#输入指令开始训练
    if FLAGS.mode == "train":
        #MAX_ITERATION在这里指的是最大迭代的次数。
        for itr in xrange(MAX_ITERATION):
            # 读取训练集的一个batch。
            #调用BatchDatset里的next_batch函数该函数主要定义bachsize,还有结合bachsize对epoch初始化,开始到结束。
            #FLAGS.batch_size是设置bachsize大小在该程序文件包开头有设置。
            train_images, train_annotations = train_dataset_reader.next_batch(FLAGS.batch_size)
            #将数据以字典形式读入
            feed_dict = {image: train_images, annotation: train_annotations, keep_probability: 0.85}
#            sess.run(train,feed_dict = {image: train_images, annotation: train_annotations, keep_probability: 0.85})
           #执行优化器优化损失操作(train_op),网络跑起来了
            sess.run(train_op, feed_dict=feed_dict)
          #打印模型训练过程训练集损失每10步打印一次并可视化。
            if itr % 10 == 0:
                train_loss, summary_str = sess.run([loss, summary_op], feed_dict=feed_dict)
                print("Step: %d, Train_loss:%g" % (itr, train_loss))
                summary_writer.add_summary(summary_str, itr)#每10步搜集所有的写文件
#            if itr % 100==0:
#                print("epoch    " + str(itr) + ": acc   "+ str(accc)
            #每500步打印测试集送入模型后的预测损失保存生成的检查点文件
            if itr % 500 == 0:
                valid_images, valid_annotations = validation_dataset_reader.next_batch(FLAGS.batch_size)
                valid_loss = sess.run(loss, feed_dict={image: valid_images, annotation: valid_annotations,
                                                       keep_probability: 1.0})
                print("%s ---> Validation_loss: %g" % (datetime.datetime.now(), valid_loss))
                saver.save(sess, FLAGS.logs_dir + "model.ckpt", itr)
#visualize指令预测结果可视化过程。
    elif FLAGS.mode == "visualize":
        valid_images, valid_annotations = validation_dataset_reader.get_random_batch(FLAGS.batch_size)
        pred = sess.run(pred_annotation, feed_dict={image: valid_images, annotation: valid_annotations,
                                                    keep_probability: 1.0})
        valid_annotations = np.squeeze(valid_annotations, axis=3)#压缩维度
        #去掉pred索引为3位置的维度(我认为是通道数只留logits值)
        pred = np.squeeze(pred, axis=3)
        #循环迭代显示并给原图、标签、预测标签命名。str(5+itr)可以修改图片的索引号,修改bachsize的值等
        #于你的测试集图片数就可以显示所有的预测图片。
        for itr in range(FLAGS.batch_size):
            utils.save_image(valid_images[itr].astype(np.uint8), FLAGS.logs_dir, name="inp_" + str(5+itr))
            utils.save_image(valid_annotations[itr].astype(np.uint8), FLAGS.logs_dir, name="gt_" + str(5+itr))
            utils.save_image(pred[itr].astype(np.uint8), FLAGS.logs_dir, name="pred_" + str(5+itr))
            print("Saved image: %d" % itr)
#以下两行程序为必须要有的关于程序启动运行的。
if __name__ == "__main__":
    tf.app.run()
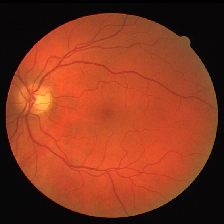
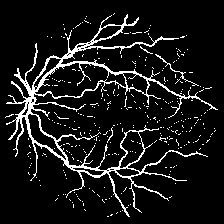
迭代5000次的实验结果图如下:
原始图:

groundTruth:

预测图:
