This article describes how you can use a custom control to view and edit data in an ASP.NET application's Detail View. The example in this article shows how to add ASPxTextBox and the ASPxCardView controls to the MainDemo application (%PUBLIC%DocumentsDevExpress Demos 19.2ComponentseXpressApp FrameworkMainDemo). You can use a similar approach in your own application with any other web control.
本文介绍如何使用自定义控件在ASP.NET应用程序的详细信息视图中查看和编辑数据。本文中的示例演示如何将 ASPxTextBox 和 ASPxCardView 控件添加到 MainDemo 应用程序(%PUBLIC%_文档_DevExpress 演示 19.2_组件eXpressApp 框架MainDemo)。您可以在自己的应用程序中将类似的方法用于任何其他 Web 控件。

Tip 提示
A similar example for WinForms is available in the How to: Show a Custom Data-Bound Control in an XAF View (WinForms) topic.
WinForms 的类似示例在"如何:在 XAF 视图 (WinForms)"主题中显示自定义数据绑定控件。
Declare an Interface to Access a Web Forms User Control from a View Controller
声明从视图控制器访问 Web 窗体用户控件的接口
In the Solution Explorer, right-click the ASP.NET module project and choose Add | New Item... to add the IDepartmentView interface.
在解决方案资源管理器中,右键单击ASP.NET模块项目,然后选择"添加 |新项目...以添加 I部门视图界面。

Make this interface public and add the following members:
- the Title string property specifying the ASPxTextBox control's text;
- the Contacts collection property specifying the ASPxCardView control's data source;
- the TitleChanged event which occurs when the ASPxTextBox control's text changes.
使此接口为公共,并添加以下成员:
- 指定 ASPxTextBox 控件的文本的标题字符串属性;
- 指定 ASPxCardView 控件的数据源的联系人集合属性;
- ASPxTextBox 控件的文本更改时发生的 TitleChanged 事件。
using System;
using System.Collections.Generic;
using MainDemo.Module.BusinessObjects;
// ..
public interface IDepartmentView {
    string Title { get; set; }
    ICollection<Contact> Contacts { get; set; }
    event EventHandler TitleChanged;
}
Create a View Controller to Manage the Web Forms User Control's Data
创建视图控制器以管理 Web 窗体用户控件的数据
In the Solution Explorer, right-click the the ASP.NET module project's Controllers folder and choose Add | New Item... to add the DepartmentViewController class.
在"解决方案资源管理器"中,右键单击ASP.NET模块项目的控制器文件夹,然后选择"添加 |新项目...以添加部门视图控制器类。

Do the following changes with the created Controller class:
- Make the Controller public.
- Inherit the Controller from the ObjectViewController<DetailView, Department> class to activate the Controller in Department Detail Views only.
- Override the OnActivated method, iterate all Detail View's WebCustomUserControlViewItems items, and subscribe to each item's ControlCreated event.
- In the WebCustomUserControlViewItem.ControlCreated event handler, check if the current control supports the IDepartmentView interface, setup the control with the ViewCurrentObject's data and subscribe to the IDepartmentView.TitleChanged event.
- In the IDepartmentView.TitleChanged event handler, pass the control's data to the ViewCurrentObject property.
- In the OnActivated method, subscribe to the CurrentObjectChanged event. In the event handler, pass the ViewCurrentObject to the control.
- Override the OnDeactivated method and unsubscribe from the WebCustomUserControlViewItem.ControlCreated and View.CurrentObjectChanged events.
对创建的控制器类执行以下更改:
- 公开控制器。
- 从 ObjectView 控制器[详细信息视图,部门] 类继承控制器,以仅在部门详细信息视图中激活控制器。
- 覆盖 On 激活方法,迭代所有详细信息视图的 Web 自定义用户控制查看项,并订阅每个项目的 ControlCreated 事件。
- 在 Web 自定义用户控制查看项目.Control创建事件处理程序中,检查当前控件是否支持 I部门视图界面,使用 ViewCurrentObject 的数据设置控件并订阅 I部门视图.TitleChanged 事件。
- 在 I部门视图.TitleChanged 事件处理程序中,将控件的数据传递给 ViewCurrentObject 属性。
- 在 On 激活方法中,订阅"当前对象更改"事件。在事件处理程序中,将 ViewCurrentObject 传递给控件。
- 覆盖 OnDeon 已激活的方法,然后取消订阅 Web 自定义用户控制视图项.ControlAnd 和 View.CurrentObject 更改事件。
using System;
using DevExpress.ExpressApp;
using DevExpress.ExpressApp.Web.Editors;
using MainDemo.Module.BusinessObjects;
// ...
public class DepartmentViewController : ObjectViewController<DetailView, Department> {
    protected override void OnActivated() {
        base.OnActivated();
        foreach(WebCustomUserControlViewItem item in View.GetItems<WebCustomUserControlViewItem>()) {
            item.ControlCreated += ViewItem_ControlCreated;
        }
        View.CurrentObjectChanged += View_CurrentObjectChanged;
    }
    protected override void OnDeactivated() {
        foreach(WebCustomUserControlViewItem item in View.GetItems<WebCustomUserControlViewItem>()) {
            item.ControlCreated -= ViewItem_ControlCreated;
        }
        View.CurrentObjectChanged -= View_CurrentObjectChanged;
        base.OnDeactivated();
    }
    private void ViewItem_ControlCreated(object sender, EventArgs e) {
        IDepartmentView departmentView = ((WebCustomUserControlViewItem)sender).Control as IDepartmentView;
        if(departmentView != null) {
            departmentView.TitleChanged += DepartmentView_TitleChanged;
            InitializeDepartmentView(departmentView);
        }
    }
    private void View_CurrentObjectChanged(object sender, EventArgs e) {
        foreach(WebCustomUserControlViewItem item in View.GetItems<WebCustomUserControlViewItem>()) {
            IDepartmentView departmentView = item.Control as IDepartmentView;
            if(departmentView != null) {
                InitializeDepartmentView(departmentView);
            }
        }
    }
    private void DepartmentView_TitleChanged(object sender, EventArgs e) {
        if(ViewCurrentObject != null) {
            ViewCurrentObject.Title = ((IDepartmentView)sender).Title;
        }
    }
    private void InitializeDepartmentView(IDepartmentView departmentView) {
        if(ViewCurrentObject != null) {
            departmentView.Title = ViewCurrentObject.Title;
            departmentView.Contacts = ViewCurrentObject.Contacts;
        }
        else {
            departmentView.Title = null;
            departmentView.Contacts = null;
        }
    }
}
Create a Web Forms User Control
创建 Web 窗体用户控件
In the Solution Explorer, right-click the ASP.NET application project and choose the Add | New Item... to add the Web Forms User Control.
在解决方案资源管理器中,右键单击ASP.NET应用程序项目,然后选择"添加 |新项目...以添加 Web 窗体用户控件。

In the designer, do the following:
- Add the ASPxTextBox control, set its ID property to TitleControl, Caption to Title and Width to 100%;
- Add the ASPxCardView control, set its ID property to ContactsControl, set it up to show the Contact's FullName and Email in two columns.
在设计器中,执行以下操作:
- 添加 ASPxTextBox 控件,将其 ID 属性设置为 TitleControl,将标题设置为标题和宽度设置为 100%;
- 添加 ASPxCardView 控件,将其 ID 属性设置为"联系人控制",将其设置为在两列中显示联系人的全名和电子邮件。
- ASCX (C#)
- ASCX (VB.NET)
<%@ Control Language="C#" AutoEventWireup="true" CodeBehind="DepartmentViewControl.ascx.cs" Inherits="MainDemo.Web.DepartmentViewControl" %>
<%@ Register Assembly="DevExpress.Web.v19.2, Version=19.2.5.0, Culture=neutral, PublicKeyToken=b88d1754d700e49a" Namespace="DevExpress.Web" TagPrefix="dx" %>

<dx:ASPxTextBox ID="TitleControl" runat="server" Caption="Title" Width="100%"></dx:ASPxTextBox>
<div style="height:5px"></div>
<dx:ASPxCardView ID="ContactsControl" runat="server" AutoGenerateColumns="false">
    <Columns>
        <dx:CardViewTextColumn Name="FullName" FieldName="FullName" Caption="Full Name" VisibleIndex="0"></dx:CardViewTextColumn>
        <dx:CardViewTextColumn Name="Email" FieldName="Email" Caption="Email" VisibleIndex="1"></dx:CardViewTextColumn>
    </Columns>
    <SettingsPager>
        <SettingsTableLayout ColumnCount="2" />
    </SettingsPager>
</dx:ASPxCardView>
Implement the IDepartmentView Interface in the DepartmentViewControl
在部门视图控制中实现 I部门视图接口
Close the designer, right-click the DepartmentViewControl.ascx file, choose View Code, and do the following:
-
Implement the MainDemo.Module.Web.IDepartmentView interface.
-
Define the following fields:
- isInitialized - a flag to determine if the control's OnInit method is called;
- _Title - stores the title string;
- _Contacts - stores the contacts collection.
-
Override the OnInit method:
- set the isInitialized flag to true,
- initialize controls using _Title and _Contacts values,
- subscribe to the TitleControl.TextChanged event.
-
Add the TitleChanged event and raise it in the TitleControl.TextChanged event handler.
- Add the Title property:
- in the property getter, return the _Title field value.
- in the property setter, set the _Title field value and update the TitleControl.Text value.
- Add the Contacts property:
- in the property getter, return the _Contacts field value
- in the property setter, set the _Contacts field value pass the new value to ContactsControl.DataSource and call the ContactsControl.DataBind method to apply changes.
关闭设计器,右键单击部门视图控制.ascx 文件,选择"查看代码",然后执行以下操作:
- 实现 MainDemo.模块.Web.I部门视图界面。
- 定义以下字段:
- 已初始化 - 一个标志,用于确定是否调用控件的 OnInit 方法;
- _Title - 存储标题字符串;
- _Contacts - 存储联系人集合。
- 重写 OnInit 方法:
- 将"已初始化"标志设置为 true,
- 使用_Title和_Contacts值初始化控件,
- 订阅 TitleControl.TextChanged 事件。
- 添加 TitleChanged 事件并在 TitleControl.TextChanged 事件处理程序中引发它。
- 添加 Title 属性:
- 在属性 getter 中,返回_Title字段值。
- 在属性设置器中,设置_Title字段值并更新 TitleControl.Text 值。
- 添加"联系人"属性:
- 在属性 getter 中,返回_Contacts字段值
- 在属性设置器中,设置_Contacts字段值将新值传递给 ContactsControl.DataSource 并调用 ContactsControl.DataBind 方法以应用更改。
using System;
using System.Collections.Generic;
using MainDemo.Module.BusinessObjects;
using MainDemo.Module.Web;

namespace MainDemo.Web {
    public partial class DepartmentViewControl : System.Web.UI.UserControl, IDepartmentView {
        private bool isInitialized;
        private string _Title;
        private ICollection<Contact> _Contacts;

        protected override void OnInit(EventArgs e) {
            isInitialized = true;
            UpdateTitleControl();
            UpdateContactsControl();
            TitleControl.TextChanged += TitleControl_TextChanged;
            base.OnInit(e);
        }
        private void UpdateTitleControl() {
            if(!isInitialized) return;
            TitleControl.Text = Title;
        }
        private void UpdateContactsControl() {
            if(!isInitialized) return;
            ContactsControl.DataSource = Contacts;
            ContactsControl.DataBind();
        }
        private void TitleControl_TextChanged(object sender, EventArgs e) {
            _Title = TitleControl.Text;
            if(TitleChanged != null) {
                TitleChanged(this, EventArgs.Empty);
            }
        }
        public string Title {
            get { return _Title; }
            set {
                _Title = value;
                UpdateTitleControl();
            }
        }
        public ICollection<Contact> Contacts {
            get { return _Contacts; }
            set {
                _Contacts = value;
                UpdateContactsControl();
            }
        }
        public event EventHandler TitleChanged;
    }
}
Add a WebCustomUserControlViewItem View Item to a View
将 Web 自定义用户控制查看项目项添加到视图
In the ASP.NET application project, double-click the Model.xafml file to start the Model Editor. Right-click the Views node and choose Add | DetailView.
在ASP.NET应用程序项目中,双击 Model.xafml 文件以启动模型编辑器。右键单击"视图"节点并选择"添加 |详细信息视图。

Set the Id property to CustomDepartment_DetailView and the ModelClass property to Department.
将 Id 属性设置为CustomDepartment_DetailView,将 ModelClass 属性设置为"部门"。

Right-click the Views | MainDemo.Module.BusinessObjects | CustomDepartment_DetailView | Items node and choose Add... | CustomUserControlViewItemWeb.
右键单击视图 |主演示.模块.业务对象 |CustomDepartment_DetailView |项目节点并选择"添加..." |自定义用户控制视图项目Web。
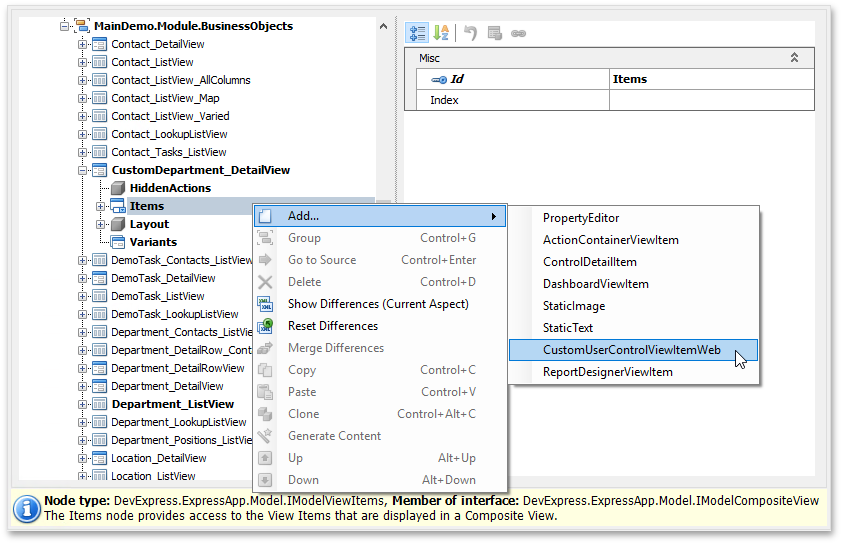
Set the Id property to DepartmentViewItem, and the CustomControlPath property to DepartmentViewControl.ascx (the file name of the custom Web Forms User Control).
将 Id 属性设置为"部门视图项",将"自定义控制路径"属性设置为"部门视图控制.ascx"(自定义 Web 窗体用户控件的文件名)。

As a result, the WebCustomUserControlViewItem View Item is added to CustomDepartment_DetailView.
因此,Web 自定义用户控制查看项目项将添加到CustomDepartment_DetailView。
Change the Default Detail View for the Department List View
更改部门列表视图的默认详细信息视图
Navigate to the Views | MainDemo.Module.BusinessObjects | Department_ListView node. In the DetailView drop-down list, select CustomDepartment_DetailView.
导航到视图 |主演示.模块.业务对象 |Department_ListView节点。在"详细信息查看"下拉列表中,选择CustomDepartment_DetailView。

Run the ASP.NET application, navigate to the Department List View and edit any Department. The Detail View displays the Text Box and Card View bound to the Department.Contacts collection (see the screenshot in the beginning of this topic).
运行ASP.NET应用程序,导航到部门列表视图并编辑任何部门。"详细信息视图"显示绑定到部门的文本框和卡片视图。