JUNIT了解学习
转自: JUnit 入门教程
JUnit高级用法之@RunWith
@RunWith
关于@RunWith注解,官方文档是这么描述的:
When a class is annotated with
@RunWithor extends a class annotated with@RunWith, JUnit will invoke the class it references to run the tests in that class instead of the runner built into JUnit.
JUnit用例都是在Runner(运行器)来执行的。通过它,可以为这个测试类指定一个特定的Runner。那么大多数时候我们都没有使用@RunWith这个注解,这是为什么呢?其实,JUnit中有一个默认的Runner,它的名字叫BlockJunit4ClassRunner,但这是在JUnit4.4之后才引入的,对于4.4之前版本的JUnit,它的名字叫Junit4ClassRunner。在新版本的源代码中已经添加了注释来说明这个问题:
/**
 * @deprecated Included for backwards compatibility with JUnit 4.4. Will be
 *             removed in the next major release. Please use
 *             {@link BlockJUnit4ClassRunner} in place of {@link JUnit4ClassRunner}.
 */
@Deprecated
public class JUnit4ClassRunner extends Runner implements Filterable, Sortable {
...
写过关于Spring项目的单元测试的同学可能见过这样的写法,就是用JUnit加载Spring的配置文件以完成Context的初始化,然后从Context中取出Bean并完成测试:
import org.junit.Test;
import org.junit.runner.RunWith;
import org.springframework.beans.factory.annotation.Autowired;
import org.springframework.context.ApplicationContext;
import org.springframework.test.context.ContextConfiguration;
import org.springframework.test.context.junit4.SpringJUnit4ClassRunner;

@RunWith(SpringJUnit4ClassRunner.class)
@ContextConfiguration(locations = { "classpath:applicationContext.xml" })
public class UserManagerTest {
  @Autowired
  ApplicationContext ctx;

  @Test
  public void testAddUser() {
    try {
      UserManager userManager = ctx.getBean(UserManager.class);
      userManager.addUser();
    } catch (Exception e) {
      e.printStackTrace();
    }
  }
}
注意这里使用了@RunWith注解,表明这个类中的测试用例需要使用SpringJUnit4ClassRunner类来执行。
@RunWith(Suite.class)
其作用是使用JUnit执行一个测试套件。Suite类是JUnit自带的,意为套件,顾名思义,就是一套东西。通过它,可以把多个相关的测试类看做一个测试套件一起测试。看个例子:
import org.junit.runner.RunWith;
import org.junit.runners.Suite;

@RunWith(Suite.class)
@Suite.SuiteClasses({ TestA.class, TestB.class, /*Any test class you want to run*/})
public class TestSuite {
    // Please note this case won't run. It will only run cases which
    // are configured in @Suite.SuiteClasses
    @Test
    public void testPrint() {
        System.out.println("Hello");
    }
}
@RunWith指定了Suite类,说明这个TestSuite类是一个套件。通过@Suite.SuiteClasses指定了要执行的测试类(这些类中的所有用例都会执行)。
需要注意的是,这个TestSuite类本身用例则不会执行了(如上面的testPrint()方法)。
@RunWith(Parameterized.class)
Parameterized类也是JUnit自带的,用于使用多个参数组合多次执行同一个测试用例。看下面的例子:
import static org.junit.Assert.assertEquals;
import java.util.Arrays;
import java.util.List;
import org.junit.Test;
import org.junit.runner.RunWith;
import org.junit.runners.Parameterized;
import org.junit.runners.Parameterized.Parameters;

@RunWith(Parameterized.class)
public class TestParameterized {

    private int expected;
    private int first;
    private int second;

    public TestParameterized(int expected, int firstNumber, int secondNumber) {
        this.expected = expected;
        this.first = firstNumber;
        this.second = secondNumber;
    }

    /**
     * Note: @Parameters annotated method must be public static,
     * otherwise an Exception will thrown.
     */
    @Parameters
    public static List<Integer[]> parameters() {
        return Arrays.asList(new Integer[][]{{3, 1, 2}, {5, 2, 3}, {7, 3, 4}, {9, 4, 5}});
    }

    @Test
    public void testAdd() {
        String format = "Using parameters: expect=%d, first=%d, second=%d";
        System.out.println(String.format(format, expected, first, second));

        Feature feature = new Feature();
        assertEquals(expected, feature.add(first, second));
    }

    @Test
    public void testPrint() {
        String format = "Print ----------: expect=%d, first=%d, second=%d";
        System.out.println(String.format(format, expected, first, second));
    }
}

class Feature {
    public int add(int i1, int i2) {
        return i1 + i2;
    }
}
执行结果如下:
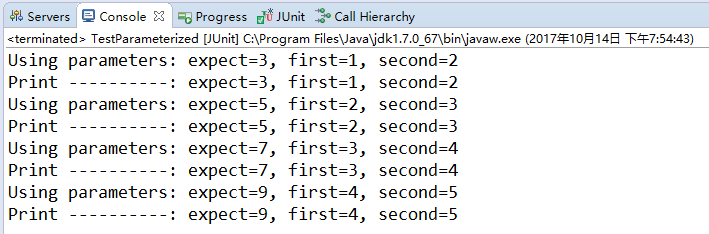
可以看到,虽然TestParameterized类中只有两个测试用例testAdd和testPrint,但是结果输出了8行,即每个用例都执行了4遍。
使用Parameterized注解需要注意几点:
- 该方法要有构造函数
- 有一个public static的方法被@Parameters标注,并且该方法只能返回Iterable类型或数组类型的数据(源代码是如下处理的)
if (parameters instanceof Iterable) {
    return (Iterable<Object>) parameters;
} else if (parameters instanceof Object[]) {
    return Arrays.asList((Object[]) parameters);
} else {
    throw parametersMethodReturnedWrongType();
}
因为上面的方式使用了构造方法来初始化数据,其实也可以使用字段注入来代替构造方法,只需稍加改变TestParameterized类即可:
- 用Parameter参数来修饰属性。注意:索引从0开始
- 属性要用public修饰
@Parameter(0)
public int expected;
@Parameter(1)
public int first;
@Parameter(2)
public int second;
@RunWith(Categories.class)
顾名思义,执行一个“类别”。和Suite类似,只是Suite是执行指定类中的所有用例,而Categories执行的范围更小,是在Suite的基础上只执行指定的“类别”的用例。这就需要事先在各个测试用例上用@Category标注该用例属于那些“类别”,之后便可以通过类别来选择执行某些用例。看例子:
/*-----TestA.java-----*/
import org.junit.Test;
import org.junit.experimental.categories.Category;

class Feature1 {}
class Feature2 {}

public class TestA {
    @Test
    @Category(Feature1.class)
    public void testAdd() {
        System.out.println("A.testAdd");
    }

    @Test
    @Category(Feature2.class)
    public void testAdd2() {
        System.out.println("A.testAdd2");
    }

    @Test
    @Category({Feature1.class, Feature2.class})
    public void testAdd3() {
        System.out.println("A.testAdd3");
    }
}

/*-----TestCategory.java-----*/
import org.junit.experimental.categories.Categories;
import org.junit.experimental.categories.Categories.ExcludeCategory;
import org.junit.experimental.categories.Categories.IncludeCategory;
import org.junit.runner.RunWith;
import org.junit.runners.Suite;

@RunWith(Categories.class)
@IncludeCategory(Feature1.class)
@ExcludeCategory(Feature2.class)
@Suite.SuiteClasses({ TestA.class, /*Any test class you want to run*/})
public class TestCategory {
    // Do nothing
}
其中,Feature1和Feature2代表两个不同的“类型”,TestA类中通过@Category标注了各个用例(可以为一个用例指定多个Category,例如上方的testAdd3方法)。@IncludeCategory指明了需要执行的类型,而@ExcludeCategory指明了不希望执行的类型,这个注解对于过滤类似testAdd3这样有多个类型的用例很有效。以下是执行结果:

可以看到,只有标注了Feature1的用例执行了,而且带有Feature2的则被过滤掉了,所以只剩下testAdd这一个用例了。
@RunWith(Theories.class)
提供一组参数的排列组合值作为待测方法的输入参数。同时注意到在使用Theories这个Runner的时候,我们的待测方法可以拥有输入参数,而这在其它的Runner中的测试方法是不行的。下面是一个例子:
import org.junit.experimental.theories.DataPoint;
import org.junit.experimental.theories.Theories;
import org.junit.experimental.theories.Theory;
import org.junit.runner.RunWith;

@RunWith(Theories.class)
public class TestTheories {
    @DataPoint
    public static String nameValue1 = "Tony";
    @DataPoint
    public static String nameValue2 = "Jim";
    @DataPoint
    public static int ageValue1 = 10;
    @DataPoint
    public static int ageValue2 = 20;

    @Theory
    public void testMethod(String name, int age){
        System.out.println(String.format("%s's age is %s", name, age));
    }
}
上面的代码的意思是,将”Tony”、”Jim”、10、20四个参数以类型合法的排列组合传给待测方法。因此输出的结果必然也有2x2=4种。下面是执行结果:

不过,为了简单,我们除了可以使用@DataPoint注解来提供参数之外,还可以通过@DataPoints注解来提供参数,参照上述代码,只需要将@DataPoint注解标注的四个字段参数替换为如下的两个即可:
@DataPoints
public static String[] names = {"Tony", "Jim"};
@DataPoints
public static int[] ageValue1 = {10, 20};
总结
介绍了这么几种Runner,现在回过头来看看一开始提到的SpringJUnit4ClassRunner,其实这个类继承与JUnit默认的运行器BlockJUnit4ClassRunner,来看看源代码中的声明(官方文档):
public class SpringJUnit4ClassRunner extends BlockJUnit4ClassRunner {继承的好处就是可以完全保留默认的功能,并且提供了一套支持Spring上下文的框架,正如官方文档所说:
SpringJUnit4ClassRunneris a custom extension of JUnit'sBlockJUnit4ClassRunnerwhich provides functionality of the Spring TestContext Framework to standard JUnit tests by means of theTestContextManagerand associated support classes and annotations.