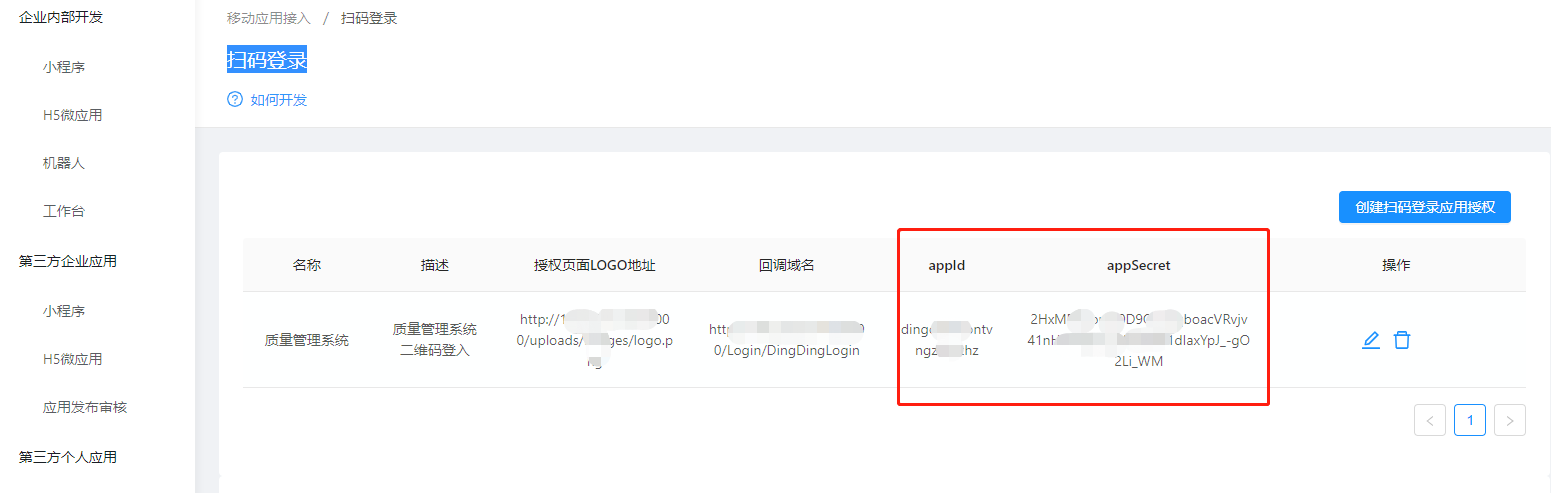
第一步:https://open-dev.dingtalk.com/ 登入钉钉开放后台创建扫码登录应用授权

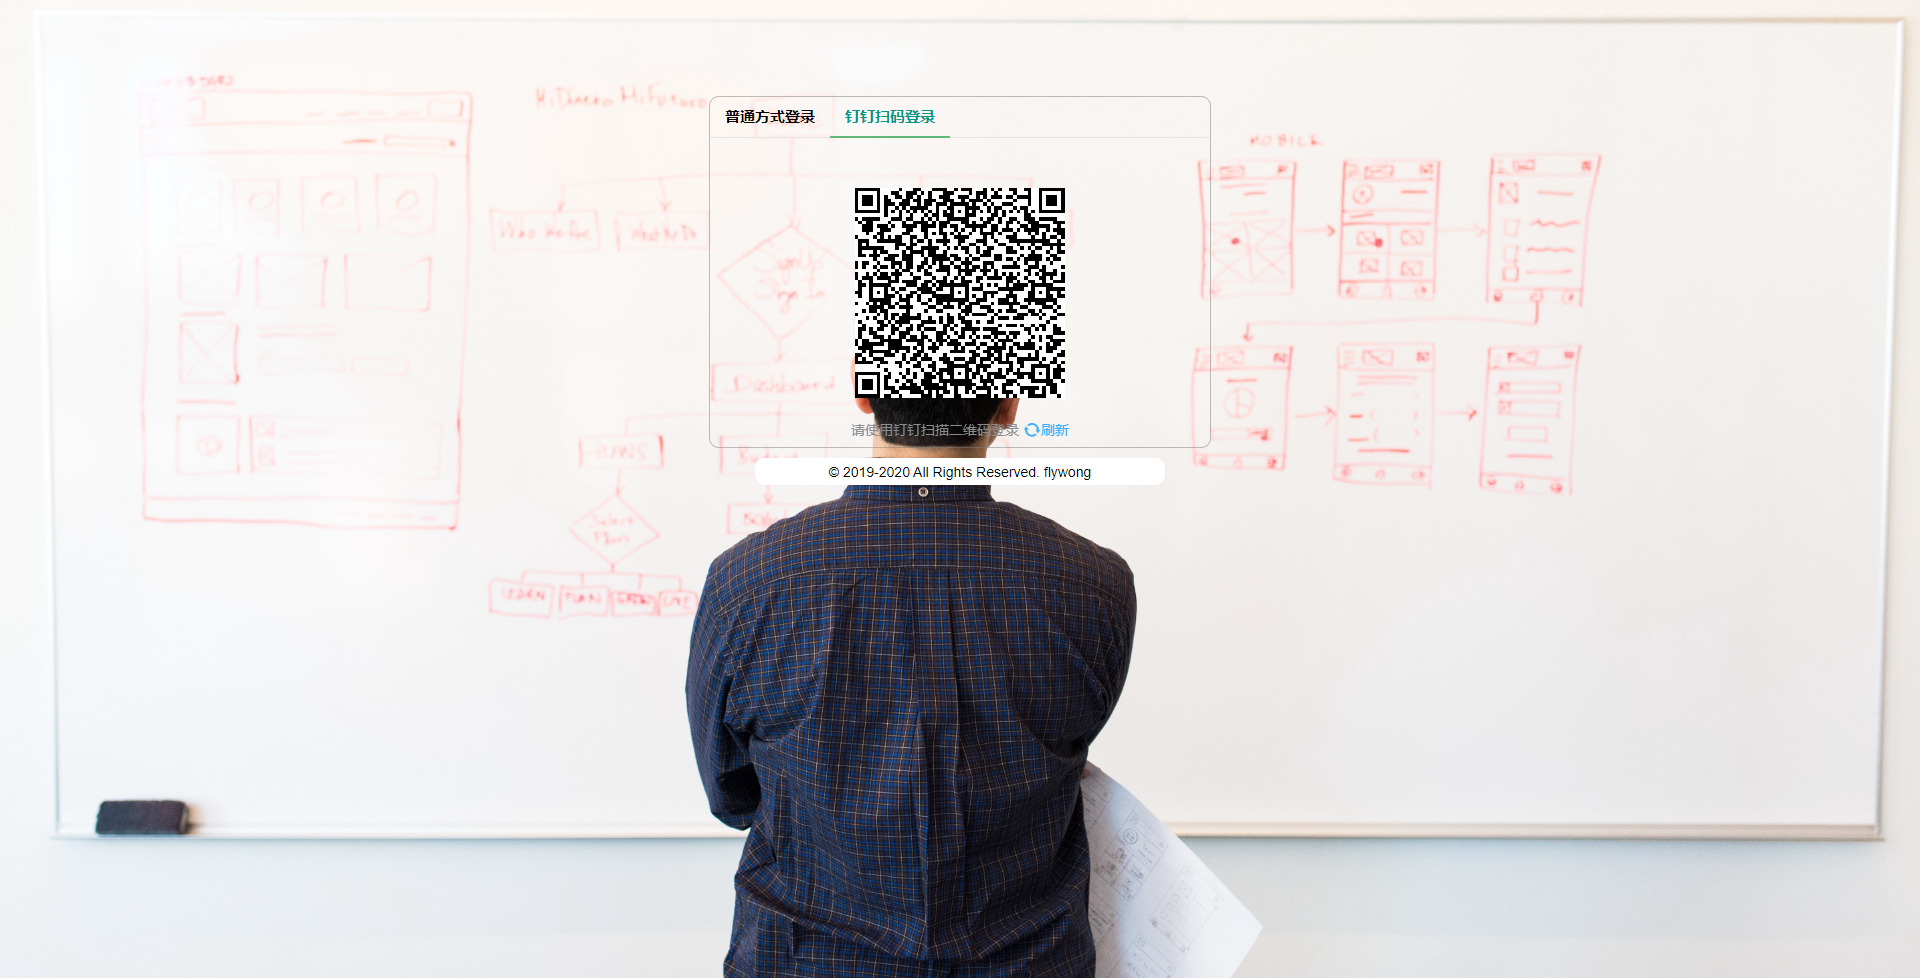
第二步:登录界面前端二维码展示:
前端页面引入:
<script src="https://g.alicdn.com/dingding/dinglogin/0.0.5/ddLogin.js"></script>
在需要显示二维码的区域加一个DIV
<div id="login_container">

</div>
下面代码中涉及到的appid 和 appSecret是从创建扫码登入应用授权中获的。
在js脚本控制中加入代码
                /*
                * 解释一下goto参数,参考以下例子:
                * var url = encodeURIComponent('http://localhost.me/index.php?test=1&aa=2');
                * var goto = encodeURIComponent('https://oapi.dingtalk.com/connect/oauth2/sns_authorize?appid=appid&response_type=code&scope=snsapi_login&state=STATE&redirect_uri='+url)
                */
                var url = encodeURIComponent('@ViewData["URL"]');
                var goto = encodeURIComponent('https://oapi.dingtalk.com/connect/oauth2/sns_authorize?appid=dingoa4wipntvngzokythz&response_type=code&scope=snsapi_login&state=STATE&redirect_uri='+url)

                var obj = DDLogin({
                    id: "login_container",//这里需要你在自己的页面定义一个HTML标签并设置id,例如<div id="login_container"></div>或<span id="login_container"></span>
                    goto: goto, //请参考注释里的方式
                    style: "border:none;background-color:rgba(128,128,128,0);color:#fff",
                     "300",
                    height: "300"
                });

                var handleMessage = function (event) {
                  var origin = event.origin;
                  console.log("origin", event.origin);
                  if(origin == "https://login.dingtalk.com" ) { //判断是否来自ddLogin扫码事件。
                      var loginTmpCode = event.data;
                      layer.msg("扫码登入中...", { icon: 6, shade: 0.1, anim: 5, time:1000 }, function () {
                        //获取到loginTmpCode后就可以在这里构造跳转链接进行跳转了 get 参数 appid 是 从创建扫码登录应用授权中获取,替换成自己创建的appid
                        window.location.href ="https://oapi.dingtalk.com/connect/oauth2/sns_authorize?appid=appid&response_type=code&scope=snsapi_login&state=STATE&redirect_uri=" +
                                url +
                                "&loginTmpCode=" +
                                loginTmpCode;
                       });


                  }
                };
                if (typeof window.addEventListener != 'undefined') {
                    window.addEventListener('message', handleMessage, false);
                } else if (typeof window.attachEvent != 'undefined') {
                    window.attachEvent('onmessage', handleMessage);
                }
解释一下 @ViewData["URL"] 是怎么来的,这个是服务端获取服务器 HOST 地址 然后返回到前端的,这样是为了不写死HOST地址。
服务端HOST的地址怎么地址如下:
[HttpGet]
public IActionResult UserLogin()
{
   string url = $"{this.Request.Scheme.ToString()}://{this.Request.Host.ToString()}/Login/DingDingLogin";
   ViewData["URL"] = url;
   return View();
}
第三步:扫码后跳转到服务端(/Login/DingDingLogin)是怎么处理的
/// <summary> /// 钉钉扫码登录 /// </summary> /// <param name="code"></param> /// <returns></returns> [HttpGet] public IActionResult DingDingLogin(string code) { MsgModel msgObj = null; string appId = _LoginAppId; string appSecret = _LoginAppSecret; string timestamp = CommonHelper.GetTimeStamp();//获取时间戳 string signature = CommonHelper.HmacSign(timestamp, appSecret);//根据时间戳和appSecret进行加密,参考钉钉开发文档 string url = $"https://oapi.dingtalk.com/sns/getuserinfo_bycode?accessKey={appId}×tamp={timestamp}&signature={signature}";//参考钉钉开发文档 //前端扫码后跳转的url中可以获取的code代码,根据code代码POST提交url可以获取unionid
postData postData = new postData { tmp_auth_code = code };
            string res = JDRMYY.Utility.HttpRequest.https_post_request(url, JsonConvert.SerializeObject(postData),"POST","application/json");//自己封装的一个服务端模拟POST提交方法
            RequestUserInfo userInfo = JsonConvert.DeserializeObject<RequestUserInfo>(res);
            string unionId = userInfo.user_info.unionid;

            IDingTalkClient client_token = new DefaultDingTalkClient("https://oapi.dingtalk.com/gettoken");
            OapiGettokenRequest req_token = new OapiGettokenRequest();
            req_token.SetHttpMethod("GET");
            req_token.Appkey = _Appkey;
            req_token.Appsecret = _Appsecret;
            OapiGettokenResponse res_token = client_token.Execute(req_token);
            RequestTokenModel token = JsonConvert.DeserializeObject<RequestTokenModel>(res_token.Body);

            IDingTalkClient client_userid = new DefaultDingTalkClient("https://oapi.dingtalk.com/user/getUseridByUnionid");
            OapiUserGetUseridByUnionidRequest req_userid = new OapiUserGetUseridByUnionidRequest();
            req_userid.Unionid = unionId;
            req_userid.SetHttpMethod("GET");
            OapiUserGetUseridByUnionidResponse res_userid = client_userid.Execute(req_userid, token.access_token);
            RequestUserIdModel userid =  JsonConvert.DeserializeObject<RequestUserIdModel>(res_userid.Body);

            IDingTalkClient client_userinfo = new DefaultDingTalkClient("https://oapi.dingtalk.com/user/get");
            OapiUserGetRequest req_userinfo = new OapiUserGetRequest();
            req_userinfo.Userid = userid.userid;
            req_userinfo.SetHttpMethod("GET");
            OapiUserGetResponse res_userinfo = client_userinfo.Execute(req_userinfo, token.access_token);
            RequestUserModel user =  JsonConvert.DeserializeObject<RequestUserModel>(res_userinfo.Body);

        //获取到user.JobNumber(工号)和系统的内部在用的人员数据表进行比对,如果找到人员,则说明有权限登录,否则则无法登录系统(发送钉钉消息给用户,并跳出错误页面)。
            string sql = "SELECT * FROM `employee` WHERE `empId` = ?empId and `useflag` = 1";
            EmployeeModel LoginUser = _mysqlService.DBFind<EmployeeModel>(_qasystem, sql, new EmployeeModel() { empId = user.jobNumber });
            if (LoginUser != null)
            {
                SetEmployeeRoles(LoginUser);//设置用户权限
                DI.WriteLogs(_mysqlService, _qasystem, new LogModel { log_content = "钉钉扫码登入", log_time = DateTime.Now, log_writer = LoginUser.empName });
                return Redirect("/Index/Index");
            }
            else
            {
                string Content = $"**质量管理系统:**
  您尚未注册质量管理系统账户,请联系**质量管理办公室**注册!";
                SendDingTalkMsg(user.mobile, Content);
                DI.WriteLogs(_mysqlService, _qasystem, new LogModel { log_content = $"钉钉扫码登入失败,{LoginUser.empId},未注册", log_time = DateTime.Now, log_writer = LoginUser.empName });

                return Redirect("/Login/LoginError");

            }
            return View();
        }
这里面涉及到三个方法解释下:
1、GetTimeStamp(获取时间戳的方法)
2、HmacSign()(加密算法)
3、http_post_request() 服务端模拟POST提交方法
代码:
/// <summary>
        /// Signature 签名算法
        /// </summary>
        /// <param name="key"></param>
        /// <param name="text"></param>
        /// <returns></returns>
        public static string HmacSign(string message, string secret)
        {
            secret = secret ?? "";
            var encoding = new System.Text.ASCIIEncoding();
            byte[] keyByte = System.Text.Encoding.UTF8.GetBytes(secret);
            byte[] messageBytes = System.Text.Encoding.UTF8.GetBytes(message);
            using (var hmacsha256 = new HMACSHA256(keyByte))
            {
                byte[] hashmessage = hmacsha256.ComputeHash(messageBytes);
                return System.Web.HttpUtility.UrlEncode(Convert.ToBase64String(hashmessage));
            }
        }
        /// <summary>
        /// 获取时间戳(毫秒)
        /// </summary>
        /// <returns></returns>
        public static string GetTimeStamp()
        {
            TimeSpan ts = DateTime.UtcNow - new DateTime(1970, 1, 1, 0, 0, 0, 0);
            return Convert.ToInt64(ts.TotalMilliseconds).ToString();
        }
public static string https_post_request(string host, string postdate, string method, string contenttype)
        {
            //格林威治时间
            DateTime dt = DateTime.UtcNow;
            //根据网站的编码自定义
            Encoding encoding = Encoding.UTF8;
            //初始化一个HttpWebRequest请求实例
            HttpWebRequest request = (HttpWebRequest)WebRequest.Create(host);
            //获取或设置cookie
            request.CookieContainer = new CookieContainer();
            //Http 请求方法 这里默认为POST
            request.Method = method;
            request.ServicePoint.Expect100Continue = false;
            //Http Post提交的数据的字节数
            request.ContentLength = Encoding.UTF8.GetByteCount(postdate);
            //Http 请求内容类型(一般为:application/xml)
            request.ContentType = contenttype;
            //Http 请求时间
            request.Date = dt;
            //POST数据字符串转成字节
            byte[] postData = encoding.GetBytes(postdate);
            //post的内容长度
            request.ContentLength = postData.Length;
            //设置响应超时时间
            request.Timeout = 60000;
            string retString = "";
            StreamReader streamReader = StreamReader.Null;
            Stream responseStream = Stream.Null;
            HttpWebResponse response = null;

            //向内存中写入POSTDATA数据流
            Stream requestStream = request.GetRequestStream();
            requestStream.Write(postData, 0, postData.Length);
            try
            {
                //获取对应HTTP请求的响应
                response = (HttpWebResponse)request.GetResponse();
            }
            catch (WebException ex)
            {
                //获取抛出异常的请求响应
                response = (HttpWebResponse)ex.Response;

            }
            responseStream = response.GetResponseStream();
            //如果http头中接受gzip的话,这里就要判断是否为有压缩,有的话,直接解压缩即可
            if (response.Headers["Content-Encoding"] != null && response.Headers["Content-Encoding"].ToLower().Contains("gzip"))
            {
                responseStream = new GZipStream(responseStream, CompressionMode.Decompress);
            }

            streamReader = new StreamReader(responseStream, encoding);
            retString = streamReader.ReadToEnd();
            streamReader.Close();
            streamReader.Dispose();
            responseStream.Close();
            responseStream.Dispose();
            response.Close();
            return retString;
        }