在线标注网站
https://gitlab.com/vgg/via
http://www.robots.ox.ac.uk/~vgg/software/via/via.html
数组与图像互转
from matplotlib import image
image.imsave('/xxx/%d.jpg'%d,  array, cmap='gray')   #数组转灰度图,jpg为三个通道数值一样
arr = image.imread("")
灰度图增强对比度
from PIL import Image
from PIL import ImageEnhance

img = Image.open('/xxx/xx.jpg')
img.show()
enh_con = ImageEnhance.Contrast(img)
contrast = 1.5  #增强的倍数
img_contrasted = enh_con.enhance(contrast)
img_contrasted.show()
处理标注网站的csv文件
import csv
import json
import numpy as np

def readcsv(filename):
    list1 = []
    with open(filename)as f:
       csv_reader = csv.reader(f)
       for row in csv_reader:
            x,y,w,h = readjson(row[5])
            list1.append([row[0], x, y, w, h])
    arr = np.array(list1)
    return arr

def readjson(jsonstr):
    jsontemp = json.loads(jsonstr)
    x,y,w,h = jsontemp["x"], jsontemp["y"], jsontemp["width"], jsontemp["height"]
    return x,y,w,h

if __name__ == '__main__':
    arr = readcsv('./ann/ann_test.csv')
    print(arr)
图像resize,等比缩放,旁边加黑边:
import cv2
import numpy as np
from glob import glob
import os
def training_transform(height, width, output_height, output_width):
  # https://docs.opencv.org/2.4/doc/tutorials/imgproc/imgtrans/warp_affine/warp_affine.html
  height_scale, width_scale = output_height / height, output_width / width
  scale = min(height_scale, width_scale)
  resize_height, resize_width = round(height * scale), round(width * scale)
  pad_top = (output_height - resize_height) // 2
  pad_left = (output_width - resize_width) // 2
  A = np.float32([[scale, 0.0], [0.0, scale]])
  B = np.float32([[pad_left], [pad_top]])
  M = np.hstack([A, B])
  return M, output_height, output_width


def testing_transform(height, width, max_stride):
  h_pad, w_pad = round(height / max_stride + 0.51) * max_stride, round(width / max_stride + 0.51) * max_stride
  pad_left = (w_pad - width) // 2
  pad_top = (h_pad - height) // 2
  A = np.eye(2, dtype='float32')
  B = np.float32([[pad_left], [pad_top]])
  M = np.hstack([A, B])
  return M, h_pad, w_pad


def invert_transform(M):
  # T = A @ x + B => x = A_inv @ (T - B) = A_inv @ T + (-A_inv @ B)
  A_inv = np.float32([[1. / M[0, 0], 0.0], [0.0, 1. / M[1, 1]]])
  B_inv = -A_inv @ M[:, 2:3]
  M_inv = np.hstack([A_inv, B_inv])
  return M_inv


def affine_transform_coords(coords, M):
  A, B = M[:2, :2], M[:2, 2:3]
  transformed_coords = A @ coords + B
  return transformed_coords


class LetterboxTransformer:
  def __init__(self, height=None, width=None, mode='training', max_stride=128):
    """Resize the input images. For `mode='training'` the resolution is fixed to `height` x `width`.
       The resolution is changed but the aspect ratio is kept.
       In `mode='testing'` the input is padded to the next bigger multiple of `max_stride` of the network.
       The orginal resolutions is thus kept."""
    self.height = height
    self.width = width
    self.mode = mode
    self.max_stride = max_stride
    self.M = None
    self.M_inv = None

  def __call__(self, image):
    h, w = image.shape[:2]
    if self.mode == 'training':
      M, h_out, w_out = training_transform(h, w, self.height, self.width)
    elif self.mode == 'testing':
      M, h_out, w_out = testing_transform(h, w, self.max_stride)

    # https://answers.opencv.org/question/33516/cv2warpaffine-results-in-an-image-shifted-by-05-pixel
    # This is different from `cv2.resize(image, (resize_width, resize_height))` & pad
    letterbox = cv2.warpAffine(image, M, (w_out, h_out))
    self.M = M
    self.M_inv = invert_transform(M)
    return letterbox

  def correct_box(self, x1, y1, x2, y2):
    coords = np.float32([[x1, x2], [y1, y2]])
    coords = affine_transform_coords(coords, self.M_inv)
    x1, y1, x2, y2 = coords[0, 0], coords[1, 0], coords[0, 1], coords[1, 1]
    return x1, y1, x2, y2

  def correct_coords(self, coords):
    coords = affine_transform_coords(coords, self.M_inv)
    return coords
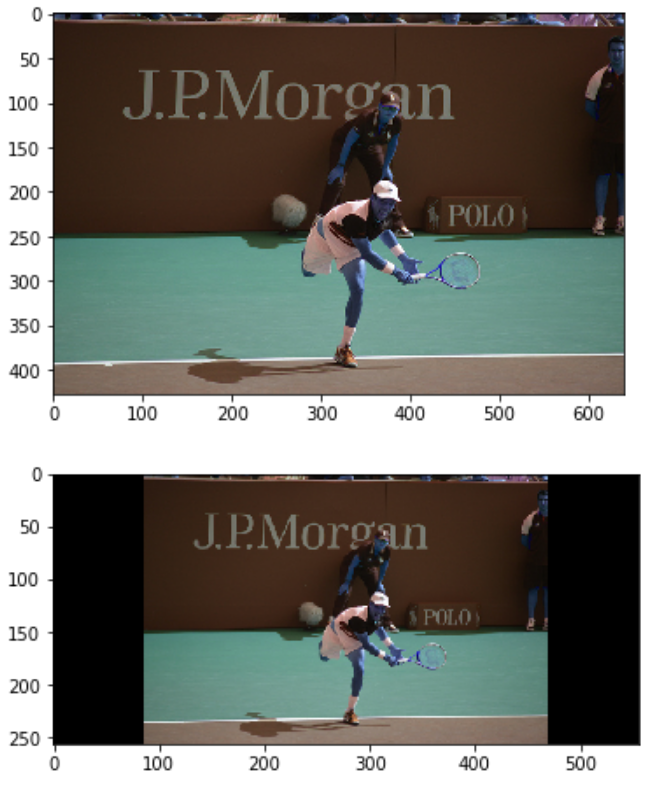
#查看效果
from matplotlib import pyplot as plt
from matplotlib import image


fn = '/home/hxybs/centerNet/Centernet-Tensorflow2/data/val2017/000000000885.jpg'
letterbox_transformer = LetterboxTransformer(256, 556)
img = cv2.imread(fn)
pimg = letterbox_transformer(img)
plt.figure()
plt.imshow(img)
plt.figure()
plt.imshow(pimg)
plt.show()
效果:
计算图片数据集的均值方差
保证所有的图片都是统一尺寸
import os
from PIL import Image
import matplotlib.pyplot as plt
import numpy as np
from imageio import imread

filepath = r'/home/xxx/images'  # 数据集目录
pathDir = os.listdir(filepath)

R_channel = 0
G_channel = 0
B_channel = 0
for idx in range(len(pathDir)):
    filename = pathDir[idx]
    img = imread(os.path.join(filepath, filename)) / 255.0
    R_channel = R_channel + np.sum(img[:, :, 0])
    G_channel = G_channel + np.sum(img[:, :, 1])
    B_channel = B_channel + np.sum(img[:, :, 2])

num = len(pathDir) * 512 * 512  # 这里(512,512)是每幅图片的大小,所有图片尺寸都一样
R_mean = R_channel / num
G_mean = G_channel / num
B_mean = B_channel / num

R_channel = 0
G_channel = 0
B_channel = 0
for idx in range(len(pathDir)):
    filename = pathDir[idx]
    img = imread(os.path.join(filepath, filename)) / 255.0
    R_channel = R_channel + np.sum((img[:, :, 0] - R_mean) ** 2)
    G_channel = G_channel + np.sum((img[:, :, 1] - G_mean) ** 2)
    B_channel = B_channel + np.sum((img[:, :, 2] - B_mean) ** 2)

R_var = np.sqrt(R_channel / num)
G_var = np.sqrt(G_channel / num)
B_var = np.sqrt(B_channel / num)
print("R_mean is %f, G_mean is %f, B_mean is %f" % (R_mean, G_mean, B_mean))
print("R_var is %f, G_var is %f, B_var is %f" % (R_var, G_var, B_var))
COCOAPI win10下安装:
首先安装setuptools、cython、matplotlib
conda install cython
安装vs++运行环境
http://go.microsoft.com/fwlink/?LinkId=691126&fixForIE=.exe
Open setup.py
Remove the line extra_compile_args=['-Wno-cpp', '-Wno-unused-function', '-std=c99'],
Runpython setup.py build_ext install