优点
mvc 模式在项目开发中的优点是能够隔离业务和展示层,进一步的我们有完整的独立对象去控制展示层
直接带来的好处是,我们可以很容易的维护和复用他们。下面你将看到:
一般来讲我们会尽量把项目中对象间的依赖降到最低,这样我们能够更容易的改变和复用他们。为了实现
这样的愿望,我们要遵循“面向接口编程,而不是类”,MVC 就提供了实现它的手段。
我们被分配了一个任务去创建ACME 2000 运动车 业务对象,我们的任务是创建一个简单的Windows 接口
目标:1 显示汽车的当前方向和速度。2 终端用户能够变换汽车方向,加速,减速。当然是在一定允许范围
内。
如果我们设计成功了,我们可能还要设计类似的汽车,敞篷小卡,三轮车,作为开发者 我们也知道 ACME
管理团队最终会说“嗨!这真的很酷”,我们能在公司的内网上看到么?“ 所有这些都想到了,我们就要发布
一个容易测量的产品。
嗯,正好,这就是一个应用MVC 的很好的例子。
开始动手了,
我们要有一个草图,MVC 有三部分:模型 ,控制器和视图。在我们的系统中,模型就是我们的汽车,视图
就是我们的用户接口,控制器就是联结模型和视图的部份。
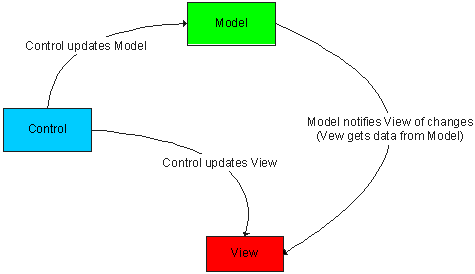
为了对模型(我们的ACME 2000 运动车)进行任何的改变,我们要使用控制器,我们的控制器要向模型发出请求。并且更新
我们的视图,也就是我们的用户接口(UI)
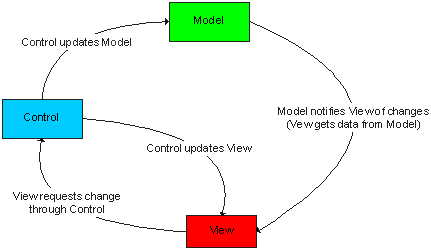
这好像真的很简单,但是这里我们有第一个问题不得不解决:
当终端用户想要对模型(我们的汽车)做一个修改的时候,发生了什么?
例如,开得更快或者转弯?这些必须要通过使用控制器(controller)来请求一个更新,更新来自我们的视图(用户接口)
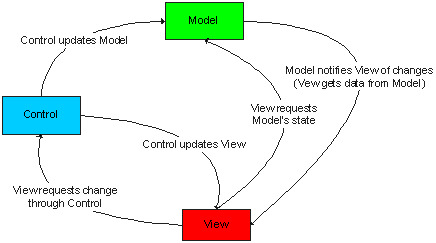
现在,我们剩下最后一个问题需要解决:
如果视图(用户接口)没有必需的信息显示模型(汽车)的当前状态那将会如何呢?
我们必须要添加更多的箭头在我们的图上,为了能够显示模型的状态信息,视图要能够请求模型的状态
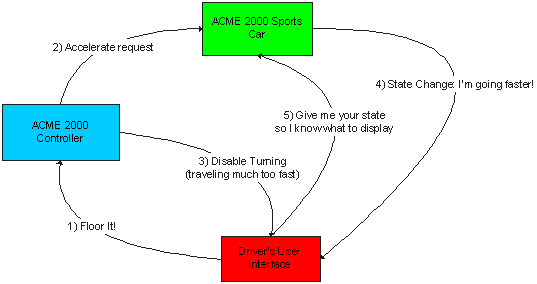
最后,我们终端用户(司机)要能够通过视图和我们整个ACME 汽车控制系统交互。如果他们需要对系统变化作出请求
例如提速,这个请求应该从视图开始,并且由控制器来处理。紧接着控制器会要求模型作出改变,并且对视图做相应的
变更。例如,如果一个鲁莽的司机要做出加快和拐弯的动作,控制器要知道禁止他这么做,并把试图的转向功能禁止掉
以免高峰时期的连环相撞。
模型会通知视图速度已经增加,试图会在相应的地方做更新。
上面的都考虑完了,我们得到一个完整的图:
下面,开始程序编制
作为一个总是思考在前的程序员,我想确信我的系统要有一个长的和成功的生命期,这意味着要对ACME 可能的变化
做足够的准备,为了实现它, 我们知道下面两个金律:
1.“保持类之间的松耦合”
2.“面向接口编程”。
因此,我们要创建三个接口(你可能已经猜到,一个是为模型,一个是为视图,一个是为控制器)
经过很多研究和与ACME客户的访谈,我们发现更多的系统规范。我们想确定我们能够设定最大的向前,向后,拐弯
我们也应该能够加速,减速,向左,向右,我们的控制面板必须显示当前的速度和方向。
第一,让我们关心一些准备项,我们需要一些东西来表示方向和转向请求。我们要创建两个枚举元素
AbsoluteDirection 和 RelativeDirection
 public enum AbsoluteDirection
 {
{
 North = 0, East, South, West
 } public enum RelativeDirection { Right, Left, Back }
下一步,让我们创建控制器接口,我们知道控制器必须向模型请求,特别的,加速,减速,转弯,
我们要用合适的方法来创建该接口
public interface IVehicleControl { void Accelerate(int paramAmount); void Decelerate(int paramAmount); void Turn(RelativeDirection paramDirection); }现在我们要创建模型的接口,我们需要知道汽车的名称,速度,最大速度,最大保留速度,最大转弯速度和方向
我们也需要方法去加速,减速,转弯。
public interface IVehicleModel { string Name { get; set;} int Speed { get; set;} int MaxSpeed { get;} int MaxTurnSpeed { get;} int MaxReverseSpeed { get;} AbsoluteDirection Direction { get; set;} void Turn(RelativeDirection paramDirection); void Accelerate(int paramAmount); void Decelerate(int paramAmount); }
最后,我们要建立视图接口,我们知道视图应该暴露一些方法给控制器,例如开启和关闭 加速,减速和转弯的请求。
public class IVehicleView{ void DisableAcceleration(); void EnableAcceleration(); void DisableDeceleration(); void EnableDeceleration(); void DisableTurning(); void EnableTurning();} 我们将IVehicleControl改为如下,任何控制器都要了解它的视图和模型,因此,
我们添加“SetModel" 和“SetView” 方法到该控制器接口。
public interface IVehicleControl{ void RequestAccelerate(int paramAmount); void RequestDecelerate(int paramAmount); void RequestTurn(RelativeDirection paramDirection); void SetModel(IVehicleModel paramAuto); void SetView(IVehicleView paramView);}
下一部分比较复杂,我想视图能够了解模型的变化,为了实现这个目的我们使用了一个GOF 设计模式 “观察者”
为了实现观察者模式,我们需要添加下面的方法到模型里(模型要被视图观察):AddObserver
RemoveObserver 和 NotifyObservers
public interface IVehicleModel { string Name { get; set;} int Speed { get; set;} int MaxSpeed { get;} int MaxTurnSpeed { get;} int MaxReverseSpeed { get;} AbsoluteDirection Direction { get; set;} void Turn(RelativeDirection paramDirection); void Accelerate(int paramAmount); void Decelerate(int paramAmount); //added for observers void AddObserver(IVehicleView paramView); void RemoveObserver(IVehicleView paramView); void NotifyObservers(); }
并且添加下面的方法到视图(视图正在观察模型),这回实现模型会有一个对视图的引用,当模型变化时,它会呼叫
NotifyObservers()方法 并且传递一个自己的引用,并且通过视图的update()方法通知一个变化的试图。
public class IVehicleView { void DisableAcceleration(); void EnableAcceleration(); void DisableDeceleration(); void EnableDeceleration(); void DisableTurning(); void EnableTurning(); void Update(IVehicleModel paramModel); }到此,我们有了我们的接口,我们下面就可以应用他们了,任何展示汽车状态的用户接口都会实现 IVehicleView
所有我们的 ACME 汽车都会实现 IVehicleModel 。同时,我们会用实现了IVehicleControl 的ACME 控制器来控制
我们的汽车。
我们知道我们所有的汽车的行为都应该一致,因此,我们要创建一段通用的代码 去处理它们的操作
他将会是一个抽象类,因为我们不想任何人驾车在一个“skeleton”周围(你不能使这个抽象类实例化)
我们叫它汽车,我们要使用一个ArrayList(System.Collections)来保持跟踪所有有兴趣的视图(还记得观察者模式么?)
每一次方向或速度的变化,汽车都会通知所有的观察者IVehicleViews。
public abstract class Automobile : IVehicleModel { "Declarations " "Constructor" "IVehicleModel Members" }
现在,我们的 "ACME 框架" 已经准备好了,我们必须创建具体的类和我们的接口,然我们先注意最后两个类,会是
我们的控制器和我们的模型。
下面就是我们的具体的汽车控制器,它实现了IVehicleControl 接口,它也会依赖模型来设置视图。(检查setView方法,
它每一次被调用时,都有一个请求被传递到模型)
注意,我们只有到 IVehicleModel 的引用(不是 汽车的抽象类) 。
public class AutomobileControl : IVehicleControl { private IVehicleModel Model; private IVehicleView View; public AutomobileControl(IVehicleModel paramModel, IVehicleView paramView) { this.Model = paramModel; this.View = paramView; } public AutomobileControl() { } IVehicleControl Members public void SetView() { if (Model.Speed >= Model.MaxSpeed) { View.DisableAcceleration(); View.EnableDeceleration(); } else if (Model.Speed <= Model.MaxReverseSpeed) { View.DisableDeceleration(); View.EnableAcceleration(); } else { View.EnableAcceleration(); View.EnableDeceleration(); } if (Model.Speed >= Model.MaxTurnSpeed) { View.DisableTurning(); } else { View.EnableTurning(); } } }
下面是我们的 ACME2000 运动车类(扩展了汽车抽象类,抽象类实现了 IVehicleModel 接口)
public class ACME2000SportsCar : Automobile { public ACME2000SportsCar(string paramName) : base(250, 40, -20, paramName) { } public ACME2000SportsCar(string paramName, int paramMaxSpeed, int paramMaxTurnSpeed, int paramMaxReverseSpeed) : base(paramMaxSpeed, paramMaxTurnSpeed, paramMaxReverseSpeed, paramName) { } }现在来看我们的视图
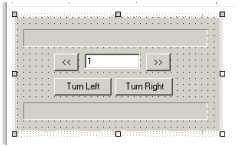
我们要创建一个AutoView视图用户控件来实现IVehicleView 接口,该视图拥有一个到控制器和模型接口的引用。
public class AutoView : System.Windows.Forms.UserControl, IVehicleView { private IVehicleControl Control = new ACME.AutomobileControl(); private IVehicleModel Model = new ACME.ACME2000SportsCar("Speedy"); } 我们也需要为该用户控件在构造函数中创建触发器
public AutoView() { // This call is required by the Windows.Forms Form Designer. InitializeComponent(); WireUp(Control, Model); } public void WireUp(IVehicleControl paramControl, IVehicleModel paramModel) { // If we're switching Models, don't keep watching // the old one! if(Model != null) { Model.RemoveObserver(this); } Model = paramModel; Control = paramControl; Control.SetModel(Model); Control.SetView(this); Model.AddObserver(this); }
下面,我们添加我们的按钮,标签用来显示汽车的状态,
private void btnAccelerate_Click(object sender, System.EventArgs e) { Control.RequestAccelerate(int.Parse(this.txtAmount.Text)); } private void btnDecelerate_Click(object sender, System.EventArgs e) { Control.RequestDecelerate(int.Parse(this.txtAmount.Text)); } private void btnLeft_Click(object sender, System.EventArgs e) { Control.RequestTurn(RelativeDirection.Left); } private void btnRight_Click(object sender, System.EventArgs e) { Control.RequestTurn(RelativeDirection.Right); } //Add a method to update the interface public void UpdateInterface(IVehicleModel auto) { this.label1.Text = auto.Name + " heading " + auto.Direction.ToString() + " at speed: " + auto.Speed.ToString(); this.pBar.Value = (auto.Speed>0)? auto.Speed*100/auto.MaxSpeed : auto.Speed*100/auto.MaxReverseSpeed; } //Finally, we'll wire up the IVehicleView interface methods public void DisableAcceleration() { this.btnAccelerate.Enabled = false; } public void EnableAcceleration() { this.btnAccelerate.Enabled = true; } public void DisableDeceleration() { this.btnDecelerate.Enabled = false; } public void EnableDeceleration() { this.btnDecelerate.Enabled = true; } public void DisableTurning() { this.btnRight.Enabled = this.btnLeft.Enabled = false; } public void EnableTurning() { this.btnRight.Enabled = this.btnLeft.Enabled = true; } public void Update(IVehicleModel paramModel) { this.UpdateInterface(paramModel); }public class ACME2000Truck: Automobile{ public ACME2000Truck(string paramName):base(80, 25, -12, paramName){} public ACME2000Truck(string paramName, int paramMaxSpeed, int paramMaxTurnSpeed, int paramMaxReverseSpeed): base(paramMaxSpeed, paramMaxTurnSpeed, paramMaxReverseSpeed, paramName){} }//in the AutoView, we just have to build the truck and wire it up!private void btnBuildNew_Click(object sender, System.EventArgs e){ this.autoView1.WireUp(new ACME.AutomobileControl(), new ACME.ACME2000Truck(this.txtName.Text));}//If we wanted a new Control that only allowed us to increase or decrease the speed by a maximum of 5mph, it's a snap! Create a SlowPokeControl (same as our AutoControl, but with limits on how much a Model will be requested to accelerate)public void RequestAccelerate(int paramAmount){ if(Model != null){ int amount = paramAmount; if(amount > 5) amount = 5; Model.Accelerate(amount); if(View != null) SetView();}}public void RequestDecelerate(int paramAmount){ if(Model != null){ int amount = paramAmount; if(amount > 5) amount = 5; Model.Accelerate(amount); Model.Decelerate(amount); if(View != null) SetView();}}//If we want to make our ACME2000 Truck a SlowPoke, we just wire it up in the AutoView!private void btnBuildNew_Click(object sender, System.EventArgs e){ this.autoView1.WireUp(new ACME.SlowPokeControl(), new ACME.ACME2000Truck(this.txtName.Text));}
结论:
你可以看到,使用MVC帮助创建代码去控制接口,这使得当我们改变请求时更容易。
你可以复用你的接口和抽象类在任何其它地方。一定要在你的下一个项目时想起MVC
你不会后悔的。