vue-cli 2.x详解
vue 2.x
- install
npm i vue-cli -g
- init
# vue init <template-name> <project-name>
vue init webpack vueapp
vue 2.x项目目录
├── build/                      # webpack config files
│   └── ...
├── config/
│   ├── index.js                # main project config
│   └── ...
├── src/
│   ├── main.js                 # app entry file
│   ├── App.vue                 # main app component
│   ├── components/             # ui components
│   │   └── ...
│   └── assets/                 # module assets (processed by webpack)
│       └── ...
├── static/                     # pure static assets (directly copied)
├── test/
│   └── unit/                   # unit tests
│   │   ├── specs/              # test spec files
│   │   ├── eslintrc            # config file for eslint with extra settings only for unit tests
│   │   ├── index.js            # test build entry file
│   │   ├── jest.conf.js        # Config file when using Jest for unit tests
│   │   └── karma.conf.js       # test runner config file when using Karma for unit tests
│   │   ├── setup.js            # file that runs before Jest runs your unit tests
│   └── e2e/                    # e2e tests
│   │   ├── specs/              # test spec files
│   │   ├── custom-assertions/  # custom assertions for e2e tests
│   │   ├── runner.js           # test runner script
│   │   └── nightwatch.conf.js  # test runner config file
├── .babelrc                    # babel config
├── .editorconfig               # indentation, spaces/tabs and similar settings for your editor
├── .eslintrc.js                # eslint config
├── .eslintignore               # eslint ignore rules
├── .gitignore                  # sensible defaults for gitignore
├── .postcssrc.js               # postcss config
├── index.html                  # index.html template
├── package.json                # build scripts and dependencies
└── README.md                   # Default README file
vue 2.x command
npm run dev
- Webpack + vue-loader for single file Vue components.
- State preserving hot-reload
- State preserving compilation error overlay
- Lint-on-save with ESLint
- Source maps
npm run build
- JavaScript minified with UglifyJS v3.
- HTML minified with html-minifier.
- CSS across all components extracted into a single file and minified with cssnano.
- All static assets compiled with version hashes for efficient long-term caching, and a production index.html is auto-generated with proper URLs to these generated assets.
vue 2.x babel config
什么是Babel
https://babeljs.io/docs/en/index.html
官方解释,是下一代JavaScript 语法的编译器。
既然是下一代Javascript的标准,浏览器因版本的不同对此会有兼容性问题,JavaScript的新的方法都不能使用,但是目前我们在项目开发一直提倡使用最新的语法糖编写,不但能减少代码量,而且async,await等新特性还解决了回调的编写机制,减轻了代码维护成本。
Babel就因此而生,它可以让你放心使用大部分的JavaScript的新的标准的方法,然后编译成兼容绝大多数的主流浏览器的代码。在项目工程脚手架中,一般会使用.babelrc文件,通过配置一些参数配合webpack进行打包压缩。
reference
- 语法转义器
主要对javascript最新的语法糖进行编译,并不负责转译javascript新增的api和全局对象。例如let/const就可以被编译,而includes/Object.assign等并不能被编译。
常用到的转译器包有,
babel-preset-env、babel-preset-es2015、babel-preset-es2016、babel-preset-es2017、babel-preset-latest等。在实际开发中可以只选用babel-preset-env来代替余下的,但是还需要配上javascirpt的制作规范一起使用,同时也是官方推荐`
{
 "presets": ["env", {
   "modules": false
  }],
  "stage-2"
}
- 补丁转义器
主要负责转译javascript新增的api和全局对象,例如
babel-plugin-transform-runtime这个插件能够编译Object.assign,同时也可以引入babel-polyfill进一步对includes这类用法保证在浏览器的兼容性。Object.assign 会被编译成以下代码:
__WEBPACK_IMPORTED_MODULE_1_babel_runtime_core_js_object_assign___default()
// .babelrc
{
    // 此项指明,转码的规则
    "presets": [
        // env项是借助插件babel-preset-env,下面这个配置说的是babel对es6,es7,es8进行转码,并且设置amd,commonjs这样的模块化文件,不进行转码
        ["env", {
          // modules通常都会设置为false,因为默认都是支持CommonJS规范,同时还有其他配置参数:"amd" | "umd" | "systemjs" | "commonjs",systemjs我还不知道规范写法是什么,amd和umd以及commonjs相对比较熟悉,下面简要列举下书写规范。
          "modules": false,
          // targets可以制定兼容浏览器版本,如果设置了browsers,那么就会覆盖targets原本对浏览器的限制配置。
          "targets":{
            "browsers":[">1%","last 2 versions","not ie <=8"]
          }
        }],
        // 下面这个是不同阶段出现的es语法,包含不同的转码插件
        "stage-2"
    ],
    // 下面这个选项是引用插件来处理代码的转换,transform-runtime用来处理全局函数和优化babel编译
    "plugins": [
      "transform-vue-jsx","transform-runtime"
      // 为了解决这种全局对象或者全局对象方法编译不足的情况,才出现了transform-runtime这个插件,但是它只会对es6的语法进行转换,而不会对新api进行转换。如果需要转换新api,也可以通过使用babel-polyfill来规避兼容性问题。
      ],
    // 下面指的是在生成的文件中,不产生注释
    "comments": false,
    // 下面这段是在特定的环境中所执行的转码规则,当环境变量是下面的test就会覆盖上面的设置
    "env": {
        // test 是提前设置的环境变量,如果没有设置BABEL_ENV则使用NODE_ENV,如果都没有设置默认就是development
        "test": {
            "presets": ["env", "stage-2"],
            "plugins": [
              "transform-vue-jsx",
              "transform-es2015-modules-commonjs",
              "dynamic-import-node"
              ]
        }
    }
}
vue 2.x Linter Configuration
- eslint config
// .eslintrc.js
// https://eslint.org/docs/user-guide/configuring

module.exports = {
  root: true,
  parserOptions: {
    parser: 'babel-eslint'
  },
  env: {
    browser: true,
  },
  extends: [
    // https://github.com/vuejs/eslint-plugin-vue#priority-a-essential-error-prevention
    // consider switching to `plugin:vue/strongly-recommended` or `plugin:vue/recommended` for stricter rules.
    'plugin:vue/essential',
    // https://github.com/standard/standard/blob/master/docs/RULES-en.md
    'standard'
  ],
  // required to lint *.vue files
  plugins: [
    'vue'
  ],
  // add your custom rules here
  rules: {
    // allow async-await
    'generator-star-spacing': 'off',
    // allow debugger during development
    'no-debugger': process.env.NODE_ENV === 'production' ? 'error' : 'off'
  }
}
- eslint rules
<!-- eslintignore -->
/build/
/config/
/dist/
/*.js
/test/unit/coverage/
vue 2.x Pre-Processors
- intro
This boilerplate has pre-configured CSS extraction for most popular CSS pre-processors including LESS, SASS, Stylus, and PostCSS. To use a pre-processor, all you need to do is install the appropriate webpack loader for it. For example, to use SASS:
# 预处理器
npm install sass-loader node-sass --save-dev
Note you also need to install node-sass because sass-loader depends on it as a peer dependency.
- Using Pre-Processors inside Components
Once installed, you can use the pre-processors inside your *.vue components using the lang attribute on <style> tags:
<style lang="scss">
/* write SASS! */
</style>

<!--
lang =“ scss”对应于CSS超集语法(带有花括号和分号)。
lang =“ sass”对应于基于缩进的语法。
-->
-
PostCSS
*.vue文件和样式文件(*.css,*.scss等)中的样式默认情况下通过PostCSS进行管道传输,因此您无需为其使用特定的加载器。您可以简单地将要使用的PostCSS插件添加到项目的根目录中的.postcssrc.js文件中:
// https://github.com/michael-ciniawsky/postcss-load-config
// ps: vue-loader docs
// http://vuejs.github.io/vue-loader/en/features/postcss.html

module.exports = {
  "plugins": {
    "postcss-import": {},
    "postcss-url": {},
    // to edit target browsers: use "browserslist" field in package.json
    "autoprefixer": {}
  }
}
- Standalone CSS Files
建议从根App.vue组件导入全局的独立样式文件,例如:
<!-- App.vue -->
<style src="./styles/global.less" lang="less"></style>
请注意,您可能只应针对您自己为应用程序编写的样式执行此操作。对于现有的库,例如
Bootstrap或Semantic UI,您可以将它们放在/static中,并直接在index.html中引用它们。这样可以避免额外的构建时间,也更适合浏览器缓存。 (请参阅静态资源处理)
vue 2.x Handling Static Assets
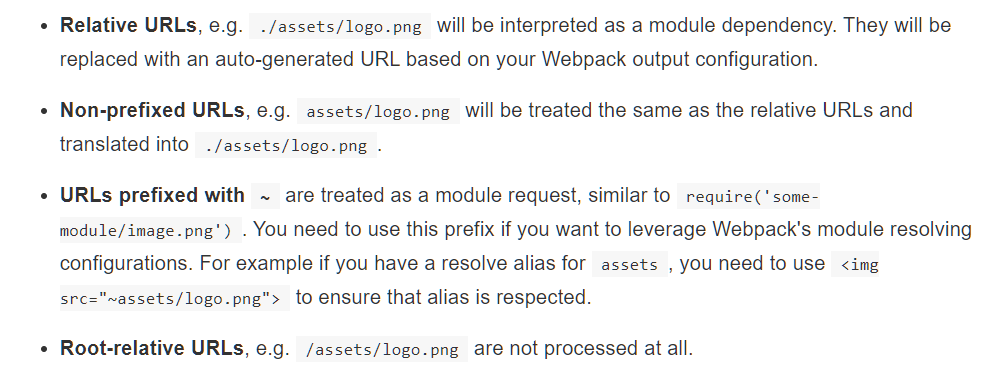
src/assetsandstatic/. What is the difference between them?
首先得理解webpack如何处理这些静态资源的,答案是:在
*.vue组件中vue-html-loader和css-loader会解析所有的模板和css,并且寻找资源的urls,例如<img src="./logo.png"> 和 background: url(./logo.png),"./logo.png"是一个相对资源路径,将由webpack解析为模块依赖项。
由于构建过程中可能会内联,复制,重命名这些资源,因此他们实际上是资源代码的一部分。这就是为什么建议将webpack处理的静态资源与其他源文件一起放在
/src内的原因。实际上,不必将他们全部放在/src/assets中,可以基于模块/组件来组织这些资源。
-
Asset Resolving Rules
-
Getting Asset Paths in JavaScript
为了使Webpack返回正确的资源路径,需要使用
require(./relative/path/to/file.jpg'),它将由file-loader处理并返回解析的URL。例如:
computed: {
  background () {
    return require('./bgs/' + this.id + '.jpg')
  }
}
// 注意,上面的示例将在最终版本中包括./bgs/下的每个图像。这是因为Webpack无法猜测其中的哪个将在运行时使用,因此将它们全部包含在内。
- "Real" Static Assets
相比之下,Webpack根本不处理
/static下的静态资源:它们使用相同的文件名按原样直接复制到其最终目标。然而必须使用绝对路径引用这些文件,该绝对路径由config/index.js中build. assetPublicPath和build.assetsSubDirectory决定。
'use strict'
// Template version: 1.3.1
// see http://vuejs-templates.github.io/webpack for documentation.

const path = require('path')

module.exports = {
  dev: {

    // Paths
    assetsSubDirectory: 'static',
    assetsPublicPath: '/',
    proxyTable: {},

    // Various Dev Server settings
    host: 'localhost', // can be overwritten by process.env.HOST
    port: 8080, // can be overwritten by process.env.PORT, if port is in use, a free one will be determined
    autoOpenBrowser: false,
    errorOverlay: true,
    notifyOnErrors: true,
    poll: false, // https://webpack.js.org/configuration/dev-server/#devserver-watchoptions-

    // Use Eslint Loader?
    // If true, your code will be linted during bundling and
    // linting errors and warnings will be shown in the console.
    useEslint: true,
    // If true, eslint errors and warnings will also be shown in the error overlay
    // in the browser.
    showEslintErrorsInOverlay: false,

    /**
     * Source Maps
     */

    // https://webpack.js.org/configuration/devtool/#development
    devtool: 'cheap-module-eval-source-map',

    // If you have problems debugging vue-files in devtools,
    // set this to false - it *may* help
    // https://vue-loader.vuejs.org/en/options.html#cachebusting
    cacheBusting: true,

    cssSourceMap: true
  },

  build: {
    // Template for index.html
    index: path.resolve(__dirname, '../dist/index.html'),

    // Paths
    assetsRoot: path.resolve(__dirname, '../dist'),
    assetsSubDirectory: 'static',
    assetsPublicPath: '/',

    /**
     * Source Maps
     */

    productionSourceMap: true,
    // https://webpack.js.org/configuration/devtool/#production
    devtool: '#source-map',

    // Gzip off by default as many popular static hosts such as
    // Surge or Netlify already gzip all static assets for you.
    // Before setting to `true`, make sure to:
    // npm install --save-dev compression-webpack-plugin
    productionGzip: false,
    productionGzipExtensions: ['js', 'css'],

    // Run the build command with an extra argument to
    // View the bundle analyzer report after build finishes:
    // `npm run build --report`
    // Set to `true` or `false` to always turn it on or off
    bundleAnalyzerReport: process.env.npm_config_report
  }
}
放置在static/中的任何文件都应使用绝对URL
/static / [filename]进行引用。如果将assetSubDirectory更改为assets,则需要将这些URL更改为/assets/[filename]
vue 2.x Environment Variables
- config
//config/prod.env.js
//字符串变量需要使用'"..."'引起来
//ps:test.env inherits the dev.env and the dev.env inherits the prod.env.
module.exports = {
  NODE_ENV: '"production"',
  DEBUG_MODE: false,
  API_KEY: '"..."' // this is shared between all environments
}

// config/dev.env.js
module.exports = merge(prodEnv, {
  NODE_ENV: '"development"',
  DEBUG_MODE: true // this overrides the DEBUG_MODE value of prod.env
})

// config/test.env.js
module.exports = merge(devEnv, {
  NODE_ENV: '"testing"'
})
- usage
Vue.config.productionTip = process.env.NODE_ENV === 'production'
vue 2.x Integrating with Backend Framework
如果要构建纯静态的应用程序(与后端AP1分开部署的应用程序),则可能甚至不需要编辑config/index. js。但是,如果您想将此模板与现有的后端框架集成在一起,例如Rails/Django/Laravel带有自己的项目结构,您可以编辑config/index.js直接将前端资产生成到您的后端项目中.
'use strict'
// Template version: 1.3.1
// see http://vuejs-templates.github.io/webpack for documentation.

const path = require('path')

module.exports = {
  dev: {

    // Paths
    assetsSubDirectory: 'static',
    assetsPublicPath: '/',
    // Define proxy rules for the dev server.
    proxyTable: {},

    // Various Dev Server settings
    host: 'localhost', // can be overwritten by process.env.HOST
    port: 8080, // can be overwritten by process.env.PORT, if port is in use, a free one will be determined
    autoOpenBrowser: false,
    errorOverlay: true,
    notifyOnErrors: true,
    poll: false, // https://webpack.js.org/configuration/dev-server/#devserver-watchoptions-

    // Use Eslint Loader?
    // If true, your code will be linted during bundling and
    // linting errors and warnings will be shown in the console.
    useEslint: true,
    // If true, eslint errors and warnings will also be shown in the error overlay
    // in the browser.
    showEslintErrorsInOverlay: false,

    /**
     * Source Maps
     */

    // https://webpack.js.org/configuration/devtool/#development
    devtool: 'cheap-module-eval-source-map',

    // If you have problems debugging vue-files in devtools,
    // set this to false - it *may* help
    // https://vue-loader.vuejs.org/en/options.html#cachebusting
    cacheBusting: true,

    cssSourceMap: true
  },
  build: {
// Template for index.html
// 必须是绝对路径,在本地文件系统中
// 这是index.html(带有注入的资源URLs)将被生成。
//如果您将此模板与后端框架一起使用,则可以编辑index.html。
// 相应地将html指向该路径,然后将其指向由您的后端应用程序呈现的视图文件,
// 例如`app/views/layouts/application.html.erb`用于一个Rails app,
// 或`resources/views/index.blade.php`用于一个Laravel php app。
    index: path.resolve(__dirname, '../dist/index.html'),


    // Paths
    // 必须是绝对路径,在本地文件系统中
    //
    assetsRoot: path.resolve(__dirname, '../dist'),
    assetsSubDirectory: 'static',
    assetsPublicPath: '/',

    /**
     * Source Maps
     */

    productionSourceMap: true,
    // https://webpack.js.org/configuration/devtool/#production
    devtool: '#source-map',

    // Gzip off by default as many popular static hosts such as
    // Surge or Netlify already gzip all static assets for you.
    // Before setting to `true`, make sure to:
    // npm install --save-dev compression-webpack-plugin
    productionGzip: false,
    productionGzipExtensions: ['js', 'css'],

    // Run the build command with an extra argument to
    // View the bundle analyzer report after build finishes:
    // `npm run build --report`
    // Set to `true` or `false` to always turn it on or off
    bundleAnalyzerReport: process.env.npm_config_report
  }
}
vue 2.x API Proxying During Development
// The example will proxy the request /api/posts/1 to http://jsonplaceholder.typicode.com/posts/1.
// config/index.js
module.exports = {
  // ...
  dev: {
    proxyTable: {
      // proxy all requests starting with /api to jsonplaceholder
      '/api': {
        target: 'http://jsonplaceholder.typicode.com',
        changeOrigin: true,
        pathRewrite: {
          '^/api': ''
        }
      }
    }
  }
}
proxyTable: {
  '**': {
    target: 'http://jsonplaceholder.typicode.com',
    filter: function (pathname, req) {
      return pathname.match('^/api') && req.method === 'GET'
    }
  }
}
vue 2.x unit testing
the test runner that launches JSDOM runs the tests and reports the results to us.
- files
setup.js
Jest runs this file before it runs the unit tests. It sets the Vue production tip to false.
- Mocking Dependencies
The Jest boilerplate comes with the ability to mock dependencies. See the mock functions guide for more details.
const path = require('path')
module.exports = {
  rootDir: path.resolve(__dirname, '../../'),
  // 告诉jest需要匹配的文件后缀
  moduleFileExtensions: [
    'js',
    'json',
    'vue'
  ],
  // 处理webpack的别名,比如将@表示/src目录
  moduleNameMapper: {
    '^@/(.*)$': '<rootDir>/src/$1'
  },
  // 匹配到.vue文件的是否用vue-jest处理,匹配到.js文件的是否用babel-jest处理
  transform: {
    '^.+\.js$': '<rootDir>/node_modules/babel-jest',
    '.*\.(vue)$': '<rootDir>/node_modules/vue-jest'
  },
  testPathIgnorePatterns: [
    '<rootDir>/test/e2e'
  ],
  // 将保存的快照测试结果进行序列化,使其更美观
  snapshotSerializers: ['<rootDir>/node_modules/jest-serializer-vue'],
  // 匹配到那些文件进行测试
  testMatch: ['**/__tests__/**/*.spec.js'],
  // 不进行匹配的目录
  transformIgnorePatterns: ['<rootDir>/node_modules/'],
  setupFiles: ['<rootDir>/test/unit/setup'],
  mapCoverage: true,
  coverageDirectory: '<rootDir>/test/unit/coverage',
  collectCoverageFrom: [
    'src/**/*.{js,vue}',
    '!src/main.js',
    '!src/router/index.js',
    '!**/node_modules/**'
  ]
}
vue 2.x end-to-end testing
vue 2.x Prerendering for SEO
如果您要预渲染在投入生产后不会发生重大变化的路由,请使用此Webpack插件:prerender-spa-plugin,该插件已通过Vue测试。对于经常更改的页面,Prerender.io和Netlify都提供了定期重新呈现搜索引擎内容的计划。
-
Using prerender-spa-plugin
- install
npm install --save-dev prerender-spa-plugin- Require it in
build/webpack.prod.conf.js
// This line should go at the top of the file where other 'imports' live in const PrerenderSpaPlugin = require('prerender-spa-plugin')- Configure it in the plugins array (also in
build/webpack.prod.conf.js)
new PrerenderSpaPlugin(
// Path to compiled app
path.join(__dirname, '../dist'),
// List of endpoints you wish to prerender
[ '/' ]
)
If you also wanted to prerender
/aboutand/contact, then that array would be[ '/', '/about', '/contact' ]
- enable history mode for
vue-routerconst router = new VueRouter({ mode: 'history', routes: [...] })