环境准备
3个节点,以下基于 Centos 7.6 系统, 内核版本:3.10.0-957.12.2.e17.x86_64
| HOST | NODE | CPU | MEM |
| 192.168.1.111 | master | 最低要求2核2C | 最低要求2GB |
| 192.168.1.112 | node1 | 最低要求2核2C | 最低要求2GB |
| 192.168.1.113 | node2 | 最低要求2核2C | 最低要求2GB |
环境初始化-master -node节点都需要操作
host文件信息:
cat >>/etc/hosts<<EOF
192.168.1.111 master
192.168.1.112 node1
192.168.1.113 node2
EOF
集群免密钥设置:
yum -y install expect
ssh-keygen -t rsa -P "" -f /root/.ssh/id_rsa
for i in 192.168.1.111 192.168.1.112 192.168.1.113;do
expect -c "
spawn ssh-copy-id -i /root/.ssh/id_rsa.pub root@$i
    expect {
        "*yes/no*" {send "yes
"; exp_continue}
        "*password*" {send "Flyaway.123
"; exp_continue}
        "*Password*" {send "Flyaway.123
";}
    } "
done
配置时间同步/关闭防火墙:
#同步节点时间;
yum install ntpdate -y
ntpdate  pool.ntp.org

#临时关闭selinux和防火墙;
sed -i '/SELINUX/s/enforcing/disabled/g'  /etc/sysconfig/selinux
setenforce  0
systemctl   stop     firewalld.service
systemctl   disable   firewalld.service
hostname:
# 节点的 hostname 必须使用标准的 DNS 命名,另外千万不用什么默认的 localhost 的 hostname,会导致各种错误出现的。在 Kubernetes 项目里,机器的名字以及一切存储在 Etcd 中的 API 对象,都必须使用标准的 DNS 命名(RFC 1123)。可以使用命令 hostnamectl set-hostname ydzs-node1 来修改 hostname。

# 修改对应节点主机名;
hostnamectl set-hostname master &&
ssh node1 "hostnamectl set-hostname node1" &&
ssh node2 "hostnamectl set-hostname node2"

# 拷贝 hosts 文件到 node 节点:
for i in node1 node2;do scp -r /etc/hosts $i:/etc/ ;done
由于开启内核 ipv4 转发需要加载 br_netfilter 模块,所以加载下该模块:
modprobe br_netfilter
创建 /etc/sysctl.d/k8s.conf 文件,添加如下内容:
net.bridge.bridge-nf-call-ip6tables = 1
net.bridge.bridge-nf-call-iptables = 1
net.ipv4.ip_forward = 1


# bridge-nf 解释:

# bridge-nf 使得 netfilter 可以对 Linux 网桥上的 IPv4/ARP/IPv6 包过滤。比如,设置net.bridge.bridge-nf-call-iptables=1后,二层的网桥在转发包时也会被 iptables的 FORWARD 规则所过滤。常用的选项包括:
# net.bridge.bridge-nf-call-arptables:是否在 arptables 的 FORWARD 中过滤网桥的 ARP 包
# net.bridge.bridge-nf-call-ip6tables:是否在 ip6tables 链中过滤 IPv6 包
# net.bridge.bridge-nf-call-iptables:是否在 iptables 链中过滤 IPv4 包
# net.bridge.bridge-nf-filter-vlan-tagged:是否在 iptables/arptables 中过滤打了 vlan 标签的包。
执行如下命令使文件生效:
sysctl -p /etc/sysctl.d/k8s.conf
安装ipvs:
$ cat > /etc/sysconfig/modules/ipvs.modules <<EOF
#!/bin/bash
modprobe -- ip_vs
modprobe -- ip_vs_rr
modprobe -- ip_vs_wrr
modprobe -- ip_vs_sh
modprobe -- nf_conntrack_ipv4
EOF

$ chmod 755 /etc/sysconfig/modules/ipvs.modules && bash /etc/sysconfig/modules/ipvs.modules && lsmod | grep -e ip_vs -e nf_conntrack_ipv4


# 安装 ipset  ipvsadm 管理工具(便于查看 ipvs 的代理规则)
 yum install ipset ipvsadm  chrony -y

# 同步服务器时间
systemctl enable chronyd && systemctl start chronyd && chronyc sources
关闭 swap 分区:
$ swapoff -a
#修改/etc/fstab文件,注释掉 SWAP 的自动挂载,使用free -m确认 swap 已经关闭。swappiness 参数调整,修改/etc/sysctl.d/k8s.conf添加下面一行:

vm.swappiness=0
#执行sysctl -p /etc/sysctl.d/k8s.conf使修改生效。


# 将 k8s.conf 文件 拷贝到 node 节点
for i in node1 node2;do scp -r /etc/sysctl.d/k8s.conf $i:/etc/sysctl.d/ ;done

ssh node1 "sysctl -p /etc/sysctl.d/k8s.conf" &&
ssh node2 "sysctl -p /etc/sysctl.d/k8s.conf"
部署docker:
yum install -y yum-utils
  device-mapper-persistent-data
  lvm2
# 如果下面命令执行超时,可以使用阿里云的源代替:http://mirrors.aliyun.com/docker-ce/linux/centos/docker-ce.repo
$ yum-config-manager
    --add-repo
    https://download.docker.com/linux/centos/docker-ce.repo
$ yum list docker-ce --showduplicates | sort -r

# 安装 docker-ce:
yum install docker-ce -y && mkdir /etc/docker

# 配置 docker 镜像加速器:

cat >> /etc/docker/daemon.json<<EOF
{
  "exec-opts": ["native.cgroupdriver=systemd"],
  "registry-mirrors" : [
    "https://ot2k4d59.mirror.aliyuncs.com/"
  ]
}
EOF

# 解释 cgroup 驱动

#由于默认情况下 kubelet 使用的 cgroupdriver 是 systemd,所以需要保持 docker 和kubelet 的 cgroupdriver 一致,我们这里修改 docker 的 cgroupdriver=systemd。如果不修改 docker 则需要修改 kubelet 的启动配置,需要保证两者一致。
启动 docker:
for i in start enable status; do systemctl $i docker ;done
配置 Kubeadm 源:
# yum 安装 kubeadm 工具时 默认是从 k8s.io 官网下载,对于不能科学**网的来说 比较头疼,所以提供了如下 阿里源 无需科学**网也可进行下载:

#  可以科学**网 选这个

cat <<EOF > /etc/yum.repos.d/kubernetes.repo
[kubernetes]
name=Kubernetes
baseurl=https://packages.cloud.google.com/yum/repos/kubernetes-el7-x86_64
enabled=1
gpgcheck=1
repo_gpgcheck=1
gpgkey=https://packages.cloud.google.com/yum/doc/yum-key.gpg
        https://packages.cloud.google.com/yum/doc/rpm-package-key.gpg
EOF

# 不能科学**网选择这个

cat <<EOF > /etc/yum.repos.d/kubernetes.repo
[kubernetes]
name=Kubernetes
baseurl=http://mirrors.aliyun.com/kubernetes/yum/repos/kubernetes-el7-x86_64
enabled=1
gpgcheck=0
repo_gpgcheck=0
gpgkey=http://mirrors.aliyun.com/kubernetes/yum/doc/yum-key.gpg
        http://mirrors.aliyun.com/kubernetes/yum/doc/rpm-package-key.gpg
EOF
安装 kubeadm、kubelet、kubectl:
# --disableexcludes 禁掉除了kubernetes之外的别的仓库

# 安装 v1.16.2 版本:
yum install -y kubelet-1.16.2 kubeadm-1.16.2 kubectl-1.16.2 --disableexcludes=kubernetes
kubeadm version

# 设置 kubelet 开机启动:
systemctl enable --now kubelet
集群初始化
在 master 节点配置 kubeadm 初始化文件, 可以通过如下命令导出默认的初始化配置:
# 为了方便管理 k8s 创建 k8s-install 目录
mkdir k8s-install

# 导出初始化配置文件
cd k8s-install/
kubeadm config print init-defaults > kubeadm.yaml
修改 kubeadm.yaml文件:
# 然后根据我们自己的需求修改配置,比如修改 imageRepository 的值,kube-proxy 的模式为 ipvs,另外需要注意的是我们这里是准备安装 flannel 网络插件的,需要将 networking.podSubnet 设置为10.244.0.0/16:

apiVersion: kubeadm.k8s.io/v1beta2
bootstrapTokens:
- groups:
  - system:bootstrappers:kubeadm:default-node-token
  token: abcdef.0123456789abcdef
  ttl: 24h0m0s
  usages:
  - signing
  - authentication
kind: InitConfiguration
localAPIEndpoint:
  advertiseAddress: 192.168.1.111  # apiserver 节点内网IP
  bindPort: 6443
nodeRegistration:
  criSocket: /var/run/dockershim.sock
  name: master  # 默认读取当前master节点的hostname
  taints:
  - effect: NoSchedule
    key: node-role.kubernetes.io/master
---
apiServer:
  timeoutForControlPlane: 4m0s
apiVersion: kubeadm.k8s.io/v1beta2
certificatesDir: /etc/kubernetes/pki
clusterName: kubernetes
controllerManager: {}
dns:
  type: CoreDNS
etcd:
  local:
    dataDir: /var/lib/etcd
imageRepository: registry.aliyuncs.com/google_containers  # 修改成阿里云镜像源
kind: ClusterConfiguration
kubernetesVersion: v1.16.2
networking:
  dnsDomain: cluster.local
  podSubnet: 10.244.0.0/16  # Pod 网段,flannel插件需要使用这个网段
  serviceSubnet: 10.96.0.0/12
scheduler: {}
---
apiVersion: kubeproxy.config.k8s.io/v1alpha1
kind: KubeProxyConfiguration
mode: ipvs  # kube-proxy 模式


# 配置提示:
对于上面的资源清单的文档比较杂,要想完整了解上面的资源对象对应的属性,可以查看对应的 godoc 文档,地址: https://godoc.org/k8s.io/kubernetes/cmd/kubeadm/app/apis/kubeadm/v1beta2。
修改配置 kubeadm.yaml 文件后, 进行初始化:
$ kubeadm init --config kubeadm.yaml
[preflight] If you know what you are doing, you can make a check non-fatal with `--ignore-preflight-errors=...`
To see the stack trace of this error execute with --v=5 or higher
[init] Using Kubernetes version: v1.16.2
[preflight] Running pre-flight checks
[preflight] Pulling images required for setting up a Kubernetes cluster
[preflight] This might take a minute or two, depending on the speed of your internet connection
[preflight] You can also perform this action in beforehand using 'kubeadm config images pull'
[kubelet-start] Writing kubelet environment file with flags to file "/var/lib/kubelet/kubeadm-flags.env"
[kubelet-start] Writing kubelet configuration to file "/var/lib/kubelet/config.yaml"
[kubelet-start] Activating the kubelet service
[certs] Using certificateDir folder "/etc/kubernetes/pki"
[certs] Generating "ca" certificate and key
x[certs] Generating "apiserver" certificate and key
[certs] apiserver serving cert is signed for DNS names [ydzs-master kubernetes kubernetes.default kubernetes.default.svc kubernetes.default.svc.cluster.local] and IPs [10.96.0.1 10.151.30.11]
xxx[certs] Generating "apiserver-kubelet-client" certificate and key
x[certs] Generating "front-proxy-ca" certificate and key
[certs] Generating "front-proxy-client" certificate and key
[certs] Generating "etcd/ca" certificate and key
[certs] Generating "etcd/server" certificate and key
[certs] etcd/server serving cert is signed for DNS names [ydzs-master localhost] and IPs [10.151.30.11 127.0.0.1 ::1]
[certs] Generating "etcd/peer" certificate and key
[certs] etcd/peer serving cert is signed for DNS names [ydzs-master localhost] and IPs [10.151.30.11 127.0.0.1 ::1]
[certs] Generating "etcd/healthcheck-client" certificate and key
[certs] Generating "apiserver-etcd-client" certificate and key
[certs] Generating "sa" key and public key
[kubeconfig] Using kubeconfig folder "/etc/kubernetes"
[kubeconfig] Writing "admin.conf" kubeconfig file
[kubeconfig] Writing "kubelet.conf" kubeconfig file
[kubeconfig] Writing "controller-manager.conf" kubeconfig file
[kubeconfig] Writing "scheduler.conf" kubeconfig file
[control-plane] Using manifest folder "/etc/kubernetes/manifests"
[control-plane] Creating static Pod manifest for "kube-apiserver"
[control-plane] Creating static Pod manifest for "kube-controller-manager"
[control-plane] Creating static Pod manifest for "kube-scheduler"
[etcd] Creating static Pod manifest for local etcd in "/etc/kubernetes/manifests"
[wait-control-plane] Waiting for the kubelet to boot up the control plane as static Pods from directory "/etc/kubernetes/manifests". This can take up to 4m0s
[apiclient] All control plane components are healthy after 39.504262 seconds
[upload-config] Storing the configuration used in ConfigMap "kubeadm-config" in the "kube-system" Namespace
[kubelet] Creating a ConfigMap "kubelet-config-1.16" in namespace kube-system with the configuration for the kubelets in the cluster
[kubelet-check] Initial timeout of 40s passed.
[upload-certs] Skipping phase. Please see --upload-certs
[mark-control-plane] Marking the node ydzs-master as control-plane by adding the label "node-role.kubernetes.io/master=''"
[mark-control-plane] Marking the node ydzs-master as control-plane by adding the taints [node-role.kubernetes.io/master:NoSchedule]
[bootstrap-token] Using token: abcdef.0123456789abcdef
[bootstrap-token] Configuring bootstrap tokens, cluster-info ConfigMap, RBAC Roles
[bootstrap-token] configured RBAC rules to allow Node Bootstrap tokens to post CSRs in order for nodes to get long term certificate credentials
[bootstrap-token] configured RBAC rules to allow the csrapprover controller automatically approve CSRs from a Node Bootstrap Token
[bootstrap-token] configured RBAC rules to allow certificate rotation for all node client certificates in the cluster
[bootstrap-token] Creating the "cluster-info" ConfigMap in the "kube-public" namespace
[addons] Applied essential addon: CoreDNS
[addons] Applied essential addon: kube-proxy

Your Kubernetes control-plane has initialized successfully!

To start using your cluster, you need to run the following as a regular user:

  mkdir -p $HOME/.kube
  sudo cp -i /etc/kubernetes/admin.conf $HOME/.kube/config
  sudo chown $(id -u):$(id -g) $HOME/.kube/config

You should now deploy a pod network to the cluster.
Run "kubectl apply -f [podnetwork].yaml" with one of the options listed at:
  https://kubernetes.io/docs/concepts/cluster-administration/addons/

Then you can join any number of worker nodes by running the following on each as root:

kubeadm join 192.168.1.111:6443 --token abcdef.0123456789abcdef
    --discovery-token-ca-cert-hash sha256:a292e66049e45264f848186d2fa3582dc360f3b5006cc160f137b5d436e078c2
拷贝 kubeconfig 文件:
mkdir -p $HOME/.kube
sudo cp -i /etc/kubernetes/admin.conf $HOME/.kube/config
sudo chown $(id -u):$(id -g) $HOME/.kube/config
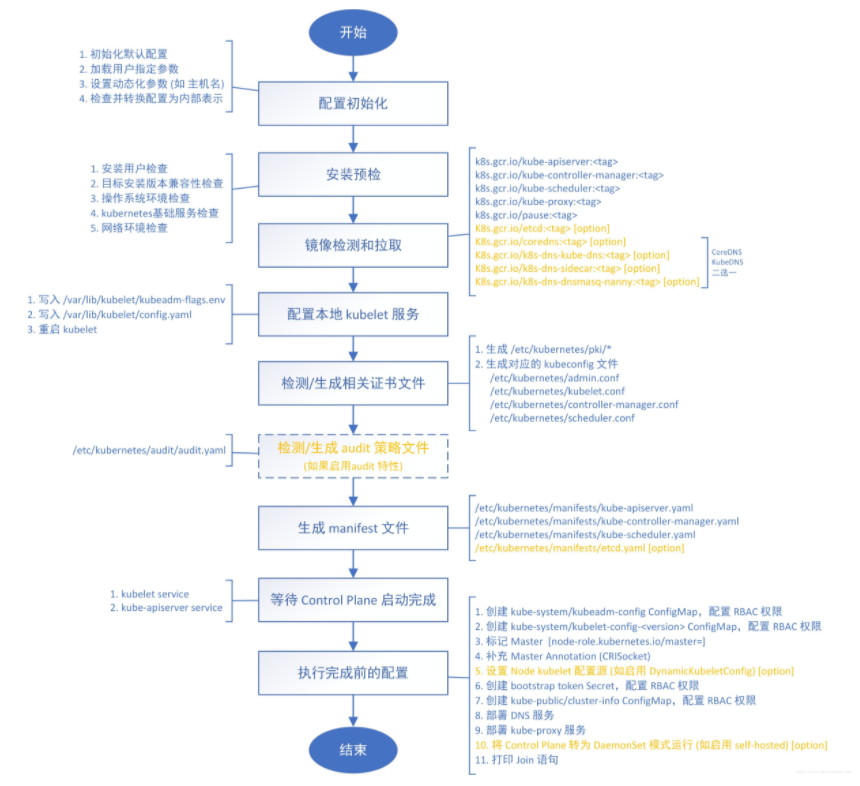
kubeadm init 命令执行流程图:
添加 node 节点
记住初始化集群上面的配置和操作要提前做好,将 master 节点上面的 $HOME/.kube/config 文件拷贝到 node 节点对应的文件中,安装 kubeadm、kubelet、kubectl(可选),然后执行上面初始化完成后提示的 join 命令即可:
$ kubeadm join 192.168.1.111:6443 --token abcdef.0123456789abcdef
>     --discovery-token-ca-cert-hash sha256:a292e66049e45264f848186d2fa3582dc360f3b5006cc160f137b5d436e078c2
[preflight] Running pre-flight checks
[preflight] Reading configuration from the cluster...
[preflight] FYI: You can look at this config file with 'kubectl -n kube-system get cm kubeadm-config -oyaml'
[kubelet-start] Downloading configuration for the kubelet from the "kubelet-config-1.16" ConfigMap in the kube-system namespace
[kubelet-start] Writing kubelet configuration to file "/var/lib/kubelet/config.yaml"
[kubelet-start] Writing kubelet environment file with flags to file "/var/lib/kubelet/kubeadm-flags.env"
[kubelet-start] Activating the kubelet service
[kubelet-start] Waiting for the kubelet to perform the TLS Bootstrap...

This node has joined the cluster:
* Certificate signing request was sent to apiserver and a response was received.
* The Kubelet was informed of the new secure connection details.

Run 'kubectl get nodes' on the control-plane to see this node join the cluster.
join 命令:
如果忘记了上面的 join 命令可以使用 kubeadm token create --print-join-command 重新获取。
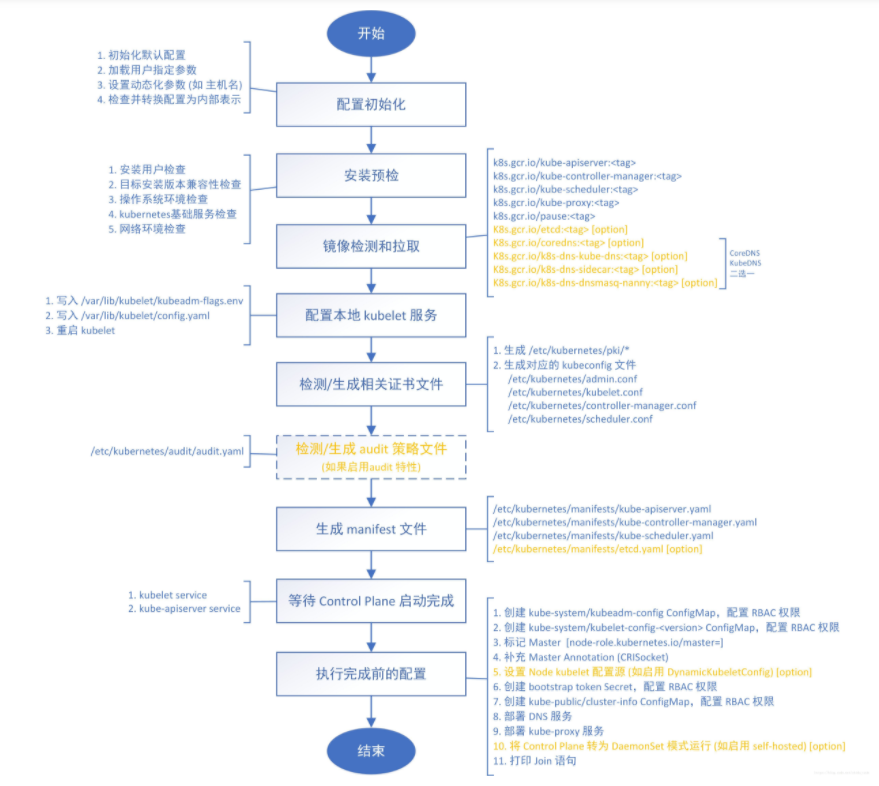
kubeadm join 命令执行流程图:
添加 node 节点后 查看:
$ kubectl get nodes
NAME          STATUS     ROLES    AGE    VERSION
master        NotReady   master   39m    v1.16.2
node1         NotReady    none1   106s   v1.16.2
node1         NotReady    none2   106s   v1.16.2
网络方案(CNI)两种网络-我们这里选择Flannel 以下作为介绍
1、Calico 推荐方案,支持网络策略
为什么部署CNI网络?
部署CNI是为了不同主机之间的Pod进行通信,因为kubernetes资源调度是需要通信进行计算服务器资源情况进行分配的
Calico是一个纯三层的数据中心网络方案,Calico支持广泛的平台,包括Kubernetes、OpenStack等。
Calico 在每一个计算节点利用 Linux Kernel 实现了一个高效的虚拟路由器( vRouter) 来负责数据转发,<br>而每个 vRouter 通过 BGP 协议负责把自己上运行的 workload 的路由信息向整个 Calico 网络内传播。
此外,Calico  项目还实现了 Kubernetes 网络策略,提供ACL功能
下载官方默认配置文件
https://docs.projectcalico.org/manifests/calico.yaml
下载完后还需要修改里面配置项:
- 定义Pod网络(CALICO_IPV4POOL_CIDR),与前面初始化集群网络pod CIDR配置一样,后面集群所有的pod都会使用这个网络进行分配地址
- 选择工作模式(CALICO_IPV4POOL_IPIP),支持**BGP(Never)**、**IPIP(Always)**、**CrossSubnet**(开启BGP并支持跨子网)
IPIP  隧道模式(overlay网络),基于以太网基础上承载容器数据表
BGP  纯路由方案,要求在二层网络中,比较推荐的模式(对性能要求高的环境)
CrossSubnet 跨网段走IPIP,同网段走BGP
修改完后应用清单和查看状态:
kubectl apply -f calico.yaml
kubectl get pods -n kube-system
2、Flannel 老版本推荐使用
Flannel是CoreOS维护的一个网络组件,Flannel为每个Pod提供全局唯一的IP,Flannel使用ETCD来存储Pod子网与Node IP之间的关系。
flanneld守护进程在每台主机上运行,并负责维护ETCD信息和路由数据包。
yaml下载地址: (国外下载地址比较慢,可以考虑更换为国内的镜像下载地址,推荐 在阿里源下载)
https://raw.githubusercontent.com/coreos/flannel/master/Documentation/kube-flannel.yml
可以看到是 NotReady 状态,这是因为还没有安装网络插件,接下来安装网络插件,可以在文档 https://kubernetes.io/docs/setup/production-environment/tools/kubeadm/create-cluster-kubeadm/ 中选择我们自己的网络插件,这里我们安装 flannel:
$ wget https://raw.githubusercontent.com/coreos/flannel/2140ac876ef134e0ed5af15c65e414cf26827915/Documentation/kube-flannel.yml
# 因为有节点是多网卡,所以需要在资源清单文件中指定内网网卡
# 搜索到名为 kube-flannel-ds-amd64 的 DaemonSet,在kube-flannel容器下面
$ vi kube-flannel.yml
......
containers:
- name: kube-flannel
  image: quay.io/coreos/flannel:v0.11.0-amd64
  command:
  - /opt/bin/flanneld
  args:
  - --ip-masq
  - --kube-subnet-mgr
  - --iface=eth0  # 如果是多网卡的话,指定内网网卡的名称
......

$ kubectl apply -f kube-flannel.yml  # 安装 flannel 网络插件

# 稍等一会查看 Pod 运行状态:
$ kubectl get pods -n kube-system
NAME                                  READY    STATUS     RESTARTS    AGE
coredns-667f964f9b-wb5fn              1/1      Running    0           20m
coredns-667f964f9b-xmwn2              1/1      Running    0           20m
etcd-ydzs-master                      1/1      Running    0           19m
kube-apiserver-ydzs-master            1/1      Running    0           19m
kube-controller-manager-ydzs-master   1/1      Running    0           19m
kube-flannel-ds-amd64-8l2wr           1/1      Running    0           12m
kube-flannel-ds-amd64-vwhbh           1/1      Running    0           12m
kube-proxy-8r4d2                      1/1      Running    0           17m
kube-proxy-rbjv7                      1/1      Running    0           20m
kube-scheduler-ydzs-master            1/1      Running    0           20m

# Flannel 网络插件

当我们部署完网络插件后执行 ifconfig 命令,正常会看到新增的cni0与flannel1这两个虚拟设备,但是如果没有看到cni0这个设备也不用太担心,我们可以观察/var/lib/cni目录是否存在,如果不存在并不是说部署有问题,而是该节点上暂时还没有应用运行,我们只需要在该节点上运行一个 Pod 就可以看到该目录会被创建,并且cni0设备也会被创建出来。
Dashboard
v1.16.2 版本的集群需要安装最新的 2.0+ 版本的 Dashboard:
# 推荐使用下面这种方式
$ wget https://raw.githubusercontent.com/kubernetes/dashboard/v2.0.0-beta5/aio/deploy/recommended.yaml
$ vi recommended.yaml
# 修改Service为NodePort类型
......
kind: Service
apiVersion: v1
metadata:
  labels:
    k8s-app: kubernetes-dashboard
  name: kubernetes-dashboard
  namespace: kubernetes-dashboard
spec:
  ports:
    - port: 443
      targetPort: 8443
      nodePort: 30001   #手工绑定端口
  selector:
    k8s-app: kubernetes-dashboard
  type: NodePort  # 加上type=NodePort变成NodePort类型的服务

# 创建及查看:
kubectl apply -f recommended.yaml
kubectl get pods -n kubernetes-dashboard -l k8s-app=kubernetes-
kubectl get svc -n kubernetes-dashboard
登录 Dashboard UI 界面:(注意使用https协议访问,http不可行,master IP+手工绑定的端口,如没有手工绑定端口 会随机生成一个端口)
https://192.168.1.111:30001
创建一个具有全局所有权限的用户来登录Dashboard:(admin.yaml) 可选:
kind: ClusterRoleBinding
apiVersion: rbac.authorization.k8s.io/v1beta1
metadata:
  name: admin
  annotations:
    rbac.authorization.kubernetes.io/autoupdate: "true"
roleRef:
  kind: ClusterRole
  name: cluster-admin
  apiGroup: rbac.authorization.k8s.io
subjects:
- kind: ServiceAccount
  name: admin
  namespace: kubernetes-dashboard

---
apiVersion: v1
kind: ServiceAccount
metadata:
  name: admin
  namespace: kubernetes-dashboard
创建:
$ kubectl apply -f admin.yaml
$ kubectl get secret -n kubernetes-dashboard|grep admin-token
admin-token-lwmmx                  kubernetes.io/service-account-token   3         1d
$ kubectl get secret admin-token-lwmmx -o jsonpath={.data.token} -n kubernetes-dashboard |base64 -d# 会生成一串很长的base64后的字符串
使用上面的 base64 解码后的字符串作为 token 登录 Dashboard 即可,新版本还新增了一个暗黑模式:

清理:
如果 集群安装过程中遇到了其他问题,我们可以使用下面的命令来进行重置:
$ kubeadm reset
$ ifconfig cni0 down && ip link delete cni0
$ ifconfig flannel.1 down && ip link delete flannel.1
$ rm -rf /var/lib/cni/