1.nginx负载均衡配置,并通过均衡配置,并通过实验验证其作用:
负载均衡目的:
将前端高并发转发至转发至后端多台服务器进行处理,解决单个节点压力过大,造成web服务响应过慢,验证的情况下导致服务器瘫痪,保障正常提供服务的问题。
工作原理:
负载均衡分为四层均衡和七层均衡。
四层负载均衡:四层工作在iso七层模型协议的第四层-传输层,主要工作是转发。
它在接收到客户端的流量以后通过修改数据包的地址信息(目标地址和端口源地址)将流量转发应用服务器。
七层负载均衡:是工作在iso七层模型协议的第七层-应用层,主要工作是代理。
它首先会走客户端建立一条完整的连接并将应用层的请求流量解析出来,在按照调度算法选择一个应用服务器。并与应用服务器建立另外一条连接请求发送过去。
配置七层负载均衡:
前端代理服务器:192.168.1.10
后端服务器: 192.168.1.11
后端服务器: 192.168.1.12
前端服务器主要配置upstream和proxy_pass:
upstream 主要是配置均衡池和调度方法,
proxy_pass 主要是配置代理服务器的IP或者服务器组的名称。
配置前端代理:nginx.conf
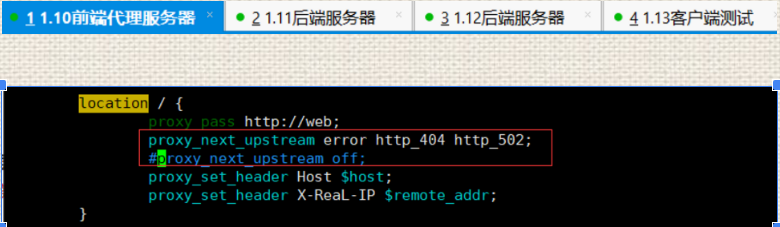
http 模块下添加:
    upstream web {
        server 192.168.1.11
        server 192.168.1.12
    }
server 模块中添加:
    location / {
        proxy_pass http://web;
        proxy_next_upstream error http_502;
        proxy_set_header Host $host;
        proxy_set_header X-Real-IP $remote_addr;
    }

后端需要有各自的发布目录文件 index.html: (配置完重新加载nginx)
轮询测试,访问前端IP:
while true;do curl 192.168.1.10;sleep 2;done

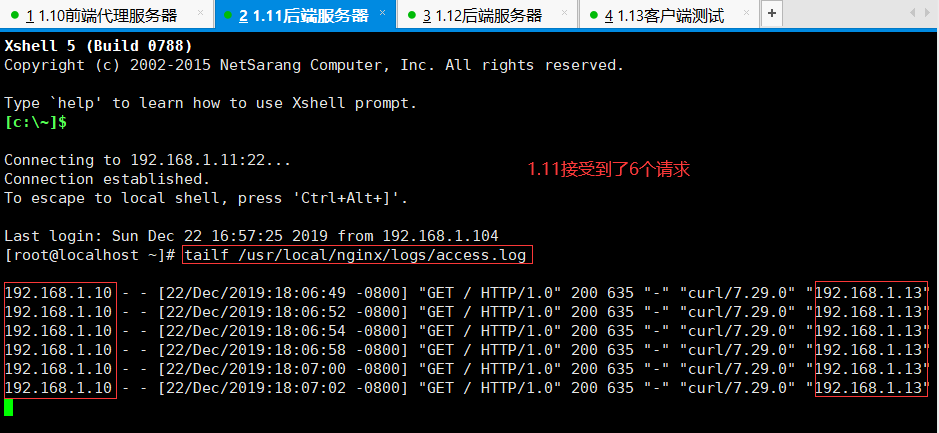
查看1.10前端服务器访问日志: 可以看到1.13请求了1.10:
tailf /usr/local/nginx/logs/access.log

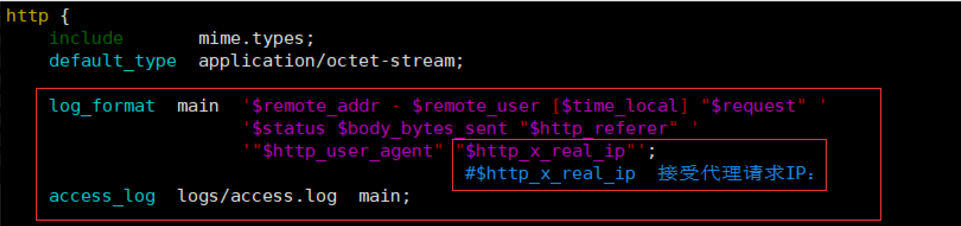
注意:前端服务器发送客户端真实IP时需要添加proxy_set_header X-Real-IP $remote_addr; 指令:
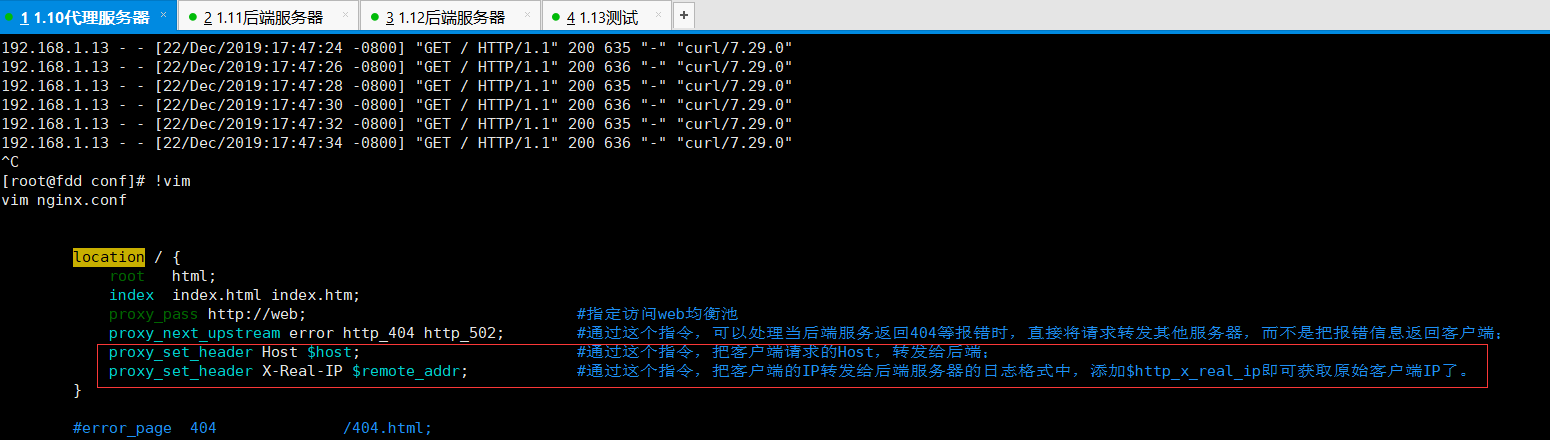
后端服务器要向记录或接受客户端的IP需要在配置文件中开启访问日志模块:(后端服务器配置)$http_x_real_ip
查看1.11后端服务器访问日志:
tailf /usr/local/nginx/logs/access.log
查看1.12后端服务器访问日志:
tailf /usr/local/nginx/logs/access.log
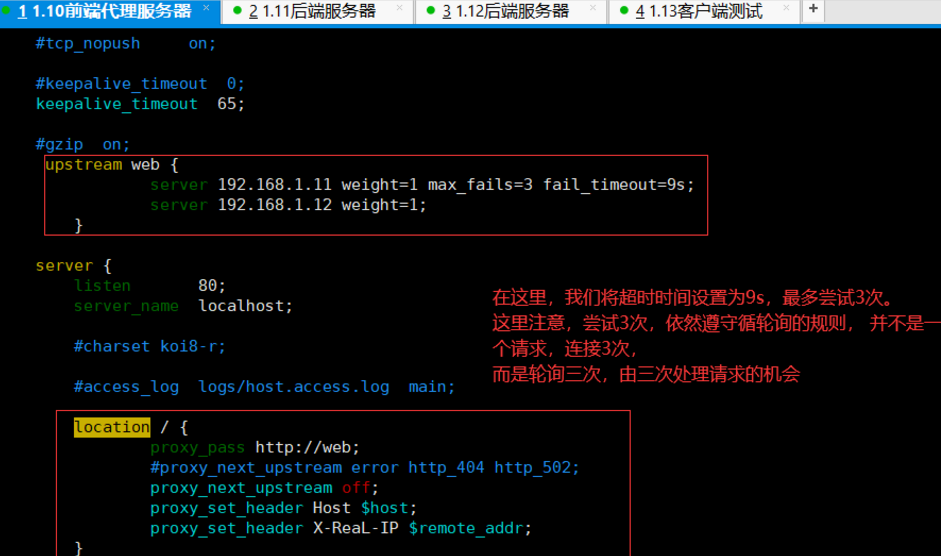
配置轮询加权重:(前端代理服务器配置)
   upstream web {
        server 192.168.1.11 weight=3;    #请求转发后端服务器1.11三次后,才会转发给1.12一次
        server 192.168.1.12 weight=1;
    }

测试访问前端IP:(空闲机器测试)
while true;do curl 192.168.1.10;sleep 2;done
查看代理服务器访问日志:
tailf /usr/local/nginx/logs/access.log
查看后端服务器访问日志:tailf /ust/local/nginx/logs/access.log
后端服务器,根据权重比例处理请求,使用与服务性不均的环境:

最大的错误连接数次数:
错误连接是由proxy_next_upstream, fastcgi_next_upstream等指令决定,且默认情况下,后端某台服务出现故障了, nginx会自动将请求再次转发给其它的服务器(因为默认proxy_next_upstream error timeout).
所以即使我没有配这个参数,nginx也可以帮我们处理error和timeout的响应,但是没法处理401等报错。
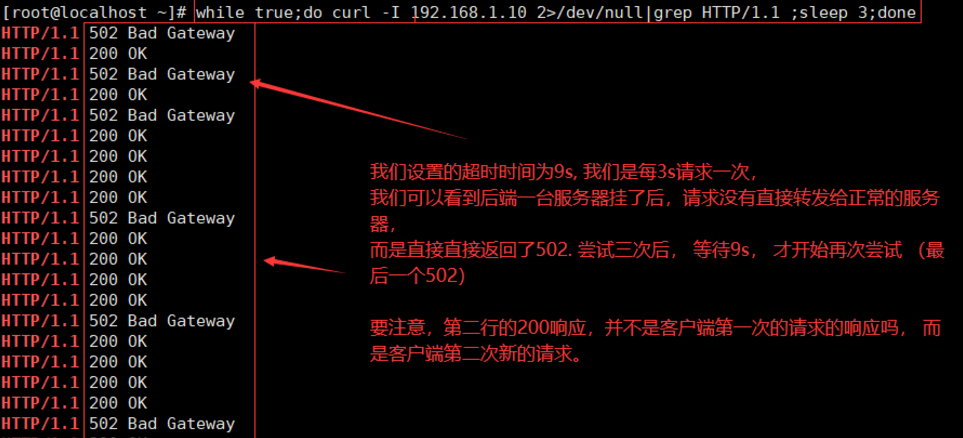
为了看清楚本质,可以先将proxy_next_upstream设置为off, 也就是不将失败的请求转发给其它正常的后端服务器,这样我们可以看到请求失败的结果。
配置前端代理:
proxy_next_upstream off;
关闭1.11后端服务器做实验:
/usr/local/nginx/sbin/nginx -s stop
访问前端IP:
while true;do curl -I 192.168.1.10 2>/dev/null|grep HTTP/1.1;sleep 3;done
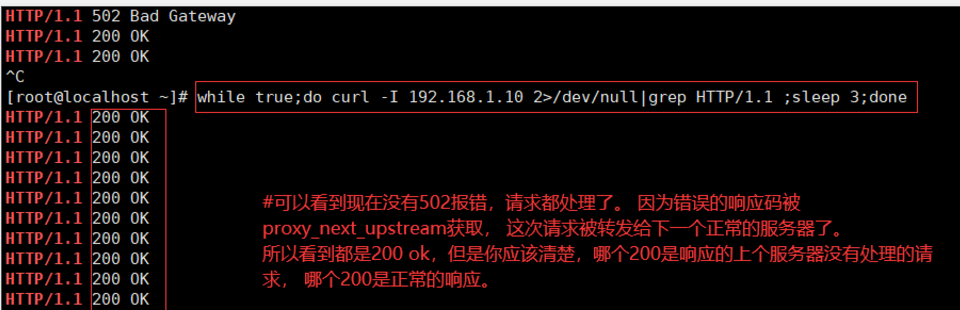
把proxy_next_upstream开启,在来访问看效果:前端代理服务器配置
重新加载nginx 访问前端IP看效果:
/usr/local/nginx/sbin/nginx -s reload
while true;do curl -I 192.168.1.10 2>/dev/null|grep HTTP/1.1;sleep 3;done
ip_hash:
通过客户端IP进行hash,在通过hash值选择后端server。
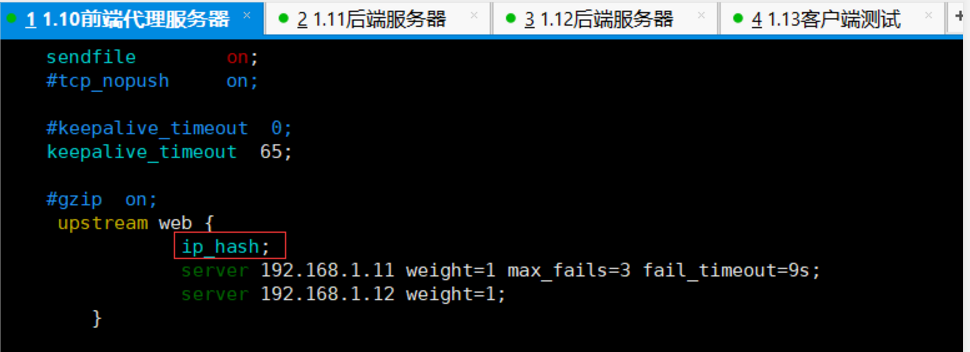
在使用负载均衡的时候会遇到会话保持的问题,常见的方法有:
1)ip_hash, 根据客户端的IP,将请求分配到不同的服务器上;
2)cookie,服务器给客户端下发一个cookie,具有特定cookie的请求会分配给特的发布者。
根据 响应时间均衡:(前端代理服务器配置)
fair 算法会根据后端节点服务的响应时间类分配请求,时间短的优先分配:
/usr/local/nginx/sbin/nginx -V
如果没有--with-stream模块需要重新编译进去

下载模块:
wget https://github.com/gnosek/nginx-upstream-fair/archive/master.zip
解压:
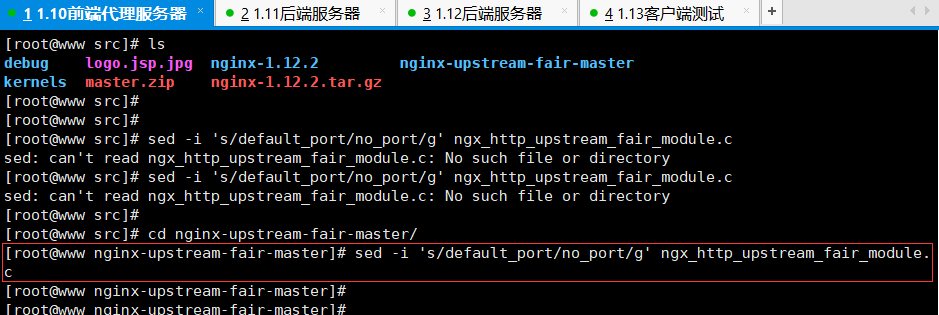
unzip master.zip
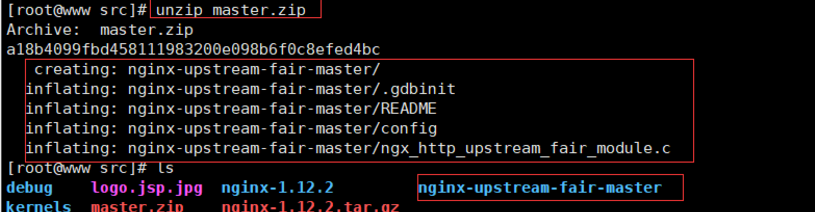
修改源码BUG:
sed -i 's/default_port/no_port/g' ngx_http_upstream_fair_module.c
编译/安装:注意 重新编译时,需把上一次的编译参数也加上
./configure --prefix=/usr/local/nginx/ --user=www --group=www --with-http_stub_status_module --with-http_ssl_module --add-module=../nginx-upstream-fair-master
配置fair:


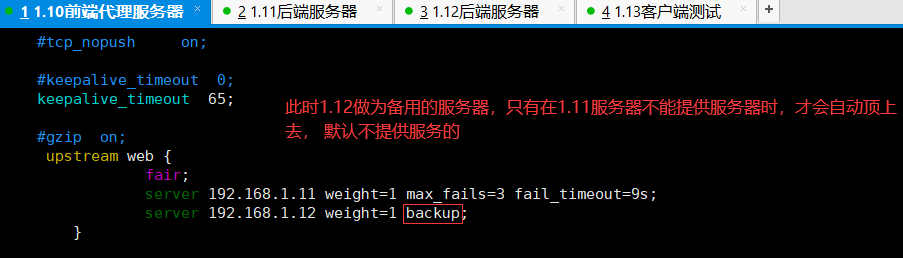
设置备用服务器:
配置四层负载均衡:
前端服务器:192.168.1.10

后端服务器1:192.168.1.11
后端服务器2:192.168.1.12
前端服务器主要配置stream和upstream, 注意该模块需要在预编译时指定,没有被默认编译进nginx。
如果没有此模块 ,需要重新预编译 编译 安装 : 加如 --with-stream模块:
./configure --prefix=/usr/local/nginx --user=www --group=www --with-http_stub_status_module --with-http_ssl-module --add-module=../nginx-upstream-fair-master --with-stream
编译安装完成后配置 nginx.conf文件:
stream {
    upstream web {
        server 192.168.1.11:80;
        server 192.168.1.12:80;
    }
    server {
        listen  80;
        proxy_connect_timeout 3s;
        proxy_timeout 10s;
        proxy_pass web;
    }
}
客户端访问1.10测试效果:
while true;do curl 192.168.1.10;sleep 2;done
查看后端服务器访问日志:
清空访问日志信息
>/usr/local/nginx/logs/access.log
查看访问日志
tailf /usr/local/nginx/logs/access.log
设置端口转发:
stream {
    upstream web {
        server 192.168.1.11:22;
    }
    server {
        listen  2222;
        proxy_connect_timeout 3s;
        proxy_timeout 10s;
        proxy_pass web;
    }
}
测试远程登录:
ssh 192.168.1.11 -p 2222