一、自定义信号
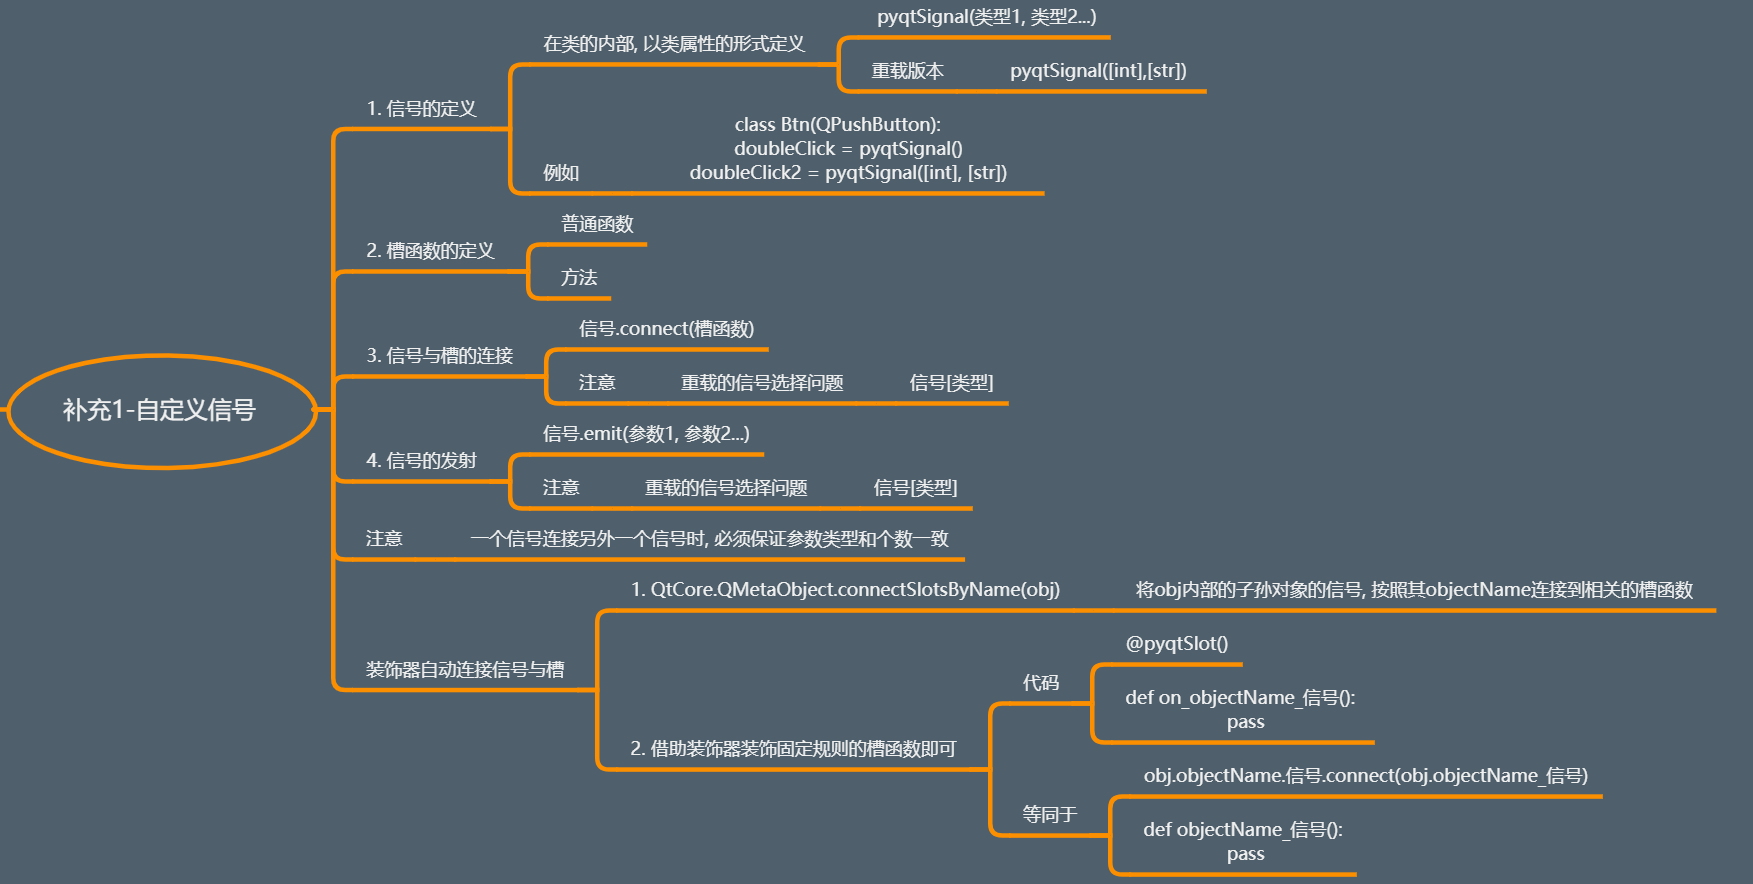
1、常规自定义信号的操作(1-4)


 1 from PyQt5.Qt import *
 2
 3 class Btn(QPushButton):
 4     # 自定义信号
 5     rightClicked = pyqtSignal([str],[int],[int,str]) # 向外发射一个字符串内容或者整型或者两个
 6
 7     def mousePressEvent(self, evt):
 8         super(Btn, self).mousePressEvent(evt)
 9
10         if evt.button() == Qt.RightButton:
11             print("应该发射右击信号")
12             self.rightClicked[str].emit(self.text())  # 选择发送字符串信号
13             self.rightClicked[int].emit(8888)  # 选择发送整型
14             self.rightClicked[int,str].emit(8888,self.text())
15
16 class Window(QWidget):
17     def __init__(self):
18         super().__init__()
19         self.setWindowTitle("自定义信号")
20         self.resize(500, 500)
21         self.setup_ui()
22
23     def setup_ui(self):
24         btn = Btn("xx",self)
25         # btn.clicked.connect(lambda :print("按钮被点击了"))
26         # btn.pressed.connect(lambda :print("按钮被按下了"))
27         # btn.rightClicked[str].connect(lambda content:print("按钮被按下了",content)) # 点击打印出信号传递的内容
28         btn.rightClicked[int,str].connect(lambda content,c2:print("按钮被按下了",content,c2))
29
30 if __name__ == '__main__':
31     import sys
32
33     app=QApplication(sys.argv)
34     window=Window()
35     window.show()
36     sys.exit(app.exec_())
37 # *******************自定义信号**********************结束
2、装饰器自动连接信号与槽
方便在生成UI的py文件后,增加信号与槽的功能。
 1 # *******************装饰器自动连接信号与槽**********************开始
 2 from PyQt5.Qt import *
 3
 4 class Window(QWidget):
 5     def __init__(self):
 6         super().__init__()
 7         self.setWindowTitle("装饰器自动连接信号与槽")
 8         self.resize(500, 500)
 9
10         self.setup_ui()
11
12     def setup_ui(self):
13         btn = QPushButton("测试按钮",self)
14         # 第一步
15         btn.setObjectName("btn")
16         btn.resize(200,200)
17         btn.move(100,100)
18         # 第二步
19         QMetaObject.connectSlotsByName(self) # 一定要放在后面
20
21         # btn.clicked.connect(self.click)
22
23     # 第三步
24     @pyqtSlot()
25     def on_btn_clicked(self):
26         print("按钮被点击了")
27
28 if __name__ == '__main__':
29     import sys
30
31     app=QApplication(sys.argv)
32
33     window=Window()
34     window.show()
35     sys.exit(app.exec_())
36 # *******************装饰器自动连接信号与槽**********************结束
二、动画
实现一些过渡的动画效果。

1、子类特定功能-QPropertyAnimation
实现某个属性值从x到y的动画变化
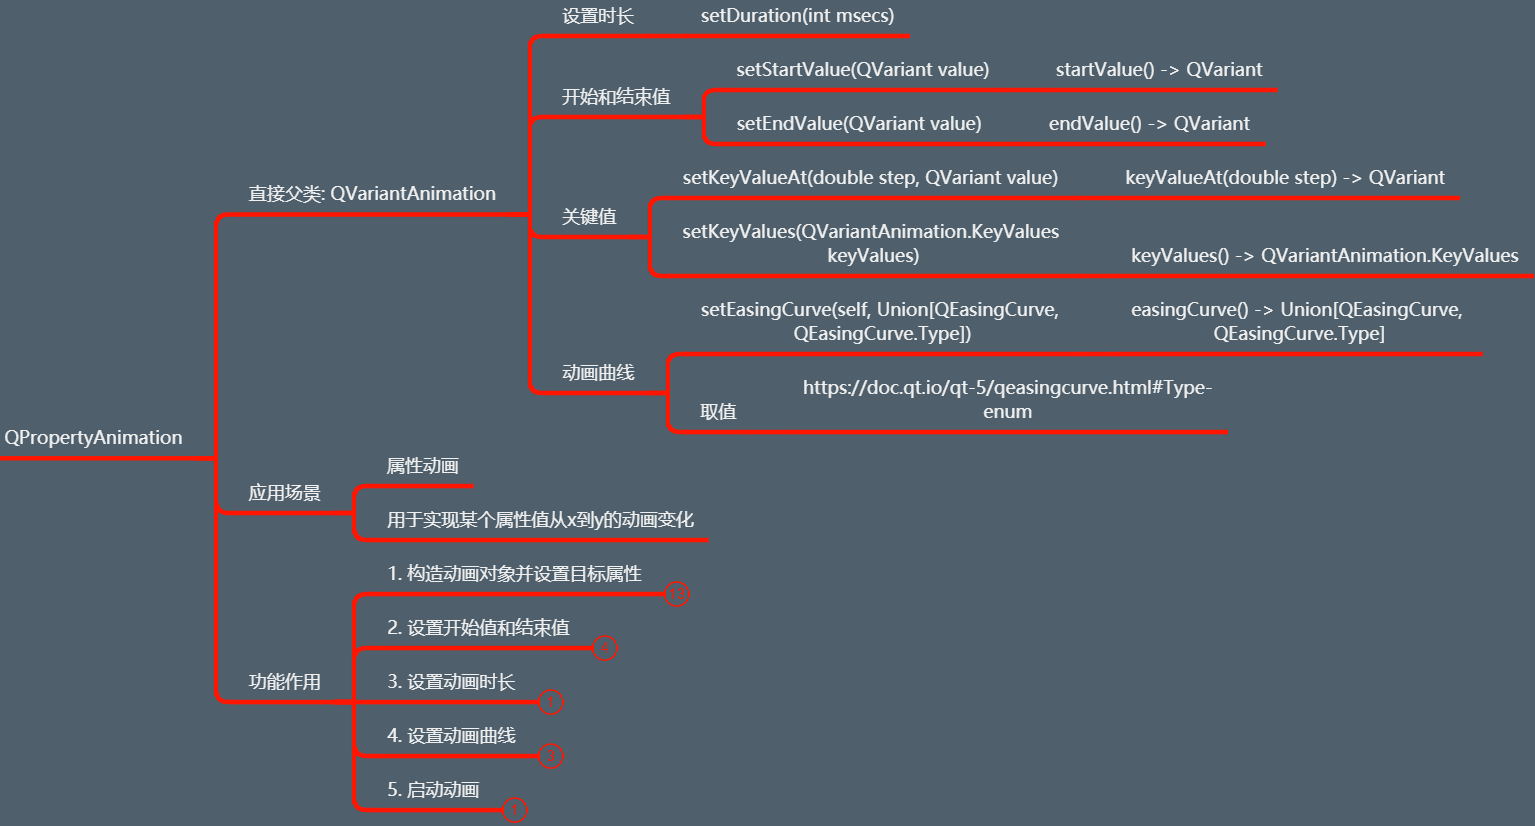
(1)构造动画并设置属性目标

(2)设置开始值和结束值、动画时长

(3)设置动画曲线、启动动画

 1 from PyQt5.Qt import *
 2
 3 class Window(QWidget):
 4     def __init__(self):
 5         super().__init__()
 6         self.setWindowTitle("动画")
 7         self.resize(500, 500)
 8         self.setup_ui()
 9
10     def setup_ui(self):
11         btn = QPushButton('测试按钮',self)
12         btn.move(100,100)
13         btn.resize(200,200)
14         btn.setStyleSheet("background-color:cyan;")
15
16         # 1、创建一个动画对象,并且设置目标,,属性
17         # animation = QPropertyAnimation(self)
18         # animation.setTargetObject(btn)
19         # animation.setPropertyName(b"pos")
20         animation = QPropertyAnimation(btn,b"geometry",self)
21
22         # 2、设置属性值 开始 插值 结束
23         animation.setStartValue(QRect(0,0,100,100))
24         animation.setEndValue(QRect(200,200,300,300))
25
26         # 3、动画时长
27         animation.setDuration(3000)
28
29         # 4、设置动画曲线
30         # animation.setEasingCurve(QEasingCurve.InQuad)
31         # animation.setEasingCurve(QEasingCurve.InBounce)
32         animation.setEasingCurve(QEasingCurve.OutBounce)
33
34         # 5、启动动画
35         animation.start()
36
37 if __name__ == '__main__':
38     import sys
39
40     app=QApplication(sys.argv)
41
42     window=Window()
43     window.show()
44     sys.exit(app.exec_())
2、基类-QAbstractAnimation
所有动画共享的功能,继承此类,实现一些自定义动画。
(1)功能作用-循环操作
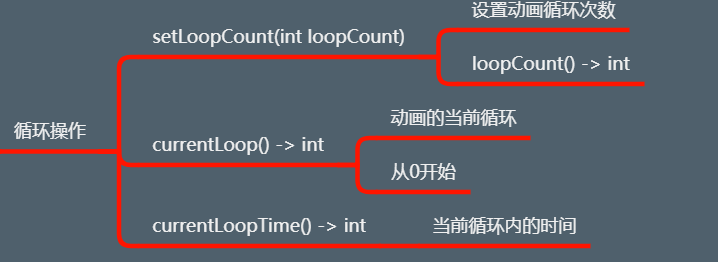
1 # 循环操作
2 animation.setLoopCount(3)
3 btn.clicked.connect(lambda :print(animation.loopCount(),animation.currentLoop())) # 查看次数,当前次数
(2)功能作用-时间操作
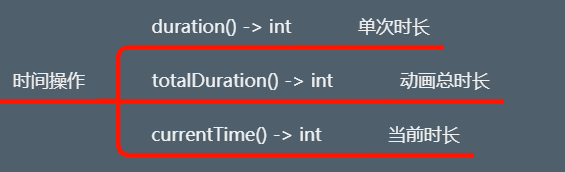
1 # 时间操作
2 btn.clicked.connect(lambda: print(animation.currentTime(), animation.currentLoopTime()))  # 查看当前时长,当前单次循环时长
3 print(animation.totalDuration(), animation.duration())  # 查看总时长,单次时长
(3)功能作用-动画方向

1 # 动画方向
2 animation.setDirection(QAbstractAnimation.Backward)  # 反向进行
(4)功能作用-动画状态

【案例】点击暂停动画,再点击恢复动画
 1 self.flag = True
 2 def animation_operation():
 3     if self.flag:
 4         animation.pause()
 5         self.flag = False
 6     else:
 7         animation.resume()
 8         self.flag = True
 9
10 btn.clicked.connect(animation_operation)
1 def animation_operation():
2     if animation.state() == QAbstractAnimation.Running:
3         animation.pause()
4     else:
5         animation.resume()
6
7 btn.clicked.connect(animation_operation)
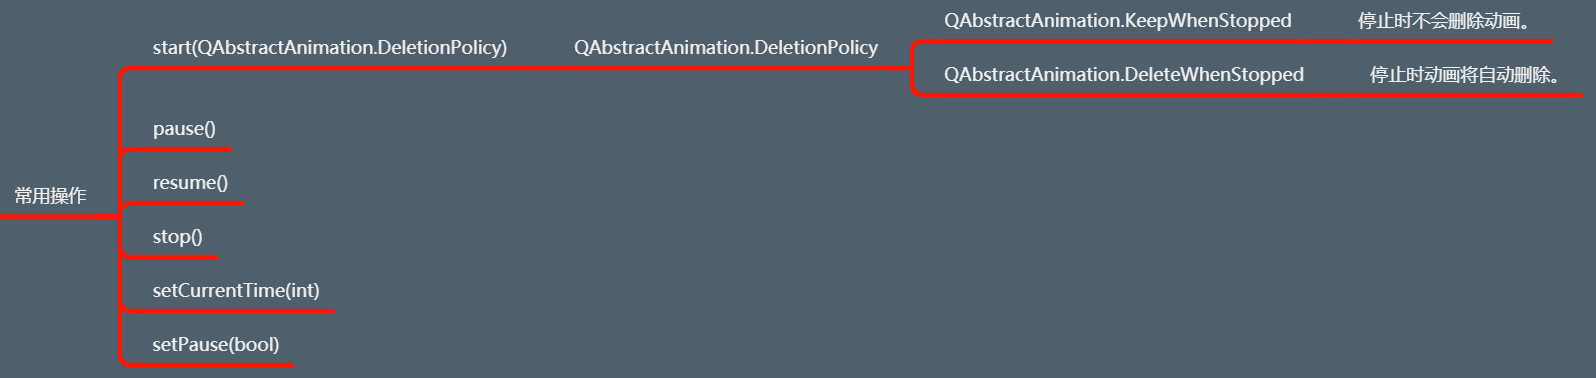
(5)常用操作
不再做详细的解释,参照上述的操作进行。
(6)常用信号
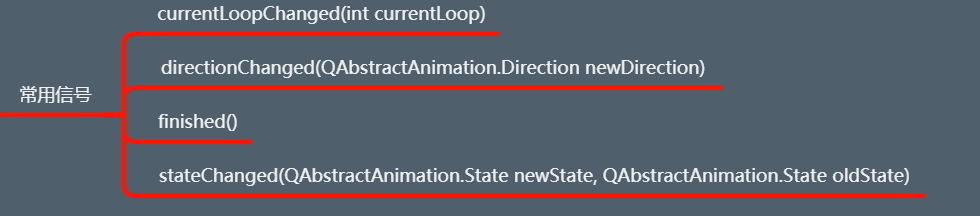
1 # 常用信号
2 animation.currentLoopChanged.connect(lambda val: print("当前循环次数发生改变", val))
3 animation.finished.connect(lambda: print("动画执行完毕"))
4 animation.stateChanged.connect(lambda ns, os: print("状态发生改变", ns, os))
3、动画组
可以将一幅动画,同时播放或者按顺序播放。
(1)基类共性功能

(2)子类功能

 1 # *******************动画组**********************开始
 2 from PyQt5.Qt import *
 3
 4 class Window(QWidget):
 5     def __init__(self):
 6         super().__init__()
 7         self.setWindowTitle("动画组")
 8         self.resize(800,800)
 9         self.setup_ui()
10
11     def setup_ui(self):
12         red_btn = QPushButton("红色按钮",self)
13         green_btn = QPushButton("绿按钮",self)
14         red_btn.resize(100,100)
15         green_btn.resize(100,100)
16         green_btn.move(150,150)
17
18         red_btn.setStyleSheet('''
19                     background-color:red;
20                 ''')
21         green_btn.setStyleSheet('''
22                     background-color:green;
23                 ''')
24         # 动画设置
25         animation = QPropertyAnimation(green_btn,b'pos',self)
26         animation.setKeyValueAt(0,QPoint(150,150))
27         animation.setKeyValueAt(0.25,QPoint(550,150))
28         animation.setKeyValueAt(0.5,QPoint(550,550))
29         animation.setKeyValueAt(0.75,QPoint(150,550))
30         animation.setKeyValueAt(1,QPoint(150,150))
31         animation.setDuration(3000)
32         # animation.start()
33
34         animation2 = QPropertyAnimation(red_btn, b'pos', self)
35         animation2.setKeyValueAt(0, QPoint(0,0))
36         animation2.setKeyValueAt(0.25, QPoint(0, 700))
37         animation2.setKeyValueAt(0.5, QPoint(700, 700))
38         animation2.setKeyValueAt(0.75, QPoint(700, 0))
39         animation2.setKeyValueAt(1, QPoint(0, 0))
40         animation2.setDuration(3000)
41         # animation2.start()
42
43         # 创建动画组
44         # animation_group1 = QParallelAnimationGroup(self) # 并行动画
45         animation_group1 = QSequentialAnimationGroup(self) # 串行动画
46         animation_group1.addAnimation(animation)
47
48         # 串行动画下添加间隔时间
49         animation_group1.addPause(5000) # 需要放在添加第二个动画之前
50
51         animation_group1.addAnimation(animation2)
52         animation_group1.start()
53
54         # 监听信号
55         red_btn.clicked.connect(animation_group1.pause)
56         green_btn.clicked.connect(animation_group1.resume)
57
58
59 if __name__ == '__main__':
60     import sys
61
62     app=QApplication(sys.argv)
63
64     window=Window()
65     window.show()
66     sys.exit(app.exec_())
67 # *******************动画组**********************结束
4、子类特定功能-QPauseAnimation

1 # 串行动画下添加间隔时间
2 # animation_group1.addPause(5000) # 需要放在添加第二个动画之前
3 pause_animation = QPauseAnimation()  # 通过实例化对象实现
4 pause_animation.setDuration(3000)
5 animation_group1.addAnimation(pause_animation)
6
7 animation_group1.addAnimation(animation2)
8 animation_group1.start()