前言
iOS中常用的持久化存储方式有好几种:
- 偏好设置(NSUserDefaults)
- plist文件存储
- 归档
- SQLite3
- Core Data
沙盒
每个iOS应用都有自己的应用沙盒(应用沙盒就是文件系统目录),与其他文件系统隔离。应用必须待在自己的沙盒里,其他应用不能访问该沙盒。沙盒下的目录如下:
- Application:存放程序源文件,上架前经过数字签名,上架后不可修改
- Documents: 保存应⽤运行时生成的需要持久化的数据,iTunes同步设备时会备份该目录。例如,游戏应用可将游戏存档保存在该目录
- tmp: 保存应⽤运行时所需的临时数据,使⽤完毕后再将相应的文件从该目录删除。应用 没有运行时,系统也可能会清除该目录下的文件。iTunes同步设备时不会备份该目录。
- Library/Caches: 保存应用运行时⽣成的需要持久化的数据,iTunes同步设备时不会备份 该目录。⼀一般存储体积大、不需要备份的非重要数据,比如网络数据缓存存储到Caches下
- Library/Preference: 保存应用的所有偏好设置,如iOS的Settings(设置) 应⽤会在该目录中查找应⽤的设置信息。iTunes同步设备时会备份该目录
虽然沙盒中有这么多文件夹,但是没有文件夹都不尽相同,都有各自的特性。所以在选择存放目录时,一定要认真选择适合的目录。
"应用程序包": 这里面存放的是应用程序的源文件,包括资源文件和可执行文件。
 NSString *path = [[NSBundle mainBundle] bundlePath];
  NSLog(@"%@", path);
Documents: 最常用的目录,iTunes同步该应用时会同步此文件夹中的内容,适合存储重要数据。
  NSString *path = NSSearchPathForDirectoriesInDomains(NSDocumentDirectory, NSUserDomainMask, YES).firstObject;
  NSLog(@"%@", path);
Library/Caches: iTunes不会同步此文件夹,适合存储体积大,不需要备份的非重要数据。
 NSString *path = NSSearchPathForDirectoriesInDomains(NSCachesDirectory, NSUserDomainMask, YES).firstObject;
  NSLog(@"%@", path);
-
Library/Preferences: iTunes同步该应用时会同步此文件夹中的内容,通常保存应用的设置信息。 tmp: iTunes不会同步此文件夹,系统可能在应用没运行时就删除该目录下的文件,所以此目录适合保存应用中的一些临时文件,用完就删除。
NSString *path = NSTemporaryDirectory();
NSLog(@"%@", path);
NSUserDefaults
NSUserDefaults是个单例类,用于存储少量数据。NSUserDefaults实际上对plist文件操作的封装,更方便我们直接操作,一般用于存储系统级别的偏好设置。比如我们经常将登录后的用户的一些设置通过NSUserDefaults存储到plist文件中。
有很多App,他们也是将用户的账号和密码存储在偏好设置中。我们不讲安全性问题,因此不讨论存储在偏好设置下是否安全。
使用起来非常简单,如下:
// 写入文件
- (void)saveUserName:(NSString *)userNamepassword:(NSString *)password {
  [[NSUserDefaults standardUserDefaults] setObject:userNameforKey:@"username"];
  [[NSUserDefaults standardUserDefaults] setObject:passwordforKey:@"password"];
  [[NSUserDefaults standardUserDefaults] synchronize];
}

// 在用的时候,就可以读取出来使用
NSString * userName = [[NSUserDefaults standardUserDefaults] objectForKey:@"username"];
NSString * password = [[NSUserDefaults standardUserDefaults] objectForKey:@"password"];
存储到偏好设置的只有系统已经提供好的类型,比如基本类型、NSNumber、NSDictionary、NSArray等。对于NSObject及继承于NSObject的类型,是不支持的。如下:
NSObject * obj = [[NSObject alloc] init];
[[NSUserDefaults standardUserDefaults] setObject:objforKey:@"obj"];

// 就会崩溃
Terminating appduetouncaughtexception 'NSInvalidArgumentException', reason: 'Attempt to insert non-property list object <NSObject: 0x7fb502680cb0> for key obj'
plist存储
有的时候,我们需要将下载的数据存储到文件中存储起来,比如,有时候我们将下载起来的城市的数据存储到本地,当更新城市的顺序时,下次也能够按照最后一次操作的顺序来显示出来。
plist文件是将某些特定的类,通过XML文件的方式保存在目录中。
NSArray;
NSMutableArray;
NSDictionary;
NSMutableDictionary;
NSData;
NSMutableData;
NSString;
NSMutableString;
NSNumber;
NSDate;
1.获得文件路径
NSString *path = NSSearchPathForDirectoriesInDomains(NSDocumentDirectory, NSUserDomainMask, YES).firstObject;

2.存储
NSString *fileName = [path stringByAppendingPathComponent:@"123.plist"];
NSArray *array = @[@"123", @"456", @"789"];
[array writeToFile:fileName atomically:YES];

3.读取
NSArray *result = [NSArray arrayWithContentsOfFile:fileName];
NSLog(@"%@", result);

4.注意
只有以上列出的类型才能使用plist文件存储。
存储时使用writeToFile: atomically:方法。 其中atomically表示是否需要先写入一个辅助文件,再把辅助文件拷贝到目标文件地址。这是更安全的写入文件方法,一般都写YES。
读取时使用arrayWithContentsOfFile:方法。
// 数据存储,是保存到手机里面,
// Plist存储,就是把某些数据写到plist文件中
// plist存储一般用来存储数组和字典
// Plist存储是苹果特有,只有苹果才能生成plist
// plist不能存储自定义对象,如NSObject、model等
NSDictionary *dict = @{@"age":@"18",@"name":@"USER"};

// 保存应用沙盒(app安装到手机上的文件夹)
// Caches文件夹
// 在某个范围内容搜索文件夹的路径
// directory:获取哪个文件夹
// domainMask:在哪个范围下获取 NSUserDomainMask:在用户的范围内搜索
// expandTilde是否展开全路径,YES:展开
NSString * cachePath = NSSearchPathForDirectoriesInDomains(NSCachesDirectory, NSUserDomainMask, YES)[0];
NSLog(@"%@",cachePath);

// 拼接文件路径
NSString * filePath = [cachePath stringByAppendingPathComponent:@"data.plist"];

// 获取应用沙盒
NSString *homePath = NSHomeDirectory();
NSLog(@"%@",homePath);

// File:文件全路径 => 所有文件夹路径 + 文件路径
[dict writeToFile:filePath atomically:YES];
// 将数据取出来
NSLog(@"%@", [NSDictionary dictionaryWithContentsOfFile:filePath]);
我们看看打印的结果:
2016-02-1722:14:43.055 iOSPersistentStorageDemo[25471:809758] /Users/huangyibiao/Library/Developer/CoreSimulator/Devices/CF3A5A4C-486F-4A72-957B-2AD94BD90EC1/data/Containers/Data/Application/65E8F814-45E5-420C-A174-822A7830748E/Library/Caches
2016-02-1722:14:43.055 iOSPersistentStorageDemo[25471:809758] /Users/huangyibiao/Library/Developer/CoreSimulator/Devices/CF3A5A4C-486F-4A72-957B-2AD94BD90EC1/data/Containers/Data/Application/65E8F814-45E5-420C-A174-822A7830748E
2016-02-1722:14:43.056 iOSPersistentStorageDemo[25471:809758] {
    age = 18;
    name = USER;
}
注意:操作plist文件时,文件路径一定要是全路径。
归档(NSKeyedArchiver)
自定义对象应用范围很广,因为它对应着MVC中的Model层,即实体类。在程序中,我们会在Model层定义很多的entity,例如User、Teacher、Person等。
那么对自定义对象的归档显得重要的多,因为很多情况下我们需要在Home键之后保存数据,在程序恢复时重新加载,那么,归档便是一个好的选择。
下面我们自定义一个Person类:
// 要使对象可以归档,必须遵守NSCoding协议
@interfacePerson: NSObject<NSCoding>

@property (nonatomic, assign) int age;
@property (nonatomic, strong) NSString *name;

@end

@implementation Person

// 什么时候调用:只要一个自定义对象归档的时候就会调用
- (void)encodeWithCoder:(NSCoder *)aCoder {
    [aCoder encodeObject:self.nameforKey:@"name"];
    [aCoder encodeInt:self.ageforKey:@"age"];
}

- (id)initWithCoder:(NSCoder *)aDecoder {
    if (self = [super init]) {
      self.name = [aDecoder decodeObjectForKey:@"name"];
      self.age = [aDecoder decodeIntForKey:@"age"];
    }
    return self;
}
@end
如何将自定义对象归档和解档:
- (void)savePerson {
    // 归档:plist存储不能存储自定义对象,此时可以使用归档来完成
    Person *person = [[Person alloc]init];
    person.age = 18;
    person.name = @"USER";

    // 获取tmp目录路径

    NSString *tempPath = NSTemporaryDirectory();

    // 拼接文件名
    NSString *filePath = [tempPathstringByAppendingPathComponent:@"person.data"];

    // 归档
    [NSKeyedArchiverarchiveRootObject:persontoFile:filePath];
}

- (void)readPerson {
    // 获取tmp
    NSString *tempPath = NSTemporaryDirectory();

    // 拼接文件名
    NSString *filePath = [tempPath stringByAppendingPathComponent:@"person.data"];

    // 解档
    Person *p = [NSKeyedUnarchiverunarchiveObjectWithFile:filePath];
    NSLog(@"%@ %d",p.name,p.age);
}
假设我们定义了一个自定义的view,这个view是用xib或者storybard来生成的,那么我们我一定如下方法时,就需要如下实现:
@implementation CustomView

// 解析xib,storyboard文件时会调用
- (id)initWithCoder:(NSCoder *)aDecoder {
    // 什么时候调用[super initWithCoder:aDecoder]?
    // 只要父类遵守了NSCoding协议,就调用[super initWithCoder:aDecoder]
    if (self = [super initWithCoder:aDecoder]) {
        NSLog(@"%s",__func__);
    }
    return  self;
}
@end
 //1.遵循NSCoding协议
  @interface Person : NSObject <NSCoding>

  //2.设置属性
  @property (strong, nonatomic) UIImage *avatar;
  @property (copy, nonatomic) NSString *name;
  @property (assign, nonatomic) NSInteger age;

  @end

//实现协议方法
//解档
  - (id)initWithCoder:(NSCoder *)aDecoder {
      if ([super init]) {
          self.avatar = [aDecoder decodeObjectForKey:@"avatar"];
          self.name = [aDecoder decodeObjectForKey:@"name"];
          self.age = [aDecoder decodeIntegerForKey:@"age"];
      }

      return self;
  }

  //归档
  - (void)encodeWithCoder:(NSCoder *)aCoder {
      [aCoder encodeObject:self.avatar forKey:@"avatar"];
      [aCoder encodeObject:self.name forKey:@"name"];
      [aCoder encodeInteger:self.age forKey:@"age"];
  }

//特别注意

//如果需要归档的类是某个自定义类的子类时,就需要在归档和解档之前先实现父类的归档和解档方法。即 [super encodeWithCoder:aCoder] 和 [super initWithCoder:aDecoder] 方法;


//需要把对象归档是调用NSKeyedArchiver的工厂方法 archiveRootObject: toFile: 方法。
NSString *file = [NSSearchPathForDirectoriesInDomains(NSDocumentDirectory, NSUserDomainMask, YES).firstObject stringByAppendingPathComponent:@"person.data"];

  Person *person = [[Person alloc] init];
  person.avatar = self.avatarView.image;
  person.name = self.nameField.text;
  person.age = [self.ageField.text integerValue];

  [NSKeyedArchiver archiveRootObject:person toFile:file];

//需要从文件中解档对象就调用NSKeyedUnarchiver的一个工厂方法 unarchiveObjectWithFile: 即可。
 NSString *file = [NSSearchPathForDirectoriesInDomains(NSDocumentDirectory, NSUserDomainMask, YES).firstObject stringByAppendingPathComponent:@"person.data"];

  Person *person = [NSKeyedUnarchiver unarchiveObjectWithFile:file];
  if (person) {
     self.avatarView.image = person.avatar;
     self.nameField.text = person.name;
     self.ageField.text = [NSString stringWithFormat:@"%ld", person.age];
  }
SQLite3
之前的所有存储方法,都是覆盖存储。如果想要增加一条数据就必须把整个文件读出来,然后修改数据后再把整个内容覆盖写入文件。所以它们都不适合存储大量的内容。
1.字段类型
表面上SQLite将数据分为以下几种类型:
- integer : 整数
- real : 实数(浮点数)
- text : 文本字符串
- blob : 二进制数据,比如文件,图片之类的
实际上SQLite是无类型的。即不管你在创表时指定的字段类型是什么,存储是依然可以存储任意类型的数据。而且在创表时也可以不指定字段类型。SQLite之所以什么类型就是为了良好的编程规范和方便开发人员交流,所以平时在使用时最好设置正确的字段类型!主键必须设置成integer
2. 准备工作
准备工作就是导入依赖库啦,在iOS中要使用SQLite3,需要添加库文件:libsqlite3.dylib并导入主头文件,这是一个C语言的库,所以直接使用SQLite3还是比较麻烦的。
3.使用
-
创建数据库并打开
操作数据库之前必须先指定数据库文件和要操作的表,所以使用SQLite3,首先要打开数据库文件,然后指定或创建一张表。
/**
*  打开数据库并创建一个表
*/
- (void)openDatabase {

   //1.设置文件名
   NSString *filename = [NSSearchPathForDirectoriesInDomains(NSDocumentDirectory, NSUserDomainMask, YES).firstObject stringByAppendingPathComponent:@"person.db"];

   //2.打开数据库文件,如果没有会自动创建一个文件
   NSInteger result = sqlite3_open(filename.UTF8String, &_sqlite3);
   if (result == SQLITE_OK) {
       NSLog(@"打开数据库成功!");

       //3.创建一个数据库表
       char *errmsg = NULL;

       sqlite3_exec(_sqlite3, "CREATE TABLE IF NOT EXISTS t_person(id integer primary key autoincrement, name text, age integer)", NULL, NULL, &errmsg);
       if (errmsg) {
           NSLog(@"错误:%s", errmsg);
       } else {
           NSLog(@"创表成功!");
       }

   } else {
       NSLog(@"打开数据库失败!");
   }
}
执行指令
使用 sqlite3_exec() 方法可以执行任何SQL语句,比如创表、更新、插入和删除操作。但是一般不用它执行查询语句,因为它不会返回查询到的数据。
/**
*  往表中插入1000条数据
*/
- (void)insertData {

NSString *nameStr;
NSInteger age;
for (NSInteger i = 0; i < 1000; i++) {
  nameStr = [NSString stringWithFormat:@"Bourne-%d", arc4random_uniform(10000)];
  age = arc4random_uniform(80) + 20;

  NSString *sql = [NSString stringWithFormat:@"INSERT INTO t_person (name, age) VALUES('%@', '%ld')", nameStr, age];

  char *errmsg = NULL;
  sqlite3_exec(_sqlite3, sql.UTF8String, NULL, NULL, &errmsg);
  if (errmsg) {
      NSLog(@"错误:%s", errmsg);
  }
}

NSLog(@"插入完毕!");
}
查询指令
前面说过一般不使用 sqlite3_exec() 方法查询数据。因为查询数据必须要获得查询结果,所以查询相对比较麻烦。示例代码如下:
- sqlite3_prepare_v2() : 检查sql的合法性
- sqlite3_step() : 逐行获取查询结果,不断重复,直到最后一条记录
- sqlite3_coloum_xxx() : 获取对应类型的内容,iCol对应的就是SQL语句中字段的顺序,从0开始。根据实际查询字段的属性,使用sqlite3_column_xxx取得对应的内容即可。
- sqlite3_finalize() : 释放stmt
/**
*  从表中读取数据到数组中
*/
- (void)readData {
   NSMutableArray *mArray = [NSMutableArray arrayWithCapacity:1000];
   char *sql = "select name, age from t_person;";
   sqlite3_stmt *stmt;

   NSInteger result = sqlite3_prepare_v2(_sqlite3, sql, -1, &stmt, NULL);
   if (result == SQLITE_OK) {
       while (sqlite3_step(stmt) == SQLITE_ROW) {

           char *name = (char *)sqlite3_column_text(stmt, 0);
           NSInteger age = sqlite3_column_int(stmt, 1);

           //创建对象
           Person *person = [Person personWithName:[NSString stringWithUTF8String:name] Age:age];
           [mArray addObject:person];
       }
       self.dataList = mArray;
   }
   sqlite3_finalize(stmt);
}
4.总结
总得来说,SQLite3的使用还是比较麻烦的,因为都是些c语言的函数,理解起来有些困难。不过在一般开发过程中,使用的都是第三方开源库 FMDB,封装了这些基本的c语言方法,使得我们在使用时更加容易理解,提高开发效率。
FMDB
1.简介
FMDB是iOS平台的SQLite数据库框架,它是以OC的方式封装了SQLite的C语言API,它相对于cocoa自带的C语言框架有如下的优点:
- 使用起来更加面向对象,省去了很多麻烦、冗余的C语言代码
- 对比苹果自带的Core Data框架,更加轻量级和灵活
- 提供了多线程安全的数据库操作方法,有效地防止数据混乱
2.核心类
FMDB有三个主要的类:
-
FMDatabase
一个FMDatabase对象就代表一个单独的SQLite数据库,用来执行SQL语句 -
FMResultSet
使用FMDatabase执行查询后的结果集 -
FMDatabaseQueue
用于在多线程中执行多个查询或更新,它是线程安全的
3.打开数据库
和c语言框架一样,FMDB通过指定SQLite数据库文件路径来创建FMDatabase对象,但FMDB更加容易理解,使用起来更容易,使用之前一样需要导入sqlite3.dylib。打开数据库方法如下:
NSString *path = [NSSearchPathForDirectoriesInDomains(NSDocumentDirectory, NSUserDomainMask, YES).firstObject stringByAppendingPathComponent:@"person.db"];

FMDatabase *database = [FMDatabase databaseWithPath:path];
if (![database open]) {
    NSLog(@"数据库打开失败!");
}
值得注意的是,Path的值可以传入以下三种情况:
-
具体文件路径,如果不存在会自动创建
-
空字符串@"",会在临时目录创建一个空的数据库,当FMDatabase连接关闭时,数据库文件也被删除
-
nil,会创建一个内存中临时数据库,当FMDatabase连接关闭时,数据库会被销毁
4.更新
在FMDB中,除查询以外的所有操作,都称为“更新”, 如:create、drop、insert、update、delete等操作,使用executeUpdate:方法执行更新:
//常用方法有以下3种:
- (BOOL)executeUpdate:(NSString*)sql, ...
- (BOOL)executeUpdateWithFormat:(NSString*)format, ...
- (BOOL)executeUpdate:(NSString*)sql withArgumentsInArray:(NSArray *)arguments

//示例
[database executeUpdate:@"CREATE TABLE IF NOT EXISTS t_person(id integer primary key autoincrement, name text, age integer)"];

//或者
[database executeUpdate:@"INSERT INTO t_person(name, age) VALUES(?, ?)", @"Bourne", [NSNumber numberWithInt:42]];
5.查询
查询方法也有3种,使用起来相当简单:
- (FMResultSet *)executeQuery:(NSString*)sql, ...
- (FMResultSet *)executeQueryWithFormat:(NSString*)format, ...
- (FMResultSet *)executeQuery:(NSString *)sql withArgumentsInArray:(NSArray *)arguments
查询示例:
//1.执行查询
FMResultSet *result = [database executeQuery:@"SELECT * FROM t_person"];

//2.遍历结果集
while ([result next]) {
    NSString *name = [result stringForColumn:@"name"];
    int age = [result intForColumn:@"age"];
}
6.线程安全
在多个线程中同时使用一个FMDatabase实例是不明智的。不要让多个线程分享同一个FMDatabase实例,它无法在多个线程中同时使用。 如果在多个线程中同时使用一个FMDatabase实例,会造成数据混乱等问题。所以,请使用 FMDatabaseQueue,它是线程安全的。以下是使用方法:
- 创建队列。
FMDatabaseQueue *queue = [FMDatabaseQueue databaseQueueWithPath:aPath];
- 使用队列
[queue inDatabase:^(FMDatabase *database) {
          [database executeUpdate:@"INSERT INTO t_person(name, age) VALUES (?, ?)", @"Bourne_1", [NSNumber numberWithInt:1]];
          [database executeUpdate:@"INSERT INTO t_person(name, age) VALUES (?, ?)", @"Bourne_2", [NSNumber numberWithInt:2]];
          [database executeUpdate:@"INSERT INTO t_person(name, age) VALUES (?, ?)", @"Bourne_3", [NSNumber numberWithInt:3]];

          FMResultSet *result = [database executeQuery:@"select * from t_person"];
         while([result next]) {

         }
}];
而且可以轻松地把简单任务包装到事务里:
[queue inTransaction:^(FMDatabase *database, BOOL *rollback) {
          [database executeUpdate:@"INSERT INTO t_person(name, age) VALUES (?, ?)", @"Bourne_1", [NSNumber numberWithInt:1]];
          [database executeUpdate:@"INSERT INTO t_person(name, age) VALUES (?, ?)", @"Bourne_2", [NSNumber numberWithInt:2]];
          [database executeUpdate:@"INSERT INTO t_person(name, age) VALUES (?, ?)", @"Bourne_3", [NSNumber numberWithInt:3]];

          FMResultSet *result = [database executeQuery:@"select * from t_person"];
             while([result next]) {

             }

           //回滚
           *rollback = YES;
    }];
FMDatabaseQueue 后台会建立系列化的G-C-D队列,并执行你传给G-C-D队列的块。这意味着 你从多线程同时调用调用方法,GDC也会按它接收的块的顺序来执行。
CoreData的简单使用
准备工作
-
创建数据库
- 新建文件,选择
CoreData->DataModel - 添加实体(表),
Add Entity - 给表中添加属性,点击
Attributes下方的‘+’号
- 新建文件,选择
-
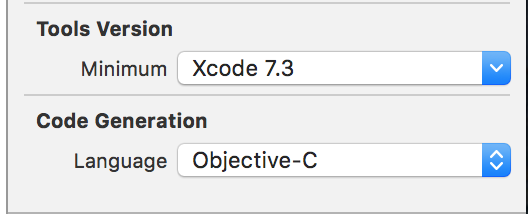
创建模型文件
- 配置Minimum、Language和Codegen三个选项。

- 选择文件,Editor->
NSManaged Object subclass - 根据提示,选择实体
-
通过代码,关联数据库和实体
创建项目的时候创建coreData
系统自动生成代码
#import <UIKit/UIKit.h>
#import <CoreData/CoreData.h>

@interface AppDelegate : UIResponder <UIApplicationDelegate>

@property (strong, nonatomic) UIWindow *window;

@property (readonly, strong) NSPersistentContainer *persistentContainer;

- (void)saveContext;


@end
- (void)applicationWillTerminate:(UIApplication *)application {
    // Called when the application is about to terminate. Save data if appropriate. See also applicationDidEnterBackground:.
    // Saves changes in the application's managed object context before the application terminates.
    [self saveContext];
}


#pragma mark - Core Data stack

@synthesize persistentContainer = _persistentContainer;

- (NSPersistentContainer *)persistentContainer {
    // The persistent container for the application. This implementation creates and returns a container, having loaded the store for the application to it.
    @synchronized (self) {
        if (_persistentContainer == nil) {
            _persistentContainer = [[NSPersistentContainer alloc] initWithName:@"AutoCoreData"];
            [_persistentContainer loadPersistentStoresWithCompletionHandler:^(NSPersistentStoreDescription *storeDescription, NSError *error) {
                if (error != nil) {
                    // Replace this implementation with code to handle the error appropriately.
                    // abort() causes the application to generate a crash log and terminate. You should not use this function in a shipping application, although it may be useful during development.

                    /*
                     Typical reasons for an error here include:
                     * The parent directory does not exist, cannot be created, or disallows writing.
                     * The persistent store is not accessible, due to permissions or data protection when the device is locked.
                     * The device is out of space.
                     * The store could not be migrated to the current model version.
                     Check the error message to determine what the actual problem was.
                    */
                    NSLog(@"Unresolved error %@, %@", error, error.userInfo);
                    abort();
                }
            }];
        }
    }

    return _persistentContainer;
}

#pragma mark - Core Data Saving support

- (void)saveContext {
    NSManagedObjectContext *context = self.persistentContainer.viewContext;
    NSError *error = nil;
    if ([context hasChanges] && ![context save:&error]) {
        // Replace this implementation with code to handle the error appropriately.
        // abort() causes the application to generate a crash log and terminate. You should not use this function in a shipping application, although it may be useful during development.
        NSLog(@"Unresolved error %@, %@", error, error.userInfo);
        abort();
    }
}
添加元素 - Create 和 读取数据 - Read
- (void)readData {
    AppDelegate * appDelegate = (AppDelegate *)[UIApplication sharedApplication].delegate;
    NSFetchRequest * request = [NSFetchRequest fetchRequestWithEntityName:@"PostCode"];
    request.sortDescriptors = @[
                                [NSSortDescriptor sortDescriptorWithKey:@"province" ascending:NO],
                                [NSSortDescriptor sortDescriptorWithKey:@"city" ascending:NO],
                                [NSSortDescriptor sortDescriptorWithKey:@"district" ascending:NO]];
    NSError * error = nil;
    NSArray * array = [appDelegate.persistentContainer.viewContext executeFetchRequest:request error:&error];
    if (error) {
        NSLog(@"%@", error);
    }


    if (!array || ([array isKindOfClass:[NSArray class]] && [array count] <= 0)) {
        // 添加数据到数据库
        dispatch_async(dispatch_get_global_queue(DISPATCH_QUEUE_PRIORITY_DEFAULT, 0), ^{
            NSString * strPath = [[NSBundle mainBundle] pathForResource:@"城市邮编最终整理_方便导入数据库" ofType:@"txt"];
            NSString * text = [NSString stringWithContentsOfFile:strPath encoding:NSUTF16StringEncoding error:nil];
            NSArray * lineArr = [text componentsSeparatedByString:@"
"];

            AppDelegate * appDelegate = (AppDelegate *)[UIApplication sharedApplication].delegate;
            NSEntityDescription * description = [NSEntityDescription entityForName:@"PostCode" inManagedObjectContext:appDelegate.persistentContainer.viewContext];
            for (NSString * line in lineArr) {
                NSArray * items = [line componentsSeparatedByString:@"	"];
                PostCode * postcode = [[PostCode alloc] initWithEntity:description insertIntoManagedObjectContext:appDelegate.persistentContainer.viewContext];
                postcode.id = items[0];
                postcode.province = items[1];
                postcode.city = items[2];
                postcode.district = items[3];
                postcode.cityId = ((NSString *)items[4]).length >=4 ? items[4]:[@"0" stringByAppendingString:items[4]];
                postcode.postCode = items[5];
            }
            [appDelegate saveContext];

            NSError *error = nil;
            NSArray *arr = [appDelegate.persistentContainer.viewContext executeFetchRequest:request error:&error];
            if (error) {
                NSLog(@"%@", error);
            } else {
                _dataSource = [[NSMutableArray alloc] initWithArray:arr];
                dispatch_async(dispatch_get_main_queue(), ^{
                    [_tableView reloadData];
                });
            }
        });
    } else {
        _dataSource = [[NSMutableArray alloc] initWithArray:array];
        [_tableView reloadData];
    }
}
删除数据 - Delete
 // 删除所有数据
           for (PostCode *postcode in a) {
                [del.managedObjectContext deleteObject:postcode];
           }
            [del saveContext];
查询数据
- (void)searchBar:(UISearchBar *)searchBar textDidChange:(NSString *)searchText {
    if (!searchText.length) {
        [self readData];
        return;
    }
    AppDelegate * appDelegate = (AppDelegate *)[UIApplication sharedApplication].delegate;
    NSFetchRequest * request = [NSFetchRequest fetchRequestWithEntityName:@"PostCode"];
    request.sortDescriptors = @[
                                [NSSortDescriptor sortDescriptorWithKey:@"province" ascending:NO],
                                [NSSortDescriptor sortDescriptorWithKey:@"city" ascending:NO],
                                [NSSortDescriptor sortDescriptorWithKey:@"district" ascending:NO]];
    request.predicate = [NSPredicate predicateWithFormat:@"province CONTAINS %@ OR city CONTAINS %@ OR district CONTAINS %@ OR cityId CONTAINS %@ OR postCode CONTAINS %@ OR id CONTAINS %@", searchText, searchText, searchText, searchText, searchText, searchText];
    NSError * error = nil;
    NSArray * array = [appDelegate.persistentContainer.viewContext executeFetchRequest:request error:&error];
    _dataSource = [[NSMutableArray alloc] initWithArray:array];
    [_tableView reloadData];
}
后续添加coreData

#import <Foundation/Foundation.h>
#import <CoreData/CoreData.h>

@interface CoreDataManager : NSObject
@property (readonly, strong) NSPersistentContainer *persistentContainer;
- (void)saveContext;
+ (instancetype) sharedCoreDataManager;
@end


#import "CoreDataManager.h"

@implementation CoreDataManager

static CoreDataManager *coredataManager;
+ (instancetype) sharedCoreDataManager{
    static dispatch_once_t onceToken;
    dispatch_once(&onceToken, ^{
        coredataManager = [[self alloc] init];
    });
    return coredataManager;
}

#pragma mark - Core Data stack

@synthesize persistentContainer = _persistentContainer;
- (NSPersistentContainer *)persistentContainer {
    // The persistent container for the application. This implementation creates and returns a container, having loaded the store for the application to it.
    @synchronized (self) {
        if (_persistentContainer == nil) {
            _persistentContainer = [[NSPersistentContainer alloc] initWithName:@"Model"];
            [_persistentContainer loadPersistentStoresWithCompletionHandler:^(NSPersistentStoreDescription *storeDescription, NSError *error) {
                if (error != nil) {
                    // Replace this implementation with code to handle the error appropriately.
                    // abort() causes the application to generate a crash log and terminate. You should not use this function in a shipping application, although it may be useful during development.

                    /*
                     Typical reasons for an error here include:
                     * The parent directory does not exist, cannot be created, or disallows writing.
                     * The persistent store is not accessible, due to permissions or data protection when the device is locked.
                     * The device is out of space.
                     * The store could not be migrated to the current model version.
                     Check the error message to determine what the actual problem was.
                     */
                    NSLog(@"Unresolved error %@, %@", error, error.userInfo);
                    abort();
                }
            }];
        }
    }

    return _persistentContainer;
}

#pragma mark - Core Data Saving support

- (void)saveContext {
    NSManagedObjectContext *context = self.persistentContainer.viewContext;
    NSError *error = nil;
    if ([context hasChanges] && ![context save:&error]) {
        // Replace this implementation with code to handle the error appropriately.
        // abort() causes the application to generate a crash log and terminate. You should not use this function in a shipping application, although it may be useful during development.
        NSLog(@"Unresolved error %@, %@", error, error.userInfo);
        abort();
    }
}
操作数据
#import "ViewController.h"
#import "CoreDataManager.h"
#import "User+CoreDataProperties.h"

@interface ViewController ()
@property (nonatomic, strong) CoreDataManager * manager;
@property (nonatomic, strong) User * user;
@end

@implementation ViewController

- (void)viewDidLoad {
    [super viewDidLoad];
    _manager = [CoreDataManager sharedCoreDataManager];
}
1、获取展示数据
- (IBAction)displayData:(UIButton *)sender {
    // 创建取回数据请求
    NSFetchRequest * request = [[NSFetchRequest alloc] init];

    // 设置要检索哪种类型的实体对象
    NSEntityDescription * entity = [NSEntityDescription entityForName:@"User" inManagedObjectContext:_manager.persistentContainer.viewContext];

    // 设置请求实体
    [request setEntity:entity];

    // 指定对结果的排序方式
//    NSSortDescriptor * sortDescriptor = [[NSSortDescriptor alloc] initWithKey:@"age" ascending:NO];
    NSArray * sortDescriptions = @[
      [NSSortDescriptor sortDescriptorWithKey:@"age" ascending:NO],
      [NSSortDescriptor sortDescriptorWithKey:@"name" ascending:NO],
      [NSSortDescriptor sortDescriptorWithKey:@"sex" ascending:NO]];

    [request setSortDescriptors:sortDescriptions];
    NSError * error = nil;

    // 执行获取数据请求,返回数组
    NSArray * fetchResult = [_manager.persistentContainer.viewContext executeFetchRequest:request error:&error];
    if (!fetchResult)
    {
        NSLog(@"error:%@,%@",error,[error userInfo]);
    }

    //    NSLog(@"fetchResult :%@",fetchResult);
    for (User * user in fetchResult) {
        NSLog(@"age :%@, name :%@, sex :%@",user.age,user.name,user.sex);
    }
}
2、添加数据
- (IBAction)insertData:(UIButton *)sender {
    //添加数据
        _user = [NSEntityDescription insertNewObjectForEntityForName:@"User" inManagedObjectContext:[CoreDataManager sharedCoreDataManager].persistentContainer.viewContext];
        [_user setName:@"fengmin111"];
        [_user setSex:@"diannao111"];
        [_user setAge:@(123)];
        NSError * error = nil;
    //    托管对象准备好后,调用托管对象上下文的save方法将数据写入数据库
        BOOL insertIsSaveSuccess = [[CoreDataManager sharedCoreDataManager].persistentContainer.viewContext save:&error];
        if (!insertIsSaveSuccess) {
            NSLog(@"Error: %@,%@",error,[error userInfo]);
        }else
        {
            NSLog(@"Save successFull");
        }
}
3、修改数据
- (IBAction)changeData:(UIButton *)sender {
    //修改数据
    //对同一个实体做数据改变
//        _user = [NSEntityDescription insertNewObjectForEntityForName:@"User" inManagedObjectContext:[CoreDataManager sharedCoreDataManager].persistentContainer.viewContext];
        [_user setName:@"sdfsdagsdfg"];
        [_user setSex:@"bijibasgfsdgsaen"];
        [_user setAge:@(888)];
        NSError * error = nil;
        //托管对象准备好后,调用托管对象上下文的save方法将数据写入数据库
        BOOL changeIsSaveSuccess = [[CoreDataManager sharedCoreDataManager].persistentContainer.viewContext save:&error];
        if (!changeIsSaveSuccess) {
            NSLog(@"Error: %@,%@",error,[error userInfo]);
        }else
        {
            NSLog(@"Change successFull");
        }
}
4、删除数据
- (IBAction)deleteData:(UIButton *)sender {
    //删除数据
//    _user = [NSEntityDescription insertNewObjectForEntityForName:@"User" inManagedObjectContext:[CoreDataManager sharedCoreDataManager].persistentContainer.viewContext];
    [[CoreDataManager sharedCoreDataManager].persistentContainer.viewContext deleteObject:_user];
        NSError *error = nil;

    //托管对象准备好后,调用托管对象上下文的save方法将数据写入数据库
    BOOL deleteIsSaveSuccess = [[CoreDataManager sharedCoreDataManager].persistentContainer.viewContext save:&error];
    if (!deleteIsSaveSuccess) {
        NSLog(@"Error: %@,%@",error,[error userInfo]);
    }else
    {
        NSLog(@"del successFull");
    }


    //删除所有数据
//    NSFetchRequest * request = [NSFetchRequest fetchRequestWithEntityName:@"User"];
//    NSArray * array = [[CoreDataManager sharedCoreDataManager].persistentContainer.viewContext executeFetchRequest:request error:&error];
//    for (User * user in array) {
//        [[CoreDataManager sharedCoreDataManager].persistentContainer.viewContext deleteObject:user];
//    }
//    [[CoreDataManager sharedCoreDataManager].persistentContainer.viewContext save:&error];
}