接着上周的项目, 在上周我别出心裁的在自定义TabbarController中加入了自定义转场动画, 受到了大家广泛的喜爱, 再次表示感激, 今天我们继续实现LifestyleViewController的第二个功能渐变导航栏!!
渐变导航栏, 现在很多项目里都有这个功能, 我们就把这个功能集成到我们的项目中来; 根据设计图纸需求, 我们需要在轮播图下面有一个搜索栏, 搜索栏根据滑动偏移到导航栏之上.
具体怎么实现呢, Easy啦~ 不急,我们一步一步来.
创建搜索栏Cell
首先打开我们的项目先在轮播图Cell下创建一个搜索栏Cell 并添加子控件.
- (UIImageView *)hotSpotsImageView {
if (!_hotSpotsImageView) {
_hotSpotsImageView = [UIImageView new];
_hotSpotsImageView.image = [UIImage imageNamed:@"Hot Spots"];
}
return _hotSpotsImageView;
}
- (void)layoutSubviews {
[super layoutSubviews];
CGFloat padding = kSpace;
CGFloat hotSpotsImageViewX = padding;
CGFloat hotSpotsImageViewW = 90;
CGFloat hotSpotsImageViewH = 20;
CGFloat hotSpotsImageViewY = self.height - hotSpotsImageViewH - 5;
self.hotSpotsImageView.frame = CGRectMake(hotSpotsImageViewX, hotSpotsImageViewY, hotSpotsImageViewW, hotSpotsImageViewH);
}
这时你可能会问 为什么不在Cell中添加TextField之类的, 由于我们的效果,之后再向您揭晓;
控制器 多Cell设计
这时回到控制器, 但是控制器中不止一种Cell, 我们怎么来设计呢?? 我的实现方法是KeysArr, 那什么是KeysArr呢,我们来看代码.
首先我们需要创建一个全局类 (这个写法和上周的 投机流 自定义转场有异曲同工之妙)
创建全局类
全局类中的每一个Key对应着你的一个Cell
.h
extern NSString * const kSQLifestyleBannerKey;
extern NSString * const kSQLifestyleSearchKey;
.m
NSString * const kSQLifestyleBannerKey = @"轮播图";
NSString * const kSQLifestyleSearchKey = @"热点";
keys数组
接着我们创建一个数组来持有这些key;
@property (nonatomic,strong) NSArray * keysArr;
- (NSArray *)keysArr {
if (!_keysArr) {
_keysArr = @[kSQLifestyleBannerKey,
kSQLifestyleSearchKey];
}
return _keysArr;
}
Tableview delegate mothod
最后在代理方法中进行判断
- (NSInteger)tableView:(UITableView *)tableView numberOfRowsInSection:(NSInteger)section {
return self.keysArr.count;
}
- (UITableViewCell *)tableView:(UITableView *)tableView cellForRowAtIndexPath:(NSIndexPath *)indexPath {
NSString * const key = self.keysArr[indexPath.row];
if (key == kSQLifestyleBannerKey) {
SQLifestyleBannerCell * cell = [SQLifestyleBannerCell cellWithTableView:tableView];
return cell;
}
if (key == kSQLifestyleSearchKey) {
SQLifestyleSearchCell * cell = [SQLifestyleSearchCell cellWithTableView:tableView];
return cell;
}
return nil;
}
- (CGFloat)tableView:(UITableView *)tableView heightForRowAtIndexPath:(NSIndexPath *)indexPath {
NSString * const key = self.keysArr[indexPath.row];
if (key == kSQLifestyleBannerKey) {
return [SQLifestyleBannerCell cellHeight];
}
if (key == kSQLifestyleSearchKey) {
return [SQLifestyleSearchCell cellHeight];
}
return 0;
}
这样当不需要某个cell显示的时候,只需要将keys从KeysArr中移除即可, 是不是很方便!!
创建搜索栏View
这里需要提醒大家的一点, 当你在自定义View的时候最好要实现initWithFrame和initWithCoder两个方法, 这样无论是用纯代码还是Xib,Storyboard使用自定义View时都能够直接加载!!
- (instancetype)initWithFrame:(CGRect)frame {
self = [super initWithFrame:frame];
if (self) {
[self setupSubviews];
}
return self;
}
- (instancetype)initWithCoder:(NSCoder *)coder {
self = [super initWithCoder:coder];
if (self) {
[self setupSubviews];
}
return self;
}
- (UITextField *)searchBarTextField {
if (!_searchBarTextField) {
_searchBarTextField = [UITextField new];
_searchBarTextField.backgroundColor = [UIColor whiteColor];
_searchBarTextField.layer.borderColor = KC05_dddddd.CGColor;
_searchBarTextField.layer.borderWidth = 0.5f;
_searchBarTextField.layer.cornerRadius = 5;
_searchBarTextField.layer.masksToBounds= YES;
_searchBarTextField.placeholder = @"Searching for something new";
_searchBarTextField.leftView = self.magnifierImageView;
_searchBarTextField.leftViewMode = UITextFieldViewModeAlways;
[_searchBarTextField setValue:KC04_999999 forKeyPath:@"placeholderLabel.textColor"];
}
return _searchBarTextField;
}
- (UIImageView *)magnifierImageView {
if (!_magnifierImageView) {
_magnifierImageView = [UIImageView new];
_magnifierImageView.image = [UIImage imageNamed:@"fa-search"];
_magnifierImageView.frame = CGRectMake(0, 0, 34, 34);
_magnifierImageView.contentMode = UIViewContentModeCenter;
}
return _magnifierImageView;
}
- (void)setupSubviews {
[self addSubview:self.searchBarTextField];
}
- (void)layoutSubviews {
[super layoutSubviews];
CGFloat searchBarTextFieldX = 0;
CGFloat searchBarTextFieldY = 0;
CGFloat searchBarTextFieldW = self.width;
CGFloat searchBarTextFieldH = 34;
self.searchBarTextField.frame = CGRectMake(searchBarTextFieldX, searchBarTextFieldY, searchBarTextFieldW, searchBarTextFieldH);
}
实现位移渐变
重于到今天的重头戏了, 我们来实现位移渐变!! 上面的自定义View 我们并不是将其添加到Cell之中, 而是将他添加到navigationController.view之上!!
创建两个自定义View
@property (nonatomic,strong) SQLifestyleSearchBarView * titleView;
@property (nonatomic,strong) SQLifestyleSearchBarView * searchBarView;
- (SQLifestyleSearchBarView *)titleView {
if (!_titleView) {
_titleView = [SQLifestyleSearchBarView new];
_titleView.frame = self.navigationController.navigationBar.frame;
}
return _titleView;
}
- (SQLifestyleSearchBarView *)searchBarView {
if (!_searchBarView) {
_searchBarView = [SQLifestyleSearchBarView new];
}
return _searchBarView;
}
其中一个的frame = self.navigationController.navigationBar.frame
并将其添加到titleView中!! 另一个将其加载navigationController.view中!! 并在viewWillLayoutSubviews中设置布局!!
- (void)loadView {
[super loadView];
[self.navigationItem setTitleView:self.titleView];
[self.navigationController.navigationBar setBackgroundImage:[UIImage imageWithColor:[UIColor clearColor]] forBarMetrics:UIBarMetricsDefault];
[self.navigationController.navigationBar setShadowImage:[UIImage imageWithColor:[UIColor clearColor]]];
}
- (void)viewDidLoad {
[super viewDidLoad];
[self.view addSubview:self.tableView];
[self.navigationController.view addSubview:self.searchBarView];
}
- (void)viewWillLayoutSubviews {
[super viewWillLayoutSubviews];
CGFloat searchBarViewX = kSpace;
CGFloat searchBarViewW = self.titleView.width;
CGFloat searchBarViewH = self.titleView.height;
CGFloat searchBarViewY = kScaleLength(210) + searchBarViewH - self.tableView.contentOffset.y - searchBarViewH;
self.searchBarView.frame = CGRectMake(searchBarViewX, searchBarViewY, searchBarViewW, searchBarViewH);
}
监听偏移
我们将设置导航栏背景颜色的方法从LoadView移到scrollViewDidScroll中来
这里需要和大家细说一下监听偏移渐变,其实很简单,就是一个公式而已 float alpha = 1 - (offset) - scrollView.contentOffset.y) / offset); 其中的offset 指的是y轴方向从初始值viewWillLayoutSubviews中的初始设定 到导航栏的位移!!
每滑动下重新调用viewWillLayoutSubviews方法重新布局, 当其到达位移点的时候, 两个View进行交换就达到了 预期的效果!!
- (void)scrollViewDidScroll:(UIScrollView *)scrollView {
[self viewWillLayoutSubviews];
[[[UIApplication sharedApplication] keyWindow] endEditing:YES];
float alpha = 1 - ((kScaleLength(190.5) - scrollView.contentOffset.y) / kScaleLength(190.5));
[self.navigationController.navigationBar setBackgroundImage:[UIImage imageWithColor:[KC01_57c2de colorWithAlphaComponent:alpha > 0.95f ? 0.95f : alpha]] forBarMetrics:UIBarMetricsDefault];
self.titleView.hidden = scrollView.contentOffset.y > kScaleLength(190.5) ? NO : YES;
self.searchBarView = !titleView.hidden;
}
对位移渐变的封装
上面的代码看到晕晕乎乎,讲的不清不楚!! 我们来讲这个功能封装一下, 先创建一个UIViewController的Catagory 实现方法!!
-
scrollView: 传入需要位移的scrollView;
-
titleView: 传入导航栏上的titleView;
-
movableView: 传入需要移动的自定义View;
-
offset: 传入y轴方向从初始值到导航栏的位移;
-
color: 传入导航栏颜色
- (void)navigationBarGradualChangeWithScrollView:(UIScrollView *)scrollView titleView:(UIView *)titleView movableView:(UIView *)movableView offset:(CGFloat)offset color:(UIColor *)color {
float alpha = 1 - ((offset - scrollView.contentOffset.y) / offset);
[self.navigationController.navigationBar setBackgroundImage:[UIImage imageWithColor:[color colorWithAlphaComponent:alpha > 0.95f ? 0.95f : alpha]] forBarMetrics:UIBarMetricsDefault];
titleView .hidden = scrollView.contentOffset.y > offset ? NO : YES;
movableView.hidden = !titleView .hidden;
}
这样我们在调用的时候就简单明了多了!! 以后做到这个功能的时候可以直接拿来用了!!
- (void)scrollViewDidScroll:(UIScrollView *)scrollView {
[self viewWillLayoutSubviews];
[[[UIApplication sharedApplication] keyWindow] endEditing:YES];
[self navigationBarGradualChangeWithScrollView:scrollView titleView:self.titleView movableView:self.searchBarView offset:kScaleLength(190.5) color:KC01_57c2de];
}
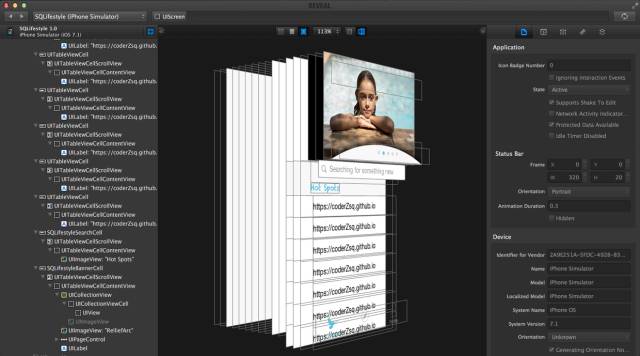
模拟效果
为了能看到效果 我们在控制器中多加几个cell 方法很简单只要在Key数组中多加几个对象即可! 并在key == @"" 时加载如下Cell
- (NSArray *)keysArr {
if (!_keysArr) {
_keysArr = @[kSQLifestyleBannerKey,
kSQLifestyleSearchKey,
@"",@"",@"",@"",@"",
@"",@"",@"",@"",@"",
@"",@"",@"",@"",@"",
@"",@"",@"",@"",@""];
}
return _keysArr;
}
static NSString * identifier = @"cell";
UITableViewCell * cell = [tableView dequeueReusableCellWithIdentifier:identifier];
if (!cell) {
cell = [[UITableViewCell alloc]initWithStyle:UITableViewCellStyleDefault reuseIdentifier:identifier];
} cell.textLabel.text = @"https://coderZsq.github.io";
return cell;
好了 我们来看下显示效果吧~~
在Reaval中显示

最终显示

具体源码及SQExtension方法信息 请到github上进行下载! 喜欢的朋友送下小星星哟!!
https://github.com/coderZsq/coderZsq.project.ios