1. 事务
1. Transaction:一组操作中,包含有很多单一的逻辑。只要有一个逻辑没有执行成功,都算失败。所有的数据都回归到最初的状态。
2. 为什么要有事务:为了确保逻辑的成功,例如:银行的转账
3. 使用命令行方式
可以使用set autocommit = off;来关闭自动提交

update account set money = money - 100 where id = 1;
此时虽然命令行中查询的结果会发生改变,但是可以使用
commit:提交事务,数据将会写到磁盘上面的数据库
rollback:数据回滚,回到最初的状态
选择是否提交

4. 使用代码的方式
事务是针对连接的
public void testTransaction(){
    Connection con = null;
    PreparedStatement ps = null;
    ResultSet rs = null;
    try{
        con = JDBCUtil.getCon();
        // 默认的连接事务是自动提交的,关闭自动提交
        con.setAutoCommit(false);
        String sql = "update account set money = money - ? where id = ?";
        ps = con.prepareStatement(sql);
        ps.setInt(1, 100);
        ps.setInt(2, 1);
        ps.executeUpdate();

        ps.setInt(1, -100);
        ps.setInt(2, 1);
        ps.executeUpdate();

        con.commit();

        /*while(rs.next()){
            String name = rs.getString("name");
            int money = rs.getInt("money");
            System.out.println("name:" + name + ",money:" + money);
        }*/
    } catch(Exception e){
        try {
            con.rollback();
        } catch (SQLException e1) {
            e1.printStackTrace();
        }
        e.printStackTrace();
    } finally{
        JDBCUtil.release(con, ps, rs);
    }
}
5. 事务的特性
a. 原子性:事务中包含的逻辑不可分割
b. 一致性:事务执行前后数据的完整性保持一致
c. 持久性:事务执行成功,数据永久保存在磁盘上面
d. 隔离性:事务在执行期间,不应该受到其它事务的影响
6. 事务的安全隐患
不考虑隔离级别的问题,可能会出现以下的问题
a. 读:脏读,不可重复读,幻读
(1). 脏读:一个事务读到了另一个事务还未提交的事务
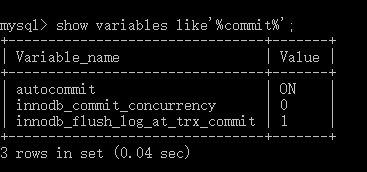
mysql查看隔离级别

默认是可重复读
隔离级别默认四种:Read Uncommitted:读未提交
Read Committed:读已提交
Repeatable Read:重复度
Serializable:可串行化
设置A窗口的隔离级别为读未提交

脏读出现的情况:两个窗口都开启事务:start transaction,回滚前和回滚后的结果不一致

(2). 不可重复度
设置a窗口的隔离级别为读已提交

a,b两个窗口都开启事务,在B窗口中执行更新操作
在a窗口中两次查询的结果不一致,一次是在b提交事务之前,一次是在b提交事务之后

这个隔离界别可以避免脏读的现象,但是引发了另一个问题,不可重复读
按照效率划分,从高到低
读未提交>读已提交>可重复读>可串行化
按照拦截程度,从高到低
可串行化>可重复度>读已提交>读未提交
(3). 可重复读
设置a窗口为可重复读

a,b两个窗口都开启事务,在b窗口中执行更新操作,b提交了数据以后,a窗口的数据也不会发生变化

(4). 幻读:一个事务读取到了另一个事务已提交的插入的数据,导致多次查询的结果不一致
(5). 可串行化:如果有一个连接的隔离级别为串行化,那么谁先打开了事务,谁就有了先执行的权力,谁后打开事务,谁就只能等待,等待前面的那个事务提交或者回滚以后,才能执行。但是这种隔离级别很少用,容易造成性能上面的问题,性能比较低
b. 写:丢失更新
事务总结:
1. 在代码中使用事务
setAutoCommit(false)
conn.commit();
conn.rollback();
2. 事务只是针对连接对象,如果再开一个连接对象,那么默认的提交
3. 事务是会自动提交的
Oracle:默认的是读已提交
mysql:默认的是可重复读
7. 丢失更新
两个事务A,B,A先更新,B后更新,会导致A的数据被覆盖
A先更新,B后回滚,导致数据还是以前的数据,
8. 解决丢失更新
悲观锁:可以在查询时加入for update
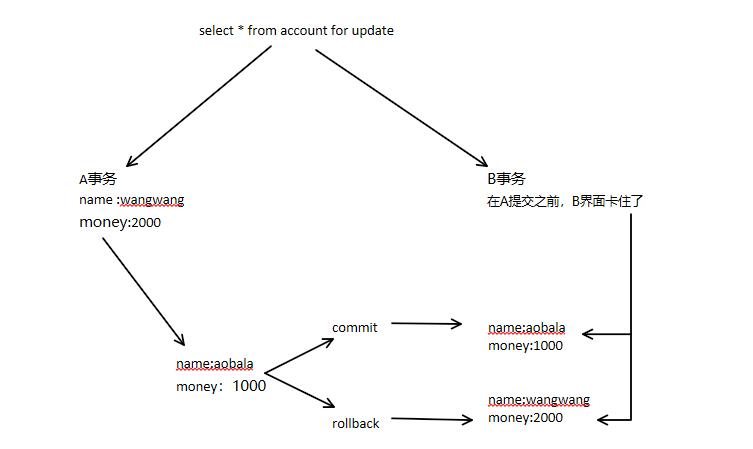
乐观锁:要求程序员自己控制

2. 数据库连接池:
1. 数据库的连接对象创建工作,比较消耗性能
2. 一开始在内存中开创一个空间,先向连接池中放置多个连接对象,后面需要连接的话,直接到池子中去,不要去自己创建连接了,使用完毕,需要归还连接,确保连接对象可以循环利用。
开源连接池:
DBCP:
a. 导入commons-dbcp-1.4.jar和commons-pool-1.5.6.jar文件
b. 配置dbcpconfig.properties文件

c. 编写代码
public void testDBCP(){
    // 构建数据源对象
    // 连接的数据库的类型,名称,用户名,密码

    // 得到连接对象
    Connection con = null;
    PreparedStatement ps = null;
    try {
        BasicDataSourceFactory factory = new BasicDataSourceFactory();
        Properties properties = new Properties();
        InputStream is = DBCPDemo.class.getClassLoader().getResourceAsStream("dbcpconfig.properties");
        properties.load(is);
        DataSource dataSource = factory.createDataSource(properties);
        con = dataSource.getConnection();
        String sql = "insert into account values(null, ?, ?)";
        ps = con.prepareStatement(sql);
        ps.setString(1, "浴帽");
        ps.setInt(2, 3000);
        ps.executeUpdate();
    } catch (Exception e) {
        // TODO Auto-generated catch block
        e.printStackTrace();
    } finally{
        JDBCUtil.release(con, ps);
    }

}
C3P0:
a. 导入c3p0-0.9.1.2.jar的包
b. 编写代码
@Test
public void C3P0Test(){
    ComboPooledDataSource dataSource = new ComboPooledDataSource();
    Connection con = null;
    PreparedStatement ps = null;
    try{
        dataSource.setDriverClass("com.mysql.jdbc.Driver");
        dataSource.setJdbcUrl("jdbc:mysql://localhost/bank");
        dataSource.setUser("root");
        dataSource.setPassword("root");
        con = dataSource.getConnection();
        String sql = "insert into account values(null, ?, ?)";
        ps = con.prepareStatement(sql);
        ps.setString(1, "xiaochogn");
        ps.setInt(2, 5000);
        ps.executeUpdate();
    } catch(Exception e){
        e.printStackTrace();
    } finally{
        JDBCUtil.release(con, ps);
    }
}
c. 使用配置文件的方式
导入配置文件:c3p0-config.xml
<?xml version="1.0" encoding="UTF-8"?>
<c3p0-config>

    <!-- default-config 默认的配置,  -->
  <default-config>
    <property name="driverClass">com.mysql.jdbc.Driver</property>
    <property name="jdbcUrl">jdbc:mysql://localhost/bank</property>
    <property name="user">root</property>
    <property name="password">root</property>


    <property name="initialPoolSize">10</property>
    <property name="maxIdleTime">30</property>
    <property name="maxPoolSize">100</property>
    <property name="minPoolSize">10</property>
    <property name="maxStatements">200</property>
  </default-config>

   <!-- This app is massive! -->
  <named-config name="oracle">
    <property name="acquireIncrement">50</property>
    <property name="initialPoolSize">100</property>
    <property name="minPoolSize">50</property>
    <property name="maxPoolSize">1000</property>

    <!-- intergalactoApp adopts a different approach to configuring statement caching -->
    <property name="maxStatements">0</property>
    <property name="maxStatementsPerConnection">5</property>

    <!-- he's important, but there's only one of him -->
    <user-overrides user="master-of-the-universe">
      <property name="acquireIncrement">1</property>
      <property name="initialPoolSize">1</property>
      <property name="minPoolSize">1</property>
      <property name="maxPoolSize">5</property>
      <property name="maxStatementsPerConnection">50</property>
    </user-overrides>
  </named-config>


</c3p0-config>
@Test
public void C3P0Test(){
    ComboPooledDataSource dataSource = new ComboPooledDataSource();// 里面可以写"orcle",或者"mysql",默认找default-config
    Connection con = null;
    PreparedStatement ps = null;
    try{
        con = dataSource.getConnection();
        String sql = "insert into account values(null, ?, ?)";
        ps = con.prepareStatement(sql);
        ps.setString(1, "chegnyang");
        ps.setInt(2, 5000);
        ps.executeUpdate();
    } catch(Exception e){
        e.printStackTrace();
    } finally{
        JDBCUtil.release(con, ps);
    }
}
3. DBUtils
DBUtils是apache组织提供的一个对JDBC进行简单封装的开源工具类库,使用它能够简化JDBC应用程序的开发,同时也不会影响程序的性能
查询方法有两种:实现接口,使用框架写好的实现类
package com.fengying.dbutils;

import java.sql.ResultSet;
import java.sql.SQLException;
import java.util.List;

import org.apache.commons.dbutils.QueryRunner;
import org.apache.commons.dbutils.ResultSetHandler;
import org.apache.commons.dbutils.handlers.BeanHandler;
import org.apache.commons.dbutils.handlers.BeanListHandler;
import org.junit.Test;

import com.fengying.domain.Account;
import com.mchange.v2.c3p0.ComboPooledDataSource;

public class TestDBUtils {
    @Test
    public void testUtils(){
        // dbutils只是简化了crub的代码,但是连接的创建以及获取工作,不在考虑范围之内
        QueryRunner queryRunner = new QueryRunner(new ComboPooledDataSource());
        try {
//            queryRunner.update("insert into account values(null, ?, ?)", "xiaocong", 10000);
//            queryRunner.update("delete from account where id = ?", 5);
//            queryRunner.update("update account set money = ? where id = ?", 100000, 3);
            // 执行查询,查询到的数据在result中,但是需要用户手动封装
            // 方法一:
            Account account = queryRunner.query("select * from account where id = ?", new ResultSetHandler<Account>(){
                public Account handle(ResultSet rs) throws SQLException{
                    Account account = new Account();
                    while(rs.next()){
                        String name = rs.getString("name");
                        int money = rs.getInt("money");
                        account.setName(name);
                        account.setMoney(money);
                    }
                    return account;
                }
            }, 6);
            System.out.println(account.toString());

            // 方法二:
            Account acc = queryRunner.query("select * from account where id = ?", new BeanHandler<Account>(Account.class), 6);
            System.out.println(acc.toString());

            // 查询数据集
            List<Account> acclist = queryRunner.query("select * from account", new BeanListHandler<Account>(Account.class));
            for(Account at : acclist){
                System.out.println(at.toString());
            }
        } catch (SQLException e) {
            e.printStackTrace();
        }
    }
}
package com.fengying.domain;

public class Account {
    private String name;
    private int money;

    public String getName() {
        return name;
    }

    public void setName(String name) {
        this.name = name;
    }

    public int getMoney() {
        return money;
    }

    @Override
    public String toString() {
        return "Account [name=" + name + ", money=" + money + "]";
    }

    public void setMoney(int money) {
        this.money = money;
    }

}
Meata data
元数据:用于描述数据的数据,String sql,描述这份sql字符串的数据叫做元数据
数据库元数据:DatabaseMetaData
参数元数据:ParameterMetaData
结果集元数据:ResultSetMetaData
4. JSP开发模式
1. 开发模式1:JavaBean + JSP,在jsp中直接写java代码,维护起来比较困难,页面代码变得臃肿
<%
封装数据
执行业务
准备数据
%>
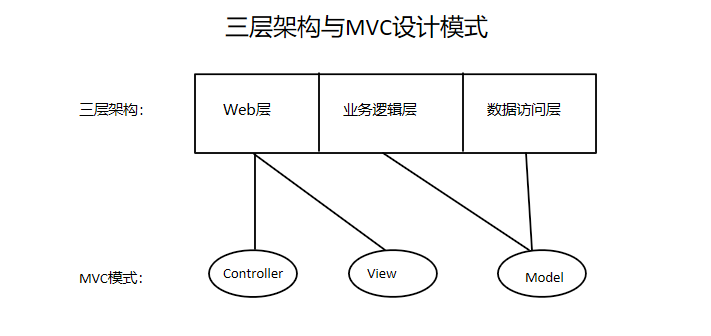
2. 开发模式2:Servlet + JavaBean + JSP,即是MVC模式
M:Model,模型层,封装数据JavaBean
V:View,视图层,jsp,只关注于显示
C:Controller,控制层,Servlet接收页面的请求,找模型层去处理,然后响应
大型项目:分层:模型比较清楚 ,便于维护,扩展方便
小型项目:严格遵守MVC,可能比较麻烦,代码稍多
3. 三层架构
Web层:servlet/jsp
业务逻辑层:Ejb,会话bean,javadBean
数据访问层:Dao
学生管理系统:
a. 查询
1. 写一个jsp页面,里面放置一个超链接
2. 写servlet,接收请求,去调用service,由service去调用dao
3. 先写Dao,做Dao实现
4. 用Service,做Service实现
5. 在servlet存储数据,并且做出页面响应
6. 在list.jsp上显示数据
b. 增加
1. 先跳转到增加的页面,编写增加的页面
2. 点击添加,提交数据到AddServlet, 处理数据
3. 调用service
4. 调用dao,完成数据持久化
5. 完成这些存储工作,跳转到列表页面,这里不能跳转到列表页面,应该先跳转到查询所有学生信息的servlet,由那个Servlet再去调用列表页面
6. 爱好value的值有多个,做相关的处理
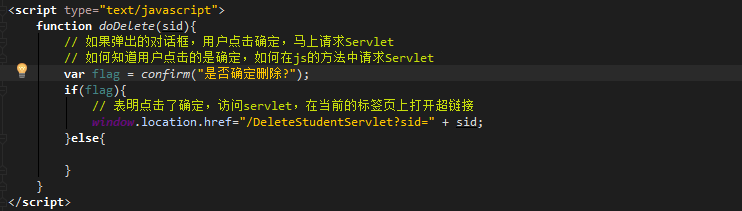
c. 删除
1. 点击超链接,弹出一个询问是否删除的对话框,如果点击了确定,那么确定删除
2. 让超链接执行一个js方法
3. 在js访问里面加入判断点击的选项,然后跳转到servlet
4. servlet中收到了请求,然后去调用service,service去调用dao
d. 更新
1. 点击列表上面的更新,先跳转到一个EditStudentServlet
在这个Servlet里面,先根据ID,去查询这个学生的所有信息出来
2. 跳转到更新的页面,在页面上面显示数据
姓名,电话文本框,使用Jstl表达式

个人简介文本域:<textarea name="info" rows="3" cols="20">${stu.info}</textarea>

性别单选框需要用到jstl表达式:

爱好多选框引入jstl的functions函数


3. 修改完毕以后,提交数据到UpdateServlet
提交的数据没有带id,需要创建一个隐藏的Input,给定id的值,然后提交表单
4. 获取数据,调用service,调用dao