编写mapper接口和对应的mapper.xml文件,注意对应的注解
@Mapper
@Repository
public interface StudentMapper {
    void insertStudent(Student student);
}
@Mapper注解标注这个接口是个mapper接口
@Repository
mapper.xml文件
<?xml version="1.0" encoding="UTF-8"?>
<!DOCTYPE mapper PUBLIC
        "-//mybatis.org//DTD Mapper 3.0//EN"
        "http://mybatis.org/dtd/mybatis-3-mapper.dtd">
<mapper namespace="com.wang.mapper.StudentMapper">
    <insert id="insertStudent" parameterType="student">
        insert into student(sname,age) values (#{sname},#{age})
    </insert>
</mapper>
创建pojo,注意需要继承serializable接口
public class Student implements Serializable {
    private String sname;
    private String sex;
    private Integer age;
    private Integer sid;
    public String getSname() {
        return sname;
    }

    public void setSname(String sname) {
        this.sname = sname;
    }

    public String getSex() {
        return sex;
    }

    public void setSex(String sex) {
        this.sex = sex;
    }

    public Integer getAge() {
        return age;
    }

    public void setAge(Integer age) {
        this.age = age;
    }

    public Integer getSid() {
        return sid;
    }

    public void setSid(Integer sid) {
        this.sid = sid;
    }

    public Student(String sname, String sex, Integer age, Integer sid) {

        this.sname = sname;
        this.sex = sex;
        this.age = age;
        this.sid = sid;
    }
}
service层实现
service接口
public interface studentService {
    void insertstudent(Student student);
}
对应service的实现类
@Service
@Transactional
public class studentserviceImpl implements studentService {

    @Autowired
    private StudentMapper studentMapper;

    public void insertstudent(Student student) {
        studentMapper.insertStudent(student);
@service将service类注册到spring容器
@transactional
注意为了能够操作数据库,这里传过来一个对应的mapper接口
controller编写
@Controller
@RequestMapping("/users")
public class studentController {
    @Autowired
    studentserviceImpl studentservice;
    /**
     * 跳转页面
     * @param
     */
    @RequestMapping("/{page}")
    public String showpage(@PathVariable String page){
        return page;
    }

    @RequestMapping("/adduser")
    public String adduser(Student student){
    studentservice.insertstudent(student);
        return "ok";
    }
}
对应的HTML页面
<!DOCTYPE html>
<html xmlns:th="http://www.thymeleaf.org">
<html lang="en">
<head>
    <meta charset="UTF-8">
    <title>yonghu</title>
</head>
<body>
<form th:action="@{/users/adduser}"  method="post">     <!-- 注意IDEA中有时候不会补全<  />,自己需要注意并加上/  -->
    <input type="text" name="sname" /><br/>
    <input type="text" name="age" /><br/>
    <input type="submit" value="confirm">
</form>
</body>
</html>
这里需要注意,为了能够使用th:标签,需要在html文件中引入命名空间
<html xmlns:th="http://www.thymeleaf.org">
跳转页面的html
<!DOCTYPE html>
<html lang="en">
<head>
    <meta charset="UTF-8">
    <title>Title</title>
</head>
<body>
save successfully
</body>
</html>
对应source目录下application.yml文件的配置内容
spring:                                 数据源的配置,这儿里出现一个问题,使用阿里巴巴对应的jar包的时候出现时区不一致的问题,需要设置时区
  datasource:
    driver-class-name: com.mysql.jdbc.Driver
    url: jdbc:mysql://localhost:3306/student?characterEncoding=utf-8
    username: root
    password:
    type: com.alibaba.druid.pool.DruidDataSource
  thymeleaf:
    suffix: .html
    prefix: classpath:/templates/         给thymleaf设置前缀和后缀,这样找页面的时候直接写上HTML文件的名字就行了。
    mode: HTML
    cache: true
    encoding: utf-8
mybatis:
  type-aliases-package: com.wang.pojo
  mapper-locations: classpath:mapper/*Mapper.xml
mybatis需要设置两个东西,一个别名和一个指定mapper.xml文件位置
对应上面红色问题的解决方法
命令行启动MySQL,执行下面语句设置时区
set global time_zone='+8:00';
最后查看对应时区
show variables like '%time_zone%';
最后启动类的编写(这里特别注意启动mapper扫面,里面放上扫描的包路径)
@SpringBootApplication
@MapperScan("com.wang.mapper.*")
public class App {
    public static void main(String[] args) {
        SpringApplication.run(App.class,args);
    }
}
工程结构
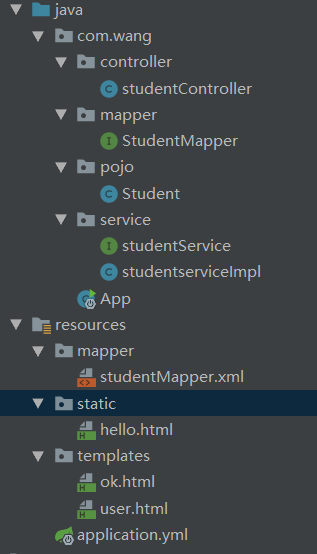
需要注意resources/static下面的内容是可以直接被访问的,以后还是需要注意一些类和方法的命名规则。