目录:
一、沙盒机制(SandBox)
- 什么是沙盒:每个iOS应用程序都会为自己创建一个文件系统目录(文件夹),这个独立、封闭、安全的空间,叫做沙盒。
(1)独立:每个应用程序都有自己的沙盒,这个沙盒文件只能自己使用
(2)封闭:应用程序一般只能使用自己的沙盒(了解:在iOS8.0之后可以访问跨应用之间沙盒的部分文件)
(3)安全:每个沙盒的内容,如果进行修改必须进行授权 - 沙盒是一种安全体系,它规定了应用程序只能在为该应用程序创建的文件夹(沙盒)内访问文件,不可以访问其他沙盒内的内容(iOS8.0已经部分开放访问,但也只是苹果内部app可以,自己开发的app如果访问会被驳回不允许上线)。所有的非代码文件都保存在这个地方,比如图片、音频、视频、属性列表(plist)、sqlite数据库和文本文件等。
- 应用程序向外请求或接收数据都需要经过权限认证。
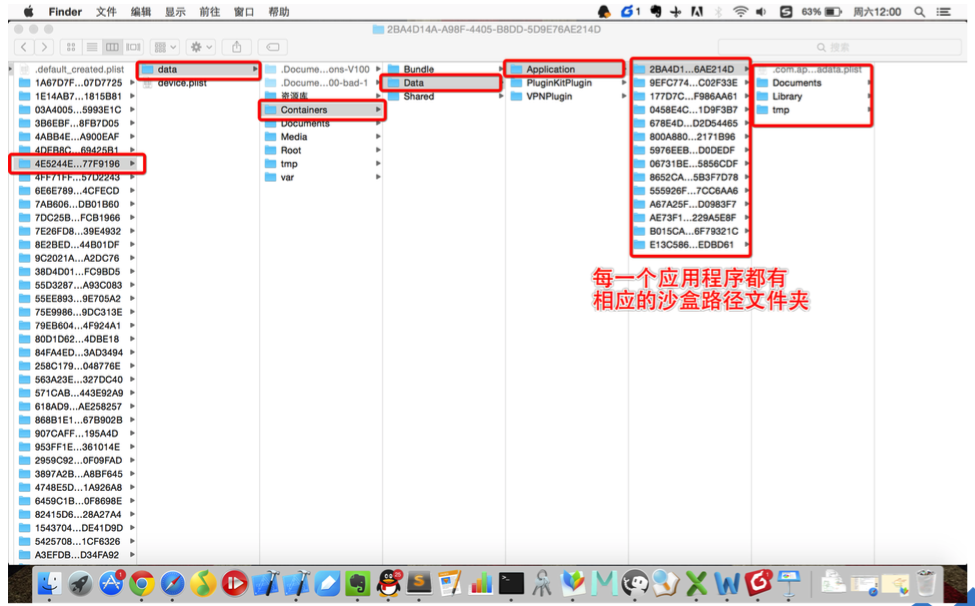
- 应用程序的沙盒目录下会有三个文件夹Documents、Library(下面有Caches和Preferences两个目录)、tmp。
(1)Documents:存储永远不会被删除的文件,会被iTunes同步,会备份到电脑上,如果需要可以从电脑中取出(在这个文件夹中不能存储一些过大的文件:如视频、音频、图片)【在程序退出的时候不会被删除,会被同步】
(2)Library:
Caches(缓存):这个文件夹的作用主要是用来缓存一些视频、音频、图片这样的内容(例如SDWebImage缓存的图片就存在这个文件夹中)【在程序退出时不会被删除,也不会被同步】
Preferences(偏好设置):保存应用程序的偏好设置,iTunes会自动备份此目录,这个目录中的内容会使用NSUserDefaults去取。
注意:不应该直接创建偏好设置文件,而是应该使用NSUserDefaults类来取得和设置应用程序的偏好
(3)tmp(临时文件夹):用来存取临时数据,临时数据可以说删除就删除,在应用程序重启的时候文件夹中的数据都会被清除掉,不会被备份。 iPhone重启时,该目录下会被清空 - 查看某个应用程序的沙盒
第一种方式: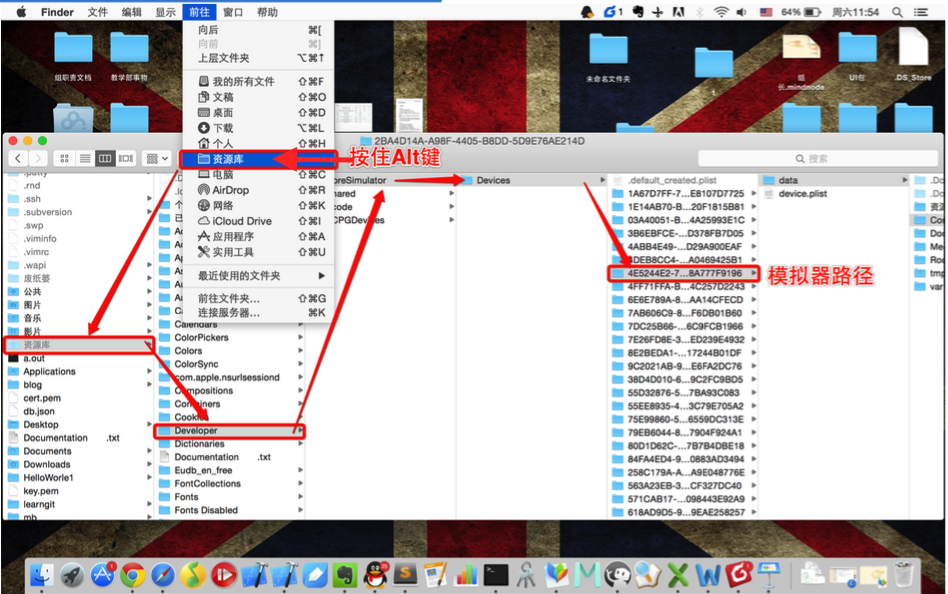
第二种方式: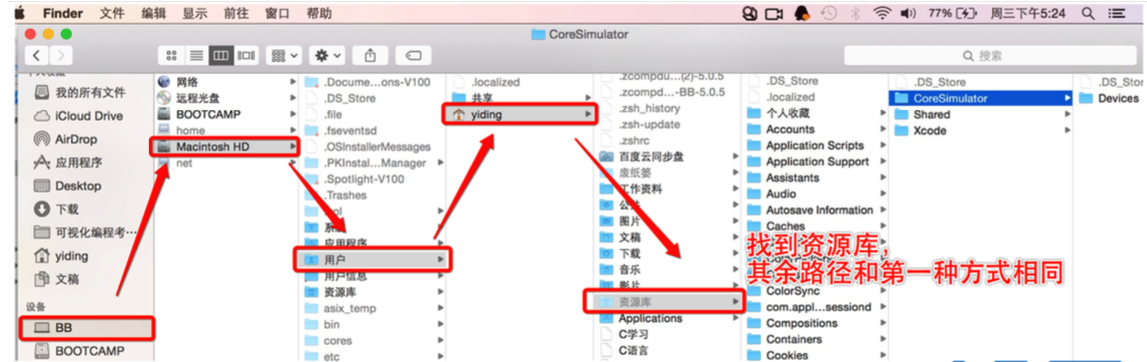
- 代码获取Documents、Library、Caches、Preferences、tmp路径
 1 #pragma mark - 第一种打开应用程序沙盒路径的方式
 2     // 地址是一个字符串
 3     // 第一个参数是:枚举值,枚举你具体要查找的文件夹【要进入哪个文件夹直接修改其值即可】NSDocumentDirectory:进入Document文件夹
 4     // 第二个参数:NSUserDomainMask表示用户的主目录
 5     // 第三个参数:一般设置为Yes表示展示完整的路径
 6     // NSSearchPathForDirectoriesInDomains 是用来查找沙盒路径的,返回值是一个数组,这个数组中只有一个元素,这个元素就是路径,直接使用下标取出即可。
 7     NSString *documentPath = [NSSearchPathForDirectoriesInDomains(NSDocumentDirectory, NSUserDomainMask, YES) objectAtIndex:0];
 8     NSLog(@"documentPath = %@", documentPath);
 9     // 打印Caches路径
10     NSString *cachesPath = [NSSearchPathForDirectoriesInDomains(NSCachesDirectory, NSUserDomainMask, YES) objectAtIndex:0];
11     NSLog(@"caches = %@", cachesPath);
12
13 #pragma mark - 第二种打开应用程序沙盒路径的方式
14     // 第一步:先找到主目录文件夹 -- 到Application
15     NSString *homePath = NSHomeDirectory();
16     NSLog(@"homePath = %@", homePath);
17     // 第二步:然后拼接自己想进入的文件夹名称
18     NSString *documentPathTwo = [homePath stringByAppendingPathComponent:@"Documents"];
19     NSLog(@"documentPathTwo = %@", documentPathTwo);
20
21     // Library路径
22     NSString *libraryPath = [homePath stringByAppendingPathComponent:@"Library"];
23     NSLog(@"libraryPath = %@", libraryPath);
24
25     // Caches路径
26     NSString *cachesPathTwo = [homePath stringByAppendingPathComponent:@"Library/Caches"];
27     NSLog(@"cachesPathTwo = %@", cachesPathTwo);
28
29 #pragma mark - 特殊的文件夹 tmp
30     // 打印tmp路径 -- 有自己的方法
31     NSString *tmpPath = NSTemporaryDirectory();
32     NSLog(@"%@", tmpPath);
33     // 打印tmp路径 -- 拼接的方式,与别的路径查找方式相同
34     NSString *tmpPathTwo = [homePath stringByAppendingPathComponent:@"tmp"];
35     NSLog(@"tmpPathTwo = %@", tmpPathTwo);
二、简单对象的读写(I/O)操作
注意:数组和字典中元素对象的类型,也必须是上述的四种,否则不能直接写入文件。
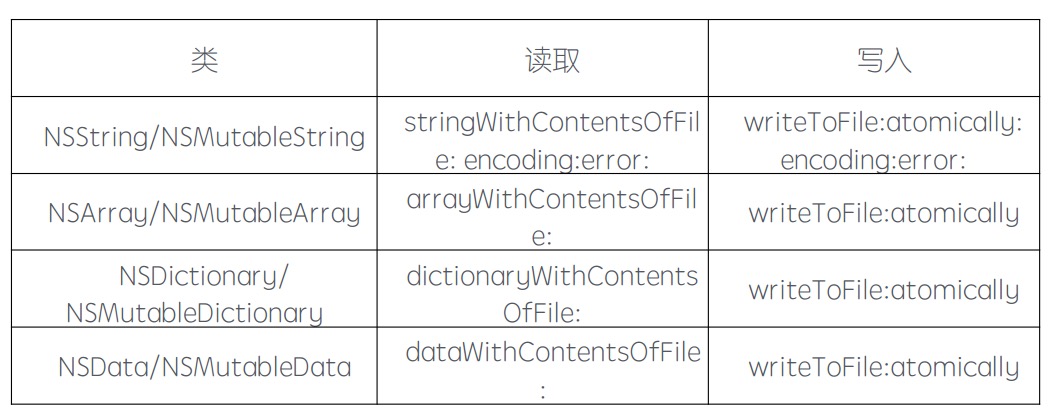
- 字符串(NSString)
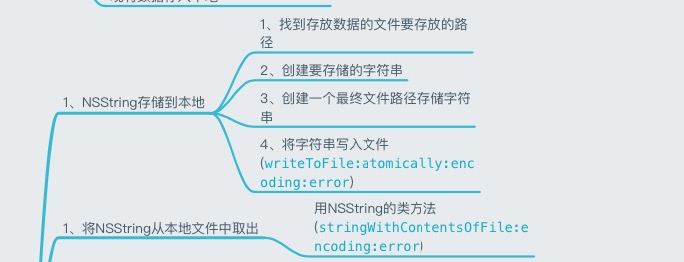
-
 1 #pragma mark - 将NSString类型的数据存储到本地
 2
 3     // 1、需要知道这个对象存在哪里,所以需要一个文件夹的路径
 4     // 找到Document的路径
 5     NSString *documentPath = [NSSearchPathForDirectoriesInDomains(NSDocumentDirectory, NSUserDomainMask, YES) objectAtIndex:0];
 6     // 2、创建要存储的内容:字符串
 7     NSString *str = @"AJAR";
 8     // 3、创建一个最终存储字符串的路径存储字符串
 9     NSString *strPath = [documentPath stringByAppendingPathComponent:@"yyp.txt"];
10     // 4、将字符串写入文件
11     // 第一个参数:要写入的文件的路径
12     // 第二个参数:在程序突然中断的情况下,是否要自动保存
13     // 第三个参数:编码格式
14     // 第四个参数:错误信息
15     [str writeToFile:strPath atomically:YES encoding:NSUTF8StringEncoding error:nil];
16 #pragma mark - 将文件中存储的字符串取出
17     // 取出字符串
18     // 第一个参数:字符串存储路径
19     // 第二个参数:编码格式
20     NSString *newStr = [NSString stringWithContentsOfFile:strPath encoding:NSUTF8StringEncoding error:nil];
- 数组(NSArray)
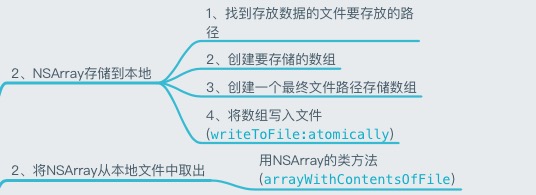
#pragma mark - 将NSArray类型的数据存储到本地
    // 1、找到Documents路径

    NSString *documentPath = [NSSearchPathForDirectoriesInDomains(NSDocumentDirectory, NSUserDomainMask, YES) objectAtIndex:0];
    // 2、创建要存储的内容:数组
    NSArray *array = @[@"Black", @"MBBoy", @"BPY", @"SPY", @"SeaRoot", @"BoomSky"];
    // 3、创建数据存储的最终路径
    NSString *arrayPath = [documentPath stringByAppendingPathComponent:@"yyp.plist"];
    // 4、将数组写入文件
    [array writeToFile:arrayPath atomically:YES];

    // 将存在本地的数组取出
    NSArray *newArray = [NSArray arrayWithContentsOfFile:arrayPath];
    NSLog(@"%@", newArray);
- 字典(NSDictionary)
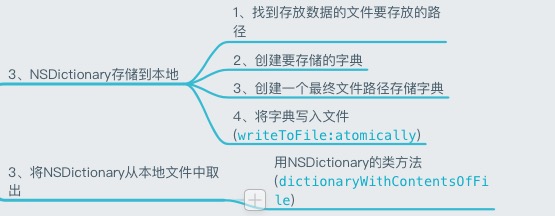
#pragma mark - 将NSDictionary类型的数据存储到本地

    NSString *documentsPath = [NSSearchPathForDirectoriesInDomains(NSDocumentDirectory, NSUserDomainMask, YES) objectAtIndex:0];
    NSDictionary *dict = @{@"name" : @"yyp",
                           @"gender" : @"girl",
                           @"age" : @23};
    NSString *dictPath = [documentsPath stringByAppendingPathComponent:@"person.plist"];
    [dict writeToFile:dictPath atomically:YES];
    // 从本地文件中取出字典
    NSDictionary *newDict = [NSDictionary dictionaryWithContentsOfFile:dictPath];
    NSLog(@"newDict = %@", newDict);
- 数据(NSData)
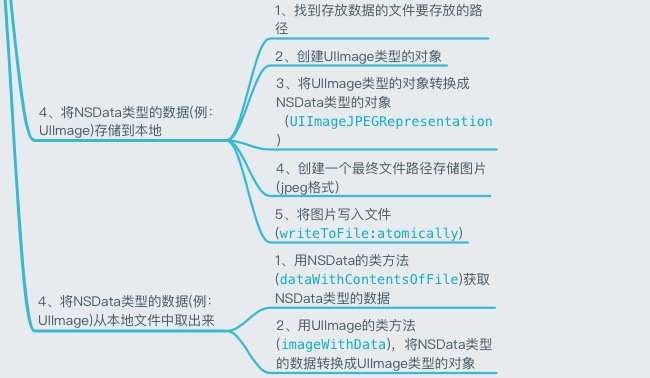
#pragma mark - 将NSData类型的数据存储到本地(以UIImage为例)
    NSString *oldImagePath = [[NSBundle mainBundle] pathForResource:@"v_red_heart_selected@2x" ofType:@"png"];
    UIImage *image1 = [UIImage imageWithContentsOfFile:oldImagePath];
    // 将image类型的对象转换为NSData类型的数据进行存储,最后保存的图片是JPEG类型
    // 第一个参数:要转换的UIImage对象
    // 第二个参数:表示图片压缩质量的值 1 -- 保持原样
    // iPhone中会将大于2M的图片自动旋转90度,进行压缩处理,最后保存的图片是JPEG类型
    NSData *imageData = UIImageJPEGRepresentation(image1, 1.0);
    NSLog(@"%@", imageData);
    // 找到存储路径
    NSString *documentPath = [NSSearchPathForDirectoriesInDomains(NSDocumentDirectory, NSUserDomainMask, YES) objectAtIndex:0];
    // 图片的最终文件路径
    NSString *imagePath = [documentPath stringByAppendingPathComponent:@"heart.jpeg"];
    // 将图片存为jpeg类型
    [imageData writeToFile:imagePath atomically:YES];

    // 将image从本地文件读取出来
    // 读取NSData对象
    NSData *newData = [NSData dataWithContentsOfFile:imagePath];
    // 将NSData对象转换成UIImage对象
    UIImage *imageWithData = [UIImage imageWithData:newData];
    // 将UIImage对象放到UIImageView上
    // 创建一个UIImageView对象用来显示取出来的UIImage对象
    UIImageView *imageView = [[UIImageView alloc] initWithImage:imageWithData];
    [self.view addSubview:imageView];
三、复杂对象的读写(I/O)操作
复杂对象因为不能调用writeToFile:方法写入本地文件中,也无法直接从本地文件中读取出来,所以复杂对象的读写操作需要借助归档、反归档(解档)来进行。
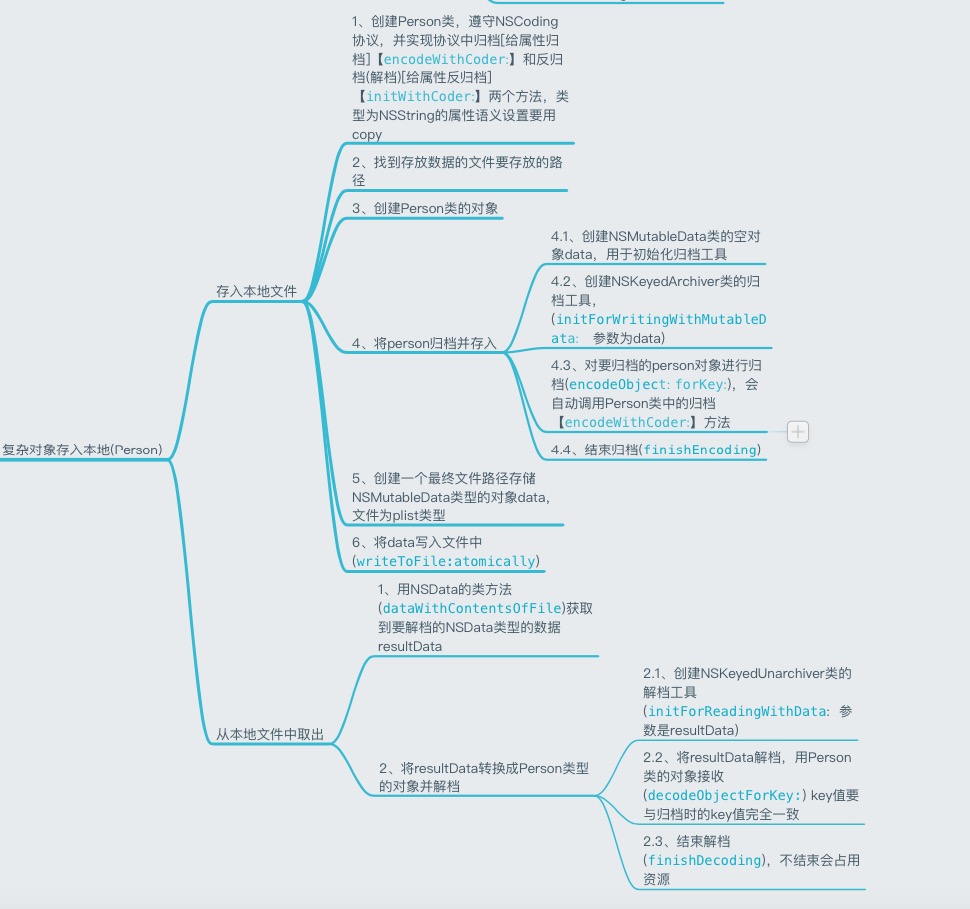
Person.m
// 归档
// 将所有的属性进行归档
- (void)encodeWithCoder:(NSCoder *)aCoder {
    // key一般与属性名一直
    [aCoder encodeObject:self.name forKey:@"name"];
    [aCoder encodeObject:self.gender forKey:@"gender"];
    [aCoder encodeInteger:self.age forKey:@"age"];
}

// 解档(返归档)
- (instancetype)initWithCoder:(NSCoder *)aDecoder {
    self = [super init];
    if (self) {
        // key值就是上面方法中定义的key值
        self.name = [aDecoder decodeObjectForKey:@"name"];
        self.gender = [aDecoder decodeObjectForKey:@"gender"];
        self.age = [aDecoder decodeIntegerForKey:@"age"];
    }
    return self;
}
ViewController.m 的 viewDidLoad方法中
  // 复杂对象的本地化
    // 如何把一个Person类的对象存入本地?
    // 前提条件:Person类必须遵守NSCoding协议,并实现协议中的两个方法,属性如果是字符串,语义设置建议用copy
#pragma mark - 复杂对象的本地化
    // 1、寻找Documents文件夹的目录
    NSString *documentPath = [NSSearchPathForDirectoriesInDomains(NSDocumentDirectory, NSUserDomainMask, YES) objectAtIndex:0];
    // 2、创建Person类的对象
    Person *person = [[Person alloc] init];
    person.name = @"BaekHyun";
    person.gender = @"boy";
    person.age = 24;
    // 3、将person归档并存入
    // 3.1、创建NSMutableData,用于初始化归档工具的
    NSMutableData *data = [NSMutableData data];
    // 3.2、创建归档工具
    NSKeyedArchiver *archiver = [[NSKeyedArchiver alloc] initForWritingWithMutableData:data];
    // 3.3、对要归档的person对象进行归档
    [archiver encodeObject:person forKey:@"person"];
    // 3.4、结束归档
    [archiver finishEncoding];
    // 4、将归档的内容(NSMutableData类型的对象)存储到本地
    NSString *personPath = [documentPath stringByAppendingPathComponent:@"person1.plist"];
    [data writeToFile:personPath atomically:YES];

#pragma mark - 解档
    // 1、将要解档的数据找出
    NSData *resultData = [NSData dataWithContentsOfFile:personPath];
    // 2、将resultData转换成Person类型的对象
    // 2.1、创建解档工具
    NSKeyedUnarchiver *unarchiver = [[NSKeyedUnarchiver alloc] initForReadingWithData:resultData];
    // 2.2、将resultData解档,用Person类的对象进行接收
    // key值要与归档时的key值完全一致
    Person *newPerson = [unarchiver decodeObjectForKey:@"person"];
    // 2.3、结束解档  不结束会占用资源
    [unarchiver finishDecoding];
    NSLog(@"%@", newPerson);