我们知道,使用面向对象编程(OOP)有一些弊端,当需要为多个不具有继承关系的对象引入同一个公共行为时,例如日志,安全检测等,我们只有在每个对象里引用公共行为,这样程序中就产生了大量的重复代码,程序就不便于维护了,所以就有了一个对面向对象编程的补充,即面向方面编程(AOP),AOP所关注的方向是横向的,不同于OOP的纵向。
Spring 2.0 采用@AspectJ注解对POJO进行标注,从而定义一个包含切点信息和增强横切逻辑的切面。Spring2.0可以将这个切面织入到匹配的目标Bean中。@AspectJ注解使用AspectJ切点表达式语法进行切点定义,可以通过切点函数,运算符,通配符等高级功能进行切点定义,拥有强大的连接点描述能力。
一:动态AOP使用示例
(1)创建用于拦截的bean
在实际工作中,此bean可能是满足业务需要的核心逻辑,例如test方法可能会封装这某个核心业务,但是,如果我们想在test前后加入日志来跟踪调试,如果直接修改源码并不符合面向对象的设计方法,而且随意修改原有代码也会造成一定的风险,还好接下来的Spring帮我们做到了这一点。
public class TestBean {
    private String testStr = "testStr";

    public String getTestStr() {
        return testStr;
    }

    public void setTestStr(String testStr) {
        this.testStr = testStr;
    }

    public void test(){
        System.out.println("test");
    }
}
(2)创建Advisor。
Spring中摒弃了最原始的繁杂配置方式而采用@AspectJ注解对POJO进行标注,使AOP的工作大大简化,例如,在AspectJTest类中,我们要做的就是在所有类的test方法执行前在控制台中打印beforeTest,而在所有类的test方法执行后打印afterTest,同时又使用环绕的方式在所有类的方法执行前后再次分别打印before1和after1。
@Aspect
public class AspectJTest {

    @Pointcut("execution(* *.test(..))")
    public void test(){

    }

    @Before("test()")
    public void beforeTest(){
        System.out.println("beforeTest");
    }

    @After("test()")
    public void afterTest(){
        System.out.println("afterTest");
    }

    public Object arountTest(ProceedingJoinPoint p){
        System.out.println("before1");
        Object obj = null;
        try{
            obj = p.proceed();
        }catch (Throwable e){
            e.printStackTrace();
        }
        System.out.println("after1");
        return obj;
    }
}
(3)创建配置文件
尽管注解可以取代XML配置,但是本文还是通过XML配置来开启AOP功能,做更详细的讲解,这样有助于理解。
<?xml version="1.0" encoding="UTF-8"?>
<beans xmlns:xsi="http://www.w3.org/2001/XMLSchema-instance"
       xmlns="http://www.springframework.org/schema/beans" xmlns:aop="http://www.springframework.org/schema/aop"
       xsi:schemaLocation="http://www.springframework.org/schema/beans
    http://www.springframework.org/schema/beans/spring-beans-3.0.xsd http://www.springframework.org/schema/aop http://www.springframework.org/schema/aop/spring-aop.xsd">

    <aop:aspectj-autoproxy ></aop:aspectj-autoproxy>
    <bean id = "test" class="test.TestBean" ></bean>
    <bean class="test.AspectJTest" ></bean>
</beans>
(4)测试
 public static void main(String[] args){
        ApplicationContext bf = new ClassPathXmlApplicationContext("aspectTest.xml");
        TestBean bean = (TestBean) bf.getBean("test");
        bean.test();
    }
(5)结果
beforeTest
before1
test
afterTest
after1
Spring实现了对所有类的test方法进行增加,使辅助功能可以独立于核心业务之外,方便与程序的扩展和解耦。
那么,Spring究竟是如何实现AOP的呢?首先我们知道,Spring是否支持注解的AOP是由一个配置文件控制的,也就是<aop:aspectj--autoproxy />,当在配置文件中声明了这句配置的时候,Spring就会支持注解的AOP,那么我们的分析就从这句注解开始。
二:动态AOP自定义标签
之前讲过Spring中的自定义注解,如果声明了自定义的注解,那么就一定会在程序中的某个地方注册了对应的解析器。通过搜索发现在AopNamespaceHander中对应着这样一段函数:
public class AopNamespaceHandler extends NamespaceHandlerSupport {

    /**
     * Register the {@link BeanDefinitionParser BeanDefinitionParsers} for the
     * '{@code config}', '{@code spring-configured}', '{@code aspectj-autoproxy}'
     * and '{@code scoped-proxy}' tags.
     */
    @Override
    public void init() {
        // In 2.0 XSD as well as in 2.1 XSD.
        registerBeanDefinitionParser("config", new ConfigBeanDefinitionParser());
        registerBeanDefinitionParser("aspectj-autoproxy", new AspectJAutoProxyBeanDefinitionParser());
        registerBeanDefinitionDecorator("scoped-proxy", new ScopedProxyBeanDefinitionDecorator());

        // Only in 2.0 XSD: moved to context namespace as of 2.1
        registerBeanDefinitionParser("spring-configured", new SpringConfiguredBeanDefinitionParser());
    }

}
我们可以得知,在解析配置文件的时候,一旦遇到aspectj-autoproxy注解时就会使用解析器AspectJAutoProxyBeanDefinitionParser进行解析,下面看看AspectJAutoProxyBeanDefinitionParser的内部实行。
(2.1)注册AnnotationAwareAspectJAutoProxyCreator
所有解析器,因为是对BeanDefinitionParser接口的统一实现,入口都是从parse函数开始的,AspectJAutoProxyBeanDefinitionParser的parse函数如下:
class AspectJAutoProxyBeanDefinitionParser implements BeanDefinitionParser {

    @Override
    public BeanDefinition parse(Element element, ParserContext parserContext) {
        AopNamespaceUtils.registerAspectJAnnotationAutoProxyCreatorIfNecessary(parserContext, element);
        extendBeanDefinition(element, parserContext);
        return null;
    }

    private void extendBeanDefinition(Element element, ParserContext parserContext) {
        BeanDefinition beanDef =
                parserContext.getRegistry().getBeanDefinition(AopConfigUtils.AUTO_PROXY_CREATOR_BEAN_NAME);
        if (element.hasChildNodes()) {
            addIncludePatterns(element, parserContext, beanDef);
        }
    }

    private void addIncludePatterns(Element element, ParserContext parserContext, BeanDefinition beanDef) {
        ManagedList<TypedStringValue> includePatterns = new ManagedList<TypedStringValue>();
        NodeList childNodes = element.getChildNodes();
        for (int i = 0; i < childNodes.getLength(); i++) {
            Node node = childNodes.item(i);
            if (node instanceof Element) {
                Element includeElement = (Element) node;
                TypedStringValue valueHolder = new TypedStringValue(includeElement.getAttribute("name"));
                valueHolder.setSource(parserContext.extractSource(includeElement));
                includePatterns.add(valueHolder);
            }
        }
        if (!includePatterns.isEmpty()) {
            includePatterns.setSource(parserContext.extractSource(element));
            beanDef.getPropertyValues().add("includePatterns", includePatterns);
        }
    }

}
其中registerAspectJAnnotationAutoProxyCreatorIfNecessary 函数是我们比较关心的,也是关键逻辑的实现。
/**
* @author Rob Harrop
 * @author Juergen Hoeller
 * @author Mark Fisher
 * @since 2.0
 * @see AopConfigUtils
 */
public abstract class AopNamespaceUtils {

    /**
     * The {@code proxy-target-class} attribute as found on AOP-related XML tags.
     */
    public static final String PROXY_TARGET_CLASS_ATTRIBUTE = "proxy-target-class";

    /**
     * The {@code expose-proxy} attribute as found on AOP-related XML tags.
     */
    private static final String EXPOSE_PROXY_ATTRIBUTE = "expose-proxy";


    public static void registerAutoProxyCreatorIfNecessary(
            ParserContext parserContext, Element sourceElement) {

        BeanDefinition beanDefinition = AopConfigUtils.registerAutoProxyCreatorIfNecessary(
                parserContext.getRegistry(), parserContext.extractSource(sourceElement));
        useClassProxyingIfNecessary(parserContext.getRegistry(), sourceElement);
        registerComponentIfNecessary(beanDefinition, parserContext);
    }

    public static void registerAspectJAutoProxyCreatorIfNecessary(
            ParserContext parserContext, Element sourceElement) {

        BeanDefinition beanDefinition = AopConfigUtils.registerAspectJAutoProxyCreatorIfNecessary(
                parserContext.getRegistry(), parserContext.extractSource(sourceElement));
        useClassProxyingIfNecessary(parserContext.getRegistry(), sourceElement);
        registerComponentIfNecessary(beanDefinition, parserContext);
    }

    public static void registerAspectJAnnotationAutoProxyCreatorIfNecessary(
            ParserContext parserContext, Element sourceElement) {

        BeanDefinition beanDefinition = AopConfigUtils.registerAspectJAnnotationAutoProxyCreatorIfNecessary(
                parserContext.getRegistry(), parserContext.extractSource(sourceElement));
        //对于proxy-target-class以及expose--proxy属性的处理
        useClassProxyingIfNecessary(parserContext.getRegistry(), sourceElement);
        //注册组件并通知,便于监听器做进一步的处理
        //其中beanDefinition的className为AnnotationAwareAspectJAutoProxyCreator
        registerComponentIfNecessary(beanDefinition, parserContext);
    }

    private static void useClassProxyingIfNecessary(BeanDefinitionRegistry registry, Element sourceElement) {
        if (sourceElement != null) {
            boolean proxyTargetClass = Boolean.valueOf(sourceElement.getAttribute(PROXY_TARGET_CLASS_ATTRIBUTE));
            if (proxyTargetClass) {
                AopConfigUtils.forceAutoProxyCreatorToUseClassProxying(registry);
            }
            boolean exposeProxy = Boolean.valueOf(sourceElement.getAttribute(EXPOSE_PROXY_ATTRIBUTE));
            if (exposeProxy) {
                AopConfigUtils.forceAutoProxyCreatorToExposeProxy(registry);
            }
        }
    }

    private static void registerComponentIfNecessary(BeanDefinition beanDefinition, ParserContext parserContext) {
        if (beanDefinition != null) {
            BeanComponentDefinition componentDefinition =
                    new BeanComponentDefinition(beanDefinition, AopConfigUtils.AUTO_PROXY_CREATOR_BEAN_NAME);
            parserContext.registerComponent(componentDefinition);
        }
    }

}
在registerAspectJAnnotationAutoProxyCreatorIfNecessary方法中主要完成了3件事情,基本上每行代码就是一个完整的逻辑。
1. 注册或升级AnnotationAwareAspectJAutoProxyCreator
对于AOP的实现,基本上都是靠AnnotationAwareAspectJAutoProxyCreator去完成,它可以根据@Point注解定义的切点来自动代理相匹配的bean。
2. 处理proxy-target-class以及expose-proxy属性
JDK动态代理:其代理对象必须是某个接口的实现,它是通过在运行期间创建一个接口的实现类来完成对目标对象的代理。
CGLIB代理:实现原理类似于JDK动态代理,只是它再运气期间生成的代理对象是针对目标类扩展的子类。CGLIB是高效的代码生成包,底层是依靠ASM(开源的Java字节码编辑类库)操作字节码实现的,性能比JDK强。
注意:如果累实现了某个接口,默认使用JDK代理。
3.注册组件并通知,便于监听器做进一步的处理。
下面是AnnotationAwareAspectJAutoProxyCreator 的类图关系
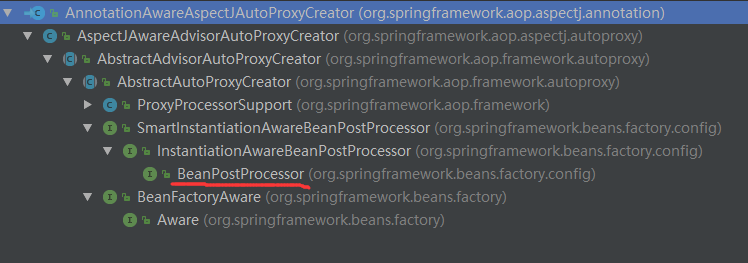
在类的层级中,我们看到AnnotationAwareAspectJAutoProxyCreator实现了BeanPostProcessor接口,而实现BeanPostProcessor后,当Spring加载这个Bean的时候会在实例化前调用postProcessAfterInitialization方法。
在父类AbstractAutoProxyCreator的postProcessAfterInitialization实现
/**
     * Create a proxy with the configured interceptors if the bean is
     * identified as one to proxy by the subclass.
     * @see #getAdvicesAndAdvisorsForBean
     */
    @Override
    public Object postProcessAfterInitialization(Object bean, String beanName) throws BeansException {
        if (bean != null) {
            Object cacheKey = getCacheKey(bean.getClass(), beanName);
            if (!this.earlyProxyReferences.contains(cacheKey)) {
                return wrapIfNecessary(bean, beanName, cacheKey);
            }
        }
        return bean;
    }


    /**
     * Build a cache key for the given bean class and bean name.
     * <p>Note: As of 4.2.3, this implementation does not return a concatenated
     * class/name String anymore but rather the most efficient cache key possible:
     * a plain bean name, prepended with {@link BeanFactory#FACTORY_BEAN_PREFIX}
     * in case of a {@code FactoryBean}; or if no bean name specified, then the
     * given bean {@code Class} as-is.
     * @param beanClass the bean class
     * @param beanName the bean name
     * @return the cache key for the given class and name
     */
    protected Object getCacheKey(Class<?> beanClass, String beanName) {
        if (StringUtils.hasLength(beanName)) {
            return (FactoryBean.class.isAssignableFrom(beanClass) ?
                    BeanFactory.FACTORY_BEAN_PREFIX + beanName : beanName);
        }
        else {
            return beanClass;
        }
    }

    /**
     * Wrap the given bean if necessary, i.e. if it is eligible for being proxied.
     * @param bean the raw bean instance
     * @param beanName the name of the bean
     * @param cacheKey the cache key for metadata access
     * @return a proxy wrapping the bean, or the raw bean instance as-is
     */
    protected Object wrapIfNecessary(Object bean, String beanName, Object cacheKey) {
        if (beanName != null && this.targetSourcedBeans.contains(beanName)) {
            return bean;
        }
        if (Boolean.FALSE.equals(this.advisedBeans.get(cacheKey))) {
            return bean;
        }
        if (isInfrastructureClass(bean.getClass()) || shouldSkip(bean.getClass(), beanName)) {
            this.advisedBeans.put(cacheKey, Boolean.FALSE);
            return bean;
        }

        // Create proxy if we have advice.
        Object[] specificInterceptors = getAdvicesAndAdvisorsForBean(bean.getClass(), beanName, null);
        if (specificInterceptors != DO_NOT_PROXY) {
            this.advisedBeans.put(cacheKey, Boolean.TRUE);
            Object proxy = createProxy(
                    bean.getClass(), beanName, specificInterceptors, new SingletonTargetSource(bean));
            this.proxyTypes.put(cacheKey, proxy.getClass());
            return proxy;
        }

        this.advisedBeans.put(cacheKey, Boolean.FALSE);
        return bean;
    }
从此函数中我们已经看到了代理创建的基本步骤。当然,在真正开始之前还需要经过一些判断,比如是否已经处理过或者是否是需要跳过的bean,而真正创建代理的代码是从getAdvicesAndAdvisorsForBean开始的。创建代理主要包含了两个步骤:
(1)获取增强方法或者增强器
(2)根据获取的增强进行代理
具体的获取和创建代码请查看相关源码,这里就不详细讲解了。