一.安装webpack-cli,webpack@4.26.1
1.npm install webpack-cli -D
2.npm install webpack@4.26.1 -D
二.踩坑
执行npm run dev报错
1./Users/lily/ForWork/forBMSys/bm-fe/node_modules/html-webpack-plugin/lib/compiler.js:81
var outputName = compilation.mainTemplate.applyPluginsWaterfall('asset-path', outputOptions.filename, {
^
TypeError: compilation.mainTemplate.applyPluginsWaterfall is not a function
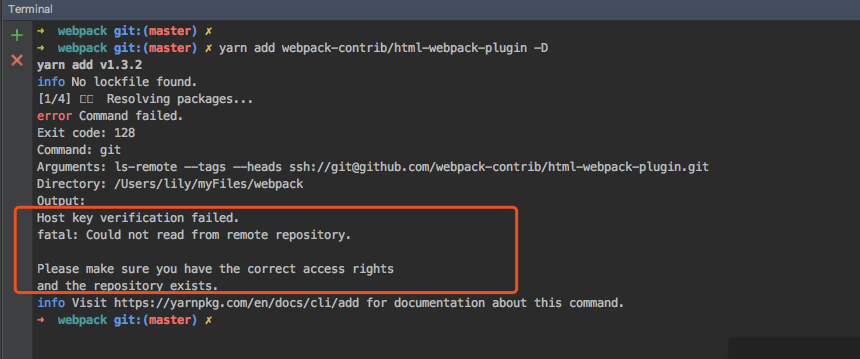
解决方案:1).npm install webpack-contrib/html-webpack-plugin -D 网上大多数是这个答案,但是我这里执行不通,每次都报错。暂时没有找到原因。
2).npm i -–save-dev html-webpack-plugin@next
2./Users/lily/ForWork/forBMSys/bm-fe/node_modules/webpack/lib/webpack.js:185
throw new RemovedPluginError(errorMessage);
^
Error: webpack.optimize.UglifyJsPlugin has been removed, please use config.optimization.minimize instead.
解决方案:
npm install --save-dev uglifyjs-webpack-plugin
webpack.dev.conf.js配置
var UglifyJsPlugin = require('uglifyjs-webpack-plugin')
optimization: {
  minimizer: [
    new UglifyJsPlugin({
      exclude: /.min.js$/,
      cache: true,
      parallel: true, // 开启并行压缩,充分利用cpu
      sourceMap: false,
      extractComments: false, // 移除注释
      uglifyOptions: {
        compress: false
      }
    })
  ]
}
3./Users/lily/ForWork/forBMSys/bm-fe/node_modules/webpack/lib/webpack.js:185
throw new RemovedPluginError(errorMessage);
^
Error: webpack.optimize.CommonsChunkPlugin has been removed, please use config.optimization.splitChunks instead.
解决方案:
注释掉CommonsChunkPlugin,webpack4自带代码分割功能,如果想要覆盖默认设置,可以添加:
optimization: {
  splitChunks: {
    cacheGroups: {
      commons: {  // 抽离自己写的公共代码
        chunks: "async",  // async针对异步加载的chunk做切割,initial针对初始chunk,all针对所有chunk。
        name: "common", // 打包后的文件名,任意命名
        minChunks: 2,//最小引用2次
        minSize: 30000 // 只要超出30000字节就生成一个新包
      },
      vendor: {   // 抽离第三方插件
        test: /[\/]node_modules[\/]/, // 指定是node_modules下的第三方包
        chunks: 'initial',
        name: 'vendor',  // 打包后的文件名,任意命名
        priority: 10 // 设置优先级,防止和自定义的公共代码提取时被覆盖,不进行打包
      },
    }
  },
  // runtimeChunk: true     // 持久缓存moduleID,ChunkID需要HashedModuleIdsPlugin等插件解决
},
注意:同时去掉 extract-text-webpack-plugin 插件的使用
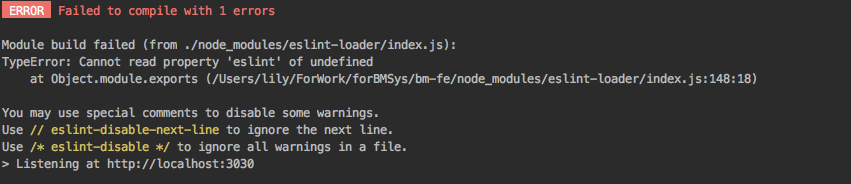
4.cannot read property 'eslint' of undefined
解决方案:
1)网上查了很多,都让使用LoaderOptionsPlugin方案,但是我这边添加之后,并没有任何效果依然报错
plugins: [new webpack.LoaderOptionsPlugin({ options: {} }),],
2)升级eslint-loader,升级 eslint-loader to ^2.0.0. 于是有了第5个错
5.ERROR in ./src/index.js
Module build failed (from ./node_modules/eslint-loader/index.js):
Error: eslint-plugin-html error: It seems that eslint is not loaded. If you think it is a bug, please file a report at https://github.com/BenoitZugmeyer/eslint-plugin-html/issues
解决方案:
eslint4只支持eslint-plugin-html V3 ,把eslint-plugin-html升级即可解决
https://github.com/BenoitZugmeyer/eslint-plugin-html/issues/60
6.ERROR in ./src/components/views/remote-dispatch/remote-car-sku-options/view/RemoteCarSkuOptionsCreate.vue?vue&type=style&index=0&id=a8deb48e&lang=scss&scoped=true& (./node_modules/vue-loader/lib??vue-loader-options!./src/components/views/remote-dispatch/remote-car-sku-options/view/RemoteCarSkuOptionsCreate.vue?vue&type=style&index=0&id=a8deb48e&lang=scss&scoped=true&) 99:0
Module parse failed: Unexpected token (99:0)
You may need an appropriate loader to handle this file type.
|
|
> .remote {
| padding: 20px;
| margin-top: 25px;
解决方案:
添加了file-loader就可以了
需要注意的是 MiniCssExtractPlugin.loader 和 style-loader 由于某种原因不能共存。
7.代码运行的时候,报错,
error in ./src/components/views/workbench/designated-driving/view-customer/task-check/task-check.vue?vue&type=style&index=0&lang=css&
Syntax Error: NonErrorEmittedError: (Emitted value instead of an instance of Error) CssSyntaxError: /Users/lily/ForWork/forBMSys/bm-fe/src/components/views/workbench/designated-driving/view-customer/task-check/task-check.vue:1:1: Unknown word
> 1 | exports = module.exports = require("../../../../../../../node_modules/css-loader/lib/css-base.js")();
| ^
2 | // imports
3 |
@ ./node_modules/vue-style-loader!./node_modules/css-loader!./node_modules/vue-loader/lib/loaders/stylePostLoader.js!./node_modules/css-loader??ref--8-1!./node_modules/vue-loader/lib??vue-loader-options!./src/components/views/workbench/designated-driving/view-customer/task-check/task-check.vue?vue&type=style&index=0&lang=css& 4:14-348 13:3-17:5 14:22-356
网上查的资料,大概两种解决方案,1.css-loader,style-loader顺序错误 2.删除css,less配置 第一种已排除,实行第二种,可行。但是build的时候又会报第6个(上一条)错误
8.Error: Plugin could not be registered at 'html-webpack-plugin-after-emit'. Hook was not found.
BREAKING CHANGE: There need to exist a hook at 'this.hooks'. To create a compatibility layer for this hook, hook into 'this._pluginCompat'.
at Compilation.plugin (/Users/lily/ForWork/forBMSys/bm-fe/node_modules/tapable/lib/Tapable.js:69:9)
at Compilation.deprecated [as plugin] (internal/util.js:53:15)
at /Users/lily/ForWork/forBMSys/bm-fe/build/dev-server.js:38:15
解决方案:
场景:项目运行起来后,一旦做出更改,保存后,便会报出该错
原因:这个错误是html-webpack-plugin和webpack4兼容问题导致,更改html-webpack-plugin版本即可,3.0.4,3.0.6都可以,排除2.28.0,3.2.0,其他版本还没有尝试
---------webpack升级完成之后的分割线-----------
9.这是webpack升级为4.0之后,项目迭代需求时遇到的问题
node_modules/html-webpack-plugin/node_modules/toposort/index.js:29
throw new Error('Cyclic dependency: '+JSON.stringify(node))
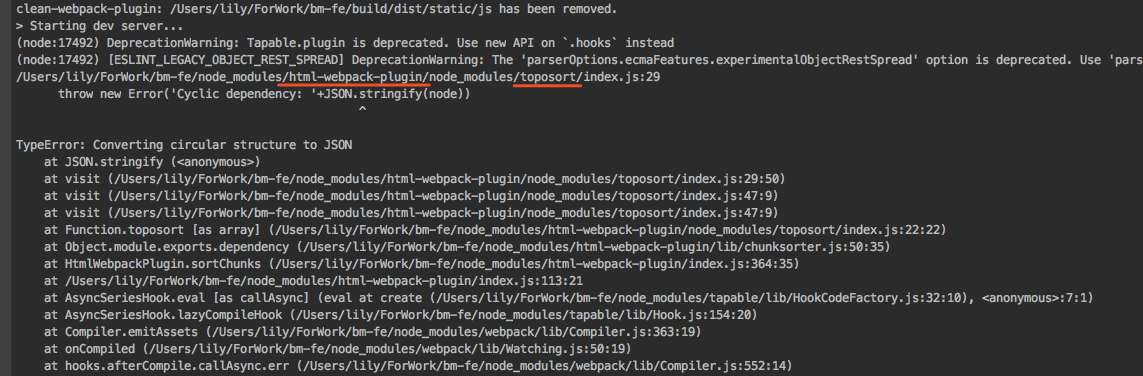
google上查都说是html-webpack-plugin的issue,参考 https://github.com/jantimon/html-webpack-plugin/issues/870 ,
更新html-webpack-plugin版本 以及安装toposort 1.0.4版本 更新完之后貌似还是报错
后来在百度上查到一篇 说是webpack4打包vue2的bug https://blog.csdn.net/alanfancy/article/details/84023940
这才发现,原来是我webpack本地配置的HtmlWebpackPlugin没有设置chunksSortMode: 'none' 至此问题解决
三.优化
1.html-webpack-plugin
npm i --save-dev html-webpack-plugin@next
plugins:[
new HtmlWebpackPlugin({
  filename: process.env.NODE_ENV === 'testing'
    ? 'index.html'
    : config.build.index,
  template: 'index.html',
  inject: true,
  minify: {
    removeComments: true,
    collapseWhitespace: true,
    removeAttributeQuotes: true
    // more options:
    // https://github.com/kangax/html-minifier#options-quick-reference
  },
  // necessary to consistently work with multiple chunks via CommonsChunkPlugin
  chunksSortMode: 'none'
}),
]
2.mini-css-extract-plugin 拆分css
它与extract-text-webpack-plugin最大的区别是:它在code spliting的时候会将原先内联写在每一个 js chunk bundle的 css,单独拆成了一个个 css 文件
rules: [
  {
    test: /.css$/,
    use: [
      process.env.NODE_ENV !== 'production'
        ? 'vue-style-loader'
        : MiniCssExtractPlugin.loader,
      'css-loader'
    ]
  },
  {
    test: /.less$/,
    use: [
      process.env.NODE_ENV !== 'production'
        ? 'vue-style-loader'
        : MiniCssExtractPlugin.loader,
      'css-loader',
      'less-loader'
    ]
  },
...
]
3.optimize-css-assets-webpack-plugin 压缩css 优化代码
optimization: {
  minimizer: [new OptimizeCSSAssetsPlugin()];
}
4.热更新速度 babel-plugin-dynamic-import-node
 1)首先在package.json中增加BABEL_ENV
"dev": "BABEL_ENV=development webpack-dev-server XXXX" 2)在.babelrc只能加入babel-plugin-dynamic-import-node这个plugins,并让它只有在development模式中才生效。
  {
    "env": {
      “development": {
        "plugins": ["dynamic-import-node"]
      }
    }
  }
5.清除每次编译后dist目录重复文件 clean-webpack-plugin
const CleanWebpackPlugin = require('clean-webpack-plugin');
plugins:[ new CleanWebpackPlugin(['dist']),//实例化,参数为目录]
6.代码分割splitChunks
optimization: {
  splitChunks: {
    cacheGroups: {
      elementUI: {
        name: "chunk-elementUI", // 单独将 elementUI 拆包
        priority: 20, // 权重要大于 libs 和 app 不然会被打包进 libs 或者 app
        test: /[\/]node_modules[\/]element-ui[\/]/
      },
      libs: {
        name: "chunk-libs",
        test: /[\/]node_modules[\/]/,
        priority: 10,
        chunks: "initial" // 只打包初始时依赖的第三方
      },
      commons: {  // 抽离自己写的公共代码
        chunks: "async",  // async针对异步加载的chunk做切割,initial针对初始chunk,all针对所有chunk。
        name: "common", // 打包后的文件名,任意命名
        test: /[\/]src[\/]components[\/]pages/,
        minChunks: 3,//最小引用2次
        minSize: 30000 // 只要超出30000字节就生成一个新包
      },
    }
  },
  runtimeChunk: {
    name: "manifest"
  },
  minimizer: [new OptimizeCSSAssetsPlugin()]
}
7.externals分离第三方库,cdn引入第三方资源
1)index.html中,引入第三方类库 如:<script src="//cdn.bootcss.com/echarts/4.1.0/echarts.min.js"></script>
2) webpack.conf.js中配置externals 如
module.exports = {
  ...
  externals:{echarts: 'echarts'}
  ...
}
8.lodash按需加载
踩坑继续中,如果有人看到,欢迎随时交流----