最近在写一个关于音乐播放的应用,写到播放界面UI时,就想自己实现的一个播放界面。那么如何实现自定义View呢?通过查看他人博客和Android官方开发文档,初步了解了一些浅显的内容。在此记录,已供需要的朋友参考。
自定义视图的官方参考文档:http://developer.android.com/training/custom-views/create-view.html
当我们使用XML布局文件进行UI编写时,通过增加xml tag我们可以加入自己想要的任何view组件,例如下面的布局文件(只是个例子,删除了其他不重要布局元素):
1 <?xml version="1.0" encoding="utf-8"?>
2 <RelativeLayout xmlns:android="http://schemas.android.com/apk/res/android"
3     android:layout_width="match_parent"
4     android:layout_height="match_parent">
5     <TextView
6         android:layout_width="match_parent"
7         android:layout_height="match_parent" />
8 </RelativeLayout>
用过<RelativeLayout 引入RelativeLayout,通过<TextView引入TextView。然后在对应便签了加入了各种属性(如:android:layout_width、android:layout_heignt),编译程序在编译时会解析xml文件,把对应的tag生成相应的view对象。
那么自己定义的view如何通过上面那种方式使用呢?这就要说到xmlns(XML namespace)了。了解XML的朋友都知道,XML为了传输数据设计的可拓展标记语言,它不同于HTML有预定义的各种便签,它的便签是用户自定义的。在哪定义呢?xmlns!
不知道你注意到没,我们的布局文件中总是用这样一行代码:
xmlns:android="http://schemas.android.com/apk/res/android"
这就是引入命名空间。更过关于XML知识,请查看:XML介绍。简单来说通过在顶级tag中引入命名空间,整个个xml都可以用命名空间中定义的内容了,如android:id等。那么怎么为我们的自己写的view添加命名空间呢?
下面我们来创建自己的命名空间文件:首先在res->values目录下新建attrs资源文件,如下图:

在attrs中定义里需要表述的属性:
1 <?xml version="1.0" encoding="utf-8"?>
2 <resources>
3     <declare-styleable name="Circle">
4         <attr name="radius" format="dimension"/>
5         <attr name="background_color" format="color"/>
6     </declare-styleable>
7 </resources>
其中declare-styeable节点的name属性值一般是你写的view的名字,如这里我自己写的view叫Cirecle。接下来定义可以在xml中定义的组件属性,这里可以指定两个,radius和background。其中format属性指定可接受值的类型,多个类型用“|”分隔。
更多关于怎么写attrs可以参考Android sdk目录下的platformsandroid-xxxdata esvaluesattrs.xml文件,哪里为自带的所有空间声明了命名空间。
写好的命名空间如何使用呢?下面给出布局文件:
 1 <?xml version="1.0" encoding="utf-8"?>
 2 <RelativeLayout xmlns:android="http://schemas.android.com/apk/res/android"
 3     xmlns:custom="http://schemas.android.com/apk/res-auto"
 4     xmlns:tools="http://schemas.android.com/tools"
 5     android:layout_width="match_parent"
 6     android:layout_height="match_parent"
 7     android:paddingBottom="@dimen/activity_vertical_margin"
 8     android:paddingLeft="@dimen/activity_horizontal_margin"
 9     android:paddingRight="@dimen/activity_horizontal_margin"
10     android:paddingTop="@dimen/activity_vertical_margin"
11     tools:context="com.github.fallblank.myapplication.MainActivity">
12     <!--引入自定义View,并设置属性-->
13     <com.github.fallblank.myapplication.Circle
14         android:id="@+id/circle"
15         android:layout_width="wrap_content"
16         android:layout_height="wrap_content"
17         custom:background_color="#ff0000"
18         custom:radius="100dp" />
19   <!--下面两个按钮是为了改变View使其重绘-->
20     <Button
21         android:id="@+id/btn_larger"
22         android:layout_width="wrap_content"
23         android:layout_height="wrap_content"
24         android:layout_alignParentBottom="true"
25         android:text="Larger" />
26
27     <Button
28         android:id="@+id/btn_smaller"
29         android:layout_width="wrap_content"
30         android:layout_height="wrap_content"
31         android:layout_toRightOf="@id/btn_larger"
32         android:layout_alignParentBottom="true"
33         android:text="Smaller" />
34 </RelativeLayout>
注意这行代码:
xmlns:custom="http://schemas.android.com/apk/res-auto"
这里就是引入自定义的命名空间,有了这行代码后面就可以使用我们之前定义的内容custom:radius和custom:backgroud_color了。需要注意的是这里引入的方式适合于gradle编译,对应ant编译,xmlns定义如下:
xmlns:custom="http://schemas.android.com/apk/res/自定义view的包名
接下来就是如何获取在xml指定属性的值了,下面给出自定义view的代码:
 1 package com.github.fallblank.myapplication;
 2
 3 import android.content.Context;
 4 import android.content.res.TypedArray;
 5 import android.graphics.Canvas;
 6 import android.graphics.Paint;
 7 import android.util.AttributeSet;
 8 import android.view.View;
 9 import android.widget.Toast;
10
11 /**
12  * Created by fallb on 2015/11/24.
13  */
14 public class Circle extends View {
15
16     private int mColor;
17     private Context mContext;
18     private float mRadius;
19
20     public Circle(Context context, AttributeSet attrs) {
21         super(context, attrs);
22         mContext = context;
23         TypedArray a = context.getTheme().obtainStyledAttributes(attrs,R.styleable.Circle,0,0);
24         try {
25             //
26             mColor = a.getColor(R.styleable.Circle_line_color,0x000000);
27             mRadius = a.getDimension(R.styleable.Circle_side,16);
28         }finally {
29             a.recycle();
30         }
31     }
32
33     public void addSide() {
34         mRadius+=5.0;
35         invalidate();
36         requestLayout();
37     }
38
39     public void subSide(){
40         if (mRadius>=5.0){
41             mRadius-=5.0;
42             invalidate();
43             requestLayout();
44         }else {
45             Toast.makeText(mContext,"smaller enough!",Toast.LENGTH_LONG).show();
46         }
47     }
48
49     @Override
50     protected void onDraw(Canvas canvas) {
51         super.onDraw(canvas);
52         Paint paint = new Paint();
53         paint.setColor(mColor);
54         canvas.drawCircle(0,0,mRadius,paint);
55     }
56 }
上面标红的代码就是获取定义在xml中的属性的方法(为什么不用AttributeSet直接获取属性?官方文档有介绍,需要了解的朋友可以去看看)
获取到属性后就是实现自己的绘图方法,重载onDraw()实现绘制。对应怎么使用Pait、canvas,我会在后面介绍。
说了这么多,来总结一下。
- 自定义视图为了能在xml布局文件中同Android定义视图一样使用,需要创建attrs布局文件。
- 在View实现代码中通过上面的方式获取定义在xml中的属性,然后实现绘制。
- xml布局文件为了能使用自定义view需要引入用户定义的命名空间。
为了不空放嘴炮,最后给出效果图和代码:
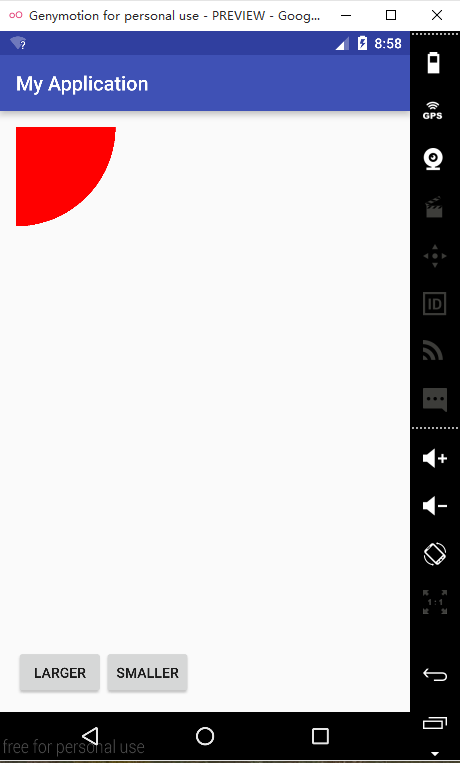

样例代码:https://github.com/fallblank/CustomView
现在遇到一个疑问:我定义的View在xml中的默认大小是充满这个父控件,指定宽度为wrap_content也没用。应该是哪里没设置,知道的朋友请告之!小弟大榭!
仅此抛砖引玉!