1.Web API
Web API是网站的一部分,用于与使用非常具体的URL请求特定信息的程序交互,这种请求称为API调用。
请求的数据将以易于处理的格式(如JSON或CSV)返回,依赖于外部数据的大多数程序都依赖于API调用,如集成社交媒体网站的应用程序。
在浏览器中输入如下地址并按回车:
https://api.github.com/search/repositories?q=language:python&sort=stars
下面显示了响应的前几行:
{
  "total_count": 2639356,
  "incomplete_results": false,
  "items": [
    {
      "id": 21289110,
      "name": "awesome-python",
      "full_name": "vinta/awesome-python",
      --snip--
可知GitHub共有2639356个Python项目,"incomplete_results"的值为false,据此我们知道请求是成功的。
2.处理API响应&概述最受欢迎仓库
import requests

url='https://api.github.com/search/repositories?q=language:python&sort=stars'
r=requests.get(url)
print("Status code:",r.status_code)

response_dict=r.json()
print("Total repositories:",response_dict['total_count'])

repo_dicts=response_dict['items']
print("Repositories returned:",len(repo_dicts))

print("Selected information about each repository:")
for repo_dict in repo_dicts:
    print('
Name:',repo_dict['name'])
    print('Owner:',repo_dict['owner']['login'])
    print('Stars:',repo_dict['stargazers_count'])
    print('Repository:',repo_dict['html_url'])
    print('Created:',repo_dict['created_at'])
    print('Description:',repo_dict['description'])
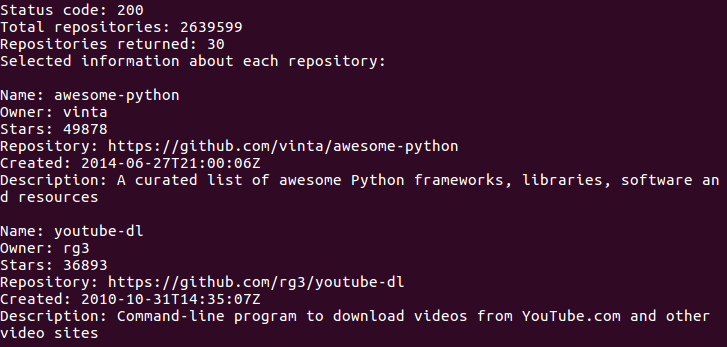
状态码200表示请求成功,循环调用每个仓库的特定信息,以便能够在可视化中包含这些信息。
3.监视API的速率限制
https://api.github.com/rate_limit
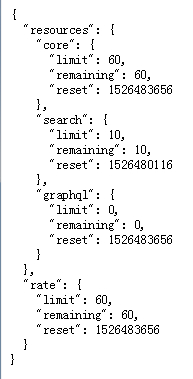
可知极限为执行10个请求,我们还可以执行8个请求,如果获得API密钥后,配额将高得多。
4.可视化呈现GitHub上Python项目受欢迎程度
import requests
import pygal
from pygal.style import LightColorizedStyle as LCS,LightenStyle as LS

url='https://api.github.com/search/repositories?q=language:python&sort=stars'
r=requests.get(url)
print("Status code:",r.status_code)

response_dict=r.json()
print("Total repositories:",response_dict['total_count'])

repo_dicts=response_dict['items']

names,stars=[],[]
for repo_dict in repo_dicts:
    names.append(repo_dict['name'])
    stars.append(repo_dict['stargazers_count'])

my_style=LS('#333366',base_style=LCS)
chart=pygal.Bar(style=my_style,x_label_rotation=45,show_legend=False)
chart.title='Most-Starred Python Projects on GitHub'
chart.x_labels=names

chart.add('',stars)
chart.render_to_file('python_repos.svg')
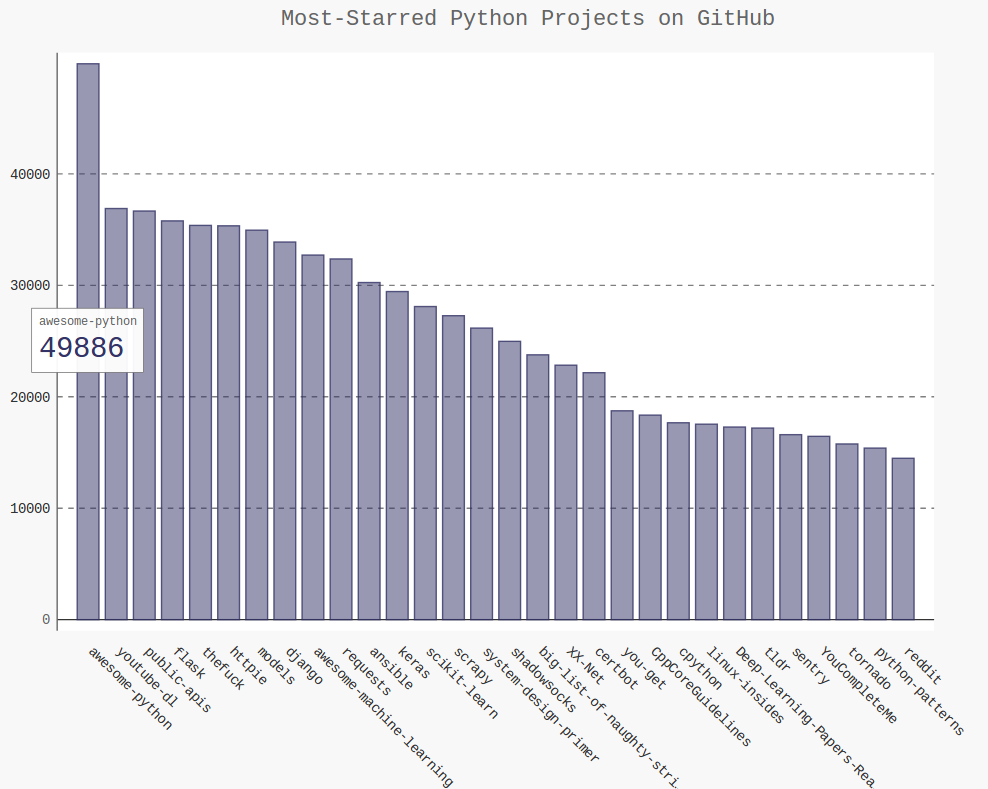
这里传递了另外两个样式实参:让标签绕x轴旋转45度,并隐藏了图例(标深蓝色的小方块)
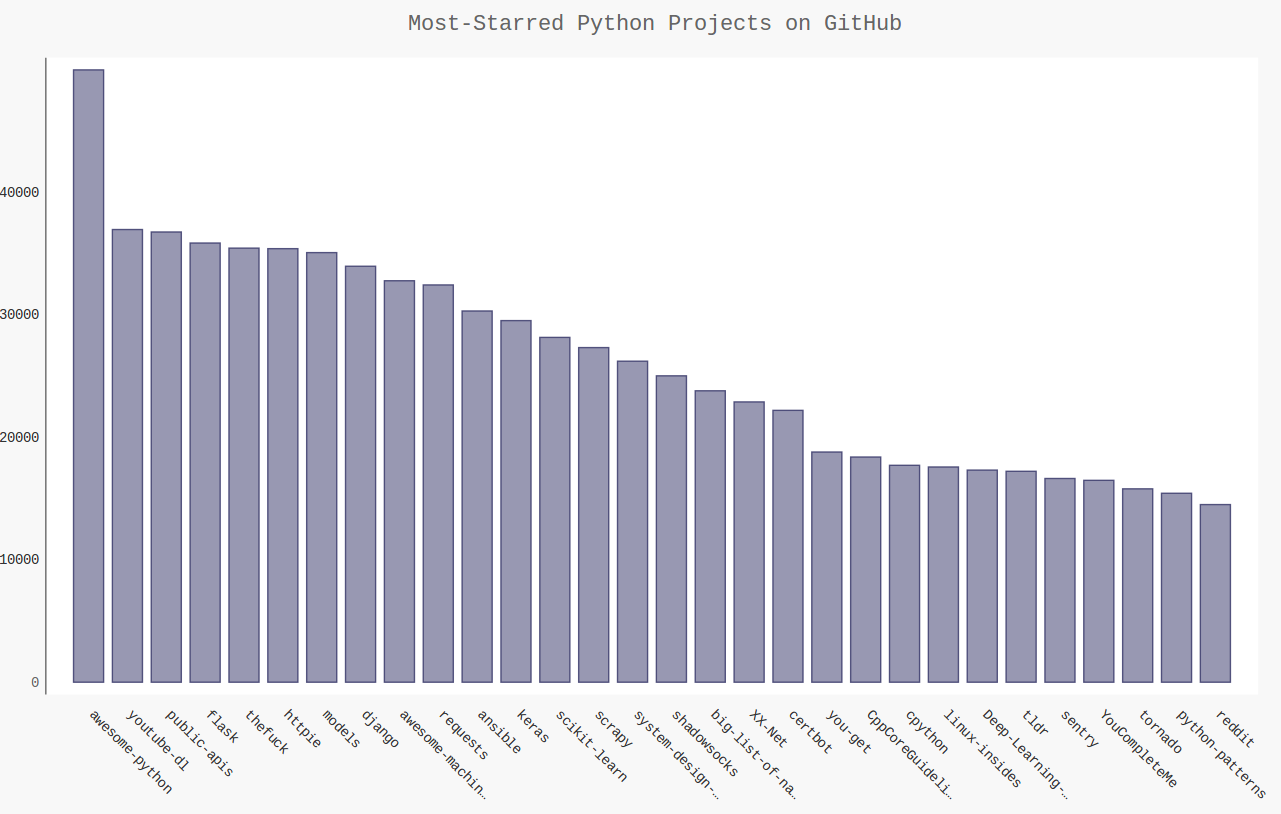
5.改进Pygal图表
(1)创建一个Pygal类Config的实例,并将其命名为my_config,通过修改其属性,可定制图表的外观。在创建Bar实例时,将my_config作为第一个实参,从而通过一个实参传递所有的配置设置。
(2)创建自定义工具提示(鼠标指向条形将显示它表示的信息),创建一个字典plot_dict,使用键'value'存储了星数,使用键‘label’存储了项目描述,使用键‘xlink’来关联相应页面的链接。
import requests
import pygal
from pygal.style import LightColorizedStyle as LCS,LightenStyle as LS

url='https://api.github.com/search/repositories?q=language:python&sort=stars'
r=requests.get(url)
print("Status code:",r.status_code)

response_dict=r.json()
print("Total repositories:",response_dict['total_count'])

repo_dicts=response_dict['items']

names,plot_dicts=[],[]
for repo_dict in repo_dicts:
    names.append(repo_dict['name'])
    plot_dict={
        'value':repo_dict['stargazers_count'],
        'label':str(repo_dict['description']),
        'xlink':repo_dict['html_url'],
        }
    plot_dicts.append(plot_dict)

my_style=LS('#333366',base_style=LCS)

my_config=pygal.Config()
my_config.x_label_rotation=45
my_config.show_legend=False
my_config.title_font_size=24
my_config.label_font_size=14
my_config.major_label_font=18
my_config.truncate_label=15
my_config.show_y_guides=False
my_config.width=1000

chart=pygal.Bar(my_config,style=my_style)
chart.title='Most-Starred Python Projects on GitHub'
chart.x_labels=names

chart.add('',plot_dicts)
chart.render_to_file('python_repos.svg')

6.Hacker News API
url链接失效,但通过这段代码可以窥见使用任何API来访问和分析信息的一般流程:
import requests

from operator import itemgetter

# Make an API call, and store the response.
url = 'https://hacker-news.firebaseio.com/v0/topstories.json'
r = requests.get(url)
print("Status code:", r.status_code)

# Process information about each submission.
submission_ids = r.json()
submission_dicts = []
for submission_id in submission_ids[:30]:
    # Make a separate API call for each submission.
    url = ('https://hacker-news.firebaseio.com/v0/item/' +
            str(submission_id) + '.json')
    submission_r = requests.get(url)
    print(submission_r.status_code)
    response_dict = submission_r.json()

    submission_dict = {
        'title': response_dict['title'],
        'link': 'http://news.ycombinator.com/item?id=' + str(submission_id),
        'comments': response_dict.get('descendants', 0)
        }
    submission_dicts.append(submission_dict)

submission_dicts = sorted(submission_dicts, key=itemgetter('comments'),
                            reverse=True)

for submission_dict in submission_dicts:
    print("
Title:", submission_dict['title'])
    print("Discussion link:", submission_dict['link'])
    print("Comments:", submission_dict['comments'])