1.水平分表
前面已经介绍过,水平分表是在同一个数据库内,把同一个表的数据按一定规则拆到多个表中。在快速入门里,我们已经对水平分库进行实现,这里不再重复介绍。
2.水平分库
前面已经介绍过,水平分库是把同一个表的数据按一定规则拆到不同的数据库中,每个库可以放在不同的服务器上。接下来看一下如何使用Sharding-JDBC实现水平分库,咱们继续对快速入门中的例子进行完善。
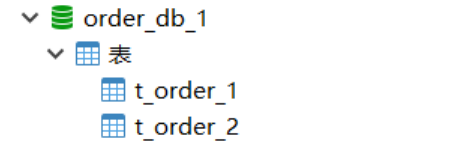
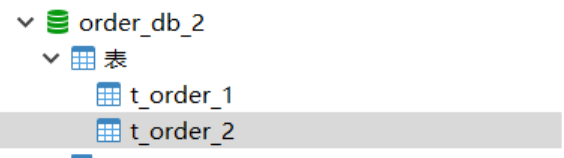
(1)将原有order_db库拆分为order_db_1、order_db_2
(2)分片规则修改
由于数据库拆分了两个,这里需要配置两个数据源。
分库需要配置分库的策略,和分表策略的意义类似,通过分库策略实现数据操作针对分库的数据库进行操作。
##水平分库分表
#sharding-jdbc分片规则配置
#数据源
spring.shardingsphere.datasource.names = m1,m2

spring.shardingsphere.datasource.m1.type = com.alibaba.druid.pool.DruidDataSource
spring.shardingsphere.datasource.m1.driver-class-name = com.mysql.jdbc.Driver
spring.shardingsphere.datasource.m1.url = jdbc:mysql://localhost:3306/order_db_1?useUnicode=true
spring.shardingsphere.datasource.m1.username = root
spring.shardingsphere.datasource.m1.password = root

spring.shardingsphere.datasource.m2.type = com.alibaba.druid.pool.DruidDataSource
spring.shardingsphere.datasource.m2.driver-class-name = com.mysql.jdbc.Driver
spring.shardingsphere.datasource.m2.url = jdbc:mysql://localhost:3306/order_db_2?useUnicode=true
spring.shardingsphere.datasource.m2.username = root
spring.shardingsphere.datasource.m2.password = root

#?分库策略,以user_id为分片键,分片策略为user_id?%?2?+?1,user_id为偶数操作m1数据源,否则操作m2
spring.shardingsphere.sharding.tables.t_order.database-strategy.inline.sharding-column = user_id
spring.shardingsphere.sharding.tables.t_order.database-strategy.inline.algorithm-expression = m$->{user_id % 2 + 1}

# 指定t_order表的数据分布情况,配置数据节点 m1.t_order_1,m1.t_order_2,m2.t_order_1,m2.t_order_2
spring.shardingsphere.sharding.tables.t_order.actual-data-nodes = m$->{1..2}.t_order_$->{1..2}

# 指定t_order表的主键生成策略为SNOWFLAKE
spring.shardingsphere.sharding.tables.t_order.key-generator.column=order_id
spring.shardingsphere.sharding.tables.t_order.key-generator.type=SNOWFLAKE

# 指定t_order表的分片策略,分片策略包括分片键和分片算法
spring.shardingsphere.sharding.tables.t_order.table-strategy.inline.sharding-column = order_id
spring.shardingsphere.sharding.tables.t_order.table-strategy.inline.algorithm-expression = t_order_$->{order_id % 2 + 1}

# 打开sql输出日志
spring.shardingsphere.props.sql.show = true
分库策略定义方式如下:
#分库策略,如何将一个逻辑表映射到多个数据源
spring.shardingsphere.sharding.tables.<逻辑表名称>.database‐strategy.<分片策略>.<分片策略属性名>= #分片策略属性值

#分表策略,如何将一个逻辑表映射为多个实际表
spring.shardingsphere.sharding.tables.<逻辑表名称>.table‐strategy.<分片策略>.<分片策略属性名>= #分片策略属性值
Sharding-JDBC支持以下几种分片策略:
不管理分库还是分表,策略基本一样。
- standard :标准分片策略,对应StandardShardingStrategy。提供对SQL语句中的=, IN和BETWEEN AND的分片操作支持。StandardShardingStrategy只支持单分片键,提供PreciseShardingAlgorithm和RangeShardingAlgorithm两个分片算法。PreciseShardingAlgorithm是必选的,用于处理=和IN的分片。RangeShardingAlgorithm是可选的,用于处理BETWEEN AND分片,如果不配置RangeShardingAlgorithm,SQL中的BETWEEN AND将按照全库路由处理。
- complex :符合分片策略,对应ComplexShardingStrategy。复合分片策略。提供对SQL语句中的=, IN和BETWEEN AND的分片操作支持。ComplexShardingStrategy支持多分片键,由于多分片键之间的关系复杂,因此并未进行过多的封装,而是直接将分片键值组合以及分片操作符透传至分片算法,完全由应用开发
者实现,提供最大的灵活度。 - inline :行表达式分片策略,对应InlineShardingStrategy。使用Groovy的表达式,提供对SQL语句中的=和IN的分片操作支持,只支持单分片键。对于简单的分片算法,可以通过简单的配置使用,从而避免繁琐的Java代码开发,如: t_user_$ ->{u_id % 8} 表示t_user表根据u_id模8,而分成8张表,表名称为 t_user_0 到t_user_7 。
- hint :Hint分片策略,对应HintShardingStrategy。通过Hint而非SQL解析的方式分片的策略。对于分片字段非SQL决定,而由其他外置条件决定的场景,可使用SQL Hint灵活的注入分片字段。例:内部系统,按照员工登录主键分库,而数据库中并无此字段。SQL Hint支持通过Java API和SQL注释(待实现)两种方式使用。
- none :不分片策略,对应NoneShardingStrategy。不分片的策略。
目前例子中都使用inline分片策略,若对其他分片策略细节若感兴趣,请查阅官方文档:https://shardingsphere.apache.org
(3) 插入测试
修改testInsertOrder方法,插入数据中包含不同的user_id
    /**
     * 插入订单
     *
     * @param price
     * @param userId
     * @param status
     * @return
     */
    @Insert("insert into t_order(price,user_id,status)values(#{price},#{userId},#{status})")
    int insertOrder(@Param("price") BigDecimal price, @Param("userId") Long userId, @Param("status") String status);
@Test
public void testInsertOrder(){
    for (int i = 0 ; i<10; i++){
        orderDao.insertOrder(new BigDecimal((i+1)*5),1L,"WAIT_PAY");
    }
    for (int i = 0 ; i<10; i++){
        orderDao.insertOrder(new BigDecimal((i+1)*10),2L,"WAIT_PAY");
    }
}
执行testInsertOrder:
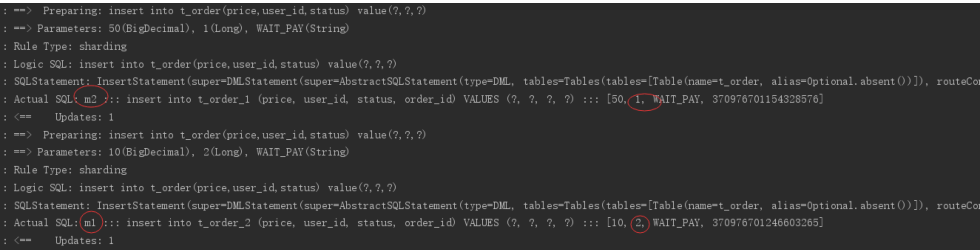
通过日志可以看出,根据user_id的奇偶不同,数据分别落在了不同数据源,达到目标。
(4)查询测试
调用快速入门的查询接口进行测试:
List<Map> selectOrderbyIds(@Param("orderIds")List<Long> orderIds);
通过日志发现,sharding-jdbc将sql路由到m1和m2:

问题分析:
由于查询语句中并没有使用分片键user_id,所以sharding-jdbc将广播路由到每个数据结点。
下边我们在sql中添加分片键进行查询。
在OrderDao中定义接口:
    /**
     * 根据id和用户id列表查询订单
     *
     * @param orderIds
     * @return
     */
    @Select("<script>" +
            "select" +
            " * " +
            " from t_order t " +
            " where t.order_id in " +
            " <foreach collection='orderIds' open='(' separator=',' close=')' item='id'>" +
            " #{id} " +
            " </foreach>" +
            " and user_id=#{userId}" +
            "</script>")
    List<Map> selectOrderbyUserAndIds(@Param("userId") Long userId, @Param("orderIds") List<Long> orderIds);
编写测试方法:
    @Test
    public void testSelectOrderbyUserAndIds() {
        List<Long> ids = new ArrayList<>();
        ids.add(598849042725732353L);
        ids.add(598532482043740164L);

        List<Map> maps = orderDao.selectOrderbyUserAndIds(1L, ids);
        System.out.println(maps);
    }
执行testSelectOrderbyUserAndIds:

查询条件user_id为1,根据分片策略m$->{user_id % 2 + 1}计算得出m2,此sharding-jdbc将sql路由到m2,见上图日志。
3.垂直分库
前面已经介绍过,垂直分库是指按照业务将表进行分类,分布到不同的数据库上面,每个库可以放在不同的服务器上,它的核心理念是专库专用。接下来看一下如何使用Sharding-JDBC实现垂直分库。
(1)创建数据库
创建数据库user_db
CREATE DATABASE `user_db` CHARACTER SET 'utf8' COLLATE 'utf8_general_ci';
在user_db中创建t_user表
DROP TABLE IF EXISTS `t_user`;
CREATE TABLE `t_user` (
`user_id` bigint(20) NOT NULL COMMENT '用户id',
`fullname` varchar(255) CHARACTER SET utf8 COLLATE utf8_general_ci NOT NULL COMMENT '用户姓名',
`user_type` char(1) DEFAULT NULL COMMENT '用户类型',
PRIMARY KEY (`user_id`) USING BTREE
) ENGINE = InnoDB CHARACTER SET = utf8 COLLATE = utf8_general_ci ROW_FORMAT = Dynamic;
(2)在Sharding-JDBC规则中修改
##水平分库分表+垂直分库
#sharding-jdbc分片规则配置
#数据源
spring.shardingsphere.datasource.names = m0,m1,m2

spring.shardingsphere.datasource.m0.type = com.alibaba.druid.pool.DruidDataSource
spring.shardingsphere.datasource.m0.driver-class-name = com.mysql.jdbc.Driver
spring.shardingsphere.datasource.m0.url = jdbc:mysql://localhost:3306/user_db?useUnicode=true
spring.shardingsphere.datasource.m0.username = root
spring.shardingsphere.datasource.m0.password = root

spring.shardingsphere.datasource.m1.type = com.alibaba.druid.pool.DruidDataSource
spring.shardingsphere.datasource.m1.driver-class-name = com.mysql.jdbc.Driver
spring.shardingsphere.datasource.m1.url = jdbc:mysql://localhost:3306/order_db_1?useUnicode=true
spring.shardingsphere.datasource.m1.username = root
spring.shardingsphere.datasource.m1.password = root

spring.shardingsphere.datasource.m2.type = com.alibaba.druid.pool.DruidDataSource
spring.shardingsphere.datasource.m2.driver-class-name = com.mysql.jdbc.Driver
spring.shardingsphere.datasource.m2.url = jdbc:mysql://localhost:3306/order_db_2?useUnicode=true
spring.shardingsphere.datasource.m2.username = root
spring.shardingsphere.datasource.m2.password = root

#?分库策略,以user_id为分片键,分片策略为user_id?%?2?+?1,user_id为偶数操作m1数据源,否则操作m2
spring.shardingsphere.sharding.tables.t_order.database-strategy.inline.sharding-column = user_id
spring.shardingsphere.sharding.tables.t_order.database-strategy.inline.algorithm-expression = m$->{user_id % 2 + 1}

# 指定t_order表的数据分布情况,配置数据节点 m1.t_order_1,m1.t_order_2,m2.t_order_1,m2.t_order_2
spring.shardingsphere.sharding.tables.t_order.actual-data-nodes = m$->{1..2}.t_order_$->{1..2}
spring.shardingsphere.sharding.tables.t_user.actual-data-nodes = m0.t_user

# 指定t_order表的主键生成策略为SNOWFLAKE
spring.shardingsphere.sharding.tables.t_order.key-generator.column=order_id
spring.shardingsphere.sharding.tables.t_order.key-generator.type=SNOWFLAKE

# 指定t_order表的分片策略,分片策略包括分片键和分片算法
spring.shardingsphere.sharding.tables.t_order.table-strategy.inline.sharding-column = order_id
spring.shardingsphere.sharding.tables.t_order.table-strategy.inline.algorithm-expression = t_order_$->{order_id % 2 + 1}
#t_user
spring.shardingsphere.sharding.tables.t_user.table-strategy.inline.sharding-column = user_id
spring.shardingsphere.sharding.tables.t_user.table-strategy.inline.algorithm-expression = t_user

# 打开sql输出日志
spring.shardingsphere.props.sql.show = true
(3) 数据操作
新增UserDao:
import org.apache.ibatis.annotations.Insert;
import org.apache.ibatis.annotations.Mapper;
import org.apache.ibatis.annotations.Param;
import org.apache.ibatis.annotations.Select;
import org.springframework.stereotype.Component;

import java.util.List;
import java.util.Map;

@Mapper
@Component
public interface UserDao {

    /**
     * 新增用户
     *
     * @param userId   用户id
     * @param fullname 用户姓名
     * @return
     */
    @Insert("insert into t_user(user_id, fullname) value(#{userId},#{fullname})")
    int insertUser(@Param("userId") Long userId, @Param("fullname") String fullname);

    /**
     * 根据id列表查询多个用户
     *
     * @param userIds 用户id列表
     * @return
     */
    @Select({"<script>",
            " select",
            " * ",
            " from t_user t ",
            " where t.user_id in",
            "<foreach collection='userIds' item='id' open='(' separator=',' close=')'>",
            "#{id}",
            "</foreach>",
            "</script>"
    })
    List<Map> selectUserbyIds(@Param("userIds") List<Long> userIds);
}
(4)测试
新增单元测试方法:
@Test
public void testInsertUser(){
    for (int i = 0 ; i<10; i++){
        Long id = i + 1L;
        userDao.insertUser(id,"姓名"+ id );
    }
}
@Test
public void testSelectUserbyIds(){
    List<Long> userIds = new ArrayList<>();
    userIds.add(1L);
    userIds.add(2L);
    List<Map> users = userDao.selectUserbyIds(userIds);
    System.out.println(users);
}
执行 testInsertUser:

通过日志可以看出t_user表的数据被落在了m0数据源,达到目标。
执行testSelectUserbyIds:
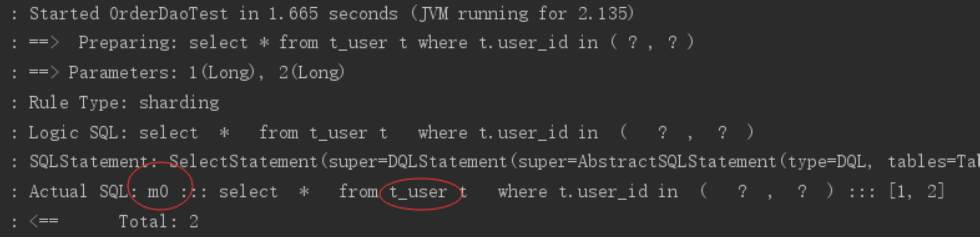
通过日志可以看出t_user表的查询操作被落在了m0数据源,达到目标。
4.公共表
公共表属于系统中数据量较小,变动少,而且属于高频联合查询的依赖表。参数表、数据字典表等属于此类型。可以将这类表在每个数据库都保存一份,所有更新操作都同时发送到所有分库执行。接下来看一下如何使用Sharding-JDBC实现公共表。
(1)创建数据库
分别在user_db、order_db_1、order_db_2中创建t_dict表:
CREATE TABLE `t_dict` (
`dict_id` bigint(20) NOT NULL COMMENT '字典id',
`type` varchar(50) CHARACTER SET utf8 COLLATE utf8_general_ci NOT NULL COMMENT '字典类型',
`code` varchar(50) CHARACTER SET utf8 COLLATE utf8_general_ci NOT NULL COMMENT '字典编码',
`value` varchar(50) CHARACTER SET utf8 COLLATE utf8_general_ci NOT NULL COMMENT '字典值',
PRIMARY KEY (`dict_id`) USING BTREE
) ENGINE = InnoDB CHARACTER SET = utf8 COLLATE = utf8_general_ci ROW_FORMAT = Dynamic;
(2)在Sharding-JDBC规则中修改
# 指定t_dict为公共表
spring.shardingsphere.sharding.broadcast-tables=t_dict
(3)数据操作
新增DictDao:
import org.apache.ibatis.annotations.Delete;
import org.apache.ibatis.annotations.Insert;
import org.apache.ibatis.annotations.Mapper;
import org.apache.ibatis.annotations.Param;
import org.springframework.stereotype.Component;

@Mapper
@Component
public interface DictDao {

    /**
     * 新增字典
     *
     * @param type  字典类型
     * @param code  字典编码
     * @param value 字典值
     * @return
     */
    @Insert("insert into t_dict(dict_id,type,code,value) value(#{dictId},#{type},#{code},#{value})")
    int insertDict(@Param("dictId") Long dictId, @Param("type") String type, @Param("code") String code, @Param("value") String value);

    /**
     * 删除字典
     *
     * @param dictId 字典id
     * @return
     */
    @Delete("delete from t_dict where dict_id = #{dictId}")
    int deleteDict(@Param("dictId") Long dictId);
}
(4)字典操作测试
新增单元测试方法:
@Test
public void testInsertDict(){
  dictDao.insertDict(1L,"user_type","0","管理员");
  dictDao.insertDict(2L,"user_type","1","操作员");
}

@Test
public void testDeleteDict(){
  dictDao.deleteDict(1L);
  dictDao.deleteDict(2L);
}
执行testInsertDict:
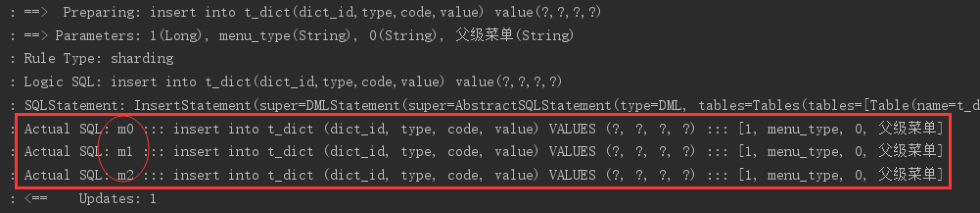
通过日志可以看出,对t_dict的表的操作被广播至所有数据源。
测试删除字典,观察是否把所有数据源中该 公共表的记录删除。
(5)字典关联查询测试
字典表已在各各分库存在,各业务表即可和字典表关联查询。
定义用户关联查询dao:
在UserDao中定义:
    /**
     * 根据id列表查询多个用户,关联查询字典表
     *
     * @param userIds 用户id列表
     * @return
     */
    @Select({"<script>",
            " select",
            " * ",
            " from t_user t ,t_dict b",
            " where t.user_type = b.code and t.user_id in",
            "<foreach collection='userIds' item='id' open='(' separator=',' close=')'>",
            "#{id}",
            "</foreach>",
            "</script>"
    })
    List<Map> selectUserInfobyIds(@Param("userIds") List<Long> userIds);
定义测试方法:
@Test
public void testSelectUserInfobyIds(){
    List<Long> userIds = new ArrayList<>();
    userIds.add(1L);
    userIds.add(2L);
    List<Map> users = userDao.selectUserInfobyIds(userIds);
    JSONArray jsonUsers = new JSONArray(users);
    System.out.println(jsonUsers);
}
执行测试方法,查看日志,成功关联查询字典表:
