- 安装 jdk (百度)
- 安装 maven
1、wget https://mirrors.tuna.tsinghua.edu.cn/apache/maven/maven-3/3.6.3/binaries/apache-maven-3.6.3-bin.tar.gz

2、sudo tar -zxf apache-maven-3.6.3-bin.tar.gz -C /usr/local/src

3、编辑 /etc/profile

M2_HOME=/usr/local/src/apache-maven-3.6.3
export M2_HOME
PATH=${PATH}:${M2_HOME}/bin
export PATH
4、source /etc/profile
5、mvn -v 有显示版本 表示成功,如果有问题 自行百度
下载源码
1、git clone https://github.com/apache/zeppelin.git 2、切到 0.9.0 分支 git checkout -b branch-0.9 origin/branch-0.9
bzip2:yum install bzip2
1、MAVEN 修改为阿里的镜像
1、进入安装maven的目录下

vi /usr/local/src/apache-maven-3.6.3/conf/settings.xml

2、 找到 mirors 标签 添加 (在vim 模式下 /mirrors)
    <mirror>
      <id>alimaven</id>
      <mirrorOf>central</mirrorOf>
      <name>aliyun maven</name>
      <url>https://maven.aliyun.com/repository/central</url>
    </mirror>
    <mirror>
      <id>alimaven</id>
      <mirrorOf>central</mirrorOf>
      <name>aliyun maven</name>
      <url>http://maven.aliyun.com/nexus/content/groups/public/</url>
    </mirror>

3、:wq 保存推出
2、下载APACHE 相关包比较慢,替换成国内源
cd zeppelin/1、rlang/pom.xml - 标签 spark.src.download.url 替换 https://mirrors.tuna.tsinghua.edu.cn/apache/spark/${spark.archive}/${spark.archive}.tgz - spark.bin.download.url 替换 https://mirrors.tuna.tsinghua.edu.cn/apache/spark/${spark.archive}/${spark.archive}-bin-without-hadoop.tgz 2、spark/pom.xml - 替换 spark.src.download.ur https://mirrors.tuna.tsinghua.edu.cn/apache/spark/${spark.archive}/${spark.archive}.tgz - 替换 spark.bin.download.url https://mirrors.tuna.tsinghua.edu.cn/apache/spark/${spark.archive}/${spark.archive}-bin-without-hadoop.tgz 3、flink/pom.xml 注意:本人没找到 flink 1.10.0 版本的 国内镜像地址, 所以替换成了1.10.1 - flink.version 1.10.1 - flink.bin.download.url https://mirrors.tuna.tsinghua.edu.cn/apache/flink/flink-${flink.version}/flink-${flink.version}-bin-scala_${scala.binary.version}.tgz 4、 zeppelin-web/package.json 由于在root 权限下 build zeppelin-web会报错 所有修改一下 bower install --silent --allow-root 见图片
2.安装node和npm(具体看别的文章这里不具体展开,这个是用来编译zeppelin-web-angular模块的)
3.安装bzip2(后续安装phantomjs 这个需要)
yum install bzip2
4.提前下载好node和npm到指定位置也可以当编译到需要下载时停止编译,然后手动下载后放入指定位置,共3个文件(与第二步不同,这步是用来编译zeppelin-web模块的)
将node文件和npm文件 提前放入到指定的maven repository的仓库中。具体版本 需要查看zeppelin目录下的pom.xml文件

com/github/eirslett/node/12.3.1/node-12.3.1-linux-x64.tar.gz
com/github/eirslett/npm/6.9.0/npm-6.9.0.tgz
还有一个phantomjs-2.1.1-linux-x86_64.tar.bz2文件 放在
/tmp/phantomjs/phantomjs-2.1.1-linux-x86_64.tar.bz2
5.修改一些配置
zeppelin-web/package.json 修改图

"postinstall": "bower install --silent --allow-root",
"prebuild": "npm-run-all clean lint:once",
"build:dist": "npm-run-all prebuild && bower install --silent --allow-root && grunt pre-webpack-dist && webpack && grunt post-webpack-dist",
"build:ci": "npm-run-all prebuild &&  bower install --silent --allow-root && grunt pre-webpack-ci && webpack && grunt post-webpack-dist",
不确定是否必须要改

      <execution>
            <id>npm audit fix</id>
            <goals>
              <goal>npm</goal>
            </goals>
            <configuration>
              <skip>${web.e2e.enabled}</skip>
              <arguments>audit fix</arguments>
            </configuration>
          </execution>
6编译zeppelin-web-angular模块
设置好 nodejs 和 npm 环境后 ,npm install && npm run build ,错误较多,需要自己排查
部分编译
参考自: jeff 大佬的文章,文末尾 有链接
- Zeppelin的核心模块
mvn clean install -DskipTests -DskipRat -pl zeppelin-web,zeppelin-server -am # 编译zeppelin核心模块

cd zeppelin-plugins  # cd到zeppelin的插件模块

mvn clean package -DskipTests  # 编译zeppelin所有的插件模块
报错信息
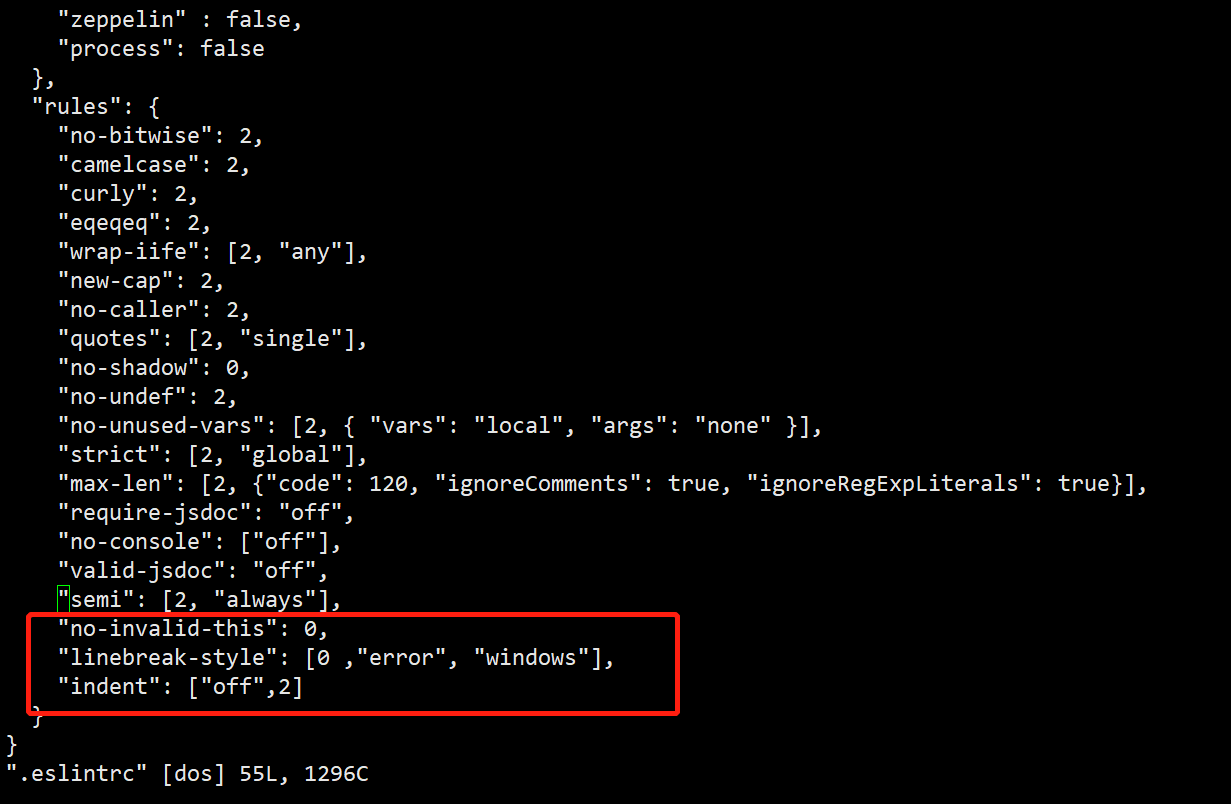
error Expected linebreaks to be 'LF' but found 'CRLF' linebreak-style
解决方法
在.eslintrc文件 rules 里面 配置

"linebreak-style": [0 ,"error", "windows"],
报错信息
error Expected indentation of 10 spaces but found 8 indent
解决
修改.eslintrc.js文件rules字段下增加

"indent": ["off", 2]
报错信息 An accessor cannot be declared in an ambient context
解决方法:
ng update --next @angular/cli --force
报错信息:warning Unexpected 'this' no-invali
解决方法:
"no-invalid-this": 0,
bzip2