jeecg-boot新建module模块
随着jeecg-boot不断拓展更新,爱好者越来越多,对于刚入门或者刚从事java(springboot)的人来说,会遇到各种各样的问题。
今天就对jeecg-boot开源项目上的一个issues:373,写个手册-jeecg-boot下多模块项目。
从issues:373 ,可以看出提问者,他想新建一个jeecg-boot-module-jm bundle,然后在 jeecg-boot-module-system 中依赖这个模块。
前提条件:jeecg-boot-module-system 能成功编译,并且jeecg-boot-module-system能成功启动
(数据库、redis配置正确)
jeecg-boot新建module模块
新建maven项目
新建maven项目 取名jeecg-boot-module-jm
可以采用idea、myeclipse 等工具来新建一个maven项目
其中 pom.xml文件内容如下
<project xmlns="http://maven.apache.org/POM/4.0.0"
    xmlns:xsi="http://www.w3.org/2001/XMLSchema-instance"
    xsi:schemaLocation="http://maven.apache.org/POM/4.0.0 http://maven.apache.org/xsd/maven-4.0.0.xsd">
    <modelVersion>4.0.0</modelVersion>
    <artifactId>jeecg-boot-module-jm</artifactId>
    <version>2.0.2</version>

    <parent>
        <groupId>org.jeecgframework.boot</groupId>
        <artifactId>jeecg-boot-parent</artifactId>
        <version>2.0.2</version>
    </parent>

    <repositories>
        <repository>
            <id>aliyun</id>
            <name>aliyun Repository</name>
            <url>http://maven.aliyun.com/nexus/content/groups/public</url>
            <snapshots>
                <enabled>false</enabled>
            </snapshots>
        </repository>
        <repository>
            <id>jeecg</id>
            <name>jeecg Repository</name>
            <url>http://maven.jeecg.org/nexus/content/repositories/jeecg</url>
            <snapshots>
                <enabled>false</enabled>
            </snapshots>
        </repository>
    </repositories>

    <dependencies>
        <dependency>
            <groupId>org.jeecgframework.boot</groupId>
            <artifactId>jeecg-boot-base-common</artifactId>
        </dependency>
    </dependencies>

    <!-- <build>
        <plugins>
            <plugin>
                <groupId>org.springframework.boot</groupId>
                <artifactId>spring-boot-maven-plugin</artifactId>
            </plugin>
        </plugins>
    </build> -->
</project>
注意:我这个pom文件直接复制了jeecg-boot-module-system 内容,将jeecg-boot-module-system名称改为jeecg-boot-module-jm,注意注释了
<build>
        <plugins>
            <plugin>
                <groupId>org.springframework.boot</groupId>
                <artifactId>spring-boot-maven-plugin</artifactId>
            </plugin>
        </plugins>
    </build>
这段代码,因为新建的项目要打包为jar在jeecg-boot-module-system引用,所以不需要把该项目打包一个springboot项目,注释上面的代码就可以了。
-
创建业务包
在项目根目录新建包名org.jeecg.modules.hello(以issues:373为例,也可以使用其他包名,记住这个包名,后面在接口问题swagger-ui使用到)
-
添加业务(测试)代码
(以issues:373为例,后面针对提出的问题,进行一一解答)这段代码后面在swagegr-ui中访问不到,因为方法上没有添加@ApiOperation
package org.jeecg.modules.hello;

import org.jeecg.common.api.vo.Result;
import org.springframework.web.bind.annotation.GetMapping;
import org.springframework.web.bind.annotation.RequestMapping;
import org.springframework.web.bind.annotation.RestController;

import io.swagger.annotations.Api;
import lombok.extern.slf4j.Slf4j;

/**
 * 测试新的module
 * @author chengtg
 *
 */
@Slf4j
@Api(tags="新建module--jm")
@RestController
@RequestMapping("/hello")
public class HelloController  {
    @GetMapping(value="/")
    public Result<String> hello(){
        Result<String> result = new Result<String>();
        result.setResult("hello word!");
        result.setSuccess(true);
        return result;
    }
}
注意:我修改了注释(@Api(tags="新建module--jm")),后面在swagegr-ui文档用到
-
将新建的项目纳入parent中
将新建的jeecg-boot-module-jm 纳入jeecg-boot-parent中
在jeecg-boot-framework项目中的pom文件 modules中添加<module>jeecg-boot-module-jm</module>
结果如下代码
<modules>
    <module>jeecg-boot-base-common</module>
    <module>jeecg-boot-module-system</module>
    <module>jeecg-boot-module-jm</module>
</modules>
添加项目依赖
在jeecg-boot-module-system项目中依赖 jeecg-boot-module-jms
修改jeecg-boot-module-system项目的pom文件
<dependencies>
        <dependency>
            <groupId>org.jeecgframework.boot</groupId>
            <artifactId>jeecg-boot-base-common</artifactId>
        </dependency>
        <dependency>
            <groupId>org.jeecgframework.boot</groupId>
            <artifactId>jeecg-boot-module-jm</artifactId>
            <version>2.0.2</version>
        </dependency>
</dependencies>
编译整个jeecg-boot-framework
如果编译如下:
[INFO] --- maven-install-plugin:2.5.2:install (default-install) @ jeecg-boot-module-system ---
[INFO] Installing /Users/chengtg/WS-platform/jeecg-boot-framework/jeecg-boot-module-system/target/jeecg-boot-module-system-2.0.2.jar to /Users/chengtg/.m2/repository/org/jeecgframework/boot/jeecg-boot-module-system/2.0.2/jeecg-boot-module-system-2.0.2.jar
[INFO] Installing /Users/chengtg/WS-platform/jeecg-boot-framework/jeecg-boot-module-system/pom.xml to /Users/chengtg/.m2/repository/org/jeecgframework/boot/jeecg-boot-module-system/2.0.2/jeecg-boot-module-system-2.0.2.pom
[INFO] ------------------------------------------------------------------------
[INFO] Reactor Summary for jeecg-boot-parent 2.0.2:
[INFO]
[INFO] jeecg-boot-parent .................................. SUCCESS [  0.236 s]
[INFO] jeecg-boot-base-common ............................. SUCCESS [  1.143 s]
[INFO] jeecg-boot-module-jm ............................... SUCCESS [  1.066 s]
[INFO] jeecg-boot-module-system ........................... SUCCESS [  3.125 s]
[INFO] ------------------------------------------------------------------------
[INFO] BUILD SUCCESS
[INFO] ------------------------------------------------------------------------
[INFO] Total time:  5.872 s
[INFO] Finished at: 2019-08-04T21:41:09+08:00
[INFO] ------------------------------------------------------------------------
说明,新建项目jeecg-boot-module-jm并在jeecg-boot-module-system中依赖,成功!
-
启动jeecg-boot-module-system项目
-
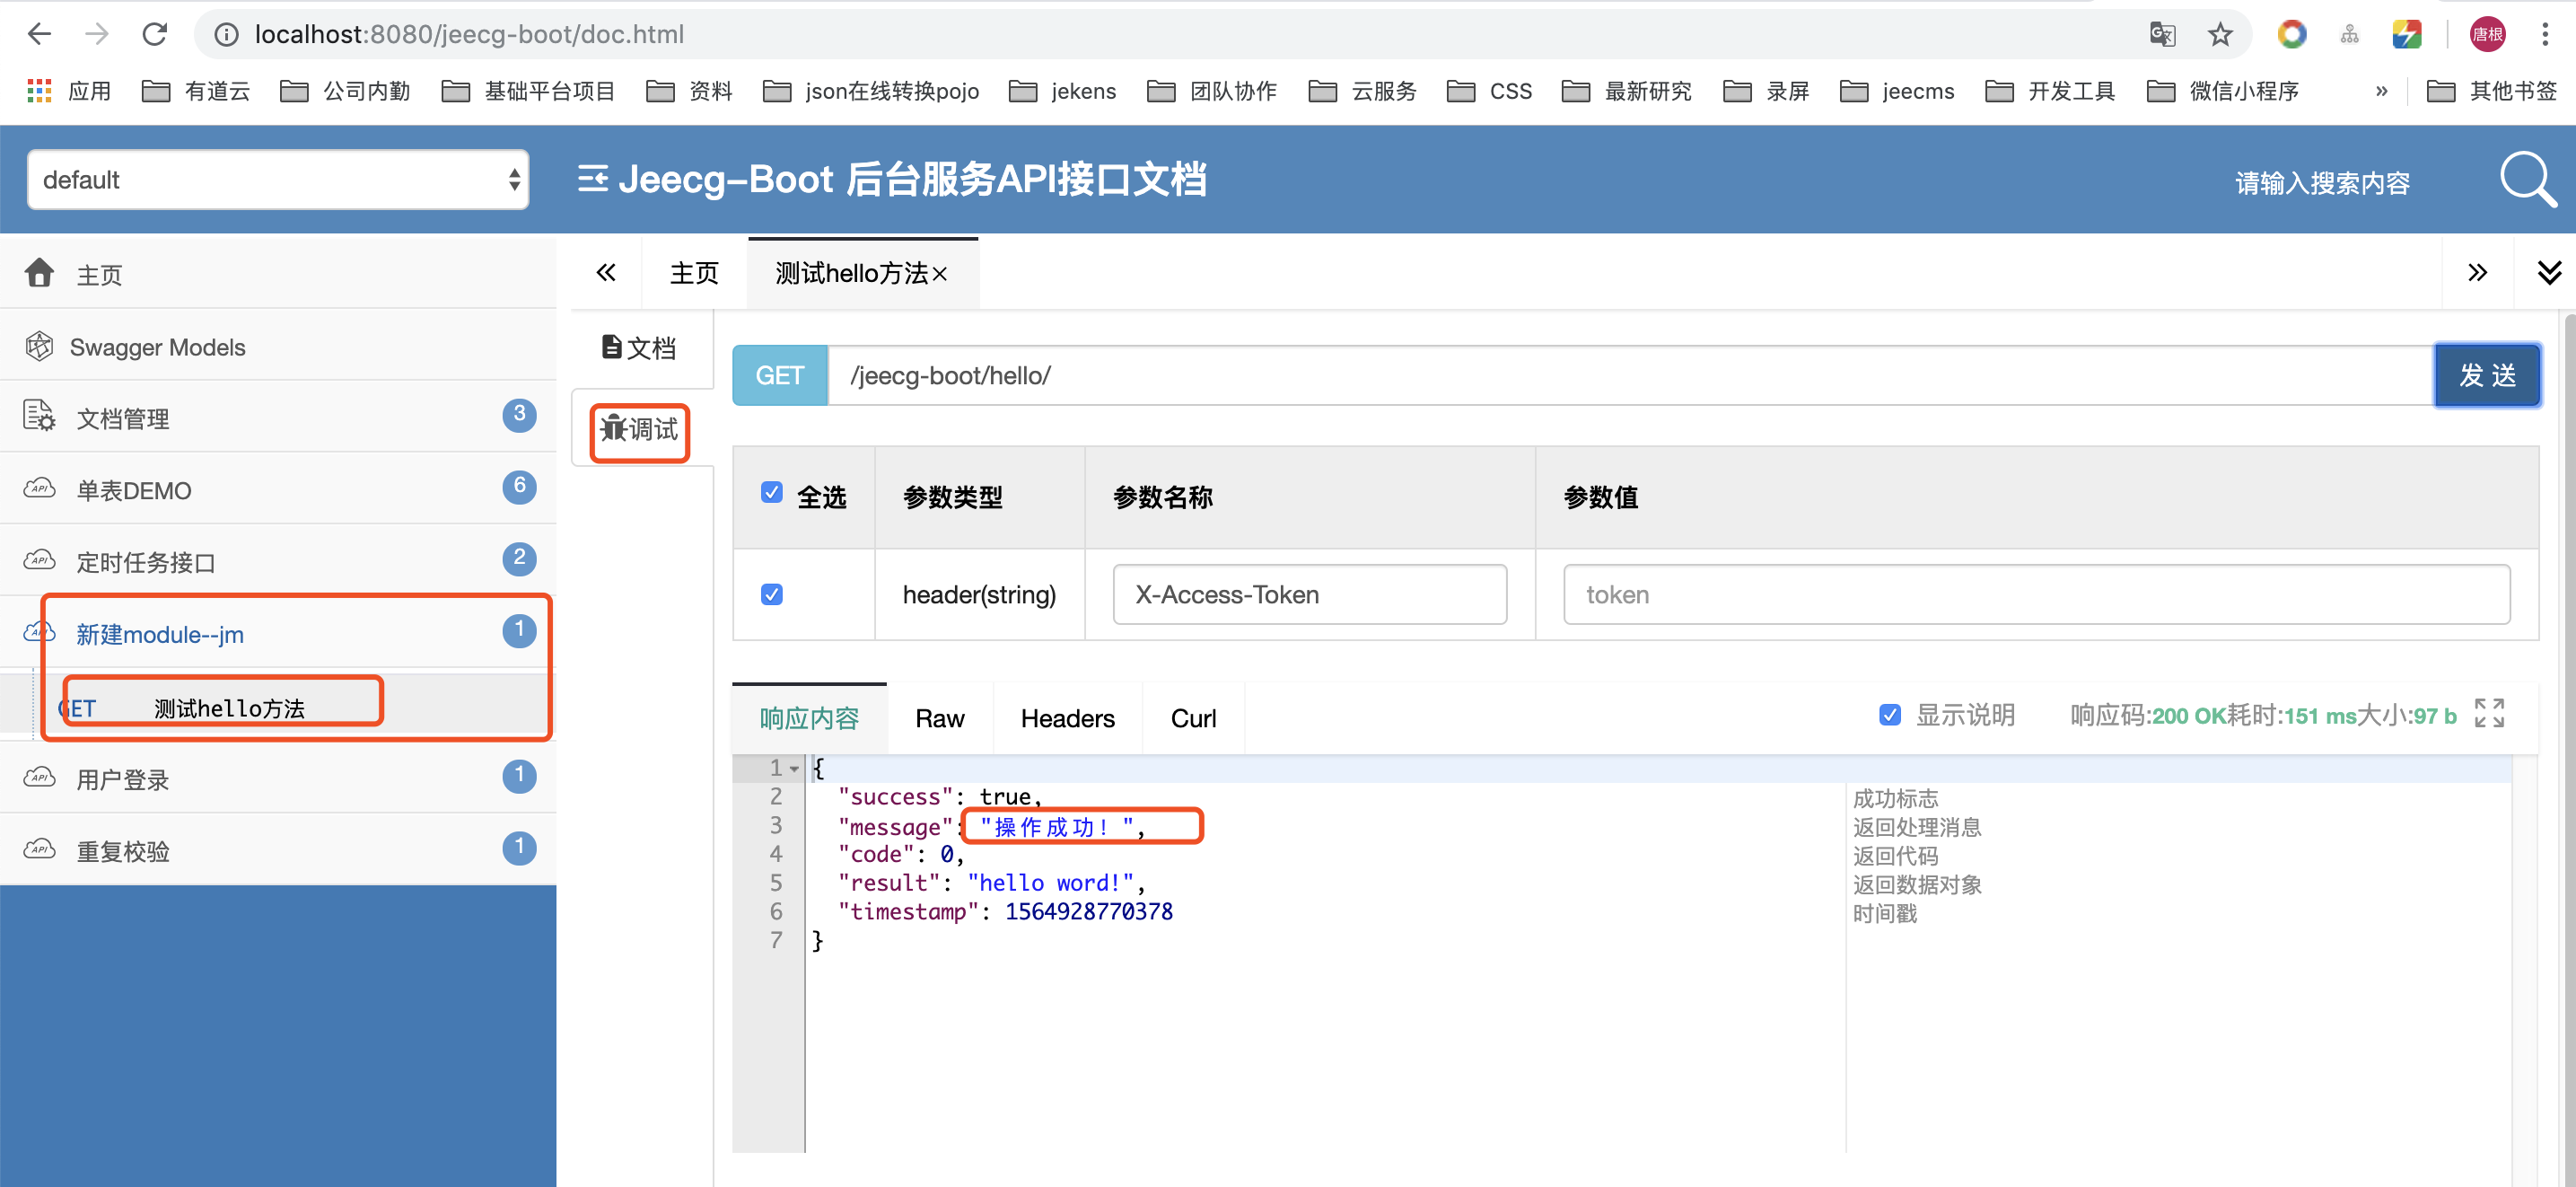
访问接口文档swagger
http://localhost:8080/jeecg-boot/doc.html
截图如下:

问题来了:为什么新添加的HelloController中@Api(tags="新建module--jm")没有 显示
原因查看Swagger2Config配置,Swagger2Config.java
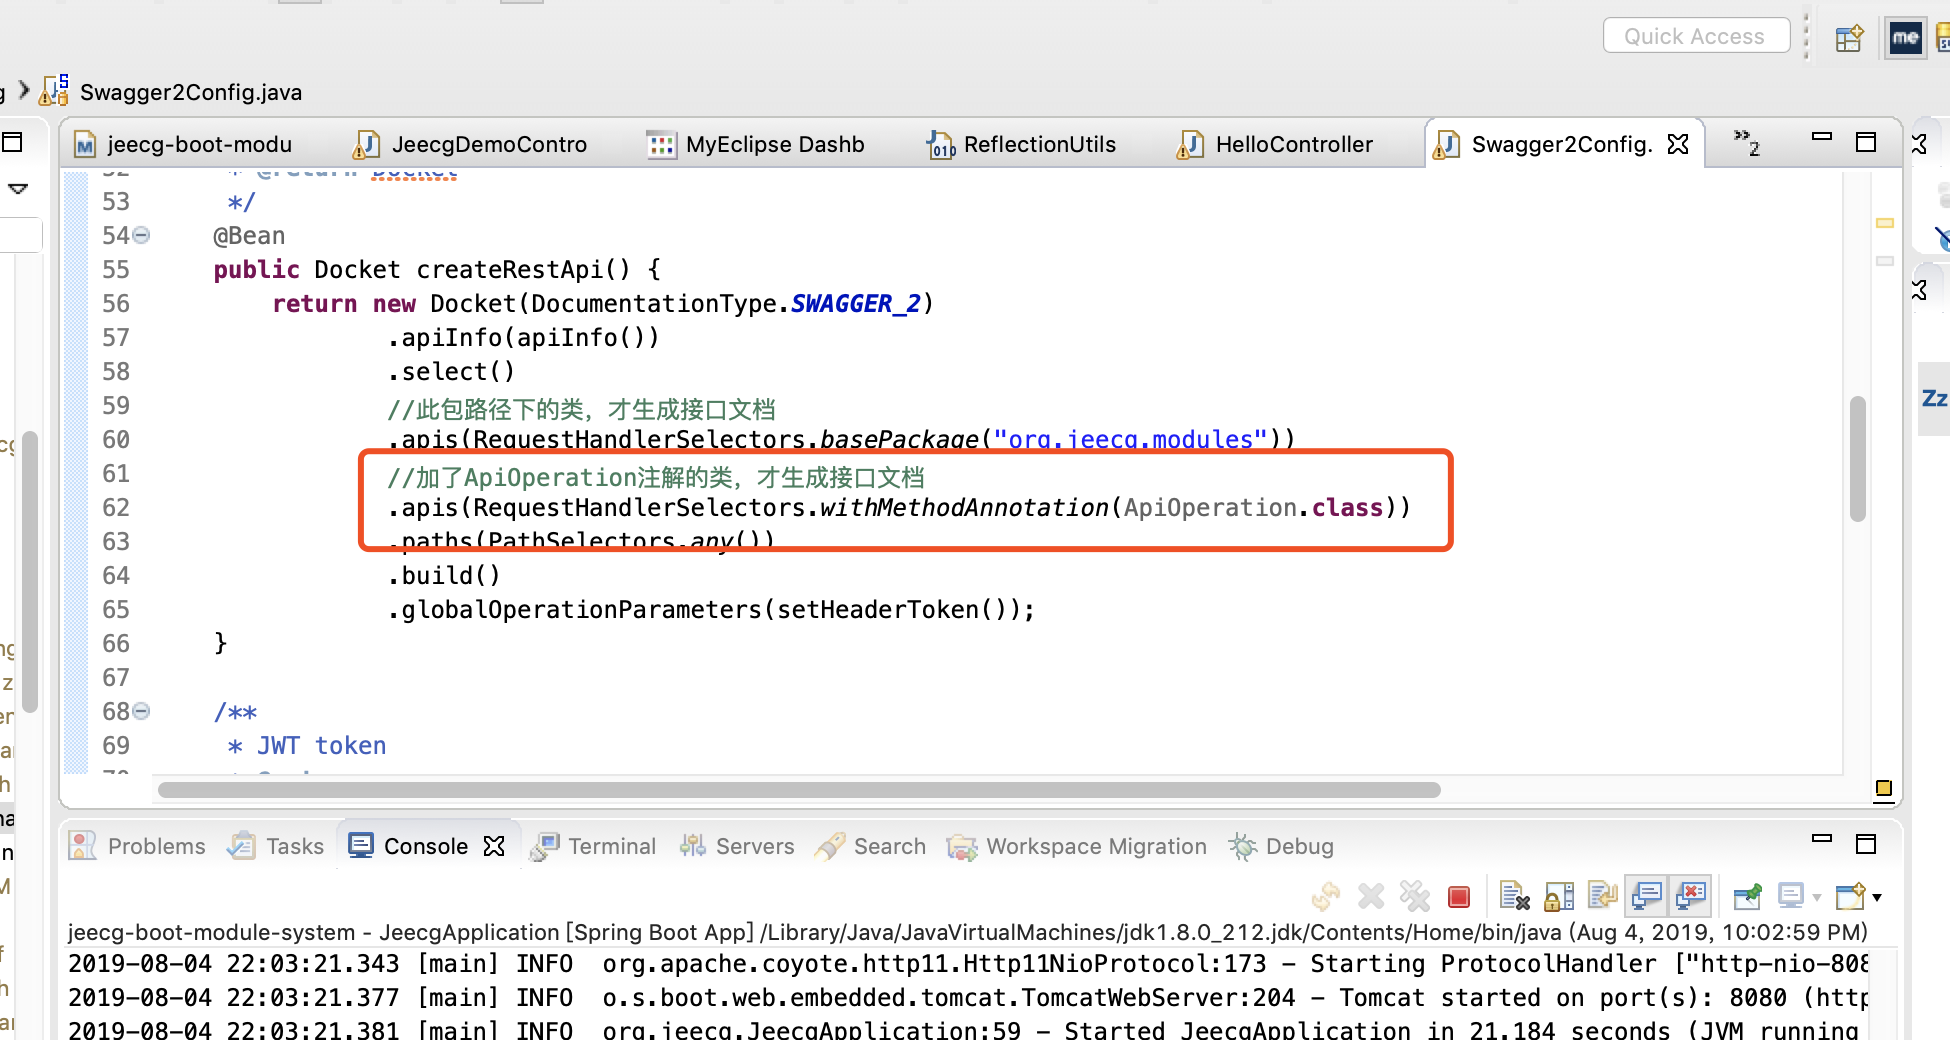
因为截图中红色圈出来的 部分
//加了ApiOperation注解的类,才生成接口文档
.apis(RequestHandlerSelectors.withMethodAnnotation(ApiOperation.class))
表示只有在controller类的方法上要添加ApiOperation注解的,否则是不生成swagegr-ui文档
-
修改HelloController代码
修改jeecg-boot-module-system-jm项目HelloController类,给hello方法添加ApiOperation注解
package org.jeecg.modules.hello;

import org.jeecg.common.api.vo.Result;
import org.springframework.web.bind.annotation.GetMapping;
import org.springframework.web.bind.annotation.RequestMapping;
import org.springframework.web.bind.annotation.RestController;

import io.swagger.annotations.Api;
import io.swagger.annotations.ApiOperation;
import io.swagger.annotations.ApiParam;
import lombok.extern.slf4j.Slf4j;

/**
 * 测试新的module
 * @author chengtg
 *
 */
@Slf4j
@Api(tags="新建module--jm")
@RestController
@RequestMapping("/hello")
public class HelloController  {
    @ApiOperation("测试hello方法")
    @GetMapping(value="/")
    public Result<String> hello(){
        Result<String> result = new Result<String>();
        result.setResult("hello word!");
        result.setSuccess(true);
        return result;
    }
}
重新编译启动。
再次访问接口文档swagger:http://localhost:8080/jeecg-boot/doc.html
-
奇迹出现了

-
测试接口-调试
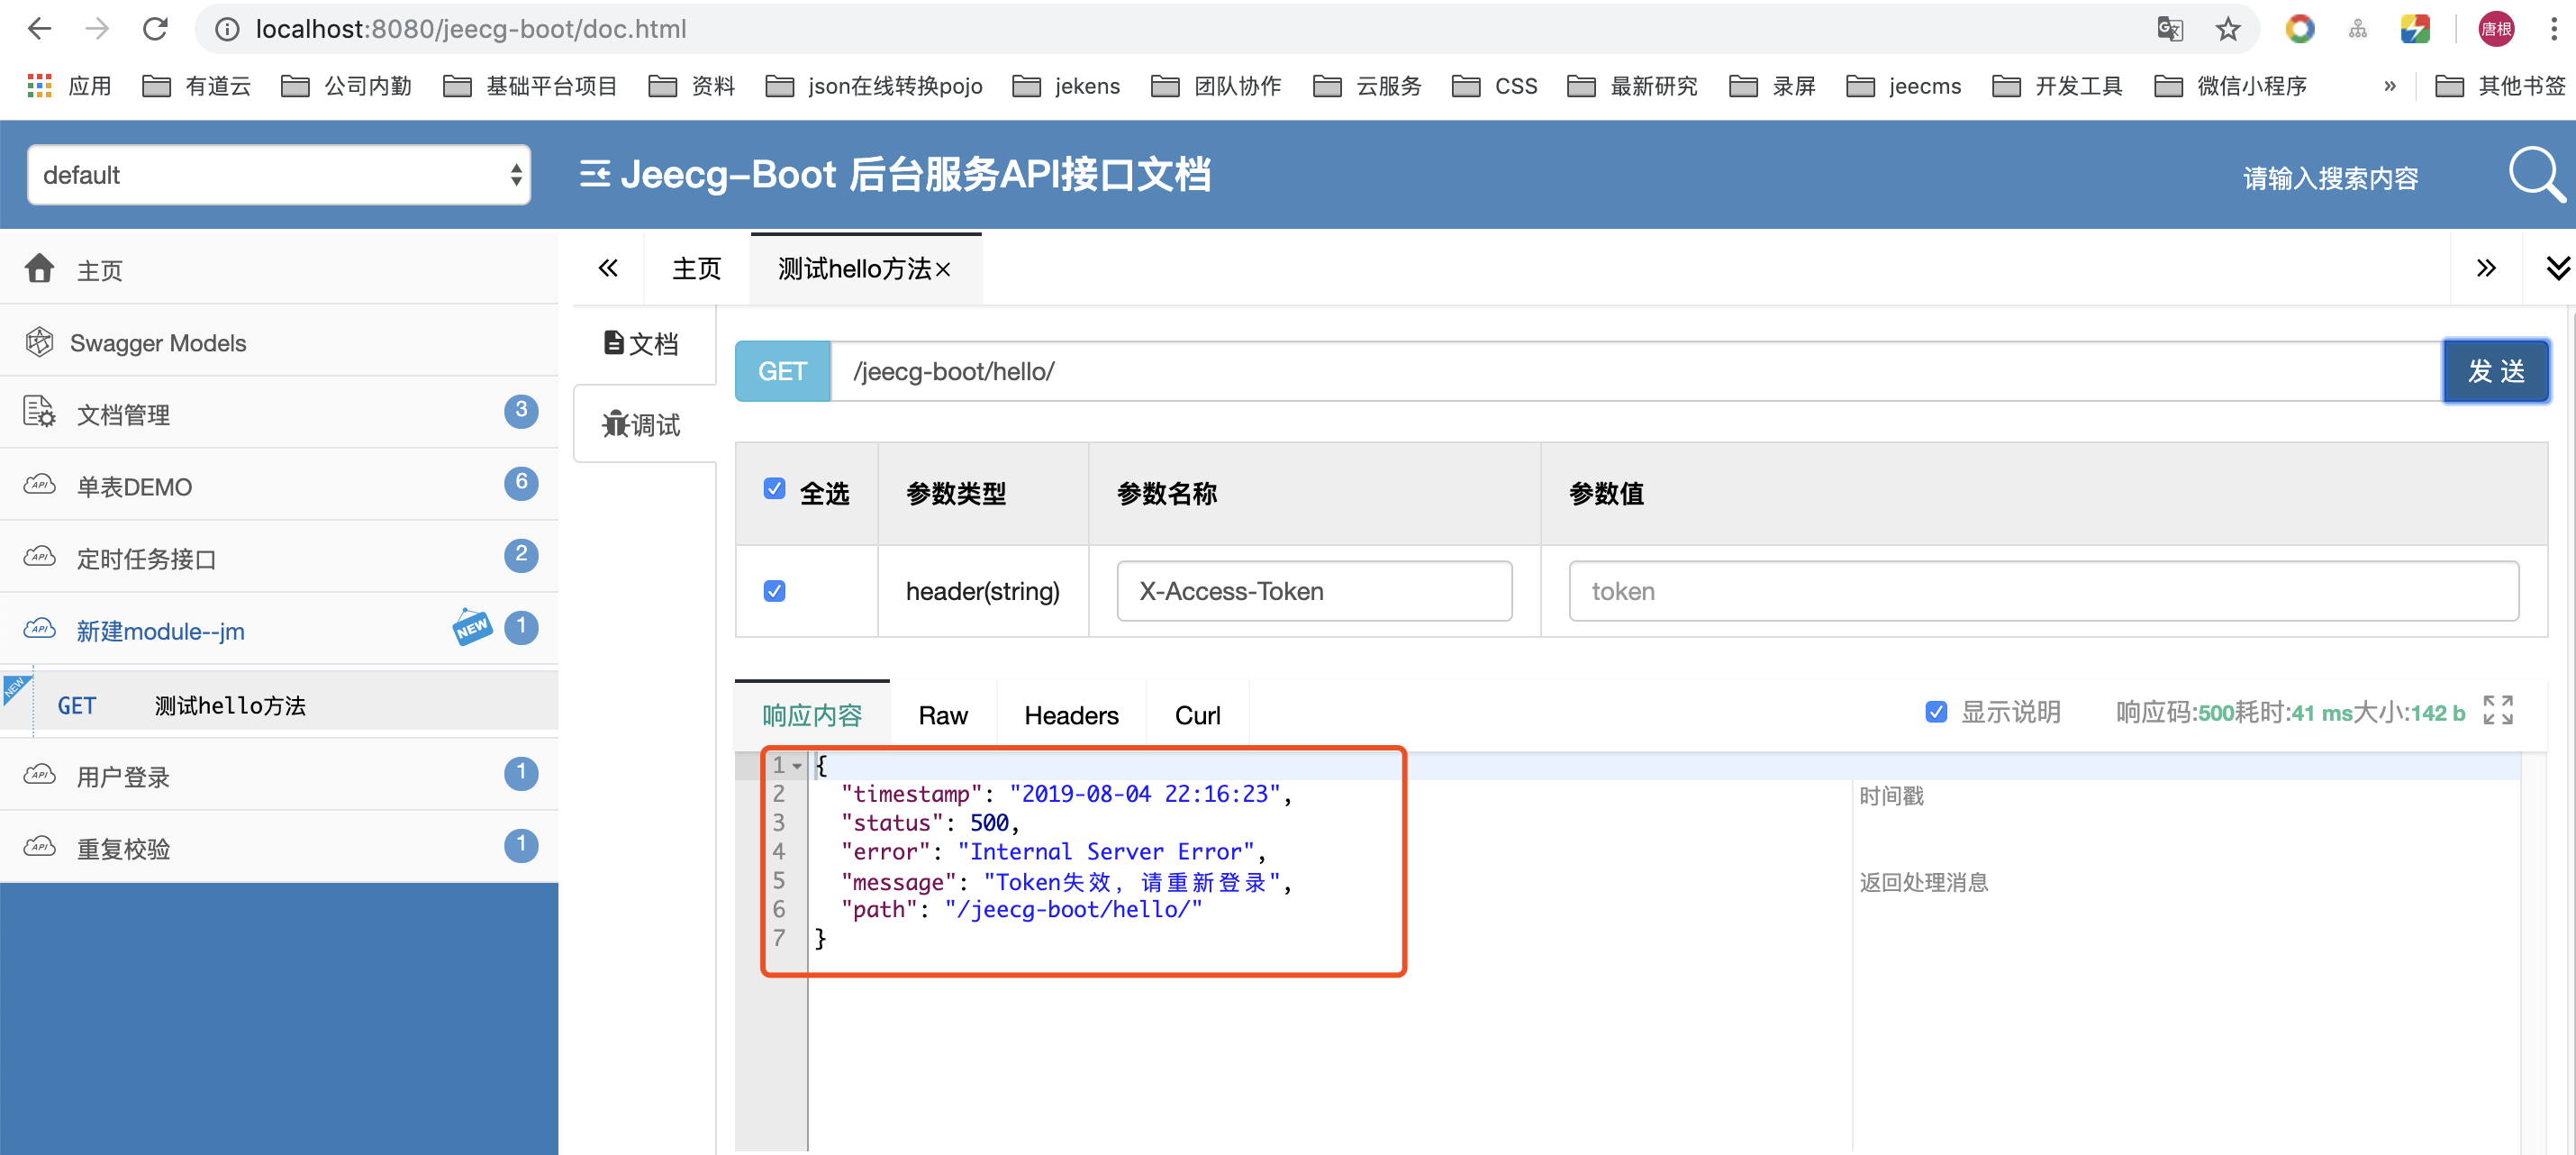
结果如上出现错误,因为被shiro拦截了
-
去掉token拦截限制
如果不需要token可以访问,可以在jeecg-boot-module-system项目中修改ShiroConfig.java配置类
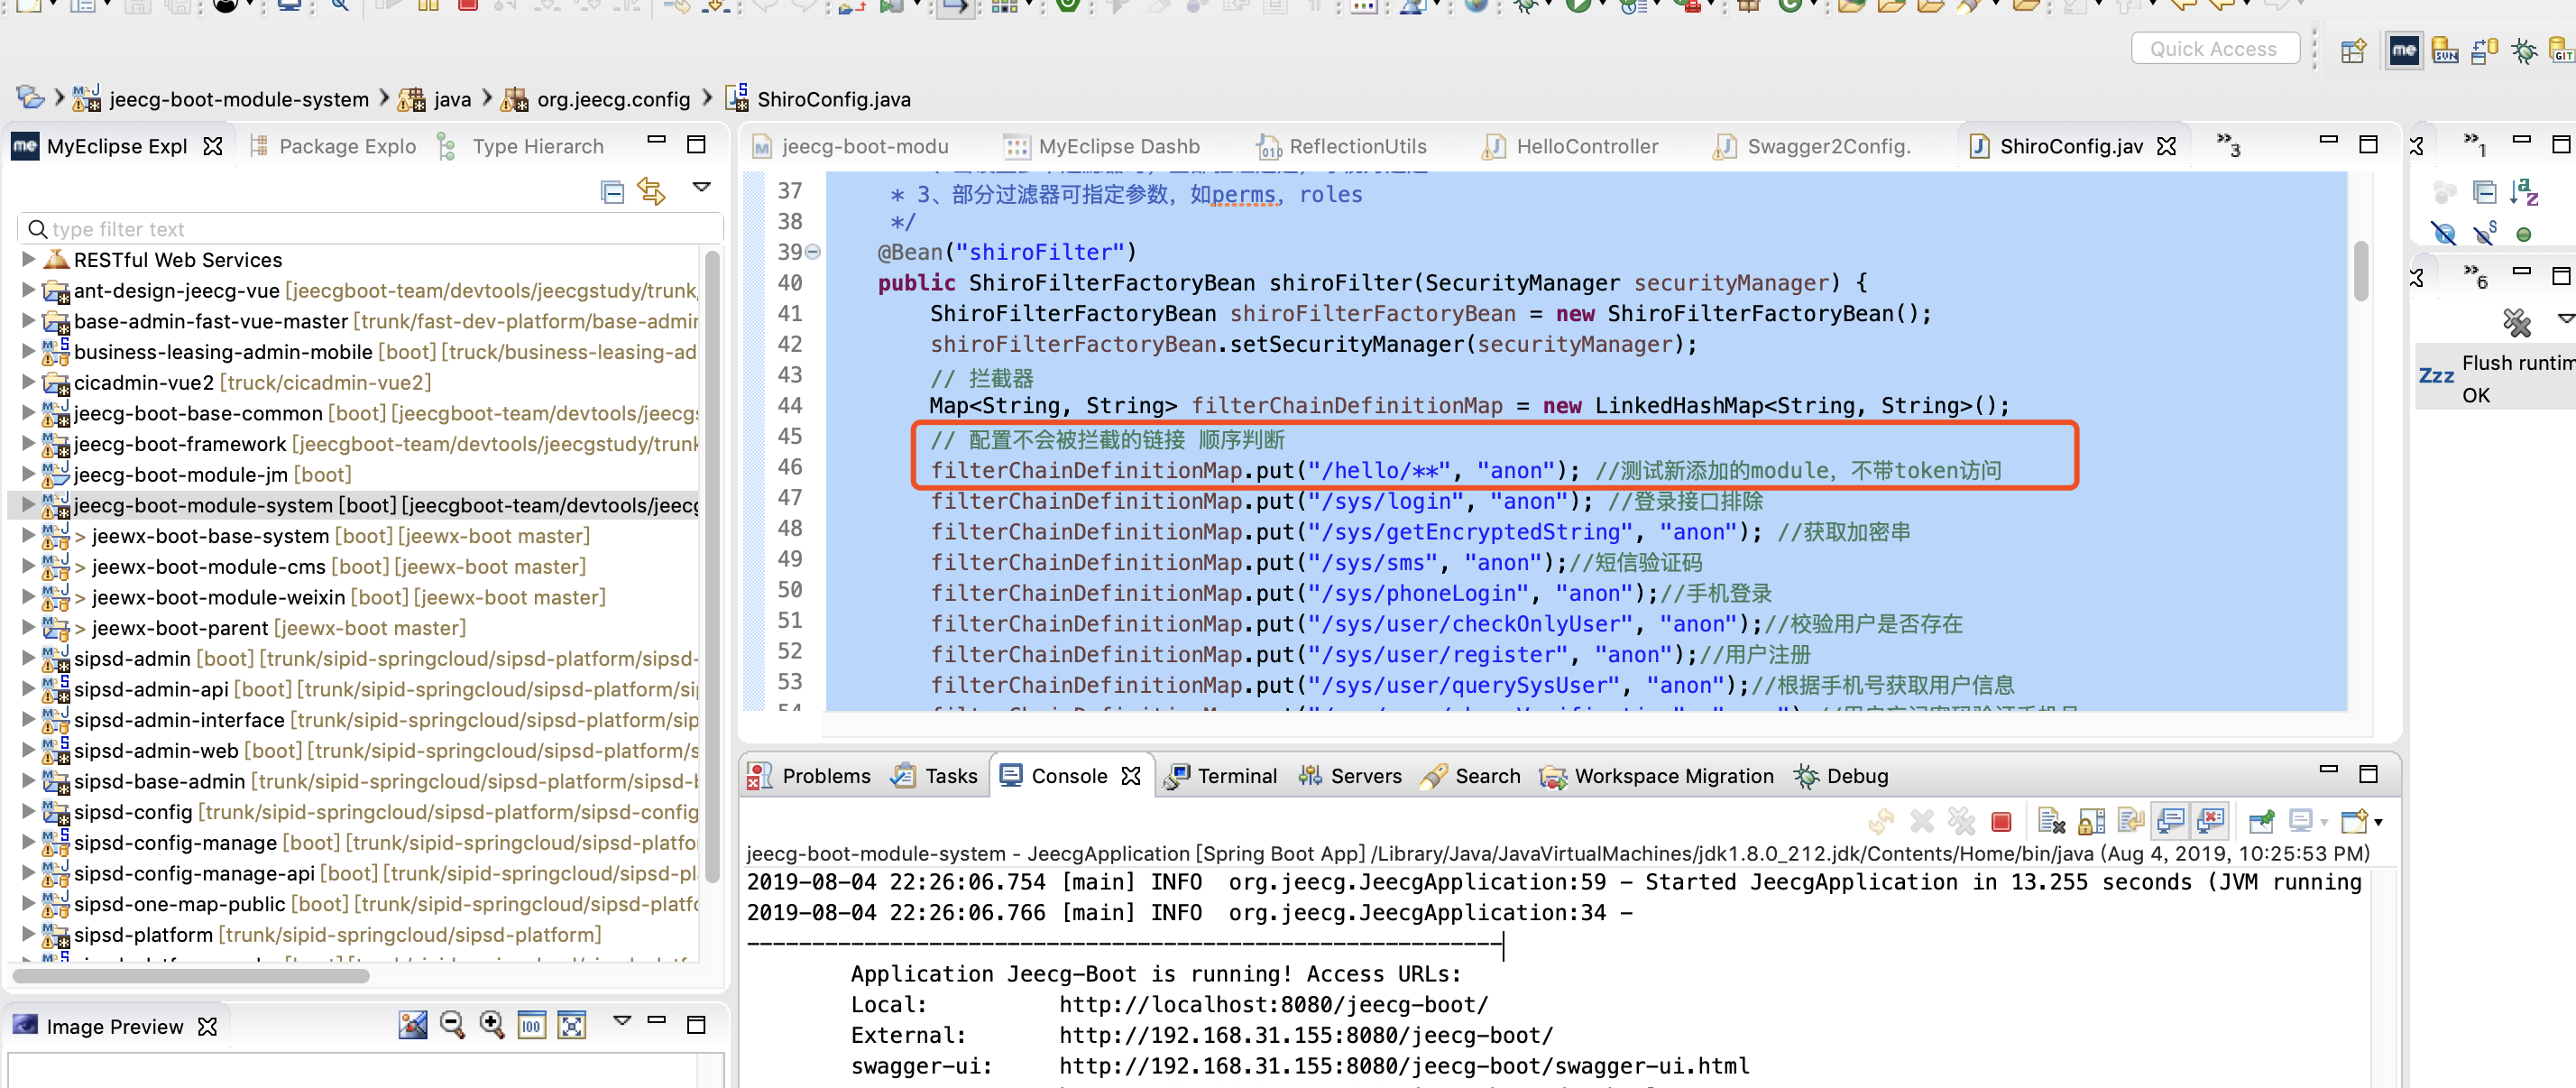
代码如下:
package org.jeecg.config;

import java.util.HashMap;
import java.util.LinkedHashMap;
import java.util.Map;

import javax.servlet.Filter;

import org.apache.shiro.mgt.DefaultSessionStorageEvaluator;
import org.apache.shiro.mgt.DefaultSubjectDAO;
import org.apache.shiro.mgt.SecurityManager;
import org.apache.shiro.spring.LifecycleBeanPostProcessor;
import org.apache.shiro.spring.security.interceptor.AuthorizationAttributeSourceAdvisor;
import org.apache.shiro.spring.web.ShiroFilterFactoryBean;
import org.apache.shiro.web.mgt.DefaultWebSecurityManager;
import org.jeecg.modules.shiro.authc.ShiroRealm;
import org.jeecg.modules.shiro.authc.aop.JwtFilter;
import org.springframework.aop.framework.autoproxy.DefaultAdvisorAutoProxyCreator;
import org.springframework.context.annotation.Bean;
import org.springframework.context.annotation.Configuration;
import org.springframework.context.annotation.DependsOn;

/**
 * @author: Scott
 * @date: 2018/2/7
 * @description: shiro 配置类
 */

@Configuration
public class ShiroConfig {

    /**
     * Filter Chain定义说明
     *
     * 1、一个URL可以配置多个Filter,使用逗号分隔
     * 2、当设置多个过滤器时,全部验证通过,才视为通过
     * 3、部分过滤器可指定参数,如perms,roles
     */
    @Bean("shiroFilter")
    public ShiroFilterFactoryBean shiroFilter(SecurityManager securityManager) {
        ShiroFilterFactoryBean shiroFilterFactoryBean = new ShiroFilterFactoryBean();
        shiroFilterFactoryBean.setSecurityManager(securityManager);
        // 拦截器
        Map<String, String> filterChainDefinitionMap = new LinkedHashMap<String, String>();
        // 配置不会被拦截的链接 顺序判断
        filterChainDefinitionMap.put("/hello/**", "anon"); //测试新添加的module,不带token访问
        filterChainDefinitionMap.put("/sys/login", "anon"); //登录接口排除
        filterChainDefinitionMap.put("/sys/getEncryptedString", "anon"); //获取加密串
        filterChainDefinitionMap.put("/sys/sms", "anon");//短信验证码
        filterChainDefinitionMap.put("/sys/phoneLogin", "anon");//手机登录
        filterChainDefinitionMap.put("/sys/user/checkOnlyUser", "anon");//校验用户是否存在
        filterChainDefinitionMap.put("/sys/user/register", "anon");//用户注册
        filterChainDefinitionMap.put("/sys/user/querySysUser", "anon");//根据手机号获取用户信息
        filterChainDefinitionMap.put("/sys/user/phoneVerification", "anon");//用户忘记密码验证手机号
        filterChainDefinitionMap.put("/sys/user/passwordChange", "anon");//用户更改密码
        filterChainDefinitionMap.put("/auth/2step-code", "anon");//登录验证码
        filterChainDefinitionMap.put("/sys/common/view/**", "anon");//图片预览不限制token
        filterChainDefinitionMap.put("/sys/common/download/**", "anon");//文件下载不限制token
        filterChainDefinitionMap.put("/sys/common/pdf/**", "anon");//pdf预览
        filterChainDefinitionMap.put("/generic/**", "anon");//pdf预览需要文件
        filterChainDefinitionMap.put("/", "anon");
        filterChainDefinitionMap.put("/doc.html", "anon");
        filterChainDefinitionMap.put("/**/*.js", "anon");
        filterChainDefinitionMap.put("/**/*.css", "anon");
        filterChainDefinitionMap.put("/**/*.html", "anon");
        filterChainDefinitionMap.put("/**/*.svg", "anon");
        filterChainDefinitionMap.put("/**/*.jpg", "anon");
        filterChainDefinitionMap.put("/**/*.png", "anon");
        filterChainDefinitionMap.put("/**/*.ico", "anon");
        filterChainDefinitionMap.put("/druid/**", "anon");
        filterChainDefinitionMap.put("/swagger-ui.html", "anon");
        filterChainDefinitionMap.put("/swagger**/**", "anon");
        filterChainDefinitionMap.put("/webjars/**", "anon");
        filterChainDefinitionMap.put("/v2/**", "anon");

        //性能监控
        filterChainDefinitionMap.put("/actuator/metrics/**", "anon");
        filterChainDefinitionMap.put("/actuator/httptrace/**", "anon");
        filterChainDefinitionMap.put("/actuator/redis/**", "anon");

        //表单设计器
        filterChainDefinitionMap.put("/desform/**", "anon"); //自定义表单
        filterChainDefinitionMap.put("/test/jeecgDemo/demo3", "anon"); //模板测试
        filterChainDefinitionMap.put("/test/jeecgDemo/redisDemo/**", "anon"); //redis测试


        //流程模块组件请求
        filterChainDefinitionMap.put("/act/process/**", "anon");
        filterChainDefinitionMap.put("/act/task/**", "anon");
        filterChainDefinitionMap.put("/act/model/**", "anon");
        filterChainDefinitionMap.put("/service/editor/**", "anon");
        filterChainDefinitionMap.put("/service/model/**", "anon");
        filterChainDefinitionMap.put("/service/model/**/save", "anon");
        filterChainDefinitionMap.put("/editor-app/**", "anon");
        filterChainDefinitionMap.put("/diagram-viewer/**", "anon");
        filterChainDefinitionMap.put("/modeler.html", "anon");
        filterChainDefinitionMap.put("/designer", "anon");
        filterChainDefinitionMap.put("/designer/**", "anon");
        filterChainDefinitionMap.put("/plug-in/**", "anon");

        //排除Online请求
        filterChainDefinitionMap.put("/auto/cgform/**", "anon");
        //FineReport报表
        filterChainDefinitionMap.put("/ReportServer**", "anon");

        // 添加自己的过滤器并且取名为jwt
        Map<String, Filter> filterMap = new HashMap<String, Filter>(1);
        filterMap.put("jwt", new JwtFilter());
        shiroFilterFactoryBean.setFilters(filterMap);
        // <!-- 过滤链定义,从上向下顺序执行,一般将/**放在最为下边
        filterChainDefinitionMap.put("/**", "jwt");

        // 未授权界面返回JSON
        shiroFilterFactoryBean.setUnauthorizedUrl("/sys/common/403");
        shiroFilterFactoryBean.setLoginUrl("/sys/common/403");
        shiroFilterFactoryBean.setFilterChainDefinitionMap(filterChainDefinitionMap);
        return shiroFilterFactoryBean;
    }

    @Bean("securityManager")
    public DefaultWebSecurityManager securityManager(ShiroRealm myRealm) {
        DefaultWebSecurityManager securityManager = new DefaultWebSecurityManager();
        securityManager.setRealm(myRealm);

        /*
         * 关闭shiro自带的session,详情见文档
         * http://shiro.apache.org/session-management.html#SessionManagement-
         * StatelessApplications%28Sessionless%29
         */
        DefaultSubjectDAO subjectDAO = new DefaultSubjectDAO();
        DefaultSessionStorageEvaluator defaultSessionStorageEvaluator = new DefaultSessionStorageEvaluator();
        defaultSessionStorageEvaluator.setSessionStorageEnabled(false);
        subjectDAO.setSessionStorageEvaluator(defaultSessionStorageEvaluator);
        securityManager.setSubjectDAO(subjectDAO);

        return securityManager;
    }

    /**
     * 下面的代码是添加注解支持
     * @return
     */
    @Bean
    @DependsOn("lifecycleBeanPostProcessor")
    public DefaultAdvisorAutoProxyCreator defaultAdvisorAutoProxyCreator() {
        DefaultAdvisorAutoProxyCreator defaultAdvisorAutoProxyCreator = new DefaultAdvisorAutoProxyCreator();
        defaultAdvisorAutoProxyCreator.setProxyTargetClass(true);
        return defaultAdvisorAutoProxyCreator;
    }

    @Bean
    public LifecycleBeanPostProcessor lifecycleBeanPostProcessor() {
        return new LifecycleBeanPostProcessor();
    }

    @Bean
    public AuthorizationAttributeSourceAdvisor authorizationAttributeSourceAdvisor(DefaultWebSecurityManager securityManager) {
        AuthorizationAttributeSourceAdvisor advisor = new AuthorizationAttributeSourceAdvisor();
        advisor.setSecurityManager(securityManager);
        return advisor;
    }

}
编译并重启服务,
再次访问接口文档http://localhost:8080/jeecg-boot/doc.html
至此,新建一个module,且测试成功!
-
回顾下主要步骤:
1.新建一个module maven项目,取名为jeecg-boot-module-jm,修改pom文件
controller中 类和方法都需要添加注解:其中类@Api(tags="新建module--jm"),方法@ApiOperation("测试hello方法")
2.将jeecg-boot-module-jm放入jeecg-boot-framework 的modules中
3.jeecg-boot-module-system依赖新添加的maven项目
4.如果不需要拦截,修改jeecg-boot-module-system配置类ShiroConfig.java
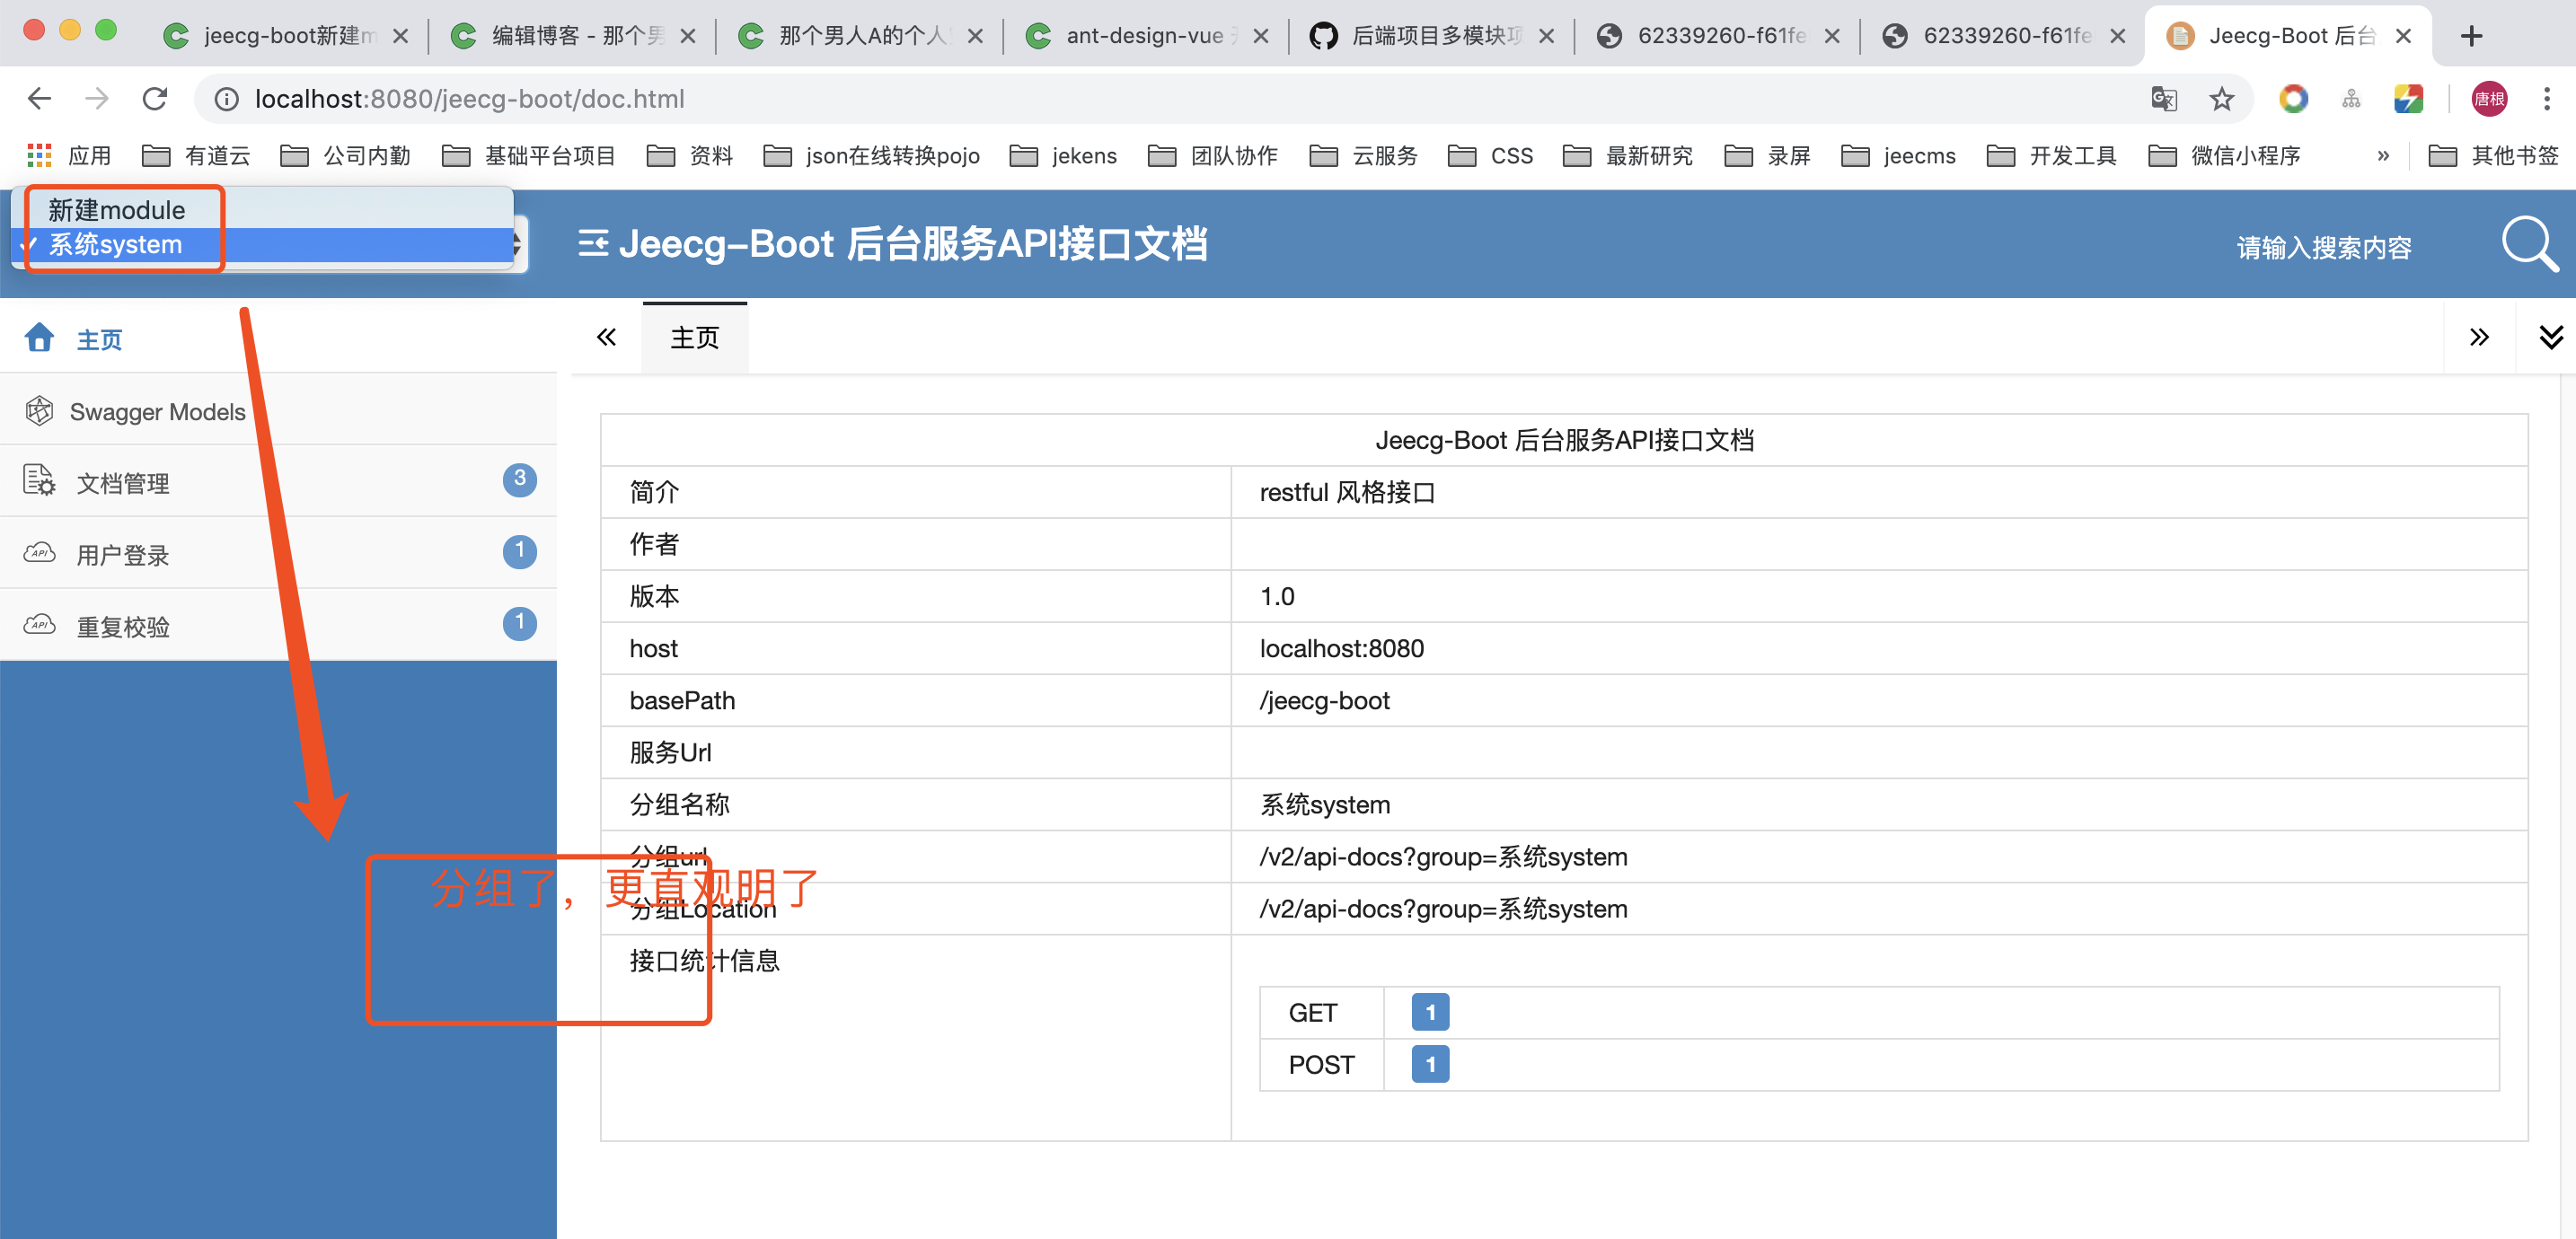
拓展:swagger-ui分组
如果想将新建的module 在swagger中以分组形式展现,可以参考如下配置Swagger2Config.java
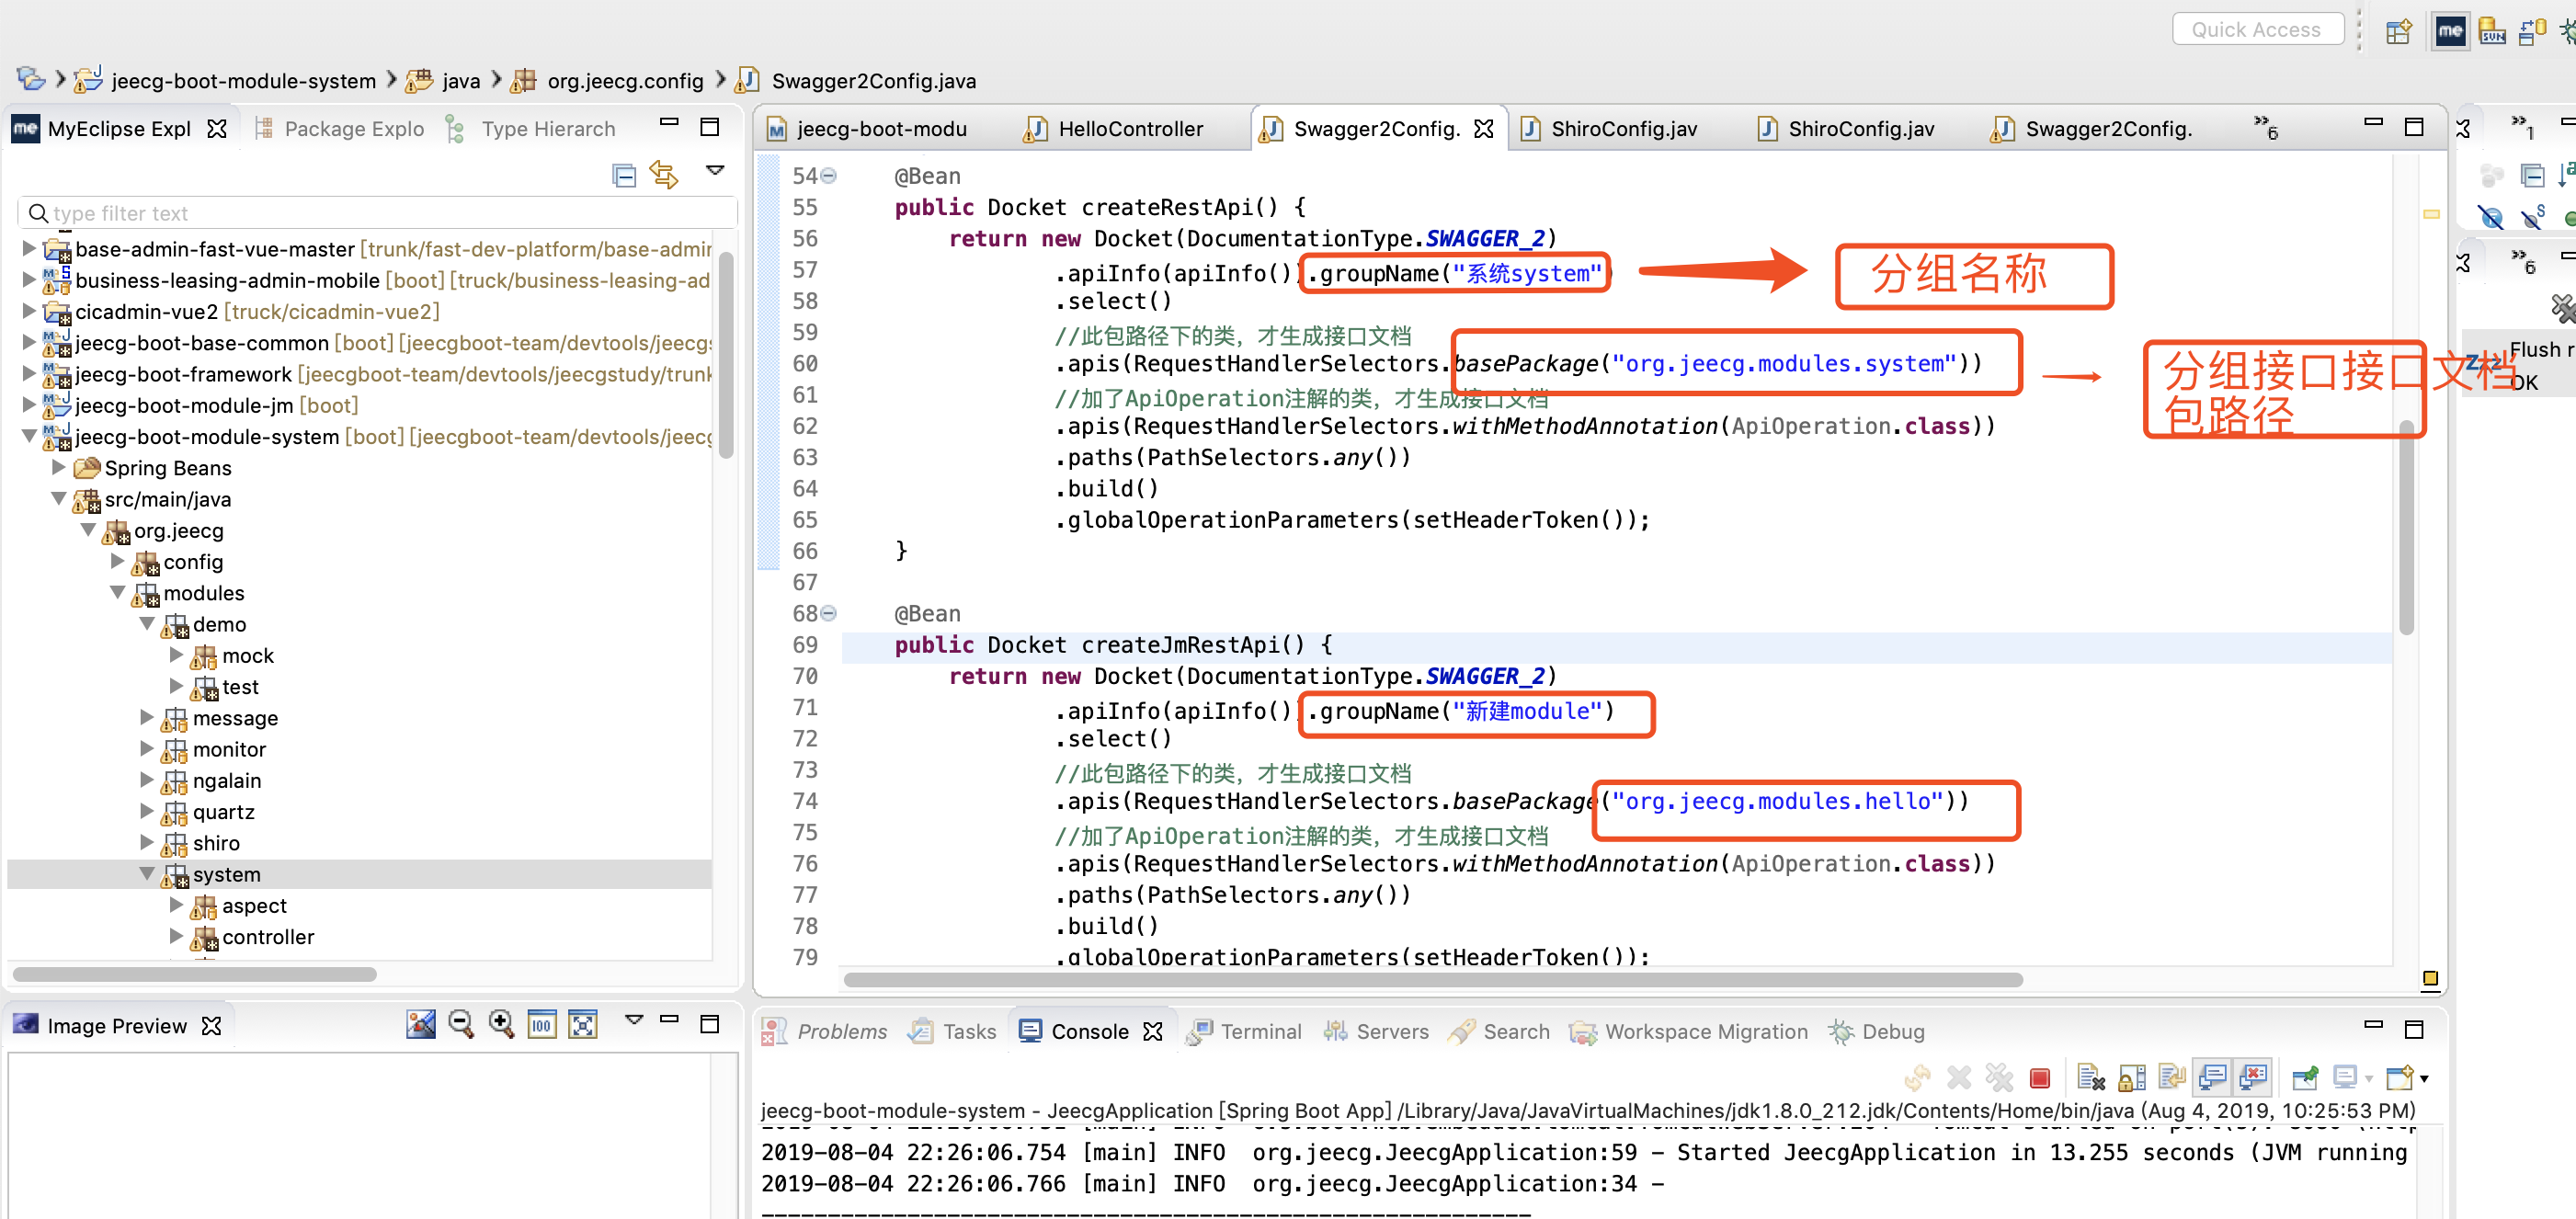
编译启动,访问swagger-ui文档:http://localhost:8080/jeecg-boot/doc.html
如图: