1.从头开始积累centos7系统运用
大牛博客:https://blog.51cto.com/yangrong/p5
linux命令的学习:
创建目录:mkdir
mkdir /data
mkdir -p /data/linux/test
分号的作用:将两条命令一行输出
cd / ;mkdir date
查找当前路径:pwd
print work directory
显示当前所在路径
ls命令:
ls -l 查看长格式
ls-ld 只查看目录
人性化阅读:
[root@python01 ~]# ls -lh /var/log/messages*
-rw------- 1 root root 134K Jun 27 15:33 /var/log/messages
-rw-------. 1 root root 1000K Jun 23 03:45 /var/log/messages-20190623
查看kb
ls -l --block-size=k
[root@python01 ~]# ls -l --block-size=k /var/log/messages*
-rw------- 1 root root 134K Jun 27 15:33 /var/log/messages
-rw-------. 1 root root 1000K Jun 23 03:45 /var/log/messages-20190623
查看兆M
[root@python01 ~]# ls -l --block-size=m /var/log/messages*
-rw------- 1 root root 1M Jun 27 15:33 /var/log/messages
-rw-------. 1 root root 1M Jun 23 03:45 /var/log/messages-20190623
查看GB
[root@python01 ~]# ls -l --block-size=g /var/log/messages*
-rw------- 1 root root 1G Jun 27 15:33 /var/log/messages
-rw-------. 1 root root 1G Jun 23 03:45 /var/log/messages-20190623
cd切换目录:
xargs 从标准输入(管道或stdin、输入重定向)获取数据。并将数据转换成命令行的参数
[root@python01 data]# cat >>test.txt<<EOF
1 2 3 4 5 6
9 8 7 5 4 2
6 5 4
EOF
[root@python01 data]# xargs < test.txt
1 2 3 4 5 6 9 8 7 5 4 2 6 5 4
[root@python01 data]# xargs -n 2 < test.txt
1 2
3 4
5 6
9 8
7 5
4 2
6 5
4
-i
参数见find命令 mv的用法
touch 命令:
创建文件
touch oldboy.txt
批量创建文件:touch stu{1..1000}
echo 命令:
echo 'I am study linux' >oldboy.txt
追加 echo 'oldboy' >>oldboy.txt
cat 命令:多行文本追加,查看文件内容
cat >>/root/oldboy.txt<<EOF
I am studying liunx.
test
mysql
EOF
清空文件内容:
>a.txt
echo '' >a.txt
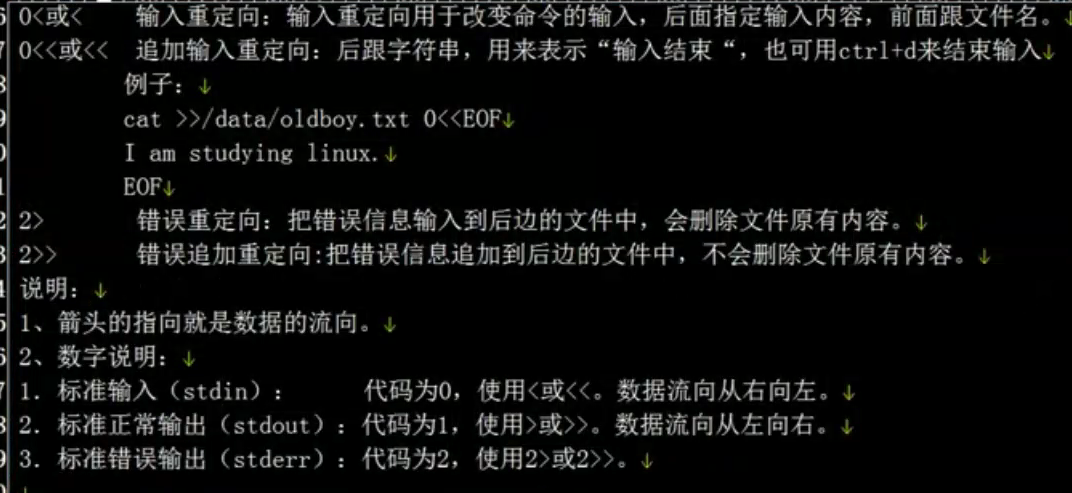
输入重定向:
[root@python01 test]# echo 1 2 3 4 >oldboy.txt
[root@python01 test]# cat oldboy.txt
1 2 3 4
[root@python01 test]# xargs -n 2 <oldboy.txt
1 2
3 4
[root@python01 test]# xargs -n 1 <oldboy.txt
1
2
3
4
[root@python01 test]# xargs -n 1 0<oldboy.txt
1
2
3
4
把空格替换成回车
[root@python01 test]# tr " " "
" <oldboy.txt
1
2
3
4
[root@python01 test]# cat oldboy.txt
1 2 3 4
[root@python01 test]# cat <oldboy.txt
1 2 3 4
cp 命令:复制
复制目录:cp -r /data /tmp
复制目录:cp -a /data /tmp
rm 命令:
删除
删除目录:rm -rf *
删除目录
rm -fr data/
rmdir data
rmdir 命令:
只能删除空目录
[root@python01 test]# rmdir stu
rmdir: failed to remove ‘stu’: Directory not empty
mv 命令:
移动
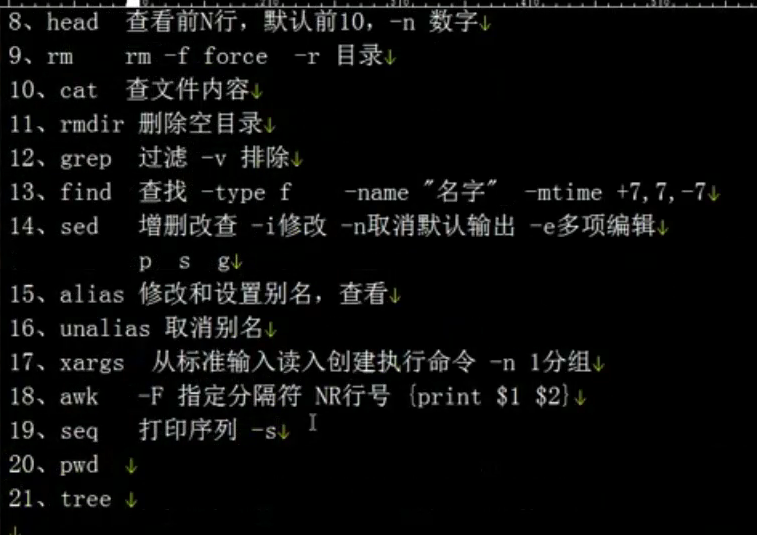
find命令:
使用find代替rm删除文件
[root@python01 test]# ls
oldboy.txt
[root@python01 test]# pwd
/root/test
[root@python01 test]# find /root/test/ -type f
/root/test/oldboy.txt
[root@python01 test]# find /root/test/ -type f
/root/test/oldboy.txt
/root/test/a.tst
[root@python01 test]# find /root/test/ -type f -name "oldboy.txt"
/root/test/oldboy.txt
[root@python01 test]# ls
a.tst oldboy.txt
[root@python01 test]# find /root/test/ -type f -name "oldboy.txt"
/root/test/oldboy.txt
将查询后的结果交给-exec执行:
[root@python01 test]# find /root/test/ -type f -name "oldboy.txt" -exec rm {} ;
[root@python01 test]# ls
a.tst
用管道符删除:
[root@python01 test]# find /root/test/ -type f -name "*.txt"
/root/test/b.txt
[root@python01 test]# find /root/test/ -type f -name "*.txt" |xargs rm -f
[root@python01 test]# ls
a.tst b.txt
[root@python01 test]# touch c.txt
[root@python01 test]# find /root/test/ -type f -name "*.txt" |xargs
/root/test/b.txt /root/test/c.txt
[root@python01 test]# find /root/test/ -type f -name "*.txt" |xargs rm -f
[root@python01 test]# ls
a.tst
删除指定时间的文件:重点命令
删除15天以前的文件:
find /log -type -f -name "*.log" -mtime +15 |xargs rm -r
删除目录30天以前的文件:
find /log -type -f -name "*.log" -mtime +30 |xargs rm -rf
-mtime 时间,按修改时间查找,时间数字,+7七天以前,7代表第七天,-7代表最近7天
find /logs -type f -mtime +5 -exec rm {} ;
find命令:
查找 -type 文件类型 f(file),d(directory),c(character),b(block),s(socker),l(link) ,-name "文件名",
-mtime 时间,按修改时间查找,时间数字,+7七天以前,7代表第七天,-7代表最近7天
-o or或者的意思
[root@python01 test]# touch {1..10}.txt
[root@python01 test]# ls
10.txt 1.txt 2.txt 3.txt 4.txt 5.txt 6.txt 7.txt 8.txt 9.txt a.tst
[root@python01 test]# find /root/test -type f -name "*.txt"
/root/test/1.txt
/root/test/2.txt
/root/test/3.txt
/root/test/4.txt
/root/test/5.txt
/root/test/6.txt
/root/test/7.txt
/root/test/8.txt
/root/test/9.txt
/root/test/10.txt
[root@python01 test]# mv `find /root/test -type f -name "*.txt"` /tmp/
[root@python01 test]# ls /tmp
10.txt 1.txt 2.txt 3.txt 4.txt 5.txt 6.txt 7.txt 8.txt 9.txt
grep命令:加-v排除制定的字符,不加就是过滤(筛子)
[root@python01 test]# cat oldboy.txt
I am studying liunx.
test
mysql
效率高
[root@python01 test]# grep -v test oldboy.txt
I am studying liunx.
mysql
效率低
[root@python01 test]# cat oldboy.txt |grep -v test
I am studying liunx.
mysql
过滤:
[root@python01 test]# grep my oldboy.txt
mysql
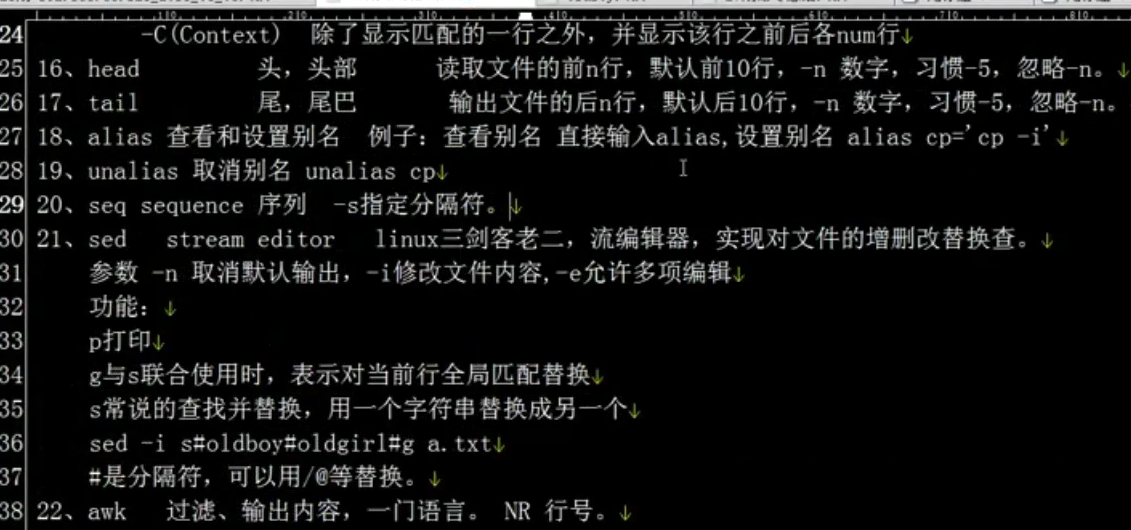
head 命令:查看文件头部行
[root@python01 test]# head -2 oldboy.txt
I am studying liunx.
[root@python01 test]# seq 20 >a.txt
[root@python01 test]# cat a.txt
1
2
3
4
5
6
7
8
9
10
11
12
13
14
15
16
17
18
19
20
[root@python01 test]# head a.txt
1
2
3
4
5
6
7
8
9
10
[root@python01 test]# tail a.txt
11
12
13
14
15
16
17
18
19
20
递归创建目录:
[root@python01 test]# mkdir -p ./01/02/03/04 ./a/b/c/d/e
[root@python01 test]# tree
.
├── 01
│ └── 02
│ └── 03
│ └── 04
├── a
│ └── b
│ └── c
│ └── d
│ └── e
├── a.txt
└── oldboy.txt
9 directories, 2 files
去掉复制的提示:忽略提示
原因就是cp mv rm 这些命令比较危险,容易搞坏文件,防止误操作,别名alias
/反斜线作用屏蔽别名
cp
全路径不适用别名
/bin/cp
[root@python01 test]# cp oldboy.txt /tmp
[root@python01 test]# cp oldboy.txt /tmp
cp: overwrite ‘/tmp/oldboy.txt’? ^C
[root@python01 test]# cp oldboy.txt /tmp
[root@python01 test]# /bin/cp oldboy.txt /tmp
查看系统现有的别名:
[root@python01 test]# alias
alias cp='cp -i'
alias egrep='egrep --color=auto'
alias fgrep='fgrep --color=auto'
alias grep='grep --color=auto'
alias l.='ls -d .* --color=auto'
alias ll='ls -l --color=auto'
alias ls='ls --color=auto'
alias mv='mv -i'
alias rm='rm -i'
alias which='alias | /usr/bin/which --tty-only --read-alias --show-dot --show-tilde'
取消别名:cp 临时生效,重启后失效
unalias cp
alias 是查看和设置别名
unalias是取消别名
别名的作用:
1.通过为危险命令加一些保护参数,防止人为误操作。
2.把很复杂的字符串或命令变成一个简单的字符串或命令。
[root@python01 test]# unalias rm
[root@python01 test]# alias
alias cp='cp -i'
alias egrep='egrep --color=auto'
alias fgrep='fgrep --color=auto'
alias grep='grep --color=auto'
alias l.='ls -d .* --color=auto'
alias ll='ls -l --color=auto'
alias ls='ls --color=auto'
alias mv='mv -i'
alias which='alias | /usr/bin/which --tty-only --read-alias --show-dot --show-tilde'
[root@python01 test]# alias rm='echo this command does not allow to use.'
[root@python01 test]# alias
alias cp='cp -i'
alias egrep='egrep --color=auto'
alias fgrep='fgrep --color=auto'
alias grep='grep --color=auto'
alias l.='ls -d .* --color=auto'
alias ll='ls -l --color=auto'
alias ls='ls --color=auto'
alias mv='mv -i'
alias rm='echo this command does not allow to use.'
alias which='alias | /usr/bin/which --tty-only --read-alias --show-dot --show-tilde'
[root@python01 test]# alias|grep rm
alias rm='echo this command does not allow to use.'
[root@python01 test]# ls
01 a a.txt oldboy.txt
[root@python01 test]# rm a
a/ a.txt
[root@python01 test]# rm a.txt
this command does not allow to use. a.txt
给查看网卡设置一个别名:
[root@python01 test]# alias net='cat /etc/sysconfig/network-scripts/ifcfg-eth0'
设置别名永久生效:
[root@python01 test]# cat /etc/profile
[root@python01 test]# cat ~/.bashrc
# .bashrc
# User specific aliases and functions
alias rm='rm -i'
alias cp='cp -i'
alias mv='mv -i'
# Source global definitions
if [ -f /etc/bashrc ]; then
. /etc/bashrc
fi
别名的修改与取消:
[root@python01 test]# alias
alias cp='cp -i'
alias egrep='egrep --color=auto'
alias fgrep='fgrep --color=auto'
alias grep='grep --color=auto'
alias l.='ls -d .* --color=auto'
alias ll='ls -l --color=auto'
alias ls='ls --color=auto'
alias mv='mv -i'
alias net='cat /etc/sysconfig/network-scripts/ifcfg-eth0'
alias rm='rm -i'
alias which='alias | /usr/bin/which --tty-only --read-alias --show-dot --show-tilde'
[root@python01 test]# unalias net
[root@python01 test]# alias
alias cp='cp -i'
alias egrep='egrep --color=auto'
alias fgrep='fgrep --color=auto'
alias grep='grep --color=auto'
alias l.='ls -d .* --color=auto'
alias ll='ls -l --color=auto'
alias ls='ls --color=auto'
alias mv='mv -i'
alias rm='rm -i'
alias which='alias | /usr/bin/which --tty-only --read-alias --show-dot --show-tilde'
seq命令:
-s 参数指定分隔符
[root@python01 test]# seq -s ' ' 10
1 2 3 4 5 6 7 8 9 10
[root@python01 ~]# seq -s "==" 10
1==2==3==4==5==6==7==8==9==10
[root@python01 ~]# echo {1..10}
1 2 3 4 5 6 7 8 9 10
[root@python01 ~]# echo {a..z}
a b c d e f g h i j k l m n o p q r s t u v w x y z
[root@python01 test]# seq 10
1
2
3
4
5
6
7
8
9
10
seq 1 3 10
从哪个数开通 间隔 结尾
[root@python01 test]# seq 1 3 10
1
4
7
10
查看文件中指定的行:
[root@python01 test]# seq 100 > test.txt
[root@python01 test]# head -30 test.txt
[root@python01 test]# head -30 test.txt |tail -11
20
21
22
23
24
25
26
27
28
29
30
sed命令:三剑客老二 处理文本 流编辑器
sed -n n的作用是取消默认输出,按照指定规则打印
p为打印的意思
打印一行:
[root@python01 test]# sed -n '20'p test.txt
20
[root@python01 test]# sed -n '$'p test.txt
100
[root@python01 test]# sed -n '20,30'p test.txt
20
21
22
23
24
25
26
27
28
29
30
[root@python01 test]# echo 'oldboy oldgirl' >oldgirl.txt
[root@python01 test]# cat oldgirl.txt
oldboy oldgirl
[root@python01 test]# sed 's#oldgirl#shenjing#g' oldgirl.txt
oldboy shenjing
-i 参数才会修改内容:
g与s联合使用是,表示对当前行全局匹配替换
s常说的查找替换,用一个字符替换成另一个字符
[root@python01 test]# sed -i 's#oldgirl#shenjing#g' oldgirl.txt
[root@python01 test]# cat oldgirl.txt
oldboy shenjing
[root@python01 test]# echo "oldboy" >boy.sh
[root@python01 test]# echo "oldboy" >old.sh
[root@python01 test]# echo "oldboy" >oldboy.sh
[root@python01 test]# find /root/test -type f -name "*.sh" |xargs cat
oldboy
oldboy
oldboy
[root@python01 test]# ls
01 a a.txt boy.sh oldboy.sh oldboy.txt oldgirl.txt old.sh stu test.txt
[root@python01 test]# find . -type f -name "*.sh"
./boy.sh
./old.sh
./oldboy.sh
[root@python01 test]# find . -type f -name "*.sh" |xargs rm -f
[root@python01 test]# ls
01 a a.txt oldboy.txt oldgirl.txt stu test.txt
批量替换多个文件中指定的字符串
[root@python01 test]# find /root/test -type f -name "*.sh" |xargs sed 's#oldboy#oldgirl#g'
oldgirl
oldgirl
oldgirl
[root@python01 test]# find /root/test -type f -name "*.sh" |xargs sed -i 's#oldboy#oldgirl#g'
[root@python01 test]# sed 's#oldgirl#oldboy#g' ` find /root/test -type f -name "*.sh"`
oldboy
oldboy
oldboy
[root@python01 test]# sed -i 's#oldgirl#oldboy#g' ` find /root/test -type f -name "*.sh"`
awk命令:三剑客老大 处理文本 过滤,输出内容,一门语音。
-F 指定分隔符 NR代表行号 {print $1 $2}
[root@python01 test]# awk '{if(NR<31&&NR>19)printf $0"
"}' test.txt
20
21
22
23
24
25
26
27
28
29
30
锦上天花:
[root@python01 test]# awk '19<NR && NR<31' test.txt
20
21
22
23
24
25
26
27
28
29
30
[root@python01 test]# awk 'NR==31' test.txt
31
grep 命令:
打印指定的行,然后加后面的10行 -A
[root@python01 test]# grep 20 -A 10 test.txt
20
21
22
23
24
25
26
27
28
29
30
显示指定行前后个5行:-C
[root@python01 test]# grep 25 -C 5 test.txt
20
21
22
23
24
25
26
27
28
29
30
显示指定行前10行: -B
[root@python01 test]# grep 30 -B 10 test.txt
20
21
22
23
24
25
26
27
28
29
30
man 命令:
查询所以命令的使用:
命令 --help
date 命令:
修改系统时间:
date -s "05/10/2010 10:18:11"
内置命令:
[root@python01 ~]# man cd
BASH_BUILTINS(1) General Commands Manual BASH_BUILTINS(1)
NAME
bash, :, ., [, alias, bg, bind, break, builtin, caller, cd, command, compgen, complete, compopt, continue, declare, dirs, disown,
echo, enable, eval, exec, exit, export, false, fc, fg, getopts, hash, help, history, jobs, kill, let, local, logout, mapfile,
popd, printf, pushd, pwd, read, readonly, return, set, shift, shopt, source, suspend, test, times, trap, true, type, typeset,
ulimit, umask, unalias, unset, wait - bash built-in commands, see bash(1)
[root@python01 ~]# which cp
alias cp='cp -i'
/usr/bin/cp
[root@python01 ~]# which cd
/usr/bin/cd
特殊符合:
./ . 点是当前目录
..// ..是上级目录
大括号:
[root@python01 ~]# mkdir -p /date/{3306,3307}/date
[root@python01 ~]# tree /date
/date
├── 3306
│ └── date
└── 3307
└── date
4 directories, 0 files
快捷键:
ctrl+c 终止当前命令活程序
ctrl+d 退出当前用户环境,相当于exit,logout
ctrl+l 清屏,相当于clear
ctrl+a 光标回到最前面 将光标移至输入行头,相当于Home键
ctrl+e 光标回到最后面 将光标移至输入行末,相当于End键
ctrl+u 清理光标前面的字符
ctrl+k 清理光标后面的字符
ctrl+w 清理光标前的一个单词
ctrl+r 搜索历史命令
32位系统和64位系统:
查看系统位数:
[root@python01 ~]# uname -m
x86_64
[root@python01 ~]# uname -a
Linux python01 3.10.0-957.el7.x86_64 #1 SMP Thu Nov 8 23:39:32 UTC 2018 x86_64 x86_64 x86_64 GNU/Linux
[root@python01 ~]# ls -ld /lib64
lrwxrwxrwx. 1 root root 9 May 24 23:24 /lib64 -> usr/lib64
[root@python01 ~]# cat /etc/redhat-release
CentOS Linux release 7.6.1810 (Core)
内核:
[root@python01 ~]# uname -r
3.10.0-957.el7.x86_64
经历过的内核版本:从2.6到3.1
ps -ef 命令:
程序是代码文件,进程是正在运行的程序
查看进程:
查看指定进程
[root@python01 ~]# ps -ef |grep ssh
root 8861 1 0 Jun17 ? 00:00:00 /usr/sbin/sshd -D
root 24809 8861 0 09:07 ? 00:00:00 sshd: root@pts/0
root 24981 24811 0 14:50 pts/0 00:00:00 grep --color=auto ssh
查看端口:
[root@python01 ~]# netstat -luntp|grep 22
tcp 0 0 0.0.0.0:22 0.0.0.0:* LISTEN 8861/sshd
tcp6 0 0 :::22 :::* LISTEN 8861/sshd
[root@python01 ~]# netstat -luntp|grep ssh
tcp 0 0 0.0.0.0:22 0.0.0.0:* LISTEN 8861/sshd
tcp6 0 0 :::22 :::* LISTEN 8861/sshd
ping不通:
1.客户端到服务端物理链路有问题。
网卡,IP,网线,防火墙
2.服务是否好的
ssh服务是否好的
检测办法:从哪个机器连就在哪个机器上操作
telnet 192.168.33.128 22(服务器的IP和PORT)
可能你原因:
服务器端防火墙阻挡
df -h 命令:
查看磁盘占用
[root@python01 ~]# df -h
Filesystem Size Used Avail Use% Mounted on
/dev/mapper/centos-root 47G 1.6G 46G 4% /
devtmpfs 1.9G 0 1.9G 0% /dev
tmpfs 1.9G 0 1.9G 0% /dev/shm
tmpfs 1.9G 12M 1.9G 1% /run
tmpfs 1.9G 0 1.9G 0% /sys/fs/cgroup
/dev/sda1 497M 139M 359M 28% /boot
/dev/mapper/centos-data 151G 33M 151G 1% /data
tmpfs 378M 0 378M 0% /run/user/0
fdisk -l命令:
[root@python01 ~]# fdisk -l
Disk /dev/sda: 214.7 GB, 214748364800 bytes, 419430400 sectors
Units = sectors of 1 * 512 = 512 bytes
Sector size (logical/physical): 512 bytes / 512 bytes
I/O size (minimum/optimal): 512 bytes / 512 bytes
Disk label type: dos
Disk identifier: 0x000e3b06
Device Boot Start End Blocks Id System
/dev/sda1 * 2048 1026047 512000 83 Linux
/dev/sda2 1026048 419430399 209202176 8e Linux LVM
Disk /dev/mapper/centos-root: 50.0 GB, 50000297984 bytes, 97656832 sectors
Units = sectors of 1 * 512 = 512 bytes
Sector size (logical/physical): 512 bytes / 512 bytes
I/O size (minimum/optimal): 512 bytes / 512 bytes
Disk /dev/mapper/centos-swap: 2147 MB, 2147483648 bytes, 4194304 sectors
Units = sectors of 1 * 512 = 512 bytes
Sector size (logical/physical): 512 bytes / 512 bytes
I/O size (minimum/optimal): 512 bytes / 512 bytes
Disk /dev/mapper/centos-data: 162.1 GB, 162067906560 bytes, 316538880 sectors
Units = sectors of 1 * 512 = 512 bytes
Sector size (logical/physical): 512 bytes / 512 bytes
I/O size (minimum/optimal): 512 bytes / 512 bytes
磁盘设备的唯一标识:
[root@python01 ~]# blkid
/dev/sda1: UUID="1653bc45-1d10-4e98-805f-6615d99d551f" TYPE="xfs"
/dev/sda2: UUID="dI0T5n-cD1U-1uwZ-Ynjj-ZxQP-yL05-2rZ5Dx" TYPE="LVM2_member"
/dev/mapper/centos-root: UUID="f0feb483-5149-4f03-b3f2-5a7c8970c7d5" TYPE="xfs"
/dev/mapper/centos-swap: UUID="1118d205-9040-463d-8509-7a3f1efb3293" TYPE="swap"
/dev/mapper/centos-data: UUID="9ec3ac30-2ad1-4135-bdc0-5203f55778f3" TYPE="xfs"