配置数据库
1.安装pymysql
(Django_login) D:demoDjango_login>pip install pymysql
Collecting pymysql
  Using cached https://files.pythonhosted.org/packages/a7/7d/682c4a7da195a678047c8f1c51bb7682aaedee1dca7547883c3993ca9282/PyMySQL-0.9.2-py2.p
y3-none-any.whl
Collecting cryptography (from pymysql)
  Using cached https://files.pythonhosted.org/packages/f1/01/a144ec664d3f9ae5837bd72c4d11bdd2d8d403318898e4092457e8af9272/cryptography-2.3.1-
cp36-cp36m-win_amd64.whl
Collecting idna>=2.1 (from cryptography->pymysql)
  Using cached https://files.pythonhosted.org/packages/4b/2a/0276479a4b3caeb8a8c1af2f8e4355746a97fab05a372e4a2c6a6b876165/idna-2.7-py2.py3-no
ne-any.whl
Requirement already satisfied: six>=1.4.1 in e:venvdjango_loginlibsite-packages (from cryptography->pymysql) (1.11.0)
Collecting asn1crypto>=0.21.0 (from cryptography->pymysql)
  Using cached https://files.pythonhosted.org/packages/ea/cd/35485615f45f30a510576f1a56d1e0a7ad7bd8ab5ed7cdc600ef7cd06222/asn1crypto-0.24.0-p
y2.py3-none-any.whl
Collecting cffi!=1.11.3,>=1.7 (from cryptography->pymysql)
  Using cached https://files.pythonhosted.org/packages/2f/85/a9184548ad4261916d08a50d9e272bf6f93c54f3735878fbfc9335efd94b/cffi-1.11.5-cp36-cp
36m-win_amd64.whl
Collecting pycparser (from cffi!=1.11.3,>=1.7->cryptography->pymysql)
  Using cached https://files.pythonhosted.org/packages/68/9e/49196946aee219aead1290e00d1e7fdeab8567783e83e1b9ab5585e6206a/pycparser-2.19.tar.
gz
Installing collected packages: idna, asn1crypto, pycparser, cffi, cryptography, pymysql
  Running setup.py install for pycparser ... done
Successfully installed asn1crypto-0.24.0 cffi-1.11.5 cryptography-2.3.1 idna-2.7 pycparser-2.19 pymysql-0.9.2
2.初始化pymysql
import pymysql
pymysql.install_as_MySQLdb()
3.创建数据库
mysql> CREATE DATABASE IF NOT EXISTS demo_login DEFAULT CHARSET utf8 COLLATE utf8_general_ci;
Query OK, 1 row affected (0.01 sec)
4.配置数据库连接信息
DATABASES = {
    'default': {
        'ENGINE': 'django.db.backends.mysql',
        'NAME': 'demo_login',
        'USER':'root',
        'PASSWORD':'root',
    }
}
5.设计数据库模型
from django.db import models

# Create your models here.
class User(models.Model):
    gender=(
        ('mal',"男"),
        ('female',"女")
    )
    name=models.CharField(max_length=64,unique=True)
    password=models.CharField(max_length=512)
    email=models.EmailField(unique=True)
    date=models.DateTimeField()
    sex=models.CharField(max_length=2,choices=gender,default='男')  #choices用于页面上的选择框标签,需要先提供一个二维的二元元组,第一个元素表示存在数据库内真实的值,第二个表示页面上显示的具体内容

     def __str__(self):
        return self.name    #这个是用于管理后台查看用户信息的,没有就会使用user_object显示

    class Meta:
        db_table='t_user'   #自定义创建的表名
        verbose_name='用户'   #管理后台显示的模型名称
        verbose_name_plural='用户'    #verbose_name的复数形式
6.创建表记录和表
(Django_login) D:demoDjango_login>python manage.py makemigrations
Migrations for 'app_login':
app_loginmigrations�001_initial.py
- Create model User
(Django_login) D:demoDjango_login>python manage.py migrate
Operations to perform:
Apply all migrations: admin, app_login, auth, contenttypes, sessions, xadmin
Running migrations:
Applying contenttypes.0001_initial... OK
Applying auth.0001_initial... OK
Applying admin.0001_initial... OK
Applying admin.0002_logentry_remove_auto_add... OK
Applying app_login.0001_initial... OK
Applying contenttypes.0002_remove_content_type_name... OK
Applying auth.0002_alter_permission_name_max_length... OK
Applying auth.0003_alter_user_email_max_length... OK
Applying auth.0004_alter_user_username_opts... OK
Applying auth.0005_alter_user_last_login_null... OK
Applying auth.0006_require_contenttypes_0002... OK
Applying auth.0007_alter_validators_add_error_messages... OK
Applying auth.0008_alter_user_username_max_length... OK
Applying sessions.0001_initial... OK
Applying xadmin.0001_initial... OK
Applying xadmin.0002_log... OK
Applying xadmin.0003_auto_20160715_0100... OK
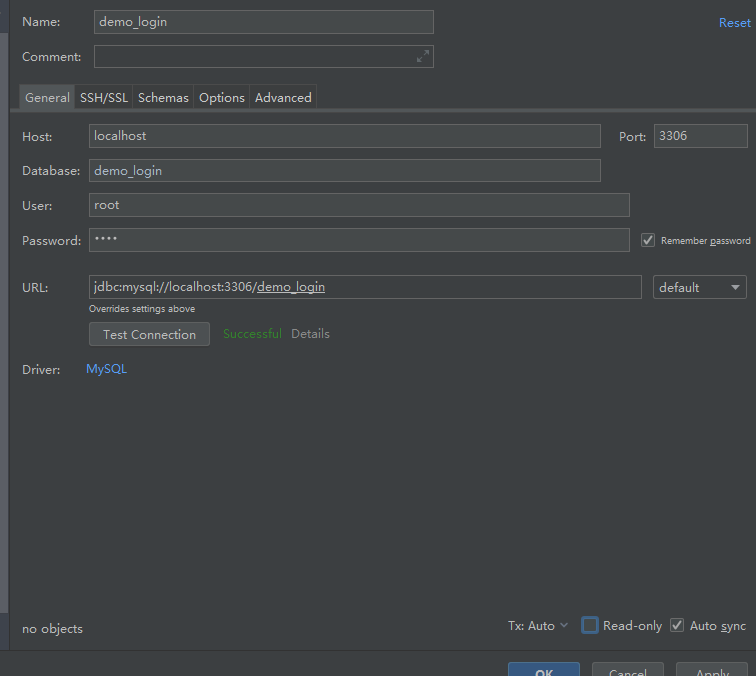
7.连接数据库
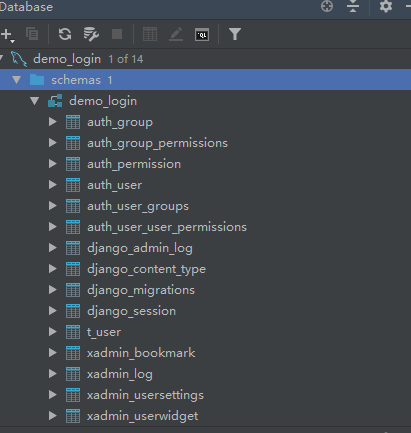
8.查看表