
壹 ❀ 引
学习任何一门框架,无论是vue、react亦或是angular,我们除了需要熟练掌握框架语法外,了解框架自身的生命周期也是至关重要的。一方面生命周期在面试中多多少少总是会提及,其次了解框架内部运转过程,对于帮助你写出符合预期的代码也是极有帮助。
但对于大多数刚接触一门框架的初学者而言,以react为例内部就存在数十个生命周期函数,它们分别代表什么含义,应该在何种场景去使用它,这些都是让人头痛的问题。
事实上,react中的组件与大自然中的生物类似,就像人有出生,成长与死亡的过程,react组件也有装载(初始化,类似出生),更新(成长)与卸载(死亡)三个阶段。将组件的生命周期按照这三个阶段去划分,并理解每个阶段应该做什么事,你会发现这样去理解会清晰很多。
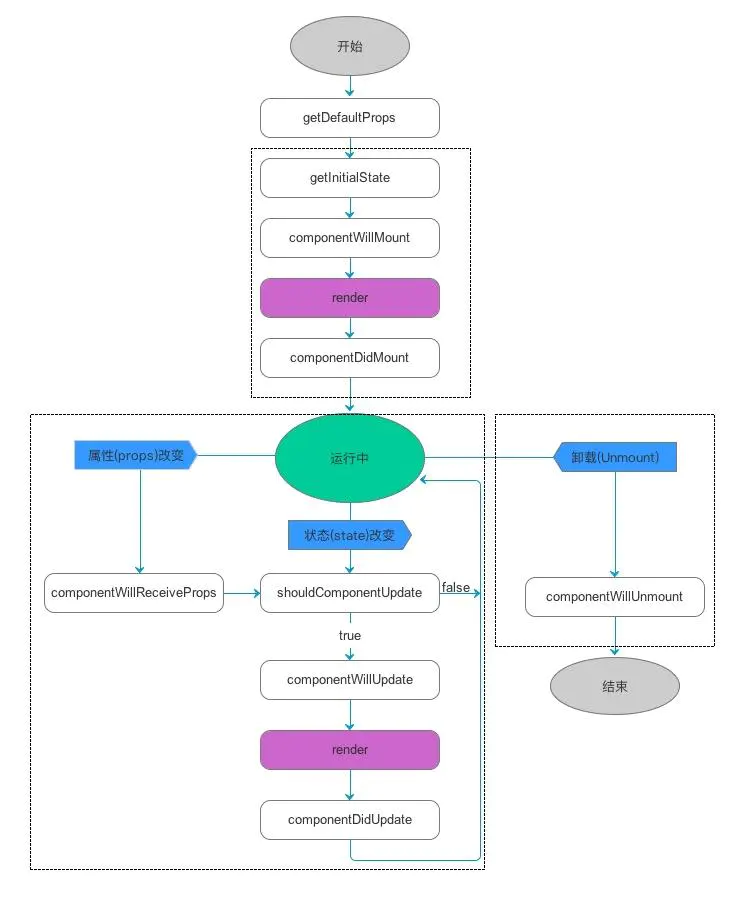
那么本文并不会像其它文章那样,开局一张生命周期运转图。我们将从三个阶段分别介绍react组件的生命周期函数作用,以及在开发中你可能使用它的场景,那么本文开始。
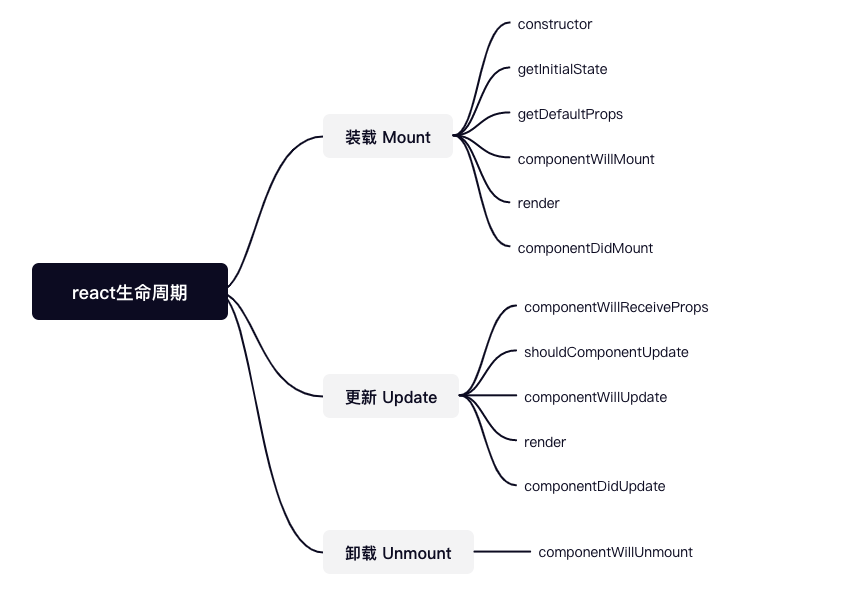
贰 ❀ 装载(Mount)阶段
所谓装载阶段,说直白点就是组件的初始化阶段。想象一下我们玩一款角色扮演游戏,角色在出生前我们都需要自定义角色性别,定义角色名,更开放一点游戏还会提供捏脸功能,比如选择发型,发色,眼睛大小,身材比例等等属性。

react装载阶段也是在做相同的事,组件初始化阶段应该渲染什么样的DOM结构?需要展示哪些属性提供哪些交互功能?这些都是在装载阶段决定好的;当然,就像人只会出生一次,react的装载阶段也只有一次。react装载阶段会执行的生命周期函数如下,让我们一一介绍它们:
- constructor
- getInitialState
- getDefaultProps
- componentWillMount
- render
- componentDidMount
贰 ❀ 壹 constructor
在前面文章的例子中,我们已经跟constructor打过招呼了,如果你了解ES6语法,对于constructor一定不会陌生。在ES6中,constructor就是构造方法,简单复习下ES5的构造函数与ES6的Class类,以下两段代码作用相同:
// ES5
function Parent1(name, age) {
    this.name = name;
    this.age = age;
};
Parent1.prototype.sayName = function () {
    console.log(this.name);
};

const son1 = new Parent1('echo', 27);
son1.sayName();// echo

// ES6
class Parent2 {
    constructor(name,age){
        this.name = name;
        this.age = age;
    }
    sayName() {
        console.log(this.name);
    }
};

const son2 = new Parent2('echo',27);
son2.sayName();// echo
由于ES6的Class类提供了继承,ES6明确规定,当子类需要继承父类时,需要在子类的constructor中执行一次super函数,目的就是调用父类的constructor函数,从而继承到父类constructor中定义的属性方法。
class Parent {
  constructor() {
    console.log(new.target.name);
  }
}
class Child extends Parent {
  constructor() {
    super();
  }
}
new Parent() // Parent
new Child() // Child
可以看到,当执行new Child()时,虽然在Child内部super()等同于调用Parent的constructor方法,但此时this指向却不是parent,而是Child的实例。
一个简单的继承例子就是:
class Parent {
    constructor(a, b) {
        this.a = a;
        this.b = b;
    }
}
class Child extends Parent {
    constructor(a, b, c) {
        super(a, b);
        this.c = c;
    }
}
const o = new Child(1, 2, 3);
console.log(o.a, o.b, o.c);// 1 2 3
可以看到child的constructor内并未定义a, b属性,但通过super,我们成功从父类Parent继承了这两个属性。所以本质上来说,此时的super()等同于Parent.prototype.constructor.call(Child,1,2),当然这句代码无法正确执行,毕竟ES6明确规定Class只能通过new调用,我们的目的也只是解释了这个过程而已。
OK,扯的有点远了,让我们回归正题。在react的constructor方法中,我们一般做三件事。
- 确保在constructor中使用this前执行super,否则会报错,这是ES6的硬性规定。
- 定义组件内部的state。
- 为组件内部定义的方法绑定this。
我想这三点大家应该很好理解,我们一一解释。
第一点,由于react组件也是通过Class继承声明,所以如果需要使用constructor,一般推荐调用super,否则可能会报错。
第二点,我们在前文提到,react组件的数据由外部传递的props与内部定义的state共同构成,所以如果我们希望为一个组件定义内部属性state,那么在constructor中定义就是最佳的做法。
第三点,由于ES6中,类的内部函数与this并不是自动绑定的,所以为了方便函数被调用时能指向正确的this,传统做法可以在constructor提前为其绑定好this。当然除了这种绑定方式,其实还有其它另外两种做法,有兴趣可参考从零开始的react入门教程(三)中关于 奇怪的事件绑定 部分内容的介绍。
我们来看一个综合的例子:
function Child(props) {
    return (
        <div className="echo">
            <div>{props.name}</div>
            <button onClick={props.sayName}>点我</button>
        </div>
    )
};

class Parent extends React.PureComponent {
    constructor() {
      	// 在使用this前调用,不然就报错
        super();
      	// 定义组件内部属性
        this.state = { name: 'echo' };
        // 为组件内部的方法绑定this
        this.sayName = this.sayName.bind(this);
    }

    sayName() {
        console.log(this.state.name);
    }

    render() {
        return (<Child name={this.state.name} sayName = {this.sayName}/>);
    }
}

ReactDOM.render(<Parent />, document.getElementById('root'));

需要注意的是并不是所有组件都需要定义constructor方法,比如函数组件,这类组件只是单纯接受外部传递的props并展示DOM,内部并未提供state,所以不需要constructor也完全没问题,比如上述例子中的Child组件。
贰 ❀ 贰 getInitialState与getDefaultProps
关于这两个方法,大家可能在react组件的生命周期图解中见过,但随着ES6语法的普及,实际项目中对两者比较陌生也是很正常的事情。在ES6语法之前,react使用React.createClass来创建组件,所以在内部便提供了这两个方法。其中getInitialState顾名思义,它内部用于返回初始化this.state的数据,而getDefaultProps则用于返回props的默认初始值。
以下两段代码目的相同:
const Parent = React.createClass({
    getInitialState: function () {
        return {
            name: 'echo'
        }
    },
    getDefaultProps: function () {
        return {
            age: 26
        }
    }
})

class Parent extends React.PureComponent {
    constructor() {
        super();
        this.state = { name: 'echo' };
    }

    static defaultProps = {
        age: 26
    }

    render() {
        return <div>{this.props.age}</div>
    }
}
通过对比发现,ES6写法上对于默认props与state的定义更为简洁。且由于React.createClass已接近废弃,所以这两个方法大家知道是做什么的就行了,而且ES6语法中我们已经有个更棒的写法来取代它们。
贰 ❀ 叁 componentWillMount与componentDidMount
这两个方法根据方法名应该就能理解何时触发,componentWillMount在constructor之后render之前触发,而componentDidMount在render之后触发。但事实上,我们在开发中使用componentWillMount的场景并不多,总结来说,如果你有一些操作需要在componentWillMount中做,你完全可以将其放在constructor中去完成。
而componentDidMount在组件初始化中使用的频率就非常高了,由于它会在render后调用,所以当它触发时,组件的装载状态已经完成了,也就是说能够渲染的DOM都已经加载好了,但对于组件而言,很多数据可能都来自网络请求,所以如果你的组件需要去请求一些网络数据,componentDidMount就是发起请求的好地方,通过请求拿回数据,并再次利用this.setState修改state,从而触发render再次渲染,这就是一次合理的组件初始化加载了。
我们来看个例子:
class Parent extends React.PureComponent {
    constructor() {
        super();
        this.state = { age: 27 };
    }
    componentDidMount() {
        setTimeout(() => {
            this.setState({ age: 18 })
        }, 3000);
    }
    render() {
        return <div>{this.state.age}</div>;
    }
}

ReactDOM.render(<Parent />, document.getElementById('root'));
这个例子中我们用定时器模拟了网络请求,在3秒后修改age为18。
贰 ❀ 肆 render
对于Class组件而言,render函数是唯一必需声明的函数,我们在声明一个Class组件时可以不提供render之外的其它任意函数,但如果不提供render就直接报错了,因为对于Class组件,你总是得告诉react你这个组件需要渲染什么内容。
当然,有同学就说了,那确实会存在一个组件什么都不需要渲染的情况啊,一般这种情况我们前面也说了,你可以在render中直接返回一个null,达到什么都不渲染的目的。
class Parent extends React.PureComponent {
    constructor() {
        super();
        this.state = { age: 27 };
    }
    render() {
        return this.state.name ? <div>{this.props.age}</div> : null
    }
}
OK,到这里我们介绍完了组件装载阶段会调用的生命周期函数,最后看个例子,加强执行先后顺序的理解。
class Child extends React.PureComponent {
    constructor() {
        super();
        console.log('子的constructor执行了')
    }
    componentWillMount(){
        console.log('子的componentWillMount执行了');
    }
    componentDidMount() {
        console.log('子的componentDidMount执行了');
    }
    render() {
        console.log('子的render执行了')
        return null;
    }
}
class Parent extends React.PureComponent {
    constructor() {
        super();
        console.log('父的constructor执行了')
    }
    componentWillMount(){
        console.log('父的componentWillMount执行了');
    }
    componentDidMount() {
        console.log('父的componentDidMount执行了');
    }
    render() {
        console.log('父的render执行了')
        return <Child />;
    }
}

ReactDOM.render(<Parent />, document.getElementById('root'));
可以看到,constructor-componentWillMount-render都是依次执行,且执行到父的render后就紧接着执行子的前三个声明周期函数,父的componentDidMount是在子的componentDidMount执行完成后才触发。
这并不难理解,由于父组件渲染的内容其实就是子组件Child,如果Child的componentDidMount不执行完成,父render又怎么知道需要渲染什么内容呢?所以等到Child的componentDidMount跑完,Parent的render才算真正跑完,此时才会调用Parent的componentDidMount方法,到此为止,父子组件的装载就算全部进行完毕。
叁 ❀ 更新(Update)阶段
在我们玩角色扮演类游戏时,当我们创建好了游戏角色,进入游戏后,我们的角色肯定不是一层不变的,随着不停的练级,通过奖励升级不同的装备等等,游戏角色的等级,装备外形都会对应的发生变化,这对应到react组件中便是更新阶段。
react更新阶段共会执行如下这些函数,我们同样一一来解释:
- componentWillReceiveProps
- shouldComponentUpdate
- componentWillUpdate
- Render
- componentDidUpdate
叁 ❀ 壹 componentWillReceiveProps
我们知道,对于react组件而言,无论是组件内部的state变化亦或是props变化,都会触发组件的render再次渲染。那么这个方法从字面意思上就是当组件接受的props发生变化时便会触发;注意,如果是组件的state变化并不会触发此方法。
事实上,与方法名componentWillReceiveProps字面意义不同,当一个父组件内部使用了一个子组件,无论父传给子的props有没有变化,只要父组件的render被再次调用(除了父组件装载时render初次调用),子组件的componentWillReceiveProps都会被调用。你可能在想,这样性能难道不会很差吗?当然不会,决定组件要不要渲染的其实是shouldComponentUpdate,这个我们后面会说,我们来看个例子:
class Child extends React.PureComponent {
    componentWillReceiveProps(nextProps){
        console.log('子组件的componentWillReceiveProps执行了');
    }
    render() {
        console.log('子的render执行了')
        return <div>1</div>;
    }
}
class Parent extends React.PureComponent {
    constructor() {
        super();
        this.state = { age: 27 };
    }
    componentDidMount() {
        setTimeout(() => {
            this.setState({ age: 18 })
        }, 3000);
    }
    render() {
        return <Child/>
    }
}
ReactDOM.render(<Parent />, document.getElementById('root'));

可以看到,Parent虽然调用了Child,但并未传递任何属性过去,由于Parent在三秒后通过定时器修改了state,导致Parent的render被再次触发,奇怪的事情发生了,Child的componentWillReceiveProps执行了,但由于此时Child内并无任何props或state变化,所以Child的render并未触发第二次。
这就是我们在上文中解释的,只要父组件的render被再次触发(除去父组件装载过程的render调用),子组件的componentWillReceiveProps其实都会被调用一次。
我们再来看一个正确的例子:
class Child extends React.PureComponent {
    componentWillReceiveProps(nextProps){
        console.log('子组件的componentWillReceiveProps执行了');
    }
    render() {
        console.log('子的render执行了')
        return <div>{this.props.age}</div>;
    }
}
class Parent extends React.PureComponent {
    constructor() {
        super();
        this.state = { age: 27 };
    }
    componentDidMount() {
        setTimeout(() => {
            this.setState({ age: 18 })
        }, 3000);
    }
    render() {
        return <Child age={this.state.age}/>
    }
}

ReactDOM.render(<Parent />, document.getElementById('root'));

在这个例子中,我们将Parent的age传递给了Child,因为子组件也有装载过程,所以一开始componentWillReceiveProps并不会触发;三秒之后,Parent修改了state中的age,此时Parent的render被再次调用,子组件的componentWillReceiveProps也被再次调用(你会发现跟props变没变没啥关系),但此次由于props变化了,所以Child的render也被再次触发。
也正是因为子组件的componentWillReceiveProps触发跟外面传递的props有没有变化没关系,所以在实际开发中,我们会在componentWillReceiveProps内部对比新旧props的差异,再决定是否需要更新子组件的state,从而决定是否需要再次渲染子组件。
来看个例子:
class Child extends React.PureComponent {
    constructor(props) {
        super(props);
        this.state = {
            name: ''
        }
    }
    componentWillReceiveProps(nextProps) {
        if (nextProps.name !== this.props.name) {
            console.log(nextProps, this.props);
            console.log('传入的props发生改变了');
            this.setState({ name: nextProps.name });
        }
    }
    render() {
        console.log('子的render执行了')
        return <div>{this.state.name}</div>;
    }
}
class Parent extends React.PureComponent {
    constructor() {
        super();
        this.state = { name: 'echo' };
    }
    componentDidMount() {
        setTimeout(() => {
            this.setState({ name: '听风是风' })
        }, 3000);
    }
    render() {
        return <Child name={this.state.name} />
    }
}

ReactDOM.render(<Parent />, document.getElementById('root'));
可以看到,在componentWillReceiveProps中nextProps就是发生变化之后的props,而this.props就是上一次的props。
叁 ❀ 贰 shouldComponentUpdate
我们在componentWillReceiveProps提到,此方法并不是决定组件是否应该渲染的方法,当然在componentWillReceiveProps中修改state的做法除外。真正决定组件是否应该更新的是shouldComponentUpdate,字面意义上就很清晰不是吗?
shouldComponentUpdate接受两个参数nextProps, nextState,并返回一个布尔值,当布尔值为true,就是告诉组件你应该更新了,若返回的是false,组件的render则不会被再次触发。我们来看个例子:
class Parent extends React.Component {
    constructor() {
        super();
        this.state = { name: 'echo' };
    }
    componentDidMount() {
        setTimeout(() => {
            this.setState({ name: '听风是风' })
        }, 3000);
    }
    shouldComponentUpdate(nextProps, nextState){
        console.log('shouldComponentUpdate执行了')
        return false;
    }
    render() {
    return <div>{this.state.name}</div>
    }
}

ReactDOM.render(<Parent />, document.getElementById('root'));
注意,这个例子中我们使用的是React.Component而不是React.PureComponent,这是因为在PureComponent中已经默认在shouldComponentUpdate函数中做了新旧props与state的浅比较,因此如果你在PureComponent中使用shouldComponentUpdate会提示报错。这里为了体现shouldComponentUpdate作用,我们得修改为React.Component。
回到这个例子,你会发现虽然我们修改了state,但由于shouldComponentUpdate返回了false,这就导致了组件render并没有被触发第二次。
在实际开发中,如果我们使用的是React.Component,那么便可以通过shouldComponentUpdate函数,对于props与state进行手动的比较,并根据你的需求来决定是返回true还是false,从而控制组件是否应该再次更新。不过我们在前面中也说了,一般我们还是推荐使用
PureComponent取代Component,因为浅比较的操作react自动会帮你做,那么使用shouldComponentUpdate的场景那就真得看你有没有一个特殊需求了。
叁 ❀ 叁 componentWillUpdate与componentDidUpdate
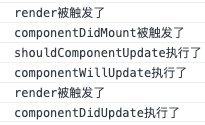
顾名思义,只有当shouldComponentUpdate返回为true,才会有componentWillUpdate与componentDidUpdate的执行。与装载阶段一样,componentWillUpdate、componentDidUpdate的执行对于render也是一前一后,来看个例子:
class Parent extends React.Component {
    constructor() {
        super();
        this.state = { name: 'echo' };
    }
    componentDidMount() {
        console.log('componentDidMount被触发了')
        setTimeout(() => {
            this.setState({ name: '听风是风' })
        }, 3000);
    }
    shouldComponentUpdate(nextProps, nextState){
        console.log('shouldComponentUpdate执行了')
        return true;
    }
    componentWillUpdate(){
        console.log('componentWillUpdate执行了')
    }
    componentDidUpdate(){
        console.log('componentDidUpdate执行了')
    }
    render() {
        console.log('render被触发了');
        return <div>{this.state.name}</div>
    }
}

ReactDOM.render(<Parent />, document.getElementById('root'));
那么来结合装载阶段,以及父子组件的情况,我们来总结下这两个阶段的执行顺序
class Child extends React.Component {
    constructor(props) {
        console.log('子组件的constructor被触发了')
        super(props);
        this.state = {
            name: ''
        }
    }
    componentWillMount(){
        console.log('子组件的componentWillMount执行了');
    }
    componentDidMount() {
        console.log('子组件的componentDidMount被触发了')
    }
    componentWillReceiveProps(nextProps) {
        console.log('子组件的componentWillReceiveProps被触发了');
    }
    shouldComponentUpdate(nextProps, nextState) {
        console.log('子组件的shouldComponentUpdate执行了')
        return true;
    }
    componentWillUpdate() {
        console.log('子组件的componentWillUpdate执行了')
    }
    componentDidUpdate() {
        console.log('子组件的componentDidUpdate执行了')
    }
    render() {
        console.log('子组件的render执行了')
        return <div>{this.props.name}</div>;
    }
}
class Parent extends React.Component {
    constructor() {
        console.log('父组件的constructor被触发了')
        super();
        this.state = { name: 'echo' };
    }
    componentWillMount(){
        console.log('父组件的componentWillMount执行了');
    }
    componentDidMount() {
        console.log('父组件的componentDidMount被触发了')
        setTimeout(() => {
            this.setState({ name: '听风是风' })
        }, 3000);
    }
    shouldComponentUpdate(nextProps, nextState) {
        console.log('父组件的shouldComponentUpdate执行了')
        return true;
    }
    componentWillUpdate() {
        console.log('父组件的componentWillUpdate执行了')
    }
    componentDidUpdate() {
        console.log('父组件的componentDidUpdate执行了')
    }
    render() {
        console.log('父组件的render被触发了');
        return <Child name={this.state.name}/>
    }
}

ReactDOM.render(<Parent />, document.getElementById('root'));
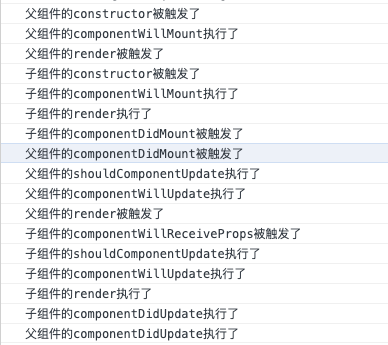
图中颜色较深的这条是父子组件装载完成,之后就是父子的更新过程,大家可以自行梳理下整个过程,这里就不多做介绍了。
肆 ❀ 卸载(Unmount)阶段
react组件的的卸妆过程就很简单了,只有一个componentWillUnmount函数,当组件要从DOM上移除时,此函数会被调用,实际开发中可能使用的场景不会很多,一般用于清理你在装载阶段创建的一些可能造成内存泄漏的数据或者方法,比如定时器,事件监听等等。
伍 ❀ 总
OK,到这里,我们完整介绍了react声明周期的三个阶段,以及各个阶段会执行的生命周期函数,我想通过这样的分析,大家对于不同声明周期函数的区别以及作用应该有了大致的了解,现在,让我们再来看react声明周期图解,是不是会清晰很多呢?
今天也是从下午三点断断续续写到了现在,整理东西果然还是费时间,元旦假期也就这么结束了!!!多么希望今天是一号!!!那么到这里,本文结束,晚安。