前戏:
一、python创建虚拟环境
fiel ----settings --- Project xxx project interpreter ---->右上角齿轮
选择路径,base interpreter 本体python解释器用3.6----ok 虚拟环境创建成功
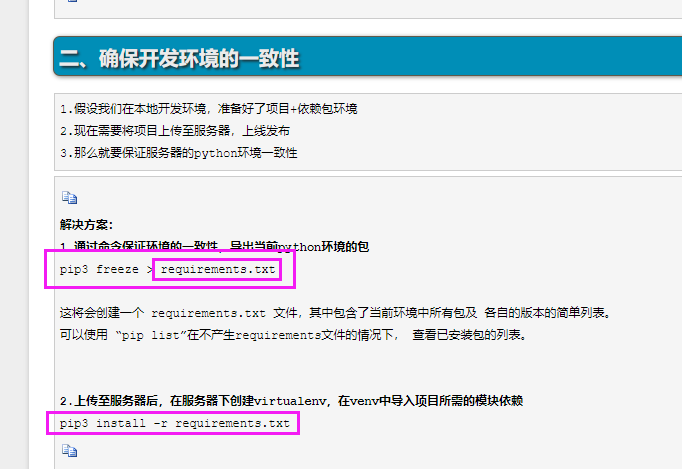
二、确保开发环境的一致性
将本体python的所有包,安装在虚拟环境上
操作方法:

1、 导出当前python环境的包
pip3 freeze > requirements.txt

2、创建一个虚拟环境
mkvirtualenv shion

3. 在venv中导入项目所需的所有依赖
pip3 install -r requirements.txt
前戏结束
1、-上传图书管理系统项目到linux服务器
用xftp
2、-完成python3解释器的安装
3、
5、-完成centos7下安装配置mariadb数据库,且创建数据库数据,迁移导入图书管理系统数据
1 安装mariadb数据库
(1)第一种方法,使用navicat导出
(2) 第二种方法,使用mysqldump命令, 此命令适用于windows和linux下
3 在服务器上将数据导入到mariadb数据库中
(1) 进入数据库, 先创建一个数据库 book_homework
create database book_homework
(2) 进入此数据库
use book_homework
source /opt/book_homework.sql
(1) 第一种方法, 在初始化数据库的时候,就允许root用户远程登录
(2) 第二种方法 使用SQL语句进行授权
grant all privileges on *.* to root@"%" identified  by "nihao123";


#  all privileges  所有权限
# *.*  所有数据路.所有表
5、测试使用linux的python解释器去运行项目 切换到 项目中运行(注意要解决解释器的模块问题,才能正常运转项目)
# 1、切换到项目中含有manage.py的目录
# 2、运行 python3  manage.py  runserver  0.0.0.0:8000


#  也可以先进入虚拟坏境,workon shion   在虚拟环境下切换到线路含有manage.py的目录,然后运行 python3  manage.py  runserver  0.0.0.0:8000
#  启动时,可能会提示少了模块,安装相应模块即可
6、通过网页端输入 192.168.1.250:8000 可以访问
完成uWSGI命令学习,使用uWSGI启动图书管理系统项目
uWSGI支持多进程,高并发
前戏: 实现一个最简单的uwsgi访问
1、安装uwsgi
pip3 install uwsgi
2 创建一个测试文件testuwsgi.py, 运行简单的uWSGI站点
第一步vim /opt/book_homework/testuwsgi.py 写入以下文件
    def application(env, start_response):
        start_response('200 OK', [('Content-Type','text/html')])
        return [b"Hello World"]
第二步 使用uwsgi命令启动此文件
uwsgi --http :9000 --file testuwsgi.py
第三步 在浏览器通过IP加端口进行访问
http://192.168.1.49:9000
3 前戏结束
用uwsgi跑图书管理项目
# 在启动命令后面加上参数
uwsgi --http :8088 --module book_manage_system.wsgi --py-autoreload=1  # 此命令应该在django项目目录下才可以,--module才能找到它的参数book_manage_system.wsgi
    --py-autoreload=1  # 参数表示自动加载python配置

# 运行上面的命令即可启动图书管理项目
# 但你会发现没有样式
使用uwsgi配置文件去启动项目
前面学的启动uwsgi的命令都特别长,因为加了很多参数,太难记了,那怎么办? 我们有更好的方法,就是在项目下面创建一个uwsgi.ini的文件,然后通过读这个文件来启动uwsgi
# uwsgi.ini配置文件, uwsgi支持ini、xml等多种配置方式,本文以 ini 为例, 在/etc/目录下新建uwsgi.ini,添加如下配置:

# uwsgi.ini file
[uwsgi]

# Django-related settings
# the base directory (full path)
chdir           = /opt/mysite
# Django's wsgi file
module          = mysite.wsgi
# the virtualenv (full path)
home            = /opt/venv
# process-related settings
# master
master          = true
# maximum number of worker processes
processes       = 1
# the socket (use the full path to be safe
socket          = 0.0.0.0:8000
# ... with appropriate permissions - may be needed
# chmod-socket    = 664
# clear environment on exit
vacuum          = true


# uwsgi.ini配置文件详解

[uwsgi]
# Django-related settings
# the base directory (full path)
# 写上项目的绝对路径
chdir           = /opt/book_manage
# Django's wsgi file
# 填写找到django的wsgi文件,填写相对路径,以chdir参数为相对路径
module          = book_manage.wsgi
# the virtualenv (full path)
# 填写虚拟环境的绝对路径
home            = /root/Envs/book_manage_env/
# process-related settings
# master
#启动uwsgi主进程
master          = true
# maximum number of worker processes
processes       = 1
# the socket (use the full path to be safe
#如果你使用了nginx,做反向代理,必须填写socket链接,而不是http参数
socket          = 0.0.0.0:8000
#如果你不用nginx,直接使用uwsgi,运行一个http服务端,就用这个http参数
http = 0.0.0.0:8000
# ... with appropriate permissions - may be needed
# chmod-socket    = 664
# clear environment on exit
vacuum          = true

uwsgi.ini配置详解
注意事项:
# 注意这四点

# 写上项目的绝对路径
chdir           = /opt/book_manage
# Django's wsgi file

# 填写找到django的wsgi文件,填写相对路径,以chdir参数为相对路径
module          = book_manage.wsgi

# the virtualenv (full path)
# 当前使用的虚拟换机的绝对路径
home            = /root/Envs/shion/

#如果你使用了nginx,做反向代理,必须填写socket链接,而不是http参数
# socket          = 0.0.0.0:8000
#如果你不用nginx,直接使用uwsgi,运行一个http服务端,就用这个http参数
http = 0.0.0.0:8000
启动项目的命令
uwsgi --ini /opt/book_manage_system/uwsig.ini
项目启动了,但是没有样式,所有要用nginx连接样式
使用ngixn处理django的静态文件
1 收集django静态文件
vim /opt/book_homework/book_homework/settings.py

加入一行配置

STATIC_ROOT='/opt/static'

回到django项目主目录下(有manage.py文件的目录), 输入命令进行收集静态文件

python3 manage.py collectstatic  #会自动在/opt目录下创建static文件夹
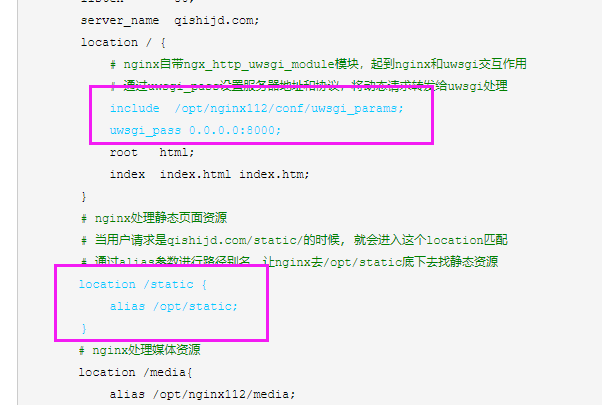
2 配置nginx与uwsgi结合
修改nginx的配置文件/opt/nginx1.12/conf/nginx.conf,添加以下配置

location / {
            # nginx自带ngx_http_uwsgi_module模块,起到nginx和uwsgi交互作用
            # 通过uwsgi_pass设置服务器地址和协议,将动态请求转发给uwsgi处理
            include  /opt/nginx112/conf/uwsgi_params;
            uwsgi_pass 0.0.0.0:8000;
            root   html;
            index  index.html index.htm;
        }

location /static {
            alias /opt/static;
        }
配置入下图:
4 平滑重启nginx
/opt/nginx112/sbin/nginx -s reload
5 确保uwsgi已经正常启动
6 启动项目
uwsgi --ini /opt/book_manage_system/uwsgi.ini
supervisor
可以自动重启uwsgi服务,保证服务可以持续运行
1、安装supervisor
# 注意此时已经退出虚拟环境了!!!!!
easy_install supervisor

# 如果没有easy_install的话,就yum安装一个setuptools工具就可以用了
yum install python-setuptools
2 通过命令生成supervisor的配置文件
echo_supervisord_conf > /etc/supervisord.conf
然后再/etc/supervisord.conf末尾添加上如下代码!!!!!!
[program:book_manage]
command=/root/Envs/book_manage_env/bin/uwsgi /opt/book_manage/uwsgi.ini
stopasgroup=true
killasgroup=true
3 最后启动supervisor,完成uWSGI启动django,nginx反向代理
supervisord -c /etc/supervisord.conf # 启动supervisor
supervisorctl -c /etxc/supervisord.conf restart book_manage  # 重启book_manage项目
4、项目成功启动
重新加载supervisor
一、添加好配置文件后

二、更新新的配置到supervisord

supervisorctl update
三、重新启动配置中的所有程序

supervisorctl reload
四、启动某个进程(program_name=你配置中写的程序名称)

supervisorctl start program_name
五、查看正在守候的进程

supervisorctl
六、停止某一进程 (program_name=你配置中写的程序名称)

pervisorctl stop program_name
七、重启某一进程 (program_name=你配置中写的程序名称)

supervisorctl restart program_name
八、停止全部进程

supervisorctl stop all
注意:显示用stop停止掉的进程,用reload或者update都不会自动重启。