1、使用dnf安装mysql(遇到暂停按y)
dnf install @mysql
2、安装完成使用下面命令启动MySQL服务
systemctl enable --now mysqld
3、查看服务是否启动(执行下面命令出现 active (running) 那么就说明已经启动了)
systemctl status mysqld
4、检查是否已经设置为开机启动MySQL服务(执行之后显示 disabled:不自启动,enabled:自动启动)
#设置开机启动
systemctl list-unit-files|grep mysqld
#设置开机启动(如果是enabled就不用执行了)
systemctl enable mysqld.service
5、设置数据库安全设置:会执行几个设置:
mysql_secure_installation
Enter password for user root:
--为root用户设置密码
Do you wish to continue with the password provided?(Press y|Y for Yes, any other key for No) :y
--您想继续使用提供的密码吗?(按y | y表示是,按其他键表示否):
Remove anonymous users? (Press y|Y for Yes, any other key for No) : y
--删除匿名账号 (y)
Disallow root login remotely? (Press y|Y for Yes, any other key for No) : n
--取消root用户远程登录 (n)
Remove test database and access to it? (Press y|Y for Yes, any other key for No) : y
--删除test库和对test库的访问权限 (y)
Reload privilege tables now? (Press y|Y for Yes, any other key for No) : y
--刷新授权表使修改生效 (y)
如果出现 Estimated strength of the password:25 那么说明密码强度不够:可以按 Ctrl+C退出设置。
6、进入mysql
mysql
如果出现 ERROR 1045 (28000): Access denied for user 'root'@'localhost' (using password: NO)
mysql -uroot -p你刚才输入的密码
7、设置MYSQL密码 123456
ALTER USER 'root'@'localhost' IDENTIFIED BY '123456';
如果出现 ERROR 1819 (HY000): Your password does not satisfy the current policy requirements 说明你的密码太简短了。
修改密码长度为:4 (设置完成再去设置密码就OK了)
修改密码长度:
set global validate_password.length=4;
修改密码规则:
set global validate_password.policy=LOW;
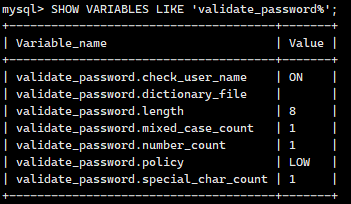
先查看密码规则
SHOW VARIABLES LIKE 'validate_password%';
下次进入MySQL使用(root是用户名,123456是你设置的密码)
mysql -uroot -p123456
8、退出MySQL
eixt;