目录
MySQL的RPM包包括很多套件,老一点版本一般直接安装Server和Client就可以。较新的版本由于包之间存在更多的依赖关系,通常需要下载以下几个包才可以完成标准的安装。
mysql-community-server数据库服务器和相关工具mysql-community-clientMySQL客户端应用程序和工具mysql-community-libsMySQL数据库客户端应用程序的共享库mysql-community-common服务器和客户端库的通用文件mysql-community-libs-compat以前的MySQL安装的共享兼容性库
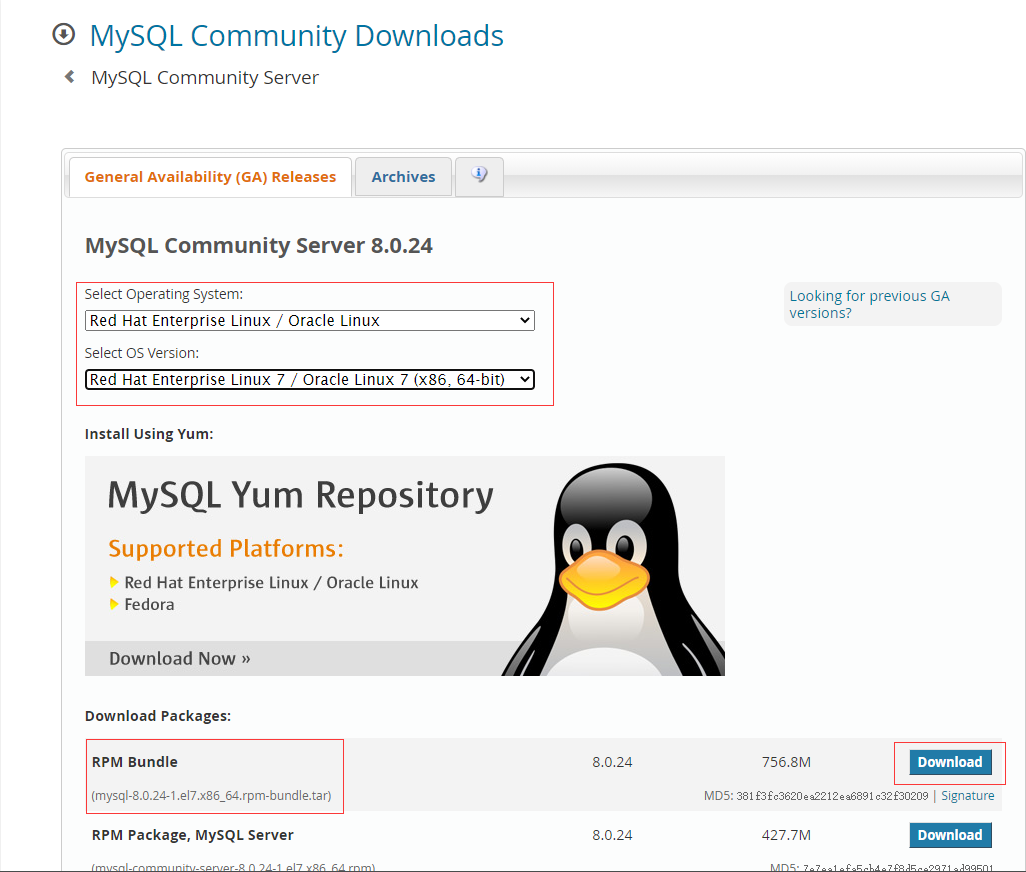
1.下载RPM包
下载RPM捆绑包tar文件,该文件包含上面列出的所有RPM软件包,无需再一个个单独下载它们。
官网下载地址:https://dev.mysql.com/downloads/mysql/
wget https://dev.mysql.com/get/Downloads/MySQL-8.0/mysql-8.0.24-1.el7.x86_64.rpm-bundle.tar

2.解压tar文件
gzip mysql-8.0.24-1.el7.x86_64.rpm-bundle.tar

tar -zxvf mysql-8.0.24-1.el7.x86_64.rpm-bundle.tar.gz
mysql-community-client-8.0.24-1.el7.x86_64.rpm
mysql-community-client-plugins-8.0.24-1.el7.x86_64.rpm
mysql-community-common-8.0.24-1.el7.x86_64.rpm
mysql-community-devel-8.0.24-1.el7.x86_64.rpm
mysql-community-embedded-compat-8.0.24-1.el7.x86_64.rpm
mysql-community-libs-8.0.24-1.el7.x86_64.rpm
mysql-community-libs-compat-8.0.24-1.el7.x86_64.rpm
mysql-community-server-8.0.24-1.el7.x86_64.rpm
mysql-community-test-8.0.24-1.el7.x86_64.rpm
3.处理原始环境
一台服务器只能安装一个版本的MySQL/MariaDB软件,所以需要删除原有的MySQL/MariaDB
[root@tidb02 ~]# rpm -qa | grep mysqld
[root@tidb02 ~]# rpm -qa | grep mariadb
mariadb-libs-5.5.68-1.el7.x86_64

[root@tidb02 ~]# rpm -e mariadb-libs --nodeps
[root@tidb02 ~]# rpm -qa | grep mariadb
4.安装MySQL相关包
sudo yum install -y mysql-community-{server,client,common,libs}-*

#因为依赖关系最终安装了6个包
Dependencies Resolved

=====================================================================================================================================
 Package                             Arch        Version              Repository                                                Size
=====================================================================================================================================
Installing:
 mysql-community-client              x86_64      8.0.24-1.el7         /mysql-community-client-8.0.24-1.el7.x86_64              219 M
 mysql-community-client-plugins      x86_64      8.0.24-1.el7         /mysql-community-client-plugins-8.0.24-1.el7.x86_64      732 k
 mysql-community-common              x86_64      8.0.24-1.el7         /mysql-community-common-8.0.24-1.el7.x86_64              9.0 M
 mysql-community-libs                x86_64      8.0.24-1.el7         /mysql-community-libs-8.0.24-1.el7.x86_64                 20 M
 mysql-community-libs-compat         x86_64      8.0.24-1.el7         /mysql-community-libs-compat-8.0.24-1.el7.x86_64         6.0 M
 mysql-community-server              x86_64      8.0.24-1.el7         /mysql-community-server-8.0.24-1.el7.x86_64              2.0 G

Transaction Summary
=====================================================================================================================================
Install  6 Packages
仅安装客户端程序
可以除去mysql-community-server软件包的安装
sudo yum install -y mysql-community-{client,common,libs}-*
5.使用RPM软件包标准安装的MySQL的目录结构
| 文件 | 位置 |
|---|---|
| 客户端和脚本 | /usr/bin |
| mysqld服务器 | /usr/sbin |
| 配置文件 | /etc/my.cnf |
| 数据目录 | /var/lib/mysql |
| 错误日志 | /var/log/mysqld.log |
| System V初始化脚本 | /etc/init.d/mysqld |
| PID文件 | /run/mysqld/mysqld.pid |
| socket文件 | /var/lib/mysql/mysql.sock |
| 客户端和脚本 | /usr/bin |
6.启动MySQL
在安装过程结束时,不会自动启动MySQL。对于Red Hat Enterprise Linux,Oracle Linux,CentOS和Fedora系统,使用以下命令来启动MySQL:
[root@tidb02 lib]# systemctl start mysqld
[root@tidb02 lib]# systemctl status mysqld
● mysqld.service - MySQL Server
   Loaded: loaded (/usr/lib/systemd/system/mysqld.service; enabled; vendor preset: disabled)
   Active: active (running) since Sun 2021-05-09 23:10:11 CST; 9s ago
     Docs: man:mysqld(8)
           http://dev.mysql.com/doc/refman/en/using-systemd.html
  Process: 12519 ExecStartPre=/usr/bin/mysqld_pre_systemd (code=exited, status=0/SUCCESS)
 Main PID: 12596 (mysqld)
   Status: "Server is operational"
   CGroup: /system.slice/mysqld.service
           └─12596 /usr/sbin/mysqld

May 09 23:10:02 tidb02 systemd[1]: Starting MySQL Server...
May 09 23:10:11 tidb02 systemd[1]: Started MySQL Server.
使用标准的systemctl命令(例如stop,start,status和restart)来管理MySQL服务器服务
7.连接MySQL
MySQL 5.7之后的版本,在初次启动MySQL时会生成临时的密码。超级用户'root'@'localhost'临时密码存储在错误日志文件中,可以通过查看/var/log/mysqld.log来获取。本实例中密码为RCraca*d5Fo0
[root@tidb02 share]# cat /var/log/mysqld.log | grep password
2021-05-09T15:10:07.052428Z 6 [Note] [MY-010454] [Server] A temporary password is generated for root@localhost: RCraca*d5Fo0
用临时密码登录
[root@tidb02 ~]# mysql -uroot -p
Enter password:
Welcome to the MySQL monitor.  Commands end with ; or g.
Your MySQL connection id is 8
Server version: 8.0.24

Copyright (c) 2000, 2021, Oracle and/or its affiliates.

Oracle is a registered trademark of Oracle Corporation and/or its
affiliates. Other names may be trademarks of their respective
owners.

Type 'help;' or 'h' for help. Type 'c' to clear the current input statement.
临时密码无法正常操作数据库
比如想查看当前数据库列表,会提示如下错误:
mysql> show databases;
ERROR 1820 (HY000): You must reset your password using ALTER USER statement before executing this statement.
修改临时密码
提示必须要修改初始密码,才能执行命令,可以用如下命令进行修改:
mysql> alter user 'root'@'localhost' identified by 'Test@123';
Query OK, 0 rows affected (0.01 sec)
修改的密码强度规则
新密码必须满足密码强度规则,默认规则如下:
mysql> show variables like 'validate_password%';
+--------------------------------------+--------+
| Variable_name                        | Value  |
+--------------------------------------+--------+
| validate_password.check_user_name    | ON     |
| validate_password.dictionary_file    |        |
| validate_password.length             | 8      |
| validate_password.mixed_case_count   | 1      |
| validate_password.number_count       | 1      |
| validate_password.policy             | MEDIUM |
| validate_password.special_char_count | 1      |
+--------------------------------------+--------+
简单解释一下,新密码至少为8位(length),其中大小写字母至少各一个(mixed_case_count),数字至少一个(number_count),特殊字符至少一个(special_char_count)。如果不满足以上任一条件,则提示如下错误:
mysql> alter user 'root'@'localhost' identified by 'test@123';
ERROR 1819 (HY000): Your password does not satisfy the current policy requirements
至此,RPM包安装MySQL完毕。
因为有悔,所以披星戴月;因为有梦,所以奋不顾身! 个人博客首发:easydb.net 微信公众号:easydb 关注我,不走丢!
