基本指令
v-cloak
v-cloak不需要表达式,它会在Vue实例结束编译时从绑定的HTML元素上移除,经常和CSS的display: none;配合使用:
这时虽然已经加了指令v-cloak,但其实并没有起到任何作用,当网速较慢、Vue.js文件还没加载完时,在页面上会显示{{ message }}的字样,直到Vue创建实例、编译模板时,DOM才会被替换,所以这个过程屏幕是有闪动的。只要加一句CSS就可以解决这个问题了:
[v-cloak] {
display: none;
}
在一般情况下,v-cloak是一个解决初始化慢导致页面闪动的最佳实践,对于简单的项目很实用,但是在具有工程化的项目里,比如后面进阶篇将介绍webpack和vue-router时,项目的HTML结构只有一个空的div元素,剩余的内容都是由路由去挂载不同组件完成的,所以不再需要v-cloak。
v-once
不需要表达式的指令,作用是定义它的元素或组件只渲染一次,包括元素或组件的所有子节点。首次渲染后,不再随数据的变化重新渲染,将被视为静态内容
<body>
    <div id="app">
        <input type="text" v-model="message" placeholder="message" />
        <h1 v-once>v-once指渲染一次:{{message}}</h1>
        <h1>双向绑定,动态显示:{{message}}</h1>
    </div>
    <script src="../lib/vue.2.6.11.js"></script>
    <script>
        new Vue({
            el: '#app',
            data: {
                message: 'hello world'
            }
        })
    </script>
</body>
条件渲染
v-if、v-else-if、v-else
<body>
    <div id="app">
        <input type="text" v-model="status" placeholder="status值" />
        <h1 v-if="status === 1">status值=1</h1>
        <h1 v-else-if="status === 1">status值=1</h1>
        <h1 v-else="status === 1">status值=1</h1>
    </div>
    <script src="../lib/vue.2.6.11.js"></script>
    <script>
        new Vue({
            el: '#app',
            data: {
                status: 1
            }
        })
    </script>
</body>
v-show
v-show是改变元素的CSS属性display。当v-show表达式的值为false时,元素会隐藏,查看DOM结构会 display: none;
<body>
    <div id="app">
        <input type="text" v-model="status" placeholder="status值" />
        <h1 v-show="status == 1">status值=1时才显示,否则隐藏</h1>
    </div>
    <script src="../lib/vue.2.6.11.js"></script>
    <script>
        new Vue({
            el: '#app',
            data: {
                status: 1
            }
        })
    </script>
</body>
列表渲染 v-for
<body>
    <div id="app">
        <ul>
            <li v-for="book in books">{{ book.name }}</li>
        </ul>
    </div>
    <script src="../lib/vue.2.6.11.js"></script>
    <script>
        new Vue({
            el: '#app',
            data: {
                books: [
                    { name: '《Vue.js实战》' },
                    { name: '《JavaScript语言精粹》' },
                    { name: '《JavaScript高级程序设计》' }
                ]
            }
        })
    </script>
</body>
v-for中可选参数:Index
<body>
    <div id="app">
        <ul>
            <li v-for="(book,index) in books">{{index}}.{{ book.name }}</li>
        </ul>
    </div>
    <script src="../lib/vue.2.6.11.js"></script>
    <script>
        new Vue({
            el: '#app',
            data: {
                books: [
                    { name: '《Vue.js实战》' },
                    { name: '《JavaScript语言精粹》' },
                    { name: '《JavaScript高级程序设计》' }
                ]
            }
        })
    </script>
</body>
v-for 遍历对象属性
遍历对象属性时,有两个可选参数,分别是键名和索引:
<body>
    <div id="app">
        <ul>
            <li v-for="value in user">{{value}}</li>
        </ul>
        <ul>
            <li v-for="(value, key, index) in user">
                {{ index }} - {{ key }}: {{ value }}
            </li>
        </ul>
    </div>
    <script src="../lib/vue.2.6.11.js"></script>
    <script>
        new Vue({
            el: '#app',
            data: {
                user: {
                    name: 'Aresn',
                    gender: '男',
                    age: 26
                }
            }
        })
    </script>
</body>
数组更新
Vue在检测到数组变化时,并不是直接重新渲染整个列表,而是最大化地复用DOM元素。替换的数组中,含有相同元素的项不会被重新渲染,因此可以大胆地用新数组来替换旧数组,不用担心性能问题。
<body>
    <div id="app">
        <ul>
            <li v-for="(book,index) in books">{{index}}.{{ book.name }}</li>
        </ul>
        <button type="button" @click="add">添加</button>
    </div>
    <script src="../lib/vue.2.6.11.js"></script>
    <script>
        var app = new Vue({
            el: '#app',
            data: {
                books: [
                    { name: '《Vue.js实战》' },
                    { name: '《JavaScript语言精粹》' },
                    { name: '《JavaScript高级程序设计》' }
                ]
            },
            methods: {
                add: function () {
                    this.books.push({ name: '《Electron In Action》' });
                }
            },
        })

    </script>
</body>
数组元素和个数更新
需要注意的是,以下变动的数组中,Vue是不能检测到的,也不会触发视图更新:
- 通过索引直接设置项,比如app.books[3] = {…}。
- 修改数组长度,比如app.books.length = 1。
解决第一个问题可以用两种方法实现同样的效果,第一种是使用Vue内置的set方法:
Vue.set(app.books, 3, {
name: '《CSS揭秘》',
author: '[希] Lea Verou'
});
如果是在webpack中使用组件化的方式(进阶篇中将介绍),默认是没有导入Vue的,这时可以使用$set,例如:
this.$set(app.books, 3, {
name: '《CSS揭秘》',
author: '[希] Lea Verou'
})
// 这里的this指向的就是当前组件实例,即app。在非webpack模式下也可以用$set方法,例如app.$set(…)
另一种方法:
app.books.splice(3, 1, {
name: '《CSS揭秘》',
author: '[希] Lea Verou'
})
第二个问题也可以直接用splice来解决:
app.books.splice(1);
<body>
    <div id="app">
        <ul>
            <li v-for="(book,index) in books">{{index}}.{{ book.name }}</li>
        </ul>
        <button type="button" @click="updateArrayElement">更新数组元素</button>
        <button type="button" @click="deleArray">截取数组</button>
    </div>
    <script src="../lib/vue.2.6.11.js"></script>
    <script>
        var app = new Vue({
            el: '#app',
            data: {
                books: [
                    { name: '《Vue.js实战》' },
                    { name: '《JavaScript语言精粹》' },
                    { name: '《JavaScript高级程序设计》' }
                ]
            },
            methods: {
                updateArrayElement: function () {
                    //方法1
                    this.books.splice(0, 1, { name: '《Vue.js实战》(this.books.splice)' });
                    //方法2
                    this.$set(this.books, 1, { name: '《JavaScript语言精粹》(app.$set)' });
                    //方法3
                    Vue.set(this.books, 2, { name: 'JavaScript高级程序设计》(Vue.set)' })
                },
                deleArray: function () {
                    this.books.splice(1);
                }
            }
        })

    </script>
</body>
过滤与排序
<body>
    <div id="app">
        <ul>
            <li v-for="(book,index) in books">{{book.id}}.{{ book.name }}</li>
        </ul>
        <ul>
            <li v-for="(book,index) in filterBooks">{{book.id}}.{{ book.name }}</li>
        </ul>
        <ul>
            <li v-for="(book,index) in sortedBooks">{{book.id}}.{{ book.name }}</li>
        </ul>
    </div>
    <script src="../lib/vue.2.6.11.js"></script>
    <script>
        var app = new Vue({
            el: '#app',
            data: {
                books: [
                    { id: 1, name: '《Vue.js实战》' },
                    { id: 2, name: '《JavaScript语言精粹》' },
                    { id: 3, name: '《JavaScript高级程序设计》' }
                ]
            }, computed: {
                filterBooks: function () {
                    return this.books.filter(function (book) {
                        return book.name.match(/JavaScript/);
                    });
                },
                sortedBooks: function () {
                    return this.books.sort(function (a, b) {
                        return b.id - a.id;
                    });
                }
            },

        })

    </script>
</body>
方法与事件
基本用法
@click的表达式可以直接使用JavaScript语句,也可以是一个在Vue实例中methods选项内的函数
-
无参数 可以不用写括号,如:@click="handleAdd"
-
特殊变量$event:
Vue提供了一个特殊变量$event,用于访问原生DOM事件,例如下面的实例可以阻止链接打开:
<body>
    <div id="app">
        count:{{count}}
        <button @click="add()">+1</button>
        <button @click="add(10)">+10</button>
        <button @click="add2">+1</button>
        <a href="http://baidu.com" @click="addWithEvent('禁止打开', $event)">打开链接</a>
    </div>
    <script src="../lib/vue.2.6.11.js"></script>
    <script>
        var app = new Vue({
            el: '#app',
            data: {
                count: 0,
            }, methods: {
                add: function (count) {
                    count = count || 1;
                    this.count += count;
                },
                add2: function () {
                    this.count += 1;
                },
                addWithEvent: function (msg, event) {
                    event.preventDefault();
                    alert(msg);
                }
            }
        })
    </script>
</body>
修饰符
在上例使用的event.preventDefault()也可以用Vue事件的修饰符来实现,在@绑定的事件后加小圆点“.”,再跟一个后缀来使用修饰符。Vue支持以下修饰符:
<body>
    <div id="app">
        <a href="http://baidu.com" @click="addWithEvent1($event)">正常打开链接</a>
        <a href="http://baidu.com" @click="addWithEvent2('禁止打开', $event)">禁止打开链接</a>
        <a href="http://baidu.com" @click.prevent="addWithEvent3('禁止打开')">禁止打开链接</a>
    </div>
    <script src="../lib/vue.2.6.11.js"></script>
    <script>
        var app = new Vue({
            el: '#app',
            data: {
                count: 0,
            }, methods: {
                addWithEvent1: function (event) {
                    alert(msg);
                },
                addWithEvent2: function (msg, event) {
                    event.preventDefault();
                    alert(msg);
                },
                addWithEvent3: function (msg, event) {
                    alert(msg);
                }
            }
        })
    </script>
</body>
练习:购物车
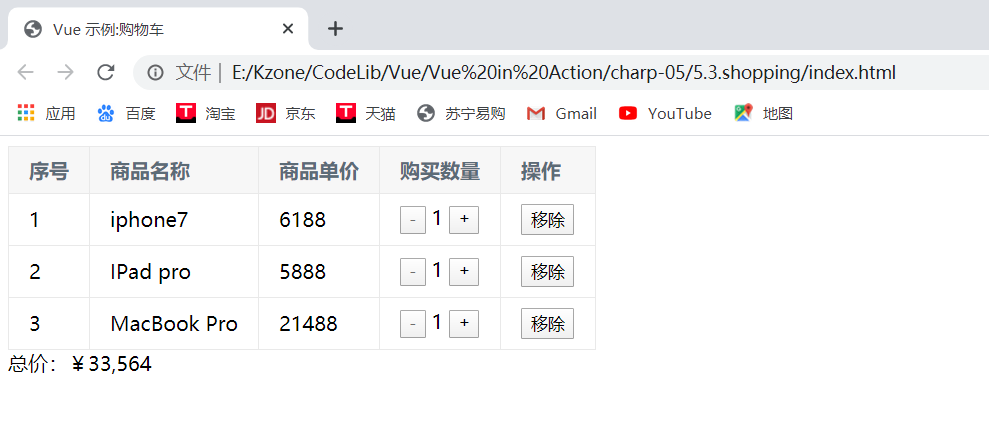
index.html
<!DOCTYPE html>
<html>

<head>
    <meta charset="utf-8">
    <title>Vue 示例:购物车</title>
    <link rel="stylesheet" type="text/css" href="style.css">
</head>

<body>
    <div id="app" v-cloak>
        <template v-if="list.length">
            <table>
                <thead>
                    <th>序号</th>
                    <th>商品名称</th>
                    <th>商品单价</th>
                    <th>购买数量</th>
                    <th>操作</th>
                </thead>
                <tbody>
                    <tr v-for="(item, index) in list">
                        <td>{{index + 1}} </td>
                        <td>{{item.name}}</td>
                        <td>{{item.price}}</td>
                        <td>
                            <button @click="handleReduce(index)" :disabled="item.count === 1">-</button>
                            {{item.count}}
                            <button @click="handleAdd(index)">+</button>
                        </td>
                        <td>
                            <button @click="handleRemove(index)">移除</button>
                        </td>
                    </tr>
                </tbody>
            </table>
            <div>
                总价:¥{{totalPrice}}
            </div>
        </template>
        <div v-else>
            购物车为空
        </div>
    </div>
    <script src="../../lib/vue.2.6.11.js"></script>
    <script src="index.js"></script>
</body>

</html>
index.js
var app = new Vue({
    el: '#app',
    data: {
        list: [
            {
                id: 1,
                name: "iphone7",
                price: 6188,
                count: 1
            },
            {
                id: 2,
                name: "IPad pro",
                price: 5888,
                count: 1
            }, {
                id: 3,
                name: "MacBook Pro",
                price: 21488,
                count: 1
            }
        ]
    }, methods: {
        handleReduce: function (index) {
            if (this.list[index].count === 1) {
                return;
            }
            this.list[index].count--;
        },
        handleAdd: function (index) {
            this.list[index].count++;
        },
        handleRemove: function (index) {
            this.list.splice(index, 1);
        },
    }, computed: {
        totalPrice: function () {
            let total = 0;
            for (let i = 0; i < this.list.length; i++) {
                const item = this.list[i];
                total += item.price * item.count;
            }
            // return total;
            return total.toString().replace(/B(?=(d{3})+$)/g, ',');
        }
    }
})
style.css
[v-cloak] {
    display: none;
}
table{
    border: 1px solid #e9e9e9;
    border-collapse: collapse;
    border-spacing: 0;
    empty-cells: show;
}
th, td{
    padding: 8px 16px;
    border: 1px solid #e9e9e9;
    text-align: left;
}
th{
    background: #f7f7f7;
    color: #5c6b77;
    font-weight: 600;
    white-space: nowrap;
}[v-cloak] {
    display: none;
}
table{
    border: 1px solid #e9e9e9;
    border-collapse: collapse;
    border-spacing: 0;
    empty-cells: show;
}
th, td{
    padding: 8px 16px;
    border: 1px solid #e9e9e9;
    text-align: left;
}
th{
    background: #f7f7f7;
    color: #5c6b77;
    font-weight: 600;
    white-space: nowrap;
}