一. Ansible 介绍
Ansible是一个配置管理系统configuration management system, python 语言是运维人员必须会的语言, ansible 是一个基于python 开发的(集合了众多运维工具 puppet、cfengine、chef、func、fabric的优点)自动化运维工具, 其功能实现基于ssh远程连接服务, ansible 可以实现批量系统配置,批量软件部署,批量文件拷贝,批量运行命令等功能, 除了ansible之外,还有saltstack 等批量管理软件.
Ansible能做什么?
ansible可以帮助运维人员完成一些批量任务,或者完成一些需要经常重复的工作。
比如:同时在100台服务器上安装nginx服务,并在安装后启动服务。
比如:将某个文件一次性拷贝到100台服务器上。
比如:每当有新服务器加入工作环境时,运维人员都要为新服务器部署某个服务,也就是说运维人员需要经常重复的完成相同的工作。
这些场景中运维人员都可以使用到ansible。
Ansible软件特点?
ansible不需要单独安装客户端,SSH相当于ansible客户端。
ansible不需要启动任何服务,仅需安装对应工具即可。
ansible依赖大量的python模块来实现批量管理。
ansible配置文件/etc/ansible/ansible.cfg。
Ansible是一种agentless(基于ssh),可实现批量配置、命令执行和控制,基于Python实现的自动化运维工具。Ansible的两个特性:
- 模块化:通过调用相关模块,完成指定任务,且支持任何语言编写的自定义模块;
- playbook:剧本,可根据需要一次执行完剧本中的所有任务或某些任务;

Ansible 架构
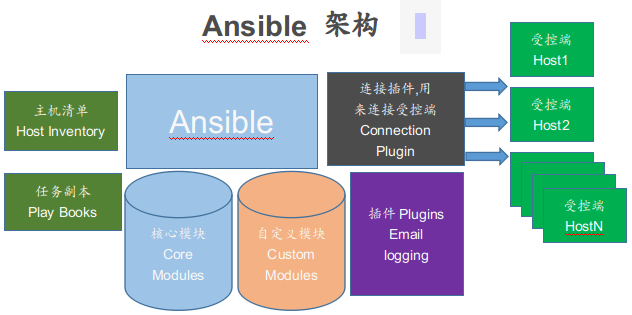
a.连接插件(connectior plugins) 用于连接主机 用来连接被管理端。
b.核心模块(core modules) 连接主机实现操作, 它依赖于具体的模块来做具体的事情。
c.自定义模块(custom modules) 根据自己的需求编写具体的模块。
d.插件(plugins) 完成模块功能的补充。
e.剧本(playbooks)ansible的配置文件,将多个任务定义在剧本中,由ansible自动执行。
f.主机清单(host inventory)定义ansible需要操作主机的范围。
最重要的一点: ansible是模块化的, 它所有的操作都依赖于模块, 不需要单独安装客户端(no agents),基于系统自带的sshd服务,sshd就相当于ansible的客户端, 不需要服务端(no sever),需要依靠大量的模块实现批量管理, 配置文件 /etc/ansible/ansible.cfg (前期不用配置)。
二. Ansible常用命令简述
语法格式:
ansible <pattern_goes_here> -m <module_name> -a <arguments>
也就是:
ansible 匹配模式 -m 模块 -a '需要执行的内容'
解释说明:
匹配模式:即哪些机器生效 (可以是某一台, 或某一组, 或all) , 默认模块为command , 执行常规的shell命令.
-m name, --module-name=name: 指定执行使用的模块。
-u username, --user=username: 指定远程主机以username运行命令。
-s, --sudo: 相当于linux系统下的sudo命令。
-usudo_username, --sudo-user=sudo_username: 使用sudo, 相当于linux系统下的sudo命令。
-C, --check: 只检查不实际执行。
-e, 即extra_vars: 引用外部参数。
-i, 即inventory: 指定仓库列表, 默认/etc/ansible/hosts。
--list-host: 列出执行主机列。
三. Ansible常用模块(23个)
ping 模块: 检查指定节点机器是否还能连通,用法很简单,不涉及参数,主机如果在线,则回复pong 。
raw 模块: 执行原始的命令,而不是通过模块子系统。
yum 模块: RedHat和CentOS的软件包安装和管理工具。
apt 模块: Ubuntu/Debian的软件包安装和管理工具。
pip 模块 : 用于管理Python库依赖项,为了使用pip模块,必须提供参数name或者requirements。
synchronize 模块: 使用rsync同步文件,将主控方目录推送到指定节点的目录下。
template 模块: 基于模板方式生成一个文件复制到远程主机(template使用Jinjia2格式作为文件模版,进行文档内变量的替换的模块。
copy 模块: 在远程主机执行复制操作文件。
user 模块 与 group 模块: user模块是请求的是useradd, userdel, usermod三个指令,goup模块请求的是groupadd, groupdel, groupmod 三个指令。
service 模块: 用于管理远程主机的服务。
get_url 模块: 该模块主要用于从http、ftp、https服务器上下载文件(类似于wget)。
fetch 模块: 它用于从远程机器获取文件,并将其本地存储在由主机名组织的文件树中。
file 模块: 主要用于远程主机上的文件操作。
lineinfile 模块: 远程主机上的文件编辑模块
unarchive模块: 用于解压文件。
command模块 和 shell模块: 用于在各被管理节点运行指定的命令. shell和command的区别:shell模块可以特殊字符,而command是不支持
hostname模块: 修改远程主机名的模块。
script模块: 在远程主机上执行主控端的脚本,相当于scp+shell组合。
stat模块: 获取远程文件的状态信息,包括atime,ctime,mtime,md5,uid,gid等信息。
cron模块: 远程主机crontab配置。
mount模块: 挂载文件系统。
find模块: 帮助在被管理主机中查找符合条件的文件,就像 find 命令一样。
selinux模块:远程管理受控节点的selinux的模块
四. Ansible 自动化运维操作记录
4.1、实验环境准备

 IP地址                 主机名               角色           系统版本
172.16.50.68       ansible-server        主控节点        centos7.5
172.16.50.65       ansible-node01        受控节点1       centos7.5
172.16.50.66       ansible-node02        受控节点2       centos7.5
172.16.50.67       ansible-node03        受控节点3       centos7.5
进行主机名修改:命令:hostnamectl set-hostname XXX (hostnamectl set-hostname ansible-server)
[root@ansible-server ~]# hostnamectl set-hostname ansible-server
[root@ansible-node01 ~]# hostnamectl set-hostname ansible-node01
[root@ansible-node02 ~]# hostnamectl set-hostname ansible-node02
[root@ansible-node03 ~]# hostnamectl set-hostname ansible-node03
设置主控节点到受控节点的ssh无密码信任关系 (ansible应用环境下, 主控节点必须要设置ssh无密码跳转到受控节点的信任关系)
添加主控节点到受控节点的认证! 首先主控节点必须要生成公私密钥对, 否则不能进行免密信任关系设置!
[root@ansible-server ~]# ssh-keygen -t rsa                                 //一直回车即可
[root@ansible-server ~]# ssh-copy-id -i /root/.ssh/id_rsa.pub -p22 root@172.16.50.65      //回车, 输入远程登录的密码即可
[root@ansible-server ~]# ssh-copy-id -i /root/.ssh/id_rsa.pub -p22 root@172.16.50.66
[root@ansible-server ~]# ssh-copy-id -i /root/.ssh/id_rsa.pub -p22 root@172.16.50.67

如果受控节点数量比较多的话, 可以使用expect进行远程ssh连接的免密信任关系, 具体可参考: https://www.cnblogs.com/kevingrace/p/5900303.html
4.2、Ansible安装部署
Ansible有两种安装方式: yum 和 pip 安装方式。
4.2.1、yum方式安装
Ansible在epel的yum中有提供,所以配置好epel源,直接使用yum命令安装即可,CentOS系统, 可以使用默认的yum源直接安装ansible。
[root@ansible-server ~]# yum install -y ansible

配置文件目录:/etc/ansible/
执行文件目录:/usr/bin/
Lib库依赖目录:/usr/lib/pythonX.X/site-packages/ansible/
Help文档目录:/usr/share/doc/ansible-X.X.X/
Man文档目录:/usr/share/man/man1/
4.2.2、pip方式安装
# yum -y install python-pip python-devel
# pip install ansible
ansible程序文件
/usr/bin/ansible:  命令行工具
ansible命令通用格式: ansible <host-pattern> [options] [-m module_name] [-a args]
/usr/bin/ansible-doc: 帮助文档
/usr/bin/ansible-playbook: 剧本执行工具
/etc/ansible/ansible.cfg: 主配置文件
/etc/ansible/hosts: 管理的主机清单
/etc/ansible/roles: 角色存放处

查看ansible命令帮助
[root@ansible-server ~]# ansible -h

查看支持的模块
[root@ansible-server ~]# ansible-doc -l
[root@ansible-server ~]# ansible-doc -l|grep copy    #查看copy模块

查看ansible的支持的模块个数
[root@ansible-server ~]# ansible-doc -l |wc -l
2080

查看ansible版本
[root@ansible-server ~]# ansible --version
ansible 2.7.8
  config file = /etc/ansible/ansible.cfg
  configured module search path = [u'/root/.ansible/plugins/modules', u'/usr/share/ansible/plugins/modules']
  ansible python module location = /usr/lib/python2.7/site-packages/ansible
  executable location = /usr/bin/ansible
  python version = 2.7.5 (default, Apr 11 2018, 07:36:10) [GCC 4.8.5 20150623 (Red Hat 4.8.5-28)]
4.3、Ansible清单管理
inventory文件通常用于定义要管理主机的认证信息, 例如ssh登录用户名、密码以及key相关信息。默认inventory文件为/etc/hostsweb-nodes, ansible模块操作命令中可以省去默认inventory (即可以省去"-i /etc/hostsweb-nodes"), 如果inventory文件定义了其他路径,则在ansible模块操作命令中不能省去, 要加上"-i inventory路径".
常用参数配置:
    ansible_ssh_host                            # 目标主机地址
    ansible_ssh_port                            # 目标主机端口,默认22
    ansible_ssh_user                           # 目标主机用户
    ansible_ssh_pass                          # 目标主机ssh密码
    ansible_sudo_pass                       # sudo密码
    ansible_sudo_exe
    ansible_connection                       # 与主机的连接类型,比如:local,ssh或者paramiko
    ansible_ssh_private_key_file       # 私钥地址
    ansible_shell_type                       # 目标系统的shell类型
    ansible_python_interpreter         # python版本

格式:[组名]
    例如 :     [test]     # 组名
             10.0.0.1  # 主机ip  或者10.0.0.1:65522 自定义端口
别名
    s1 ansible_ssh_port=65522 ansible_ssh_host=10.0.0.1 ansible_ssh_user=simon    # 别名s1

连续的主机
  [g1]
         g[1:50].example.com
          g[a-f].example.com

如何配置Inventory文件?
主控节点:
- 支持主机名通配以及正则表达式,例如web[1:3].oldboy.com;
- 支持基于非标准的ssh端口,例如web1.oldboy.com:6666;
- 支持指定变量,可对个别主机的特殊配置,如登陆用户,密码等;
受控节点
- 支持嵌套组,例如[game:children],那么在game模块下面的组都会被game所包含;
- 支持指定变量,例如[game:vars]在下面指定变量;
ansible的inventory清单文件(/etc/ansible/hosts)中配置说明:
[ ] 中的名字代表组名
主机(hosts)部分可以使用域名、主机名、IP地址表示, 一般此类配置中多使用IP地址;
组名下的主机地址就是ansible可以管理的地址;
下面是/etc/ansible/hosts 文件中清单的配置示例:
[root@ansible-server ~]# cd /etc/ansible/
[root@ansible-server ansible]# cp hosts hosts.bak
[root@ansible-server ansible]# vim hosts                      //如下, 这里设置了两组管理清单
...........
#可以使用受控节点的ip, 下面表示test-hosts组包括172.16.50.65, 172。16.50.66, 172.16.50.67 (如果ssh端口不是22, 比如是22222, 可以配置为"172.16.50.65:22222")
[test-hosts]
172.16.50.6[5:7]

#也可以使用受控节点的主机名, 前提是主控节点要能跟受控节点的主机名正常通信
[web-nodes]
172.16.50.6[5:7]
#ansible-node03                //前提是要能ping通这个主机名, 即做好/etc/hosts主机名映射

简单测试,可设置是否生效
查看ansible清单里所有节点的uptime情况
[root@ansible-server ansible]# ansible all -m command -a "uptime"
172.16.50.66 | SUCCESS | rc=0 >>
 10:28:51 up 3 days, 18:56,  3 users,  load average: 0.00, 0.01, 0.05

172.16.50.67 | SUCCESS | rc=0 >>
 10:28:51 up 3 days, 18:56,  3 users,  load average: 0.00, 0.01, 0.05

172.16.50.65 | SUCCESS | rc=0 >>
 10:28:51 up 3 days, 18:57,  3 users,  load average: 0.00, 0.01, 0.05

查看ansible清单里test-hosts组的节点的主机名
[root@ansible-server ansible]# ansible all -m command -a "hostname"
172.16.50.66 | SUCCESS | rc=0 >>
ansible-node02

172.16.50.65 | SUCCESS | rc=0 >>
ansible-node01

172.16.50.67 | SUCCESS | rc=0 >>
ansible-node03

查看ansible清单里web-nodes组的节点的系统时间
[root@ansible-server ansible]# ansible web-nodes -m command -a "date"
172.16.50.66 | SUCCESS | rc=0 >>
Mon Apr 22 10:38:11 CST 2019

172.16.50.67 | SUCCESS | rc=0 >>
Mon Apr 22 10:38:11 CST 2019

172.16.50.65 | SUCCESS | rc=0 >>
Mon Apr 22 10:38:11 CST 2019

[root@ansible-server ansible]# ansible test-hosts --list-hosts
  hosts (3):
    172.16.50.65
    172.16.50.66
    172.16.50.67
[root@ansible-server ansible]# ansible web-nodes --list-hosts
  hosts (3):
    172.16.50.65
    172.16.50.66
    172.16.50.67

[root@ansible-server ansible]#  ansible -i /etc/ansible/hosts web-nodes -m command -a "cat /etc/redhat-release"
172.16.50.66 | SUCCESS | rc=0 >>
CentOS Linux release 7.5.1804 (Core)

172.16.50.65 | SUCCESS | rc=0 >>
CentOS Linux release 7.5.1804 (Core)

172.16.50.67 | SUCCESS | rc=0 >>
CentOS Linux release 7.5.1804 (Core)
4.4、Ansible 常用模块
4.4.1. ping模块
检查指定节点机器是否还能连通,用法很简单,不涉及参数. 主机如果在线,则回复pong. 测试连通性的模块.
[root@ansible-server ansible]# ansible web-nodes -m ping
172.16.50.67 | SUCCESS => {
    "changed": false,
    "ping": "pong"
}
172.16.50.66 | SUCCESS => {
    "changed": false,
    "ping": "pong"
}
172.16.50.65 | SUCCESS => {
    "changed": false,
    "ping": "pong"
}

[root@ansible-server ansible]# ansible -i /etc/ansible/hosts all -m ping
172.16.50.67 | SUCCESS => {
    "changed": false,
    "ping": "pong"
}
172.16.50.66 | SUCCESS => {
    "changed": false,
    "ping": "pong"
}
172.16.50.65 | SUCCESS => {
    "changed": false,
    "ping": "pong"
}

可以获得该模块的说明
[root@ansible-server ~]# ansible-doc -v ping
4.4.2. raw模块
执行原始的命令,而不是通过模块子系统。在任何情况下,使用shell或command命令模块也是合适的。给定原始的参数直接通过配置的远程shell运行。可返回标准输出、错误输出和返回代码。此模块没有变更处理程序支持。 这个模块不需要远程系统上的Python,就像脚本模块一样。此模块也支持Windows目标。raw, shell, command三个模块都能调用对象机器上的某条指令或者某个可执行文件。raw和shell模块很像, 都支持管道; command模块不支持管道。
注意下三者之间的微妙区别, 如下会发现raw模块执行的是系统原始命令, 执行后会主动关闭到被控制节点的连接!
[root@ansible-server ~]# ansible -i /etc/ansible/hosts all -m raw -a "hostname"
172.16.50.65 | SUCCESS | rc=0 >>
ansible-node01
Shared connection to 172.16.50.65 closed.

172.16.50.66 | SUCCESS | rc=0 >>
ansible-node02
Shared connection to 172.16.50.66 closed.

172.16.50.67 | SUCCESS | rc=0 >>
ansible-node03
Shared connection to 172.16.50.67 closed.

[root@ansible-server ~]# ansible -i /etc/ansible/hosts all -m shell -a "hostname"
172.16.50.65 | SUCCESS | rc=0 >>
ansible-node01

172.16.50.66 | SUCCESS | rc=0 >>
ansible-node02

172.16.50.67 | SUCCESS | rc=0 >>
ansible-node03

[root@ansible-server ~]# ansible -i /etc/ansible/hosts all -m command -a "hostname"
172.16.50.66 | SUCCESS | rc=0 >>
ansible-node02

172.16.50.65 | SUCCESS | rc=0 >>
ansible-node01

172.16.50.67 | SUCCESS | rc=0 >>
ansible-node03

raw和shell模块支持管道, command模块不支持管道
[root@ansible-server ~]# ansible -i /etc/ansible/hosts all -m raw -a "cat /etc/passwd|grep root"
172.16.50.65 | SUCCESS | rc=0 >>
root:x:0:0:root:/root:/bin/bash
operator:x:11:0:operator:/root:/sbin/nologin
Shared connection to 172.16.50.65 closed.

172.16.50.66 | SUCCESS | rc=0 >>
root:x:0:0:root:/root:/bin/bash
operator:x:11:0:operator:/root:/sbin/nologin
Shared connection to 172.16.50.66 closed.

172.16.50.67 | SUCCESS | rc=0 >>
root:x:0:0:root:/root:/bin/bash
operator:x:11:0:operator:/root:/sbin/nologin
Shared connection to 172.16.50.67 closed.

[root@ansible-server ~]# ansible -i /etc/ansible/hosts all -m shell -a "cat /etc/passwd|grep root"
172.16.50.67 | SUCCESS | rc=0 >>
root:x:0:0:root:/root:/bin/bash
operator:x:11:0:operator:/root:/sbin/nologin

172.16.50.66 | SUCCESS | rc=0 >>
root:x:0:0:root:/root:/bin/bash
operator:x:11:0:operator:/root:/sbin/nologin

172.16.50.65 | SUCCESS | rc=0 >>
root:x:0:0:root:/root:/bin/bash
operator:x:11:0:operator:/root:/sbin/nologin

[root@ansible-server ~]# ansible -i /etc/ansible/hosts all -m command -a "cat /etc/passwd|grep root"
172.16.50.66 | FAILED | rc=1 >>
cat: /etc/passwd|grep: No such file or directory
cat: root: No such file or directorynon-zero return code

172.16.50.65 | FAILED | rc=1 >>
cat: /etc/passwd|grep: No such file or directory
cat: root: No such file or directorynon-zero return code

172.16.50.67 | FAILED | rc=1 >>
cat: /etc/passwd|grep: No such file or directory
cat: root: No such file or directorynon-zero return code
4.4.3.yum模块
这个模块是RedHat 和 CentOS作为远端受控节点OS的时候,用的最多的模块, 是RedHat / CentOS包管理工具的模块, 使用`yum’软件包管理器管理软件包,其选项有:
config_file:yum的配置文件 (optional)
disable_gpg_check:关闭gpg_check (optional)
disablerepo:不启用某个源 (optional)
enablerepo:启用某个源(optional)
name:要进行操作的软件包的名字,默认最新的程序包,指明要安装的程序包,可以带上版本号,也可以传递一个url或者一个本地的rpm包的路径
state:表示是安装还是卸载的状态, 其中present、installed、latest 表示安装, absent 、removed表示卸载删除; present默认状态, laster表示安装最新版本.
温馨提示:
要确保受控节点的python版本对应正确, 否则执行下面命令会报错 (下面报错说明受控节点需要python2版本, 而当前是python3):
"msg": "The Python 2 bindings for rpm are needed for this module. If you require Python 3 support use the `dnf` Ansible module instead..
The Python 2 yum module is needed for this module. If you require Python 3 support use the `dnf` Ansible module instead."

安装httpd
[root@ansible-server ~]# ansible web-nodes -m yum -a 'name=httpd state=latest'
[root@ansible-server ~]# ansible web-nodes -m yum -a 'name=httpd state=present'
[root@ansible-server ~]# ansible web-nodes -m yum -a 'name=httpd state=installed'

[root@ansible-server ~]# ansible web-nodes -m yum -a 'name=http://nginx.org/packages/centos/6/noarch/RPMS/nginx-release-centos-6-0.el6.ngx.noarch.rpm state=present'
[root@ansible-server ~]# ansible web-nodes -m yum -a 'name="@Development tools" state=present'

卸载httpd
[root@ansible-server ~]# ansible web-nodes -m yum -a 'name=httpd state=absent'
[root@ansible-server ~]# ansible web-nodes -m yum -a 'name=httpd state=removed'
4.4.4、apt模块
这个模块是ubuntu作为远端受控节点OS的时候,用的最多的模块。Apt是Ubuntu/Debian的包管理工具。
deb: 用于安装远程机器上的.deb后缀的软件包(optional)
install_recommends: 这个参数可以控制远程电脑上是否只是下载软件包,还是下载后安装,默认参数为true,设置为false的时候只下载软件包,不安装
update_cache: 当这个参数为yes的时候等于apt-get update(optional)
name: apt要下载的软件包名字,支持name=git=1.6 这种制定版本的模式
state: 状态(present,absent,latest),表示是安装还是卸载. 其中present、installed、latest 表示安装, absent 、removed表示卸载删除; present默认状态, laster表示安装最新版本.
在安装foo软件包前更新然后安装foo
# ansible web-nodes -m apt -a 'name=foo update_cache=yes'

移除foo软件包
# ansible web-nodes -m apt -a 'name=foo state=absent'

安装foo软件包
# ansible web-nodes -m apt -a 'name=foo state=present'

安装foo 1.0软件包
# ansible web-nodes -m apt -a 'name=foo=1.00 state=present'

安装nginx最新的名字为squeeze-backport发布包,并且安装前执行更新
# ansible web-nodes -m apt -a 'name=nginx state=latest default_release=squeeze-backports update_cache=yes'

只下载openjdk-6-jdk最新的软件包,不安装
# ansible web-nodes -m apt -a 'name=openjdk-6-jdk state=latest install_recommends=no'

安装所有软件包到最新版本
# ansible web-nodes -m apt -a 'upgrade=dist'

更新apt-get的list
# ansible web-nodes -m apt -a 'update_cache=yes'

3600秒后停止update_cache
# ansible web-nodes -m apt -a 'update_cache=yes cache_valid_time=3600'

安装远程节点上的/tmp/mypackage.deb软件包
# ansible web-nodes -m apt -a 'deb=/tmp/mypackage.deb'
4.4.5.pip 模块
用于管理Python库依赖项,为了使用pip模块,必须提供参数name或者requirements
chdir: 执行pip命令前cd进入的目录
name:要安装的Python库的名称或远程包的URL。
requirements:一个pip requirements.txt文件的路径,它应该是远程系统的本地文件,如果使用chdir选项,则可以将文件指定为相对路径。
version:指定的Python库的安装版本。
extra_args:额外的参数传递给pip (后面使用双引号)。
executable:显式可执行文件或可执行文件的路径名,用于为系统中安装的特定版本的Python运行pip。 例如pip-3.3,如果系统中安装了Python 2.7和3.3,并且想要为Python 3.3安装运行pip。 它不能与“virtualenv”参数一起指定(在2.1中添加)。 默认情况下,它将采用适用于python解释器的版本。 pip3在python 3上,pip2或pip在python 2上。
virtualenv:要安装到的virtualenv目录的可选路径。 它不能与’executable’参数一起指定(在2.1中添加)。 如果virtualenv不存在,则将在安装软件包之前创建它。 可选的virtualenv_site_packages,virtualenv_command和virtualenv_python选项会影响virtualenv的创建。
virtualenv_command:用于创建虚拟环境的命令或路径名。 例如pyvenv,virtualenv,virtualenv2,~/bin /virtualenv,/usr/local/bin/virtualenv。
virtualenv_python:用于创建虚拟环境的Python可执行文件。 例如python3.5,python2.7。 未指定时,将使用用于运行ansible模块的Python版本。 当virtualenv_command使用pyvenv或-m venv模块时,不应使用此参数。
state:状态(present,absent,latest, forcereinstall),表示是安装还是卸载的状态. 其中present表示默认安装; lastest表示最新版本安装; absent表示卸载和删除; forcereinstall表示强制重新安装, "forcereinstall"选项仅适用于可ansible 2.1及更高版本.
受控节点批量安装pip
[root@ansible-server ~]# ansible web-nodes -m shell -a 'yum -y install epel-release'
[root@ansible-server ~]# ansible web-nodes -m shell -a 'yum install python-pip -y'

---------
如果报错没有安装包,可能涉及yum源调整。我实验用例使用的是centos7系统,所以调整yum源为7的,操作如下:
[root@ansible-node01 ~]# cd /etc/yum.repos.d
[root@ansible-node01 yum.repos.d]# cat CentOS-Base.repo
# CentOS-Base.repo
#
# The mirror system uses the connecting IP address of the client and the
# update status of each mirror to pick mirrors that are updated to and
# geographically close to the client.  You should use this for CentOS updates
# unless you are manually picking other mirrors.
#
# If the mirrorlist= does not work for you, as a fall back you can try the
# remarked out baseurl= line instead.
#
#

[base]
name=CentOS-$releasever - Base - mirrors.aliyun.com
failovermethod=priority
baseurl=http://mirrors.aliyun.com/centos/$releasever/os/$basearch/
        http://mirrors.aliyuncs.com/centos/$releasever/os/$basearch/
        http://mirrors.cloud.aliyuncs.com/centos/$releasever/os/$basearch/
gpgcheck=1
gpgkey=http://mirrors.aliyun.com/centos/RPM-GPG-KEY-CentOS-6

#released updates
[updates]
name=CentOS-$releasever - Updates - mirrors.aliyun.com
failovermethod=priority
baseurl=http://mirrors.aliyun.com/centos/$releasever/updates/$basearch/
        http://mirrors.aliyuncs.com/centos/$releasever/updates/$basearch/
        http://mirrors.cloud.aliyuncs.com/centos/$releasever/updates/$basearch/
gpgcheck=1
gpgkey=http://mirrors.aliyun.com/centos/RPM-GPG-KEY-CentOS-6

#additional packages that may be useful
[extras]
name=CentOS-$releasever - Extras - mirrors.aliyun.com
failovermethod=priority
baseurl=http://mirrors.aliyun.com/centos/$releasever/extras/$basearch/
        http://mirrors.aliyuncs.com/centos/$releasever/extras/$basearch/
        http://mirrors.cloud.aliyuncs.com/centos/$releasever/extras/$basearch/
gpgcheck=1
gpgkey=http://mirrors.aliyun.com/centos/RPM-GPG-KEY-CentOS-6

#additional packages that extend functionality of existing packages
[centosplus]
name=CentOS-$releasever - Plus - mirrors.aliyun.com
failovermethod=priority
baseurl=http://mirrors.aliyun.com/centos/$releasever/centosplus/$basearch/
        http://mirrors.aliyuncs.com/centos/$releasever/centosplus/$basearch/
        http://mirrors.cloud.aliyuncs.com/centos/$releasever/centosplus/$basearch/
gpgcheck=1
enabled=0
gpgkey=http://mirrors.aliyun.com/centos/RPM-GPG-KEY-CentOS-6

#contrib - packages by Centos Users
[contrib]
name=CentOS-$releasever - Contrib - mirrors.aliyun.com
failovermethod=priority
baseurl=http://mirrors.aliyun.com/centos/$releasever/contrib/$basearch/
        http://mirrors.aliyuncs.com/centos/$releasever/contrib/$basearch/
        http://mirrors.cloud.aliyuncs.com/centos/$releasever/contrib/$basearch/
gpgcheck=1
enabled=0
gpgkey=http://mirrors.aliyun.com/centos/RPM-GPG-KEY-CentOS-6

需要将RPM-GPG-KEY-CentOS-6调整为7的;
[root@ansible-node01 yum.repos.d]# sed -i 's/RPM-GPG-KEY-CentOS-6/RPM-GPG-KEY-CentOS-7/g' CentOS-Base.repo

--------

安装bottle python包
[root@ansible-server ~]# ansible web-nodes -m pip -a 'name=bottle'
[root@ansible-server ~]# ansible web-nodes -m pip -a 'name=bottle state=present'          #默认的present状态可以省略不写

卸载bottle python包
[root@ansible-server ~]# ansible web-nodes -m pip -a 'name=bottle state=absent'

在0.4.6版安装bottle python包
[root@ansible-server ~]# ansible web-nodes -m pip -a 'name=bottle version=0.4.6 state=present'

使用远程协议(bzr +,hg +,git +,svn +)安装MyApp。 不必在extra_args中提供'-e'选项。
[root@ansible-server ~]# ansible web-nodes -m pip -a 'name=svn+http://myrepo/svn/MyApp#egg=MyApp'

使用远程协议(bzr +,hg +,git +)安装MyApp。
[root@ansible-server ~]# ansible web-nodes -m pip -a 'name=git+http://myrepo/app/MyApp'

从本地压缩包安装MyApp
[root@ansible-server ~]# ansible web-nodes -m pip -a 'name=file:///path/to/MyApp.tar.gz'

将bottle安装到指定的virtualenv中,继承全局安装的模块
[root@ansible-server ~]# ansible web-nodes -m pip -a 'name=bottle virtualenv=/my_app/venv virtualenv_site_packages=yes'

使用Python 2.7将bottle安装到指定的virtualenv中
[root@ansible-server ~]# ansible web-nodes -m pip -a 'name=bottle virtualenv=/my_app/venv virtualenv_command=virtualenv-2.7'

在用户主目录中安装bottle (extra_args后面使用双引号)
[root@ansible-server ~]# ansible web-nodes -m pip -a 'name=bottle extra_args="--user"'

安装指定的python requirements
[root@ansible-server ~]# ansible web-nodes -m pip -a 'requirements=/my_app/requirements.txt'

在指定的virtualenv中安装指定的python requirements
[root@ansible-server ~]# ansible web-nodes -m pip -a 'requirements=/my_app/requirements.txt virtualenv=/my_app/venv'

安装指定的python requirements和自定义pip源URL
[root@ansible-server ~]# ansible web-nodes -m pip -a 'requirements=/my_app/requirements.txt extra_args="-i https://example.com/pypi/simple"'

专门为Python 3.3安装bottle,使用'pip-3.3'可执行文件
[root@ansible-server ~]# ansible web-nodes -m pip -a 'name=bottle executable=pip-3.3'

安装 bottle,如果已安装,强制重新安装
[root@ansible-server ~]# ansible web-nodes -m pip -a 'name=bottle state=forcereinstall'
4.4.6、synchronize 模块
这个模块是使用rsync同步文件,将主控方目录推送到指定受控节点的目录下。其参数如下:
delete: 删除不存在的文件,delete=yes 使两边的内容一样(即以推送方为主),默认no
src: 要同步到目的地的源主机上的路径; 路径可以是绝对的或相对的。如果路径使用”/”来结尾,则只复制目录里的内容,如果没有使用”/”来结尾,则包含目录在内的整个内容全部复制
dest:目的地主机上将与源同步的路径; 路径可以是绝对的或相对的。
dest_port:默认目录主机上的端口 ,默认是22,走的ssh协议。
mode: push或pull,默认push,一般用于从本机向远程主机上传文件,pull 模式用于从远程主机上取文件。
rsync_opts:通过传递数组来指定其他rsync选项。
将主控节点上/data/kevin目录同步到受控节点的/home目录下
[root@ansible-server ~]# ansible web-nodes -m synchronize -a 'src=/data/kevin dest=/home'

将主控节点上/data/kevin/test.file文件同步到受控节点的/opt目录下
[root@ansible-server ~]# ansible web-nodes -m synchronize -a 'src=/data/kevin/test.file dest=/opt'

将主控节点上/data/kevin/test.file文件同步到受控节点的/root/bobo.file文件
[root@ansible-server ~]# ansible web-nodes -m synchronize -a 'src=/data/kevin/test.file dest=/root/bobo.file'

将主控节点上/opt/同步到受控节点的/opt/目录, 使受控节点保持和主控节点的opt目录一致, 不一样的就删除! 默认delete=no
[root@ansible-server ~]# ansible web-nodes -m synchronize -a 'src=/opt/ dest=/opt/ delete=yes'

注意命令中要加"/", 如果不加"/", 则主控节点的opt目录就同步到受控节点的/opt目录下即, 即/opt/opt
[root@ansible-server ~]# ansible web-nodes -m synchronize -a 'src=/opt dest=/opt delete=yes'

将主控节点上/data/kevin目录同步到受控节点的/mnt/www目录下. 但是bobo目录排除在外!  rsync_opts可以进行多次传递.
[root@ansible-server ~]# ansible web-nodes -m synchronize -a 'src=/data/kevin/ dest=/mnt/www/ rsync_opts="--no-motd" rsync_opts="--exclude=bobo"'

强制两边同步保持一致! 跟主控节点源目录保持一致!
[root@ansible-server ~]# ansible web-nodes -m synchronize -a 'src=/data/kevin/ dest=/mnt/www/ rsync_opts="--no-motd" rsync_opts="--exclude=bobo" delete=yes'

从远程受控节点上将/usr/local/src/grace.file文件拉取到主控节点的/root目录下
[root@ansible-server ~]# ansible web-nodes -m synchronize -a 'src=/usr/local/src/grace.file dest=/root/ rsync_opts="-avpgolr" mode=pull '
synchronize 模块和copy模块常用参数和简单比较请查看下述链接:https://www.ssforce.cn/archives/341
4.4.7、template 模块
基于模板方式生成一个文件复制到远程主机(template使用Jinjia2格式作为文件模版,进行文档内变量的替换的模块。它的每次使用都会被ansible标记为”changed”状态。)
backup: 如果原目标文件存在,则先备份目标文件
src: 在ansible控制器上的Jinja2格式化模板的路径。 这可以是相对或绝对的路径。
dest: 将模板渲染到远程机器上的位置。
force: 是否强制覆盖,默认为yes
owner: 目标文件属主
group: 目标文件属组
mode: 目标文件的权限模式,模式可以被指定为符号模式(例如,u + rwx或u = rw,g = r,o = r)
[root@ansible-server ~]# ansible web-nodes -m template -a "src=/mytemplates/foo.j2 dest=/etc/file.conf owner=bin group=wheel  mode=0644"

同样的例子,但使用等效于0644的符号模式
[root@ansible-server ~]# ansible web-nodes -m template -a "src=/mytemplates/foo.j2 dest=/etc/file.conf owner=bin group=wheel mode="u=rw,g=r,o=r""

具体用法, 可参考playbook剧本写法.
4.4.8、copy 模块
把主控节点本地的文件上传同步到远程受控节点上, 该模块不支持从远程受控节点拉取文件到主控节点上。 参数选项如下:
src:指定源文件路径,可以是相对路径,也可以是绝对路径,可以是目录(并非是必须的,可以使用content,直接生成文件内容). src即是要复制到远程主机的文件在本地的地址,可以是绝对路径,也可以是相对路径。如果路径是一个目录,它将递归复制。在这种情况下,如果路径使用”/”来结尾,则只复制目录里的内容,如果没有使用”/”来结尾,则包含目录在内的整个内容全部复制,类似于rsync。
dest:指定目标文件路径,只能是绝对路径,如果src是目录,此项必须是目录. 这个是必选项!
owner:指定属主;
group:指定属组;
mode:指定权限,可以以数字指定比如0644;
content:代替src,直接往dest文件中写内容,可以引用变量,也可以直接使用inventory中的主机变量. 写后会覆盖原文件内容!
backup:在覆盖之前将原文件备份,备份文件包含时间信息。有两个选项:yes|no
force: 如果目标主机包含该文件,但内容不同,如果设置为yes,则强制覆盖,如果为no,则只有当目标主机的目标位置不存在该文件时,才复制。默认为yes ;
directory_mode:递归的设定目录的权限,默认为系统默认权限;
others:所有的file模块里的选项都可以在这里使用;
特别注意: src和content不能同时使用!!!!


[root@ansible-server ~]# ansible web-nodes -m copy -a 'src=/data/kevin/ dest=/mnt/www/ backup=yes'

[root@ansible-server ~]# ansible web-nodes -m copy -a 'src=/etc/hosts dest=/mnt/www/ owner=root group=root mode=0644'

[root@ansible-server ~]# ansible web-nodes -m copy -a 'src=/etc/hosts dest=/mnt/www/ owner=root group=root mode="u=rw,g=r,o=r"'

向远程受控节点的/mnt/www/test.file文件写入内容, 把原内容覆盖掉
[root@ansible-server ~]# ansible web-nodes -m copy -a 'content="
My age is 26" dest=/mnt/www/test.file'
4.4.9、user 模块与group 模块
user模块是请求的是useradd, userdel, usermod三个指令,goup模块请求的是groupadd, groupdel, groupmod 三个指令。
user模块
home: 指定用户的家目录, 需要与createhome配合使用。
groups: 指定用户的属组。
uid: 指定用的uid。
password: 设定用户密码, password参数需要接受md5加密后的值. 特别注意: 指定password参数时, 不能使用明文密码, 因为后面这一串密码会被直接传送到被管理主机的/etc/shadow文件中, 所以需要先将密码字符串进行加密处理, 然后将得到的字符串放到password中即可。
name: 指定用户名。
system: 是否为系统用户。 表示默认创建为普通用户, 而非系统用户, 指定是用yes. 也就是说yes是默认创建为普通用户, 而非系统用户;
update_password: 修改用户密码, 其中always: 新密码和旧密码不同时进行修改; on_create: 为新创建的用户指定密码.
createhome: 创建家目录, 其中yes表示默认项, 即创建用户默认是有家目录的; no表示创建用户时不创建家目录.
remove: 其中yes是删除用户家目录, 需要指定此参数; no是默认项, 删除用户时默认不删除用户的家目录. 当state=absent时, remove=yes则表示连同家目录一起删除, 等价于userdel -r。
state: 用户状态是创建还是删除. (present, absent) ;默认为present; 其中present表示添加用户; absent表示删除用户
shell: 指定用户的shell环境。
generate_ssh_key: 是否为相关用户生成SSH密钥。 这不会覆盖现有的SSH密钥。
ssh_key_bits: 可选择指定要创建的SSH密钥中的位数。
ssh_key_passphrase: 设置SSH密钥的密码。 如果没有提供密码, SSH密钥将默认没有密码。
ssh_key_file: 指定SSH密钥文件名(可选). 如果这是一个相对的文件名, 那么它将是相对于用户的主目录。
ssh_key_type: 指定要生成的SSH密钥的类型(可选). 可用的SSH密钥类型将取决于目标主机上的实现。
使用bash shell添加用户haha,将组"管理员"和"开发人员"附加到用户组
[root@ansible-server ~]# ansible web-nodes -m user -a "name=haha shell=/bin/bash groups=admins,developers append=yes"

增加用户anhui (先对密码做明文到密文的处理)
[root@ansible-server ~]# echo "anhui@123" | openssl passwd -1 -stdin
$1$rj74jCVy$NDW80bgY0DUTuHUlSunVv1
[root@ansible-server ~]# ansible web-nodes -m user -a 'name=anhui system=yes password=$1$rj74jCVy$NDW80bgY0DUTuHUlSunVv1 state=present'

删除用户anhui
[root@ansible-server ~]# ansible web-nodes -m user -a 'name=anhui remove=yes state=absent'

更新用户kevin的密码 (先对新密码kevin@bj123做明文到密文的处理)
[root@ansible-server ~]# echo "kevin@bj123"| openssl passwd -1 -stdin
$1$5X5bH5.J$RwE6o6g6bX953W7vAaizv/
[root@ansible-server ~]# ansible web-nodes -m user -a 'name=kevin update_password=always password=$1$5X5bH5.J$RwE6o6g6bX953W7vAaizv/'

在~/.ssh/id_rsa中为用户bobo创建一个2048位的SSH密钥
[root@ansible-server ~]# ansible web-nodes -m user -a 'name=bobo generate_ssh_key=yes ssh_key_bits=2048 ssh_key_file=.ssh/id_rsa'

[root@ansible-server ~]# ansible web-nodes -m group -a "name=yang gid=888"
[root@ansible-server ~]# ansible web-nodes -m user -a "name=yang uid=888 group=888 shell=/sbin/nologin create_home=no"
group模块
gid: 指定用的gid。
name: 指定用户名。
state: 是创建还是删除, (present,absent);
system: 如果是,则表示创建的组是系统组;
[root@ansible-server ~]# ansible web-nodes -m group -a "name=huoqiu state=present"
[root@ansible-server ~]# ansible web-nodes -m group -a "name=chenzun gid=897 state=present"
[root@ansible-server ~]# ansible web-nodes -m group -a "name=huoqiu state=absent"
4.4.10、service 模块
管理服务的模块, service管理的服务必须是yum安装的服务, 即默认的系统服务脚本. 编译安装的服务不好使用service模块管理.
name: 服务名称;
state: started/stopped/restarted/reloaded;
enabled: true/false;
runlevel: 运行级别;
sleep: 如果执行了restarted,在stop和start之间沉睡几秒;
arguments: 给命令行提供一些选项;
[root@ansible-server ~]# ansible web-nodes -m service -a "name=sshd state=restarted"
[root@ansible-server ~]# ansible web-nodes -m service -a "enabled=on name=httpd state=started"
[root@ansible-server ~]# ansible web-nodes -m service -a "enabled=yes name=httpd state=started"
[root@ansible-server ~]# ansible web-nodes -m service -a "name=httpd state=reloaded"
[root@ansible-server ~]# ansible web-nodes -m service -a "name=httpd state=stopped"
4.4.11、get_url 模块
该模块主要用于从http、ftp、https服务器上下载文件(类似于wget), 主要有如下选项:
sha256sum: 下载完成后进行sha256 check;
timeout: 下载超时时间, 默认10s
url: 下载的URL
url_password、url_username: 主要用于需要用户名密码进行验证的情况
dest: 将文件下载到哪里的绝对路径。如果dest是目录, 则使用服务器提供的文件名, 或者如果没有提供, 将使用远程服务器上的URL的基本名称。
headers: 以格式“key: value, key: value”为请求添加自定义HTTP标头
[root@ansible-server ~]# ansible web-nodes -m get_url -a "url=http://lan.Okay686.com/RDPWrap-v1.6.1.zip dest=/usr/local/src/"
[root@ansible-server ~]# ansible web-nodes -m get_url -a "url=http://10.0.8.50/ops.sh  dest=/opt/shell.sh mode=0440"
[root@ansible-server ~]# ansible web-nodes -m get_url -a 'url=http://10.0.8.50/ops.sh dest=/opt/shell.sh headers="key:value,key:value"'
[root@ansible-server ~]# ansible web-nodes -m get_url -a 'url=http://10.0.8.50/ops.sh dest=/opt/shell.sh checksum=sha256:b5bb9d8014a0f9b1d61e21e796d78dccdf1352f23cd32812f4850b878ae4944c'
4.4.12、fetch 模块 (从远程拉取出来文件)
它用于从远程机器获取文件,并将其本地存储在由主机名组织的文件树中。
src: 指定从远程控制节点上要拉取的文件, 记住: 这个只能拉取文件!! 不能拉取目录!!! 后续版本可能会支持递归提取。
dest: 将远程节点拉取的文件保存到本地的目录路径. 例如,如果dest目录是/backup,在主机host.example.com上命名为/ etc/profile的src文件将被保存到/backup/host.example.com/etc/profile。
flat: 允许覆盖将目标文件添加到主机名/path/to/file的默认行为。默认为no!! 如果设置为yes, 将不会显示类似172.16.60.221/root/信息. (即在dest的本机存放目录下不会创建远程节点ip命名的目录)
将web-nodes组内的远程节点的/root/aaa.txt文件拉取到主控节点的/tmp下
[root@ansible-server ~]# ansible web-nodes -m fetch -a "dest=/mnt/ src=/root/aaa.txt"
172.16.50.67 | SUCCESS => {
    "changed": true,
    "checksum": "1fadd60f6e905b860a1182110cec7d0fa3981079",
    "dest": "/mnt/172.16.50.67/root/aaa.txt",
    "md5sum": "4532c0c474c02a4c5b60aa8643afcd64",
    "remote_checksum": "1fadd60f6e905b860a1182110cec7d0fa3981079",
    "remote_md5sum": null
}
172.16.50.65 | SUCCESS => {
    "changed": true,
    "checksum": "8807289098028621898390d6e025208f3972c8e3",
    "dest": "/mnt/172.16.50.65/root/aaa.txt",
    "md5sum": "43cf562f0b509f60b8b1ae2cfc3a836a",
    "remote_checksum": "8807289098028621898390d6e025208f3972c8e3",
    "remote_md5sum": null
}
172.16.50.66 | SUCCESS => {
    "changed": true,
    "checksum": "2c3b353fc488f70bbad25a43f5381840f45d05d5",
    "dest": "/mnt/172.16.50.66/root/aaa.txt",
    "md5sum": "8f25cc34e999c8cca920181d2f89379b",
    "remote_checksum": "2c3b353fc488f70bbad25a43f5381840f45d05d5",
    "remote_md5sum": null

拉取过来后, 会发现dest定义的文件存放目录下会有以远程节点ip命名的目录
[root@ansible-server ~]# ls /mnt/
172.16.50.65  172.16.50.66  172.16.50.67  xs-tools
[root@ansible-server ~]# ls /mnt/172.16.50.65/root/
aaa.txt
[root@ansible-server ~]# ls /mnt/172.16.50.66/root/
aaa.txt

flat参数,拉取的时候会自动创建设置的dest中不存在的目录(同名文件会覆盖):
[root@ansible-server ~]# ansible web-nodes -m fetch -a "dest=/mnt/linan/ src=/root/aaa.txt"
172.16.50.66 | SUCCESS => {
    "changed": true,
    "checksum": "2c3b353fc488f70bbad25a43f5381840f45d05d5",
    "dest": "/mnt/linan/172.16.50.66/root/aaa.txt",
    "md5sum": "8f25cc34e999c8cca920181d2f89379b",
    "remote_checksum": "2c3b353fc488f70bbad25a43f5381840f45d05d5",
    "remote_md5sum": null
}
172.16.50.67 | SUCCESS => {
    "changed": true,
    "checksum": "1fadd60f6e905b860a1182110cec7d0fa3981079",
    "dest": "/mnt/linan/172.16.50.67/root/aaa.txt",
    "md5sum": "4532c0c474c02a4c5b60aa8643afcd64",
    "remote_checksum": "1fadd60f6e905b860a1182110cec7d0fa3981079",
    "remote_md5sum": null
}
172.16.50.65 | SUCCESS => {
    "changed": true,
    "checksum": "8807289098028621898390d6e025208f3972c8e3",
    "dest": "/mnt/linan/172.16.50.65/root/aaa.txt",
    "md5sum": "43cf562f0b509f60b8b1ae2cfc3a836a",
    "remote_checksum": "8807289098028621898390d6e025208f3972c8e3",
    "remote_md5sum": null

[root@ansible-server ~]# ls /mnt/
172.16.50.65  172.16.50.66  172.16.50.67  linan  xs-tools
[root@ansible-server ~]# ls /mnt/linan/
172.16.50.65  172.16.50.66  172.16.50.67

[root@ansible-server ~]# ls /mnt/linan/172.16.50.65/root/
aaa.txt

如果不想要从远程节点拉取过来的文件在本机存放目录里已远程节点ip命名的目录里面, 即去掉上面的/mnt里面的172.16.50.65、172.16.50.66和172.16.50.67目录
[root@ansible-server ~]# ansible web-nodes -m fetch -a "dest=/mnt/kevin/ src=/root/aaa.txt flat=yes"
172.16.50.65 | SUCCESS => {
    "changed": true,
    "checksum": "8807289098028621898390d6e025208f3972c8e3",
    "dest": "/mnt/kevin/aaa.txt",
    "md5sum": "43cf562f0b509f60b8b1ae2cfc3a836a",
    "remote_checksum": "8807289098028621898390d6e025208f3972c8e3",
    "remote_md5sum": null
}
172.16.50.66 | SUCCESS => {
    "changed": true,
    "checksum": "2c3b353fc488f70bbad25a43f5381840f45d05d5",
    "dest": "/mnt/kevin/aaa.txt",
    "md5sum": "8f25cc34e999c8cca920181d2f89379b",
    "remote_checksum": "2c3b353fc488f70bbad25a43f5381840f45d05d5",
    "remote_md5sum": null
}
172.16.50.67 | SUCCESS => {
    "changed": true,
    "checksum": "1fadd60f6e905b860a1182110cec7d0fa3981079",
    "dest": "/mnt/kevin/aaa.txt",
    "md5sum": "4532c0c474c02a4c5b60aa8643afcd64",
    "remote_checksum": "1fadd60f6e905b860a1182110cec7d0fa3981079",
    "remote_md5sum": null

[root@ansible-server ~]# ls /mnt/
172.16.50.65  172.16.50.66  172.16.50.67  eason  kevin  linan  xs-tools
[root@ansible-server ~]# ls /mnt/kevin/
aaa.txt
4.4.13、file 模块
file模块主要用于远程主机上的文件操作,file模块包含如下选项:
force: 需要在两种情况下强制创建软链接,一种是源文件不存在但之后会建立的情况下;另一种是目标软链接已存在,需要先取消之前的软链,然后创建新的软链,有两个选项: yes|no
group: 定义文件/目录的属组
mode: 定义文件/目录的权限
owner: 定义文件/目录的属主
path: 必选项,定义文件/目录的路径
recurse: 递归的设置文件的属性,只对目录有效
src: 要被链接的源文件的路径,只应用于state=link的情况
dest: 被链接到的路径,只应用于state=link的情况
state: 表示file的状态, 主要分为:
directory: 如果目录不存在,创建目录;
file: 即使文件不存在,也不会被创建;
link: 创建软链接;
hard: 创建硬链接;
touch: 如果文件不存在,则会创建一个新的文件,如果文件或目录已存在,则更新其最后修改时间;
absent: 删除目录、文件或者取消链接文件;
[root@ansible-server ~]# ansible web-nodes -m file -a "path=/data/test state=touch mode="600" owner=kevin group=kevin"
[root@ansible-server ~]# ansible web-nodes -m file -a "path=/data/haha state=directory mode="755" owner=kevin group=kevin"
[root@ansible-server ~]# ansible web-nodes -m file -a "path=/data/test state=absent"
[root@ansible-server ~]# ansible web-nodes -m file -a "path=/data/test state=touch mode="u+rw,g-wx,o-rwx" owner=kevin group=kevin"

文件的软链接和硬链接
[root@ansible-server ~]# ansible web-nodes -m file -a "src=/data/test dest=/opt/heihei state=link"
[root@ansible-server ~]# ansible web-nodes -m file -a "src=/data/test dest=/mnt/hh state=hard"
[root@ansible-server ~]# ansible web-nodes -m file -a "src=/etc/passwd dest=/opt/heihei state=link force=yes"

目录做软链接
[root@ansible-server ~]# ansible web-nodes -m file -a "src=/data/haha/ dest=/root/aaa state=link"
4.4.14、lineinfile 模块
用于对远程受控节点的文件编辑模块. 主要选项有:
path: 指定要修改的配置文件, 包括:
regexp:匹配要修改的内容
line:要增加或者修改的内容
state: 状态, 包括:
absent:表示删除,当匹配到时进行删除
present:表示增加,当匹配到时进行修改,当没有匹配到时在最后增加一行,默认为此项
backrefs: 该参数值包括:
no:表示如果没有匹配到,则增加line;如果匹配成功,则替换line;
yes:表示如果没有匹配到,则不变line;如果匹配成功,则替换line;
backup: 该参数值包括:
no:表示如果没有匹配到,则增加line;如果匹配成功,则替换line;不备份原文件
yes:表示如果没有匹配到,则增加line;如果匹配成功,则替换line;备份原文件
insertafter(匹配的是此行): 在匹配到的行之后添加一行. (经测试, 发现是匹配到的行的最后一行的后面添加一行)
insertbefore(匹配的是此行): 在匹配到的行之前添加一行. (经测试, 发现是匹配到的行的最后一行的前面添加一行)
温馨提示: 经测试,当不添加backerfs: yes参数时,匹配到后也会进行替换,但当匹配到的内容不存在时,会在最后增加一行;所以当不增加backerfs参数时,要确定匹配到的内容存在;
将远程受控节点的/data/aaa.txt文件中的"123"字段修改为"eason"
[root@ansible-server ~]# ansible web-nodes -m lineinfile -a 'path=/data/test regexp="123" line="eason" backrefs=no'

[root@ansible-server ~]# ansible web-nodes -m lineinfile -a 'path=/etc/sudoers regexp="SYSTEM,SOFTWARE" line="STAPLES_ADMIN ALL=(ROOT) NOPASSWD:NETWORKING,LOCATE,STORAGE,DELEGATING,DRIVERS,SYSTEM,SOFTWARE,SERVICES,PROCESSES,FILE" backrefs=no'

匹配到的行后增加一行
[root@ansible-server ~]# ansible web-nodes -m lineinfile -a 'dest=/data/test insertafter="eason" line="huihui"'

匹配到的行前增加一行
[root@ansible-server ~]# ansible web-nodes -m lineinfile -a 'dest=/data/test insertbefore="root" line="huihui"'

删除匹配到的行:
[root@ansible-server ~]# ansible web-nodes -m lineinfile -a 'path=/data/test regexp="123" state=absent'
4.4.15、unarchive模块
用于解压文件,模块包含如下选项:
copy: 在解压文件之前,是否先将文件复制到远程主机,默认为yes。若为no,则要求目标主机上压缩包必须存在。
creates: 指定一个文件名,当该文件存在时,则解压指令不执行
dest: 远程主机上的一个路径,即文件解压的绝对路径。 必须是一个目录路径!
group: 解压后的目录或文件的属组;
list_files: 如果为yes,则会列出压缩包里的文件,默认为no,2.0版本新增的选项;
mode: 解压后文件的权限;
src: 如果copy为yes,则需要指定压缩文件的源路径;
owner: 解压后文件或目录的属主;
经测试, 该模块解压时识别zip, tgz , tar.gz, tar.bz2 格式的压缩包, gzip格式的测试时不支持.
将/usr/local/src/nginx.tgz解压缩到/data/www中
[root@ansible-server ~]# ansible web-nodes -m unarchive -a "src=/usr/local/src/nginx.tgz dest=/data/www/"
解压远程受控节点上已存在的文件
[root@ansible-server ~]# ansible web-nodes -m unarchive -a "src=/root/file.zip dest=/usr/local remote_src=yes"
解压文档需要下载的文件(2.0中添加)
[root@ansible-server ~]# ansible web-nodes -m unarchive -a "src=https://example.com/example.zip dest=/usr/local/bin remote_src=yes"
4.4.16、command模块 和 shell模块
用于在各被管理节点运行指定的命令. shell和command的区别:shell模块可以特殊字符,而command是不支持!!
command 是ansible的默认模块, 即不指定模块的时候默认使用的模块就是command ! 使用ansible自带模块执行命令 如果要用 > < | & ‘ ‘ 使用shell 模块, command是不支持管道符之类的。
可以使用"ansible-doc -s shell" 或 "ansible-doc -s command" 查看下shell和command的参数, 两者之间的参数用法上基本一样的.
[root@ansible-server ~]# ansible-doc -s shell
- name: Execute commands in nodes.
  shell:
      chdir:                 # 在执行命令之前,先cd到指定的目录下
      creates:               # 用于判断命令是否要执行,如果指定的文件存在(可以使用通配符)存在,则不执行
      executable:            # 不再使⽤默认的/bin/sh解析并执⾏命令,⽽是使⽤此处指定的命令解析(例如使⽤expect解析expect脚本。必须为绝对路径)
      free_form:             # 默认的选项,这里只是显示,实际上是没有的
      removes:               # 用于判断命令是否要执行,如果指定的文件存在(可以使用通配符)不存在,则不执行
      stdin:                 # 将命令的stdin直接设置为指定值
      warn:                  # 设置command的警告信息(在/etc/ansible/ansible.cfg中有配置项)

具体示例如下:
[root@ansible-server ~]# ansible all -a "date"
172.16.50.67 | SUCCESS | rc=0 >>
Tue Apr 23 11:37:03 CST 2019

172.16.50.65 | SUCCESS | rc=0 >>
Tue Apr 23 11:37:03 CST 2019

172.16.50.66 | SUCCESS | rc=0 >>
Tue Apr 23 11:37:03 CST 2019

[root@ansible-server ~]# ansible all -m command -a "date"
172.16.50.66 | SUCCESS | rc=0 >>
Tue Apr 23 11:37:17 CST 2019

172.16.50.67 | SUCCESS | rc=0 >>
Tue Apr 23 11:37:17 CST 2019

172.16.50.65 | SUCCESS | rc=0 >>
Tue Apr 23 11:37:17 CST 2019

在命令执行之前, 先切换到指定的目录路径下
[root@ansible-server ~]# ansible web-nodes -m command -a "chdir=/tmp pwd"
172.16.50.66 | SUCCESS | rc=0 >>
/tmp

172.16.50.65 | SUCCESS | rc=0 >>
/tmp

172.16.50.67 | SUCCESS | rc=0 >>
/tmp

creates 文件是否存在,不存在就执行命令
[root@ansible-server ~]# ansible web-nodes -m command -a "creates=/etc/hosts date"
172.16.50.66 | SUCCESS | rc=0 >>
skipped, since /etc/hosts exists

172.16.50.67 | SUCCESS | rc=0 >>
skipped, since /etc/hosts exists

172.16.50.65 | SUCCESS | rc=0 >>
skipped, since /etc/hosts exists

[root@ansible-server ~]# ansible web-nodes -m command -a "creates=/etc/hosts1231 date"
172.16.50.67 | SUCCESS | rc=0 >>
Tue Apr 23 11:38:16 CST 2019

172.16.50.66 | SUCCESS | rc=0 >>
Tue Apr 23 11:38:16 CST 2019

172.16.50.65 | SUCCESS | rc=0 >>
Tue Apr 23 11:38:16 CST 2019

removes 文件是否存在,不存在就不执行命令,
[root@ansible-server ~]# ansible web-nodes -m command -a "removes=/etc/hosts uptime"
172.16.50.66 | SUCCESS | rc=0 >>
 11:38:41 up 4 days, 20:06,  3 users,  load average: 0.02, 0.02, 0.05

172.16.50.67 | SUCCESS | rc=0 >>
 11:38:41 up 4 days, 20:06,  3 users,  load average: 0.02, 0.02, 0.05

172.16.50.65 | SUCCESS | rc=0 >>
 11:38:41 up 4 days, 20:06,  3 users,  load average: 0.00, 0.01, 0.05

[root@ansible-server ~]# ansible web-nodes -m command -a "removes=/etc/hosts1231 uptime"
172.16.50.66 | SUCCESS | rc=0 >>
skipped, since /etc/hosts1231 does not exist

172.16.50.65 | SUCCESS | rc=0 >>
skipped, since /etc/hosts1231 does not exist

172.16.50.67 | SUCCESS | rc=0 >>
skipped, since /etc/hosts1231 does not exist
shell 模块:这是个万能模块, 执行linux命令时可以用远程节点执行命令;
注意: shell 模块在远程执行脚本时,远程主机上一定要有相应的脚本;
[root@ansible-server ~]# ansible web-nodes -m shell -a "/bin/bash /opt/test.sh"
[root@ansible-server ~]# ansible web-nodes -m shell -a "/bin/bash /opt/test.sh"
172.16.50.66 | SUCCESS | rc=0 >>
ansible-node02
it is OK

172.16.50.67 | SUCCESS | rc=0 >>
ansible-node03
it is OK

172.16.50.65 | SUCCESS | rc=0 >>
ansible-node01
it is OK

下面的shell模块命令中使用了特殊字符, 如果使用comand模块则就不行了!!
[root@ansible-server ~]# ansible web-nodes -m shell -a "cat /etc/passwd > /tmp/test"
172.16.50.66 | SUCCESS | rc=0 >>

172.16.50.67 | SUCCESS | rc=0 >>

172.16.50.65 | SUCCESS | rc=0 >>

使用command模块执行下面命令, 则就会报错!  command模块不支持特殊字符!
[root@ansible-server ~]# ansible web-nodes -m command -a "cat /etc/passwd > /tmp/test"
4.4.17、hostname模块
修改远程受控节点的主机名的模块
使用hostname模块修改远程节点的主机名时, 最好指明远程单节点ip地址进行设置主机名了. 因为不同节点的主机名不一样
[root@ansible-server ~]# ansible 172.16.50.67 -m hostname -a 'name="web-node03"'
172.16.50.67 | SUCCESS => {
    "ansible_facts": {
        "ansible_domain": "",
        "ansible_fqdn": "web-node03",
        "ansible_hostname": "web-node03",
        "ansible_nodename": "web-node03"
    },
    "changed": true,
    "name": "web-node03"
}
4.4.18、script模块
在远程受控节点上执行主控节点的脚本,相当于scp+shell组合
比如在远程受控节点上执行主控节点的/opt/test.sh脚本
[root@ansible-server ~]# ansible all -m script -a "/opt/test.sh"
4.4.19、stat模块
获取远程文件的状态信息,包括atime,ctime,mtime,md5,uid,gid等信息
[root@ansible-server ~]# ansible all -m stat -a "path=/data/test"
4.4.20、 cron模块
远程受控节点的crontab配置
设置指定的crontab计划任务
[root@ansible-server ~]# ansible web-nodes -m cron -a "name='test' hour='2-5' minute='*/5' day='1' month='3,4' weekday='1' job='ls -l' user=root"
172.16.50.66 | SUCCESS => {
    "changed": true,
    "envs": [],
    "jobs": [
        "test"
    ]
}
172.16.50.67 | SUCCESS => {
    "changed": true,
    "envs": [],
    "jobs": [
        "test"
    ]
}
172.16.50.65 | SUCCESS => {
    "changed": true,
    "envs": [],
    "jobs": [
        "test"
    ]
}

然后到受控节点上查看:
[root@ansible-node01 ~]# crontab -l
*/5 * * * * /usr/sbin/ntpdate 172.16.51.150 > /dev/null 2>&1
#Ansible: test
*/5 2-5 1 3,4 1 ls -l

删除指定crontab
[root@ansible-server ~]# ansible web-nodes -m cron -a "name='test' state=absent"
172.16.50.65 | SUCCESS => {
    "changed": true,
    "envs": [],
    "jobs": []
}
172.16.50.66 | SUCCESS => {
    "changed": true,
    "envs": [],
    "jobs": []
}
172.16.50.67 | SUCCESS => {
    "changed": true,
    "envs": [],
    "jobs": []
}

[root@ansible-node01 ~]# crontab -l
*/5 * * * * /usr/sbin/ntpdate 172.16.51.150 > /dev/null 2>&1

======================================================
使用ansible添加一条定时任务
[root@ansible-server ~]# ansible web-nodes -m cron -a "minute=* hour=* day=* month=* weekday=*  job='/bin/sh /server/scripts/test.sh'"

远程受控节点上查看
[root@ansible-node02 ~]# crontab -l
#Ansible: None
* * * * * /bin/sh /server/scripts/test.sh

设置定时任务注释信息,防止重复,name设定一个名称
[root@ansible-server ~]# ansible web-nodes -m cron -a "name='cron01' job='/bin/sh /server/scripts/test.sh'"
[root@ansible-server ~]# ansible web-nodes -m cron -a "name='cron02' job='/bin/sh /server/scripts/test2.sh'"

远程受控节点上查看
[root@ansible-node02 ~]# crontab -l
#Ansible: cron01
* * * * * /bin/sh /server/scripts/test.sh
#Ansible: cron02
* * * * * /bin/sh /server/scripts/test2.sh

删除相应定时任务
[root@ansible-server ~]# ansible 172.16.50.65 -m cron -a "name='ansible cron02' minute=0 hour=0 job='/bin/sh /server/scripts/test.sh' state=absent"

注释相应定时任务,使定时任务失效 (disabled=yes 表示注释掉, 即无效; disabled=no 表示去掉注释, 即有效)
[root@ansible-server ~]# ansible web-nodes -m cron -a "name='ansible cron01' minute=0 hour=0 job='/bin/sh /server/scripts/test.sh' disabled=yes"
4.4.21、mount模块
在远程受控节点上挂载文件系统。可用参数:
present: 开机挂载,仅将挂载配置写入/etc/fstab(不常用)
mounted: 挂载设备,并将配置写入/etc/fstab
unmounted: 卸载设备,不会清除/etc/fstab写入的配置
absent: 卸载设备,会清理/etc/fstab写入的配置
mount已经使用path代替了原来的name参数,但是name参数还是可以使用的.
将受控节点的/dev/sd0设备挂载到/mnt/data目录上, 文件格式为ext4, 只读属性
[root@ansible-server ~]# ansible web-nodes -m mount -a "path=/mnt/data src=/dev/sd0 fstype=ext4 ots=ro state=present"

仅将挂载的配置写入/etc/fstab,并不会执行挂载操作
[root@ansible-server ~]# ansible web-nodes -m mount -a "src=172.16.50.65:/data path=/data fstype=nfs opts=defaults state=present"

临时挂载设备,并将挂载信息写入/etc/fstab
[root@ansible-server ~]# ansible web-nodes -m mount -a "src=172.16.50.65:/data path=/data fstype=nfs opts=defaults state=mounted"

临时卸载,不会清理/etc/fstab
[root@ansible-server ~]# ansible web-nodes -m mount -a "src=172.16.50.65:/data path=/data fstype=nfs opts=defaults state=unmounted"

卸载,不仅临时卸载,同时会清理/etc/fstab
[root@ansible-server ~]# ansible web-nodes -m mount -a "src=172.16.50.65:/data path=/data fstype=nfs opts=defaults state=absent"
4.4.22、find模块
帮助在被管理的受控主机中查找符合条件的文件,就像 find 命令一样.
常用选项:
paths: 必须参数,指定在哪个目录中查找文件,可以指定多个路径,路径间用逗号隔开,此参数有别名,使用别名 path 或者别名 name 可以代替 paths。
recurse: 默认情况下,只会在指定的目录中查找文件,也就是说,如果目录中还包含目录,ansible 并不会递归的进入子目录查找对应文件,如果想要递归的查找文件,需要使用 recurse 参数,当 recurse 参数设置为 yes 时,表示在指定目录中递归的查找文件。
hidden: 默认情况下,隐藏文件会被忽略,当 hidden 参数的值设置为 yes 时,才会查找隐藏文件。
file_type: 默认情况下,ansible 只会根据条件查找”文件”,并不会查找”目录”或”软链接”等文件类型,如果想要指定查找的文件类型,可以通过 file_type 指定文件类型,可指定的文件类型有 any、directory、file、link 四种。
patterns: 使用此参数指定需要查找的文件名称,支持使用 shell(比如通配符)或者正则表达式去匹配文件名称,默认情况下,使用 shell 匹配对应的文件名,如果想要使用 python 的正则去匹配文件名,需要将 use_regex 参数的值设置为 yes。
use_regex:默认情况下,find 模块不会使用正则表达式去解析 patterns 参数中对应的内容,当 use_regex 设置为 yes 时,表示使用 python 正则解析 patterns 参数中的表达式,否则,使用 glob 通配符解析 patterns 参数中的表达式。
contains:使用此参数可以根据文章内容查找文件,此参数的值为一个正则表达式,find 模块会根据对应的正则表达式匹配文件内容。
age: 使用此参数可以根据时间范围查找文件,默认以文件的 mtime 为准与指定的时间进行对比,比如,如果想要查找 mtime 在3天之前的文件,那么可以设置 age=3d,如果想要查找 mtime 在3天以内的文件,可以设置 age=-3d,这里所说的3天是按照当前时间往前推3天,可以使用的单位有秒(s)、分(m)、时(h)、天(d)、星期(w)。
age_stamp: 文件的时间属性中有三个时间种类,atime、ctime、mtime,当我们根据时间范围查找文件时,可以指定以哪个时间种类为准,当根据时间查找文件时,默认以 mtime 为准。
size: 使用此参数可以根据文件大小查找文件,比如,如果想要查找大于3M的文件,那么可以设置 size=3m,如果想要查找小于50k的文件,可以设置 size=-50k,可以使用的单位有 t、g、m、k、b。
get_checksum: 当有符合查找条件的文件被找到时,会同时返回对应文件的 sha1校验码,如果要查找的文件比较大,那么生成校验码的时间会比较长
在受控主机的 /data目录中查找文件内容中包含wang字符串的文件,隐藏文件会被忽略,不会进行递归查找。
[root@ansible-server ~]# ansible web-nodes -m find -a "paths=/data contains=".*wang.*""

在受控主机的的 /data目录以及其子目录中查找文件内容中包含wang字符串的文件,隐藏文件会被忽略。
[root@ansible-server ~]# ansible web-nodes -m find -a "paths=/data contains=".*wang.*" recurse=yes"

在受控主机的的 /data目录中查找以 .sh 结尾的文件,包括隐藏文件,但是不包括目录或其他文件类型,不会进行递归查找。
[root@ansible-server ~]# ansible web-nodes -m find -a 'paths=/data patterns="*.sh" file_type=any hidden=yes'

在受控主机的的 /data目录中查找以 .sh 结尾的文件,只不过patterns对应的表达式为正则表达式,查找范围包括隐藏文件,包括所有文件类型,
但是不会进行递归查找,不会对/data目录的子目录进行查找。
[root@ansible-server ~]# ansible web-nodes -m find -a 'paths=/data patterns=".*.sh" use_regex=yes file_type=any hidden=yes'

在受控主机的的 /data目录中以及其子目录中查找 mtime 在1天以内的文件,不包含隐藏文件,不包含目录或软链接文件等文件类型。
[root@ansible-server ~]# ansible web-nodes -m find -a "path=/data age=-1d recurse=yes"

在受控主机的的 /data目录中以及其子目录中查找大于 2g 的文件,不包含隐藏文件,不包含目录或软链接文件等文件类型。
[root@ansible-server ~]# ansible web-nodes -m find -a "paths=/data size=2g recurse=yes"

在受控主机的的 /data目录中以及其子目录中查找以 .sh 结尾的文件,并且返回符合条件文件的 sha1 校验码,包括隐藏文件
[root@ansible-server ~]# ansible web-nodes -m find -a "paths=/data patterns=*.sh get_checksum=yes hidden=yes recurse=yes"
4.4.23、 selinux模块
管理远程受控节点的selinux的模块
[root@ansible-server ~]# ansible web-nodes -m selinux -a 'state=disabled'
172.16.50.67 | SUCCESS => {
    "changed": false,
    "configfile": "/etc/selinux/config",
    "msg": "",
    "policy": "targeted",
    "reboot_required": false,
    "state": "disabled"
}
172.16.50.66 | SUCCESS => {
    "changed": false,
    "configfile": "/etc/selinux/config",
    "msg": "",
    "policy": "targeted",
    "reboot_required": false,
    "state": "disabled"
}
172.16.50.65 | SUCCESS => {
    "changed": false,
    "configfile": "/etc/selinux/config",
    "msg": "",
    "policy": "targeted",
    "reboot_required": false,
    "state": "disabled"
}
4.4.24、setup模块
用于收集远程受控主机的一些基本信息.
filter参数:用于进行条件过滤。如果设置,仅返回匹配过滤条件的信息
不加过滤参数, 就会将受控主机的所有信息都打印出来
[root@ansible-server ~]# ansible web-nodes -m setup

获取受控主机的 IPV4 地址
[root@ansible-server ~]# ansible web-nodes -m setup -a "filter=ansible_all_ipv4_addresses"
172.16.50.66 | SUCCESS => {
    "ansible_facts": {
        "ansible_all_ipv4_addresses": [
            "172.16.50.66"
        ],
        "ansible_all_ipv6_addresses": [
            "fe80::c8fa:a0ff:fe18:dbe4"
        ],
        "ansible_apparmor": {
            "status": "disabled"
        },
........下面信息不展示。

获取受控主机的内存信息
[root@ansible-server ~]# ansible web-nodes -m setup -a "filter=ansible_memory_mb"
172.16.50.66 | SUCCESS => {
    "ansible_facts": {
        "ansible_memory_mb": {
            "nocache": {
                "free": 7581,
                "used": 235
            },
            "real": {
                "free": 7270,
                "total": 7816,
                "used": 546
            },
            "swap": {
                "cached": 0,
                "free": 10239,
                "total": 10239,
                "used": 0
            }
        }
    },
    "changed": false
}
172.16.50.65 | SUCCESS => {
    "ansible_facts": {
        "ansible_memory_mb": {
            "nocache": {
                "free": 7583,
                "used": 233
            },
            "real": {
                "free": 7270,
                "total": 7816,
                "used": 546
            },
            "swap": {
                "cached": 0,
                "free": 10239,
                "total": 10239,
                "used": 0
            }
        }
    },
    "changed": false
}
172.16.50.67 | SUCCESS => {
    "ansible_facts": {
        "ansible_memory_mb": {
            "nocache": {
                "free": 7584,
                "used": 232
            },
            "real": {
                "free": 7272,
                "total": 7816,
                "used": 544
            },
            "swap": {
                "cached": 0,
                "free": 10239,
                "total": 10239,
                "used": 0
            }
        }
    },
    "changed": false
}

通过通配符实现模糊匹配,比如以”mb”关键字结尾的信息
[root@ansible-server ~]# ansible web-nodes -m setup -a "filter=*mb"
172.16.50.66 | SUCCESS => {
    "ansible_facts": {
        "ansible_memfree_mb": 7271,
        "ansible_memory_mb": {
            "nocache": {
                "free": 7583,
                "used": 233
            },
            "real": {
                "free": 7271,
                "total": 7816,
                "used": 545
            },
            "swap": {
                "cached": 0,
                "free": 10239,
                "total": 10239,
                "used": 0
            }
        },
        "ansible_memtotal_mb": 7816,
        "ansible_swapfree_mb": 10239,
        "ansible_swaptotal_mb": 10239
    },
    "changed": false
}
172.16.50.65 | SUCCESS => {
    "ansible_facts": {
        "ansible_memfree_mb": 7271,
        "ansible_memory_mb": {
            "nocache": {
                "free": 7584,
                "used": 232
            },
            "real": {
                "free": 7271,
                "total": 7816,
                "used": 545
            },
            "swap": {
                "cached": 0,
                "free": 10239,
                "total": 10239,
                "used": 0
            }
        },
        "ansible_memtotal_mb": 7816,
        "ansible_swapfree_mb": 10239,
        "ansible_swaptotal_mb": 10239
    },
    "changed": false
}
172.16.50.67 | SUCCESS => {
    "ansible_facts": {
        "ansible_memfree_mb": 7272,
        "ansible_memory_mb": {
            "nocache": {
                "free": 7584,
                "used": 232
            },
            "real": {
                "free": 7272,
                "total": 7816,
                "used": 544
            },
            "swap": {
                "cached": 0,
                "free": 10239,
                "total": 10239,
                "used": 0
            }
        },
        "ansible_memtotal_mb": 7816,
        "ansible_swapfree_mb": 10239,
        "ansible_swaptotal_mb": 10239
    },
    "changed": false
}
其他常用信息列出:
ansible_all_ipv4_addresses:仅显示ipv4的信息。
ansible_devices:仅显示磁盘设备信息。
ansible_distribution:显示是什么系统,例:centos,suse等。
ansible_distribution_major_version:显示是系统主版本。
ansible_distribution_version:仅显示系统版本。
ansible_machine:显示系统类型,例:32位,还是64位。
ansible_eth0:仅显示eth0的信息。
ansible_hostname:仅显示主机名。
ansible_kernel:仅显示内核版本。
ansible_lvm:显示lvm相关信息。
ansible_memtotal_mb:显示系统总内存。
ansible_memfree_mb:显示可用系统内存。
ansible_memory_mb:详细显示内存情况。
ansible_swaptotal_mb:显示总的swap内存。
ansible_swapfree_mb:显示swap内存的可用内存。
ansible_mounts:显示系统磁盘挂载情况。
ansible_processor:显示cpu个数(具体显示每个cpu的型号)。
ansible_processor_vcpus:显示cpu个数(只显示总的个数).
五、Ansible系列命令介绍
Ansible命令是日常工作中最长使用的命令,主要的使用场景为非固化需求,临时一次性的操作。
5.1、ansible命令的用法
ansible命令其实在运维工作中用的最多的命令,它的主要目的或者说是主要的应用场景是:在做临时性的操作的时候(比如只想看看被控端的一台主机或者多台主机是否存活),在man中的定义是:run a command somewhere else ansible通过ssh实现配置管理、应用部署、任务执行等功能,建议配置ansible端能基于密钥认证的方式联系各个被管理节点. ansible命令在运维工作中是尤为重要的在操作的时候结合ansible的模块(ansible-doc --list命令查看模块)可以实现很多功能:
语法:ansible <host-pattern> [options]

使用ansible --help可以查看到命令参数,
常用选项参数:
--version               #显示版本
-m module               #指定使用的模块,默认为command
-v                      #查看执行的详细过程(-vv、-vvvv更详细)
--list-hosts            #显示主机列表(可以简写为--list)
-k,--ask-pass           #提示输入ssh连接密码,默认使用key验证
-K,--ask-become-pass    #提示执行输入sudo的密码
-C,--check              #检查,并不执行
-T,--timeout=TIMEOUT    #执行命令的超时时间,默认10s
-u,--user=REMOTE_USER   #指定远程执行的执行用户
-b,--become             #代替旧版本的sudo切换
-h,--help               #显示使用帮助
-u                      #指定远程主机运行此命令的用户
-s                      #相当于sudo
-S                      #使用sudo

======================================================
[普通选项]
-a MODULE_ARGS
--args=MODULE_ARGS
传递参数给模块

--ask-vault-pass
询问vault的密码

-B SECONDS
--background=SECONDS
异步后台⽅式执⾏任务,并在指定的秒数后超时,超时会杀掉任务的进程。默认是同步,即保持长连接,它会等待
所有执⾏完毕(即阻塞模式)。但有时候是没必要这样的,⽐如某些命令的执⾏时间⽐ssh的超时时间还长。如果
不指定超时秒数,将以同步⽅式运⾏任务

-P POLL_INTERVAL
--poll=POLL_INTERVAL
异步模式下轮询任务的时间间隔,默认60秒

-C
--check
不对远程主机做一些改变,而是预测某些可能发生的改变(检查功能)

-e EXTRA_VARS
--extra-vars=EXTRA_VARS
配置额外的配置变量(key=value或者YAML/JSON格式)

-f FORKS
--forks=FORKS
指定并行处理的进程数量,默认5个

-h
--help
显示帮助信息

-i INVENTORY
--inventory-file=INVENTORY
指定inventory⽂件,多个⽂件使⽤逗号分隔。默认为/etc/ansible/hosts

-l SUBSET
--limit=SECONDS
使⽤额外的匹配模式来筛选⽬标主机列表。
此处的匹配模式是在已有匹配模式下进⾏的,所以是更严格的筛选。例如指定了主机组的情况下,使⽤-l选项从中只选⼀台主机进⾏控制

--list-hosts
不会执行任何操作,而是列出匹配到的主机列表

-m MODULE_NAME
--module-name=MODULE_NAME
指定要执行的模块名,默认的模块为"command"

--new-vault-password-file=NEW_VAULT_PASSWORD_FILE
new vault password f ile f or rekey

-o
--one-line
简化输出(一行输出模式)

--output-OUTPUT_FILE
output f ile name f or encrypt or decrypt; use - f or stdout

--syntax-check
检查playbook的语法,不会执行

-t TREE
--tree=TREE
记录输出到此⽬录中(测试时以每个host名如IP地址为⽂件名记录,结果记录到对应的⽂件中)。
此选项在ansible巨慢的时候(如瞬间应该返回的命令还需要10多秒才完成)有奇⽤,或者将ansible的结果重
定向到某个⽂件中也能解决,为什么如此,我也不明⽩(表⾯看来和输出⽅式有关系),多次亲测有效。

--vault-password-file=VAULT_PASSWORD_FILE
指定vault密码文件

-v
--verbose
输出详细信息,-vvv和-vvvv输出更详细的信息

--version
显示ansbile的版本

======================================================
[以下是连接选项,⽤于控制谁以及如何连接主机]
-k
--ask-pass
询问连接时的密码

--private-key=KEY_FILE
--key-file=KEY_FILE
使用文件来认证SSH连接的过程

-u REMOTE_USER
--user=REMOTE_USER
使用指定的用户名进行连接

-c CINNECTION
--connection=CINNECTION
连接类型,默认为ssh。paramiko (SSH), ssh, winrm and local. local is mostly usef ul f or crontab or kickstarts.

-T TIMEOUT
--time=TIMEOUT
连接的超时时间,单位为秒,默认10秒

--ssh-common-args=SSH_COMMON_ARGS
指定传递给sftp/scp/ssh等⼯具的通⽤额外参数

--sftp-extra-args=SFTP_EXTRA_ARGS
指定只传递给sftp的额外参数,如-f

--scp-extra-args=SCP_EXTRA_ARGS
指定只传递给scp的额外参数,如-l

--ssh-extra-args=SSH_EXTRA_ARGS
指定只传递给ssh的额外参数,如-R

======================================================
[以下是权限控制选项:控制在⽬标主机上以什么⾝份和权限运⾏任务]
-s
--sudo
为运行ansible命令的用户提升权限为sudo_user的权限,此命令已经报废,使用become代替

-u SUDO_USER
--sudo-user=SUDO_USER
期望的sudo_user,默认为root,已报废,使用become代替

-S
--su
使⽤su的⽅式执⾏操作,已废弃,使⽤become替代

-R SU_USER
--su-user=SU_USER
使⽤此user的su执⾏操作,默认为root,已废弃,使⽤become替代

-b
--become
使用become的方式升级权限

--become-method=BECOME_METHOD
指定提升权限的方式,可选以下⼏种:sudo/su/pbrun/pf exec/doas/dzdo/ksu/runas值

--become-user=BECOME_USER
要提升为哪个user的权限,默认为root

--ask-sudo-pass
询问sudo密码,已废弃,使⽤become替代

--ask-su-pass
询问su的密码,已废弃,使⽤become替代

-K
--ask-become-pass
询问become提升权限时的密码
Ansible返回结果一般会使用红色,橘色,橘黄色显示,红色表示执行过程异常,会终止剩余任务的执行,绿色和橘黄色表示执行过程没有异常,但橘黄色表示命令执行结束后目标有状态变化,绿色表示命令执行结束后目标没有状态变化。
5.2、ansible-doc
ansible-doc是查看ansible模块(插件)文档说明,针对每个模块都有详细的用法说明,功能和Linux的man命令类似
语法:ansible-doc [-l|-F|-s] [options] [-t <plugin type> ] [plugin]
参数:
-a, --all                                   #显示文档所有的模块(这个选项有个bug)
-h, --help                                  #显示使用帮助
-j, --json                                  #将所有的模块转储为JSON格式
-l, --list                                  #查看模块列表
-F, --list_files                            #显示模块的名称和模块原路径
-M MODULE_PATH, --module-path=MODULE_PATH   #
-s, --snippet                               #简介的显示模块的帮助信息
-t TYPE, --type=TYPE                        #指定模块类型(默认为module)
-v, --verbose                               #查看执行的详细过程(-vv、-vvvv更详细)
--version                                   #查看版本

执行 ansible-doc 模块名  查看模块的详细信息
示例:
查看模块详细信息
[root@ansible ~]# ansible-doc ping
> PING    (/usr/lib/python2.7/site-packages/ansible/modules/system/ping.py)

        A trivial test module, this module always returns `pong' on successful contact. It does not make sense in playbooks, but it is useful from `/usr/bin/ansible' to verify the
        ability to login and that a usable Python is configured. This is NOT ICMP ping, this is just a trivial test module that requires Python on the remote-node. For Windows targets,
        use the [win_ping] module instead. For Network targets, use the [net_ping] module instead.

OPTIONS (= is mandatory):

- data
        Data to return for the `ping' return value.
        If this parameter is set to `crash', the module will cause an exception.
        [Default: pong]


NOTES:
      * For Windows targets, use the [win_ping] module instead.
      * For Network targets, use the [net_ping] module instead.

AUTHOR: Ansible Core Team, Michael DeHaan
        METADATA:
          status:
          - stableinterface
          supported_by: core


EXAMPLES:
# Test we can logon to 'webservers' and execute python with json lib.
# ansible webservers -m ping

# Example from an Ansible Playbook
- ping:

# Induce an exception to see what happens
- ping:
    data: crash

RETURN VALUES:


ping:
    description: value provided with the data parameter
    returned: success
    type: string
    sample: pong

查看模块的简单信息
[root@ansible ~]# ansible-doc -s ping
- name: Try to connect to host, verify a usable python and return `pong' on success
  ping:
      data:                  # Data to return for the `ping' return value. If this parameter is set to `crash', the module will cause an exception.
5.3、ansible-playbook
ansible-playbook是日常用的最多的命令,其工作机制是:通过读取预先编写好的playbook文件实现批量管理,要实现的功能与命令ansbile一样,可以理解为按一定的条件组成ansible的任务集ansible-playbook命令后跟YML格式的playbook文件,执行事先编排好的任务集
语法: ansible-playbook [options] playbook.yml [playbook2 ...]
参数:大部分的参数和ansible的参数一致
可以使用:ansible-playbook --help可以查看到命令参数

例如: 使用ansible-playbook执行一个yaml文件
[root@ansible ~]# ansible-playbook -C /opt/ansible-playbook/test.yaml
5.4、ansible-galaxy
这个命令是一个下载互联网上roles集合的工具(这里提到的roles集合其实就是多个playbook文件的集合)
roles集合所在地址: https://galaxy.ansible.com
使用方法:
语法:ansible-galaxy [delete|import|info|init|install|list|login|remove|search|setup] [--help] [options] ...
参数:
-h, --help                          #查看命令帮助
-c, --ignore-certs                  #忽略SSL证书验证错误
-s API_SERVER, --server=API_SERVER  #API服务器地址
-v, --verbose                       #查看执行的详细过程(-vv、-vvvv更详细)
--version                           #查看版本

示例:
搜索roles
[root@ansible ~]# ansible-galaxy search nginx

查看search的使用帮助
[root@ansible ~]# ansible-galaxy search --help

安装roles
[root@ansible ~]# ansible-galaxy install geerlingguy.nginx
- downloading role 'nginx', owned by geerlingguy
- downloading role from https://github.com/geerlingguy/ansible-role-nginx/archive/2.6.2.tar.gz
- extracting geerlingguy.nginx to /root/.ansible/roles/geerlingguy.nginx
- geerlingguy.nginx (2.6.2) was installed successfully
上面可以看到实际上就是互联网上的geerlingguy.nginx下载到本地的/root/.ansible/roles/中
查看install的使用帮助
[root@ansible ~]# ansible-galaxy install --help

删除roles
[root@ansible ~]# ansible-galaxy remove geerlingguy.nginx
这个步骤就是把/root/.ansible/roles/中的geerlingguy.nginx文件夹删除
查看remove的使用帮助
[root@ansible ~]# ansible-galaxy remove --help

列出安装的roles
[root@ansible ~]# ansible-galaxy list
- geerlingguy.nginx, 2.6.2
查看list的使用帮助
[root@ansible ~]# ansible-galaxy list --help

====================================================================
温馨提示:
ansible-galaxy的使用方法还有很多,在语法中可以看到能执行的操作,可以使用示例中的相同方法查看各个功能的帮助信息!!!
====================================================================
5.5、ansible-pull
该指令设计到了ansible的另一种的工作模式: pull模式 (ansible默认使用的是push模式),这个和通常使用的push模式的工作机制正好相反(push拉取,pull推送)
ansible的pull模式适用于:
-> 你有数量巨大的机器需要配置,即使使用高并发线程依然需要花费大量的时间
-> 你要在刚启动的,没有联网的主机上执行ansible
语法: ansible-pull -U <repository> [options] [<playbook.yml>]
参数: 大部分的参数和ansible的参数一直,因为不常用所有就不列举了
可以使用 ansible-pull --help查看具体的帮助

通过ansible-pull结合Git和crontab一并实现,其原理如下:通过crontab定期拉取指定的Git版本到本地,并以指定模式自动运行预先制订好的指令。

具体示例参考如下:
*/20 * * * * root /usr/local/bin/ansible-pull -o -C 2.1.0 -d /srv/www/king-gw/ -i /etc/ansible/hosts -U git:// git.kingifa.com/king-gw-ansiblepull >> /var/log/ansible-pull.log 2>&1

===========================================================
温馨提示:
ansible-pull通常在配置大批量的机器的场景下使用,灵活性有小小的欠缺,但效率几乎可以无限的提升,对于运维人员的技术水平和前瞻性的规划有很高要求!!!
===========================================================
5.6、ansible-console (ansible自己的终端)
Ansible-console是ansible为用户提供的一款交互式工具,用户可在ansible-console虚拟出的终端上使用ansible内置的各种命令。所有的操作与shell类似,并支持tab补全.
语法:ansible-console [<host-pattern>] [options]
参数:大部分的参数和ansible的参数一直,因为不常用所有就不列举了
可以使用:ansible-console --help 查看帮助

===============使用示例================
对所有的被控客户机进行终端命令操作
[root@ansible ~]# ansible-console
Welcome to the ansible console.
Type help or ? to list commands.

root@all (3)[f:5]$ 然后在虚拟终端里执行命令, 比如输入"uptime", 就会显示所有被控客户机的uptime命令结果

对/etc/ansible/hosts里面定义的某个清单列表进行终端命令操作
[root@ansible ~]# ansible-console web-nodes
Welcome to the ansible console.
Type help or ? to list commands.

root@web-nodes (9)[f:5]$ list
172.16.60.212
172.16.60.213

root@web-nodes (9)[f:5]$ cat /etc/passwd|grep root
172.16.60.212 | CHANGED | rc=0 >>
root:x:0:0:root:/root:/bin/bash
operator:x:11:0:operator:/root:/sbin/nologin
dockerroot:x:998:995:Docker User:/var/lib/docker:/sbin/nologin

172.16.60.213 | CHANGED | rc=0 >>
root:x:0:0:root:/root:/bin/bash
operator:x:11:0:operator:/root:/sbin/nologin
dockerroot:x:998:995:Docker User:/var/lib/docker:/sbin/nologin

root@web (2)[f:5]$

在终端可做的操作
设置并发数: forks n  例如:forks 10
切换组: cd 组名      例如:cd web
列出当前组主机列表   例如:list
列出所有的内置命令(其实就是内置的模块)   例如:?或者help

exit命令退出终端
5.7、ansible-config (该命令不常用)
查看,编辑管理ansible的配置文件
语法:ansible-config [view|dump|list] [--help] [options] [ansible.cfg]
参数:
-c CONFIG_FILE, --config=CONFIG_FILE    #指定配置文件所在的路径
-h, --help                              #查看帮助信息
-v, --verbose                           #查看执行的详细过程(-vv、-vvvv更详细)
--version                               #查看版本
5.8、ansible-connection
这是一个插件,指定执行模式(测试用)
5.9、ansible-inventory
查看被控制端主机清单的详细信息默认情况下它使用库存脚本,返回JSON格式:
[root@ansible-server ~]# ansible-inventory --list
{
    "_meta": {
        "hostvars": {
            "172.16.50.65": {},
            "172.16.50.66": {},
            "172.16.50.67": {}
        }
    },
    "all": {
        "children": [
            "test-hosts",
            "ungrouped",
            "web-nodes"
        ]
    },
    "test-hosts": {
        "hosts": [
            "172.16.50.65",
            "172.16.50.66",
            "172.16.50.67"
        ]
    },
    "ungrouped": {},
    "web-nodes": {
        "hosts": [
            "172.16.50.65",
            "172.16.50.66",
            "172.16.50.67"
        ]
    }
}
5.10、ansible-vault
ansible-vault主要用于配置文件的加密,如编写的playbook配置文件中包含敏感的信息,不希望其他人随便的看,ansible-vault可加密/解密这个配置文件:
语法:ansible-vault [create|decrypt|edit|encrypt|encrypt_string|rekey|view] [options] [vaultfile.yml]
参数:
--ask-vault-pass      ask for vault password
-h, --help                                          #查看帮助信息
--new-vault-id=NEW_VAULT_ID                         #设置用于rekey的新vault标识
--new-vault-password-file=NEW_VAULT_PASSWORD_FILE   #新的保险库密码文件为rekey
--vault-id=VAULT_IDS                                #要使用的保险库标识
--vault-password-file=VAULT_PASSWORD_FILES          #库密码文件
-v, --verbose                                       #查看执行的详细过程(-vv、-vvvv更详细)
--version                                           #查看版本

使用参数:
encrypt (加密)
decrypt (解密)
create (创建)
view (查看)
edit (编辑)
rekey (修改密码)

示例说明
新建一个yml的文件,写入一些数据
[root@ansible-server ~]# echo "kevin123" > bo.yaml

给test.yml设置密码
[root@ansible-server ~]# ansible-vault encrypt bo.yaml
New Vault password:
Confirm New Vault password:
Encryption successful

查看这个yaml文件
[root@ansible-server ~]# cat bo.yaml
$ANSIBLE_VAULT;1.1;AES256
33663035323365353562633732366331336261356561636531393039336166623537383263346533
3634363730303134376230653163376239386536626533640a356461633233663937343061313563
36313036643738626531373331623237373636313332313830333738343561306132643836306232
3139393632343163620a313939333639333362373663323065666161646231663263363338663934
6431

上面查看到明显被加密了. 正确的查看方式如下 (即先解密, 然后再查看):
[root@ansible-server ~]# ansible-vault decrypt bo.yaml
Vault password:
Decryption successful

[root@ansible-server ~]# cat bo.yaml
kevin123

查看被加密的文件
[root@ansible-server ~]# ansible-vault encrypt bo.yaml
New Vault password:
Confirm New Vault password:
Encryption successful

[root@ansible-server ~]# ansible-vault view bo.yaml
Vault password:
kevin123

接着编辑被加密的文件
[root@ansible-server ~]# ansible-vault edit bo.yaml
Vault password:   #输入密码后, 就进入了bo.yaml文件的打开方式(相当于vim进入编辑)

[root@ansible-server ~]# ansible-vault view bo.yaml
Vault password:
kevin123
this is test

创建被加密的文件
[root@ansible-server ~]# ansible-vault create grace.yaml
New Vault password:     #输定这个新文件密码
Confirm New Vault password:   #再次确认密码后, 就直接进入到这个新文件中进行编辑

 [root@ansible-server ~]# ansible-vault view grace.yaml
Vault password:
this is test of grace
Ansible 其他用法
1、ansible限制后台运行时间
后台运行总是耗费比较长的时间,从而其状态在随后总是能够查看的,如果踢掉主机,又不想轮训,如下:
[root@ansible-server ~]# ansible web-nodes -B 3600 -P 0 -a "/usr/bin/long_running_operation --do-stuff"

如果要检查服务的状态,可以使用模块async_status,传递job id,如下:
[root@ansible-server ~]# ansible web-nodes -m async_status -a "jid=488359678239.2844"

轮训是内建的, 如下:
[root@ansible-server ~]# ansible web-nodes -B 1800 -P 60 -a "/usr/bin/long_running_operation --do-stuff"

解释说明:
参数-B表示运行最多30分钟,30*60,-P 60 轮训其状态每60S,
当时间运行在-B参数后的时间之后,此服务会被停止运行。
可以使用参数—forksvalue,来确保服务尽快运行
2、ansible收集和查看相关信息, 用于过滤等
[root@ansible-server ~]# ansible all -m setup
[root@ansible-server ~]# ansible web-nodes -m setup
[root@ansible-server ~]# ansible 172.16.50.67 -m setup
3、Ansible的委托、并发、任务超时
Ansible-playbook 并发运行async、poll, 即ansible的异步执行
ansible方便在于能批量下发,并返回结果和呈现。简单、高效。但有的任务执行起来却不那么直接,可能会花比较长的时间,甚至可能会比ssh的超时时间还要长。这种情况任务是不是没法执行了?
ansible考虑到了这种情况,解决方法就是让下发的任务执行的连接变为异步:任务下发之后,长连接不再保持,而是每隔一段时间轮询结果,直到任务结束。这就需要在playbook的任务中加入两个参数:async和poll。其中:
-> async参数值代表了这个任务执行时间的上限值。即任务执行所用时间如果超出这个时间,则认为任务失败。此参数若未设置,则为同步执行。
-> poll参数值代表了任务异步执行时轮询的时间间隔。
ansible默认只会创建5个进程,所以一次任务只能同时控制5台机器执行,那如果你有大量的机器需要控制,或者你希望减少进程数,那你可以采取异步执行。ansible的模块可以把task放进后台,然后轮询它.这使得在一定进程数下能让大量需要的机器同时运作起来。使用async和poll这两个关键字便可以并行运行一个任务。async这个关键字触发ansible并行运作任务,而async的值是ansible等待运行这个任务的最大超时值,而poll就是ansible检查这个任务是否完成的频率时间。
3.1、异步和轮询
Ansible 有时候要执行等待时间很长的操作, 这个操作可能要持续很长时间,设置超过ssh的timeout,这时候你可以在step中指定async 和 poll 来实现异步操作。
async 表示这个step的最长等待时长,如果设置为0,表示一直等待下去直到动作完成。
poll 表示检查step操作结果的间隔时长。
示例1、
---
- name: Test
  hosts: localhost
  tasks:
    - name: wair for
      shell: sleep 16
      async: 10
      poll: 2

结果:
TASK: [wair for] **************************************************************
ok: [localhost]
<job 207388424975.101038> polling, 8s remaining
ok: [localhost]
<job 207388424975.101038> polling, 6s remaining
ok: [localhost]
<job 207388424975.101038> polling, 4s remaining
ok: [localhost]
<job 207388424975.101038> polling, 2s remaining
ok: [localhost]
<job 207388424975.101038> polling, 0s remaining
<job 207388424975.101038> FAILED on localhost

这个step失败, 因为操作时间超过了最大等待时长
示例2、
---
- name: Test
  hosts: localhost
  tasks:
    - name: wair for
      shell: sleep 16
      async: 10
      poll: 0

结果:
TASK: [wair for] **************************************************************
<job 621720484791.102116> finished on localhost

PLAY RECAP ********************************************************************

poll 设置为0, 表示不用等待执行结果, 该step执行成功
示例3、
---
- name: Test
  hosts: localhost
  tasks:
    - name: wair for
      shell: sleep 16
      async: 0
      poll: 10

结果:
# time ansible-playbook xiama.yml
TASK: [wair for] **************************************************************
changed: [localhost]

PLAY RECAP ********************************************************************
localhost                  : ok=2    changed=1    unreachable=0    failed=0


real    0m16.693s

async设置为0, 会一直等待直到该操作完成.
3.2、ansible-playbook执行时的并发限制
一般情况下, ansible会同时在所有服务器上执行用户定义的操作, 但是用户可以通过serial参数来定义同时可以在多少太机器上执行操作。
- name: test play
  hosts: webservers
  serial: 3

webservers组中的3台机器完全完成play后, 其他3台机器才会开始执行
serial参数在ansible-1.8以后就开始支持百分比
最大失败百分比
默认情况下, 只要group中还有server没有失败, ansible就是继续执行tasks. 实际上, 用户可以通过"max_fail_percentage" 来定义, 只要超过max_fail_percentage台的server失败, ansible 就可以中止tasks的执行:
- hosts: webservers
  max_fail_percentage: 30
  serial: 10
注意: 实际失败机器必须大于这个百分比时, tasks才会被中止. 等于时是不会中止tasks的
4、委托
通过"delegate_to", 用户可以把某一个任务放在委托的机器上执行.
- hosts: webservers
  serial: 5

  tasks:

  - name: take out of load balancer pool
    command: /usr/bin/take_out_of_pool {{ inventory_hostname }}
    delegate_to: 127.0.0.1
上面的task会在跑ansible的机器上执行, "delegate_to: 127.0.0.1" 可以用local_action来代替:
tasks:

- name: take out of load balancer pool
  local_action: command /usr/bin/take_out_of_pool {{ inventory_hostname }}
委托者的facts
默认情况下, 委托任务的facts是inventory_hostname中主机的facts, 而不是被委托机器的facts。在ansible 2.0 中, 设置delegate_facts为true可以让任务去收集被委托机器的facts
- hosts: app_servers
  tasks:
    - name: gather facts from db servers
      setup:
      delegate_to: "{{item}}"
      delegate_facts: True
      with_items: "{{groups[‘dbservers‘}}"

该例子会收集dbservers的facts并分配给这些机器, 而不会去收集app_servers的facts
RUN ONCE
通过run_once: true来指定该task只能在某一台机器上执行一次. 可以和delegate_to 结合使用
- command: /opt/application/upgrade_db.py
  run_once: true
  delegate_to: web01.example.org

指定在"web01.example.org"上执行这
如果没有delegate_to, 那么这个task会在第一台机器上执行
---------------------------------------------书山有路勤为径,学海无涯苦作舟--------------------------------------------------------